Jump to content

Recommended Posts

(Pictures are not uploading properly, I will fix it when I can and put them in the appropriate places in the post)

I want to start off by saying, pictures are limited, as the only bolts you need to remove (10 total) are fairly obvious and in your face, the only two that are 'difficult' to find I will explain where they are.

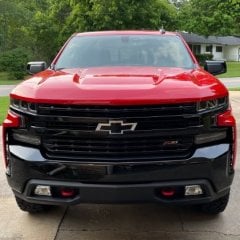
I special ordered my truck how I wanted it with every option I needed, but I left off the chrome package because I don't like chrome. But then my dad bought a black LT RCSB and I loved the chrome bumper so I decided I had to have one while I look for all blue color matched (Z71) front end parts.

The first part that needs to come off is the plastic trim under the hood, that is on top of the radiator/grille.
There are 10 push-pins that hold it on.
I used the second tool in the picture, lift the first stage of the clip, once its up about 3/4 inch, get under the base and pull it completely out.
image_16103_zpstvi2gtaw.jpg
Next, the grille is held on with 4 10mm bolts, these bolts don't do much honestly.
Pulling the grille itself out was the most challenging part of the whole job. There are clips in front of each bolt that will slide back in their slots if you breath too hard.
On the middle/driver's side clip, there is a plastic locator pin that appears to be nearly impossible to leave intact and remove the grille, so I cut it off flush - there are enough pressure clips to keep everything aligned.
I started at the passenger side and removed the top clip, then pulled the grille out at the middle cross piece.
Don't be afraid of pulling too hard, the pressure clips release with some force.
Once the grille pull out approximately 1", you can lift the grille up and out.

This leaves the bumper.
There are a total of 6 bolts that attach the bumper to the truck, 4 accessible now that the grille is removed, the other 2 are harder to get too, one on each side.
If you lay down in front of each tire and look up, you will see the brace that secure the bumper. Remove the one 15mm bolt that on each side (leave side with 2 bolts on the frame).

Now you can remove the four 18 mm bolts that are in front of the radiator. The bumper should rest on its mounts once all bolts are removed without a risk of falling, but be careful regardless.

That will leave you with something that looks like this, kind of intimidating at first.

I had to transfer all the appropriate brackets from my back bumper to my chrome one, a little bit of effort but if you have gotten this far you won't have an issue.

Then everything goes back together exactly the opposite as it came apart.

post-160134-0-18113900-1493861504_thumb.jpg

post-160134-0-36627700-1493861506_thumb.jpg

post-160134-0-25530400-1493861508_thumb.jpg

post-160134-0-98167200-1493861510_thumb.jpg

post-160134-0-18113900-1493861504_thumb.jpg

post-160134-0-36627700-1493861506_thumb.jpg

post-160134-0-25530400-1493861508_thumb.jpg

post-160134-0-98167200-1493861510_thumb.jpg

post-160134-0-18113900-1493861504_thumb.jpg

post-160134-0-36627700-1493861506_thumb.jpg

post-160134-0-25530400-1493861508_thumb.jpg

post-160134-0-98167200-1493861510_thumb.jpg

post-160134-0-18113900-1493861504_thumb.jpg

post-160134-0-36627700-1493861506_thumb.jpg

post-160134-0-25530400-1493861508_thumb.jpg

post-160134-0-98167200-1493861510_thumb.jpg

Link to comment
Share on other sites

Cheapo is as cheapo does, been there, done that, through a set like that out. You do not want to wrestle with broken push pins and tools that bend under pressure on a hot day.......and at $4 a push pin from Chevy could be expensive. Use in trunk work and underbelly panel removal requires a lot of force to remove without damage and plastic doesn't do it well........need a proper tool for a proper job:


https://www.amazon.com/Lisle-35260-Plastic-Fastener-Remover/dp/B0002SRCMO/ref=sr_1_9?ie=UTF8&qid=1493916624&sr=8-9&keywords=automotive+clip+remover


And there are better plastic tools for trim that do not flex easily and a variety more suited to some trim configurations that do not bend like taffy when they get hot:


https://www.amazon.com/CarBoss-Universal-Anti-scratch-Interior-Installation/dp/B01GO2L1MI/ref=sr_1_31?ie=UTF8&qid=1493916671&sr=8-31&keywords=automotive+clip+remover


And do not go to the dealer for replacement pins either, over 400 pins for the cost of 8 from the dealer....even has a remover, although the movable rubber pivot on the one above comes in handy in tight places......could always throw a large rubber gromet on the one in this kit


https://www.amazon.com/Retainer-Popular-Applications-Fastener-Chrysler/dp/B06WGVVZGR/ref=sr_1_31?ie=UTF8&qid=1493917069&sr=8-31&keywords=automotive+clip+remover

Link to comment
Share on other sites

can you post a link to the tools?


Cheapo is as cheapo does, been there, done that, through a set like that out. You do not want to wrestle with broken push pins and tools that bend under pressure on a hot day.......and at $4 a push pin from Chevy could be expensive. Use in trunk work and underbelly panel removal requires a lot of force to remove without damage and plastic doesn't do it well........need a proper tool for a proper job:


https://www.amazon.com/Lisle-35260-Plastic-Fastener-Remover/dp/B0002SRCMO/ref=sr_1_9?ie=UTF8&qid=1493916624&sr=8-9&keywords=automotive+clip+remover


And there are better plastic tools for trim that do not flex easily and a variety more suited to some trim configurations that do not bend like taffy when they get hot:


https://www.amazon.com/CarBoss-Universal-Anti-scratch-Interior-Installation/dp/B01GO2L1MI/ref=sr_1_31?ie=UTF8&qid=1493916671&sr=8-31&keywords=automotive+clip+remover


And do not go to the dealer for replacement pins either, over 400 pins for the cost of 8 from the dealer....even has a remover, although the movable rubber pivot on the one above comes in handy in tight places......could always throw a large rubber gromet on the one in this kit


https://www.amazon.com/Retainer-Popular-Applications-Fastener-Chrysler/dp/B06WGVVZGR/ref=sr_1_31?ie=UTF8&qid=1493917069&sr=8-31&keywords=automotive+clip+remover

https://www.harborfreight.com/5-piece-auto-trim-and-molding-tool-set-67021.html


I've been using this kit for approximately 4 years now, although I obviously don't use them every day.

These are of decent quality, especially for being harbor freight.


I don't see the need to spend any more money on tools that you use so infrequently

Link to comment
Share on other sites


https://www.harborfreight.com/5-piece-auto-trim-and-molding-tool-set-67021.html


I've been using this kit for approximately 4 years now, although I obviously don't use them every day.

These are of decent quality, especially for being harbor freight.


I don't see the need to spend any more money on tools that you use so infrequently

Harbor Freight - eh


I'm still using the Craftsman sockets and torque wrenches bought in 1973. And infrequent use of a tool is no excuse when a poorly broached socket boogers the edges of a bolt or a borderline spec tool strips out the center of a torx fastener, or a torque wrench snaps the head off a bolt. Would you rather bring your vehicle for service to a mechanic using Harbor Freight tools, or one using Craftsman or Snap-on??????


And all plastic trim removal sticks are not the same......Here's what the blue HF trim removal crap looks like after removing the fan shroud push pins on the Silvy and breaking one in the process compared to a similarly looking stiffer plastic red one from an Amazon supplier:

post-156616-0-13274500-1493995902_thumb.jpg

post-156616-0-70126200-1493995914_thumb.jpg

post-156616-0-25868600-1493996564_thumb.jpg

post-156616-0-96321900-1493996591_thumb.jpg

post-156616-0-13274500-1493995902_thumb.jpg

post-156616-0-70126200-1493995914_thumb.jpg

post-156616-0-25868600-1493996564_thumb.jpg

post-156616-0-96321900-1493996591_thumb.jpg

post-156616-0-13274500-1493995902_thumb.jpg

post-156616-0-70126200-1493995914_thumb.jpg

post-156616-0-25868600-1493996564_thumb.jpg

post-156616-0-96321900-1493996591_thumb.jpg

post-156616-0-13274500-1493995902_thumb.jpg

post-156616-0-70126200-1493995914_thumb.jpg

post-156616-0-25868600-1493996564_thumb.jpg

post-156616-0-96321900-1493996591_thumb.jpg

Link to comment
Share on other sites

  • 2 months later...

I made a YouTube video highlighting this process, hopefully this makes it a little easier to understand and follow along, as well as do this project for yourself.
Please leave your comments on what you think, I want and can handle the criticism, I'll probably see the comments more quickly on the video.

Good Luck with your projects!


Link to comment
Share on other sites

Archived

This topic is now archived and is closed to further replies.


×
×
  • Create New...

Important Information

By using this site, you agree to our Terms of Use.