

Tim99GT
-
Posts
229 -
Joined
-
Last visited
-
Days Won
3
Recent Profile Visitors


Tim99GT's Achievements
")
Enthusiast (4/11)
90
Reputation
-
HID Headlight Bulbs / HID Projector Retrofit
Tim99GT replied to MotoMedic's topic in 2014-2018 Silverado & Sierra Mods
Did you sort this out by any chance? My passenger side started doing this a couple weeks ago and now doesn't come on at all. At least it hasn't come on in a day or two. The ballast still sounds as if it's on with a buzzing noise so I'm thinking maybe the ignighter went out or the bulb. -
HID Headlight Bulbs / HID Projector Retrofit
Tim99GT replied to MotoMedic's topic in 2014-2018 Silverado & Sierra Mods
Thank you sir! Yes, I went with Morimoto 35w ballasts and 5500k bulbs for this setup. P.S. When you finally do yours, let me know and I'll send you the other ballast extension that I have. They're sold in pairs and I only used one on the passenger side and wont need the other extension. It'll make mounting the passenger side ballast just a tad easier with the extra cable -
HID Headlight Bulbs / HID Projector Retrofit
Tim99GT replied to MotoMedic's topic in 2014-2018 Silverado & Sierra Mods
So everything works great! Except for my driver side high beam... For some reason the shutter isn't working. The passenger side works perfect, but when I swap to high beams, the driver side does nothing. When I get my light bars in next week I'm going to look into it further and pull the cap off to see if maybe I somehow forgot to plug in the shutter wire or if it is in fact just not working. I've pulled the front of the truck apart way too much in the past four days to care to pull it again right now lol. I'll have to pull the grille for the light bar install anyways so I'll just do it then and knock out two birds with one stone. Hopefully it's just a brain fart on my part and I forgot to plug the connector in. Fingers crossed anyways ? Anyways, the retro is so worth the money!! It's like a whole new vehicle haha. I still need to adjust them a tad more to fine tune them. I'm too tired to do so tonight, but here are a few teaser pictures. More to come when they are set right Oh and for those who are looking to do HIDs and are wanting to know where people (or me for that matter) mounted their ballasts and relay, here are a couple pictures of the install locations. I know I had searched and didn't really come up with much when I was trying to find mounting locations. I mounted my relay under the crossbar on the passenger side. The bolt that holds the brace bar to the fender wall is just a smidge larger that the hole in the relay bracket. I pulled the bolt out of the fender completely and carefully used it to thread a set of threads (literally like two threads lol) into the inside of the hole on the relay bracket. NOTE: Don't run the bolt all the way in because it does gall the bolt threads. It will somewhat round off the threads on the tip of the bolt, but quite frankly you don't need those as once they thread through the brace they are exposed on the other side anyways. Once the threads were made, I reinstalled the brace bar and as the bolt came through the other side of the bar, I held the relay bracket up to it firmly and threaded the bolt into both until it was tight on the brace bar. I then used some HD zip ties and secured the relay (just for precaution) and wires to the bar itself. Excess battery connection wire for the relay was folded up, zip tied, and placed between the air box and the back of the headlight/radiator support. Picture: The ballasts were mounted underneath the top of the radiator support (or whatever you call it). You can see the zip ties holding it. I passed them through the holds on the ballast bracket and then around the brace and secured it. I used two per ballast and theyre not going anywhere anytime soon. Extra zip ties were used to secure the wires going to the driver side ballast. They were secured underneath the same radiator support bar across the front of the truck. The driver side ballast was also secured under this support bar on the driver side. Once the plastic cover is placed back on you can't tell I have HIDs other than the relay being visable. Everything else is hidden. Here are a couple pictures of the ballasts mounted and wires tucked: -
HID Headlight Bulbs / HID Projector Retrofit
Tim99GT replied to MotoMedic's topic in 2014-2018 Silverado & Sierra Mods
I have like zero slack for the factory plug on the passenger side for whatever reason. I was able to get it through the cap though. It was super tight, but I did get the pin in the plug and I went test the light and viola!! They work!! Heatshrinking the pins now on the plug and going reinstall. I'll post pictures when finished -
HID Headlight Bulbs / HID Projector Retrofit
Tim99GT replied to MotoMedic's topic in 2014-2018 Silverado & Sierra Mods
Roger that. Looks like I'll have to cut this damn headlight open yet again (rx350 retro) :/ I'll post up shortly with results. -
HID Headlight Bulbs / HID Projector Retrofit
Tim99GT replied to MotoMedic's topic in 2014-2018 Silverado & Sierra Mods
Can someone elaborate on this please. I received my igniters today and have everything plugged up and nothing. Had a buddy move the headlight and they flickered and then nothing. Is it the OEM plug that's inside the passenger headlight that's the issue correct? -
5.5" RCX lift? Do you mean 5" or maybe 7.5"??
-
HID Headlight Bulbs / HID Projector Retrofit
Tim99GT replied to MotoMedic's topic in 2014-2018 Silverado & Sierra Mods
Ok, got it but holy hell. I thought I was going to break it. The wire was all taped up in the housing with no slack -
HID Headlight Bulbs / HID Projector Retrofit
Tim99GT replied to MotoMedic's topic in 2014-2018 Silverado & Sierra Mods
I'm currently in the process of the rx350 retrofit and I have a snag. How do get the shutter plug off?? It's like there isn't enough wire to actually unplug it. Kind of like the wire I is attached in the housing and there's not enough slack. -
What have you done to your K2 today?
Tim99GT replied to block8head's topic in 2014-2018 Silverado & Sierra Mods
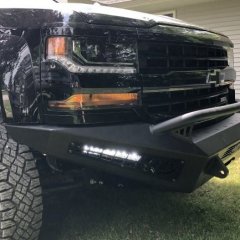
SCA bumper install, rx350 retrofit, and AT grille swap ? Light bars won't be in until next week or so with the holidays and all. -
What have you done to your K2 today?
Tim99GT replied to block8head's topic in 2014-2018 Silverado & Sierra Mods
-
What have you done to your K2 today?
Tim99GT replied to block8head's topic in 2014-2018 Silverado & Sierra Mods
You'd be surprised. I've had them mounted under my truck (used as AMP step lights) for almost 2 years now and they still work perfectly. I live in Louisiana as well, so we see our fair share of heavy rain and flooding. With that said, they have definitely been exposed and drenched in water multiple times and i have had zero issues. I would say if you are worried about the wire connections, put a little bit of silicon in the end to seal them up better and you should be good to go. As Kerrslight said, I wouldn't judge a book by its cover -
What have you done to your K2 today?
Tim99GT replied to block8head's topic in 2014-2018 Silverado & Sierra Mods
As soon as my SCA bumper arrives and i get it wrapped to color match it to my truck ill be installing everything at once and I will post some pictures. I already have the vinyl so it shouldn't take long to do. The bumper was supposed to be here this week, but i received an email from SCA yesterday stating that the shipment was pushed because they are making another batch of them. It is now going to ship either Friday of this week or next Monday, depending on when the batch is completed. With that said, I should be installing everything next weekend. My fingers are crossed anyways haha -
What have you done to your K2 today?
Tim99GT replied to block8head's topic in 2014-2018 Silverado & Sierra Mods
Thanks man! The door accents literally just pop off. There is a video on YouTube that shows where the clips are located for each piece. To remove them, you take a moldling/trim wedge and run it between the door and the trim and pry out away from the door in a straight fashion. The clips pull out and the trim comes off. Make sure you work your way across the trim evenly so you don't crack it. I on the other hand, couldn't find my trim wedge and completely forgot to pick one up while I was at autozone so I used a butter knife lol This is not advised as its not the right tool for the job, but I've been around the block a few times per say removing car molding and felt comfortable with it. I was able to pop it off making sure I didn't pull it out too much or put too much pressure on one area while prying. Again, this isn't the right tool for the job, but it'll work so long as you know where the clips are (can slide the knife along the underside of the trim until you feel the clip) and take your time. Edit: I forgot to mention that I picked up the vinyl online from Amazon. I went to a site (metro restyling) and ordered some vinyl swatches, and then did a search for the vinyl name I decided on. Amazon had it for a lower price so I picked it up from there. -
What have you done to your K2 today?
Tim99GT replied to block8head's topic in 2014-2018 Silverado & Sierra Mods
So I snapped a few photos during the last two letters just to show how I did it. These should be in order and a basic representation of the steps taken. Cut vinyl square to fit letter: Smooth vinyl onto letter while using a card or squeegee to push vinyl into seem between chrome outline and the letter itself: Not pictured: use exacto knife or razor blade to cut vinyl making sure to stay as close to the chrome outline as possible. Take your time on this part! Note: I kept my heat gun in the other hand and used it to warm the vinyl every few seconds as I cut. To me it seemed as if the vinyl cut smoother and I didn't have to push on the blade as much to cut through it. Slowly pull trimmings away. I used the heat gut to keep the vinyl very plyable and this seemed to make it easier to pull up without pulling the vinyl that is laying over the letter itself.

-
Forum Statistics
246k
Total Topics2.6m
Total Posts -
Member Statistics
333,593
Total Members8,960
Most Online
-
Who's Online 21 Members, 2 Anonymous, 1,442 Guests (See full list)