
Motor City Rick
-
Posts
148 -
Joined
-
Last visited
Recent Profile Visitors
1,932 profile views


Motor City Rick's Achievements
")
-
 Here is a schematic of the distributor, there should be a pigtail in the harness, when you crank the motor, it should pulse when cranking. If a solid light, the ignition module is not getting a crank signal. Then you will have to check the resistance in the pickup coil. Value should be 900 to 1100 ohms, if not, replace the pickup. If there is that resistance, replace the ignition module with a "factory replacement" Delco, not an aftermarket. Also it's imperative you clean the 2 grounding screws for the ignition module. They are the ground points for the module. If you get "any" silicone paste on those screws, the module will act like it failed.
 -
Custom Lowering Blocks???
Motor City Rick replied to Rockrz's topic in 1982-2005 Chevrolet S-10/Blazer & GMC S15/Sonoma/Jimmy
You can buy lowering blocks online, just remember to torque the axle u-bolts to the proper amount. -
Looks like a shock absorber mounting stud.
-
You have 2 simple direction to go in, since your dealing with an older motor, get a TH 400 or TH 350 trans dirt cheap. The 4l60e needs the ECM to function properly You can easily get misdirected if you go the electronic route. Old school motor, ...old school trans.
-
2001 S10 Codes
Motor City Rick replied to bcrooms's topic in 1982-2005 Chevrolet S-10/Blazer & GMC S15/Sonoma/Jimmy
Brandon, First, DO NOT replace the O2 sensors!!! When you have lean codes (P0171 and P0174) on both side of the motor it tells me you have vacuum leak somewhere on the intake manifold. Get a can of carb spray, ...and give small squirts to various places on the intake, hoses, or any seals on the intake and notice a change in engine speed. It sounds like going to find problems there, ...not the O2 sensors. Next "only install"l a 195 degree thermostat. Code P0128 tells me your motor did not get to the 195 degree temp within 7 1/2 minutes. Using a colder thermostat will create more problems than you can imagine. As for P0341, if you truck has a zillion miles, you might be in the early stages of a "stretched" timing chain if nobody diddled with the crank position sensor. Clear codes and see what returns after the thermostat and intake part reseal. -
I went to numerous Detroit area GMC dealers to have my 2001 Sonoma EBCM reprogrammed for an axle ratio change from 4.10 to a 3.08 ratio. This has been going on for the last 4 years. I'm only 21 miles from the GM Tech Center in Warren, Michigan where all the possible solutions sit. I find in uncanny that no tech, dealership in a 50 mile radius has the capacity to access the EBCM to make this simple change. I even went to the level of offering $500 cash to any tech that has the proper equipment to make this change. 4 years later, ...no takers. It's either the dealerships / techs don't have the equipment or have the knowledgebase to change the axle value.
-
1999 Silverado brake lights not working!
Motor City Rick replied to michaelj239's topic in 1999-2013 Silverado & Sierra 1500
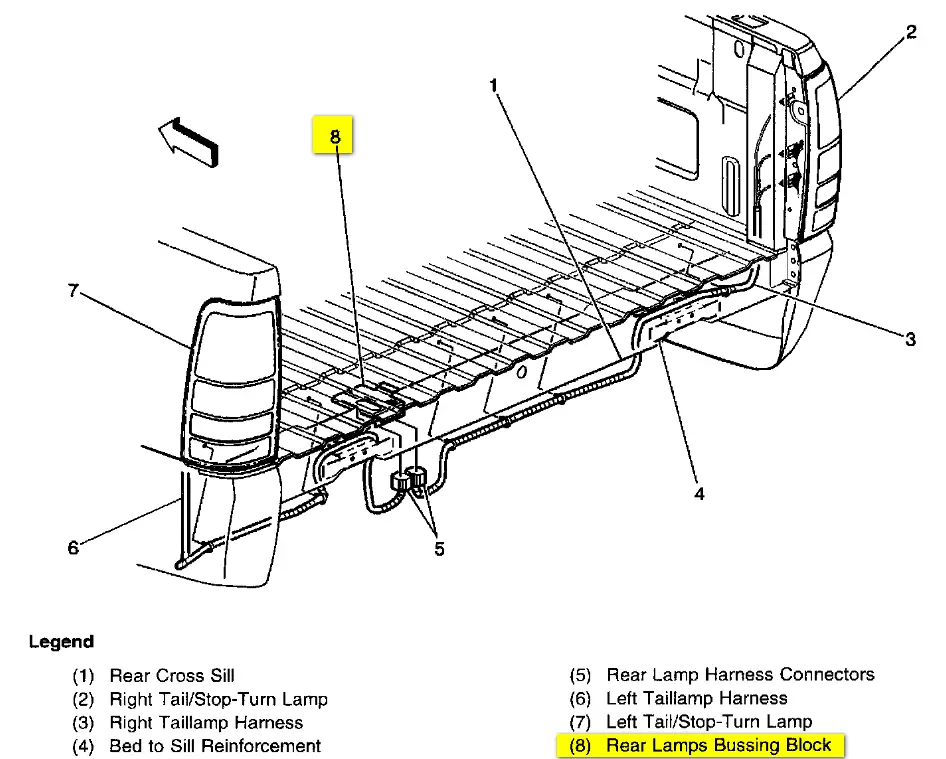
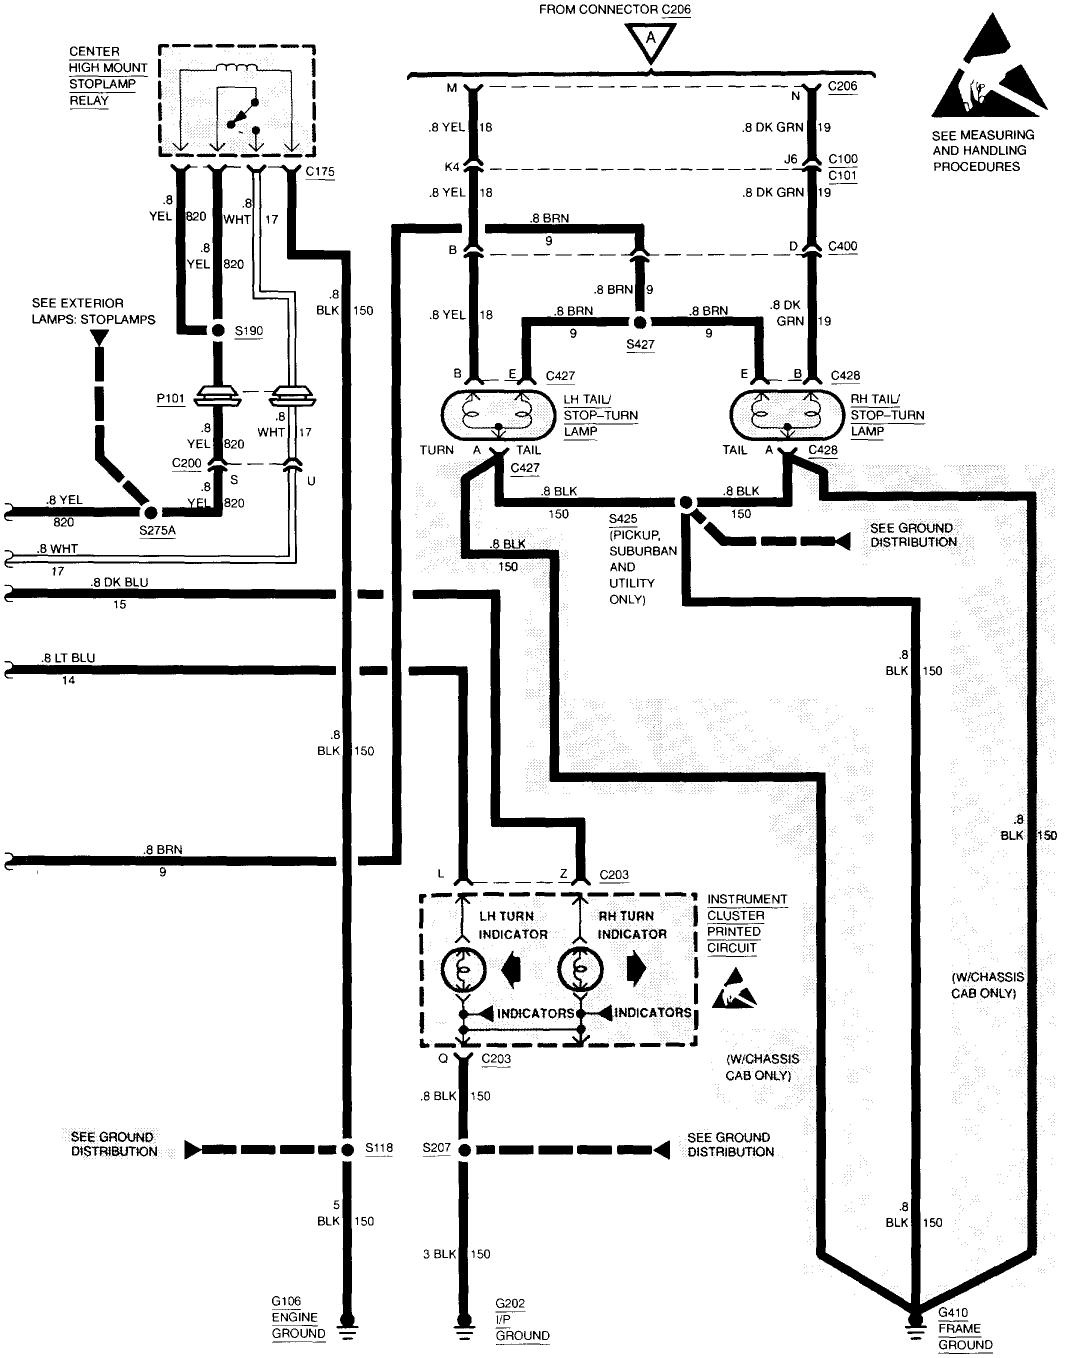
I deleted the old schematic (2 bulb) and put in the one for 1 bulb taillights instead of 2 bulb system. My error. Yellow wire is left hand turn signal / brake light Dark Green wire is right hand turn signal / brake light Chocolate wire is running / license plate lights Every black wire is grounds Let me know if you have a light blue and or any white wire back by the rear bumper???
-
1999 Silverado brake lights not working!
Motor City Rick replied to michaelj239's topic in 1999-2013 Silverado & Sierra 1500
Okay michaelj329, Stop changing parts on guesstimates! Go to the rear of the truck near the left rear bumper area by the frame rail, locate the rear taillight harness connector. In that harness is a yellow & dark green wire. I need you to stick a 12 volt test light into that connector on both sides while somebody is pressing on the brake pedal. Is there 12 volts??? If yes, the problem could be at the trailer harness connection or an open in tail light harness leading to the left rear taillight. If no, go to the brake light switch and test the white wire there. If there is power, coming out of brake switch, then there an open leading back to the taillight harness. First check to see if the white wire is backed out of the bulkhead (firewall) connector. I will leave a very simple schematic to help you along. You can save it as .jpeg for your own personal use.
-
When you add "oversized tires" you add oversized problems. When people install oversized tires / wheels, they "amplify" road vibrations (lose vehicle power) because they are increasing the overall rotating mass of the tires / wheels (which could be out of balance / or tires out of round). Every vehicle has specifically designed suspension parts as well as body mounts to dampen road vibrations. Start making modifications without the knowledge of what it will effect, ...will cause driveability problems going down the road.
-
Transmission
Motor City Rick replied to Sid Dunn's topic in 1988-1999 Chevrolet & GMC C/K GMT400 Platform
Sid Dun, Here is some diagrams to help you understand what's going on. Chances are the temp sensor got damaged while doing the rebuild. That sensor is within the trans pan, tucked up in the valve body area. . The #1 location on the internal trans harness is where the temp sensor is located.
-
Invisible, Stop changing parts on guesstimates until you diagnose the vibration! Some of us are trying to save you money. At 60 to 75 mph is where tire / wheel balances come into play, Silverradosid was on point about the tie rod possibilities. Loose lateral steering components like tie rods, idler arms etc are factors also. Have a skilled person inspect for loose front end components. Anything that has slop, ....change it. Seeing you have "changed everything",.... if you still have any vibration at that speed, balance the tire / wheels down to at least a 1/4 ounce accuracy. If you feel vibration in the seat of you pants, balance the rear wheel / tires.
-
Go to" Ign0" fuse (10 amp). Measure the available voltage on both sides of that fuse. Is it the same as battery voltage? If yes, move on. If no, find high resistance back to the battery Now disconnect the ECM (ignition off), to keep things simple, test all pink wires for battery voltage on the ECM connectors. If any pink wire has no voltage, go check both sides of the fuses in the power distribution center (under the hood) and the fuse panel in the dash, check for blown fuse(s). Now I need you to focus on checking for battery voltage with pin # 75 (pink wire on ECM connector), that feeds the "E" pin down by the transmission. Is there battery voltage? If yes, that is good, now remove the trans connector with terminal "E" and measure for battery voltage to ground. Is there battery voltage? If yes, available electrical power (battery voltage) is available to the transmission. If no, high resistance issue back to "Ign0" fuse. Check pin # 63 also (pink wire) on ECM connector. Is there battery voltage? If yes, move to terminal "E" on the trans connector with the trans connector disconnected. Measure voltage to ground, is there battery voltage??? If yes, available electrical power is available to the transmission. If no, high resistance is in the circuit back to the power junction point.
-
2016 GMC 2500 6.0
Motor City Rick replied to royg6677's topic in 2015-2019 Silverado & Sierra HD Troubleshooting
Will be waiting for the test outcome results. The test methodology is on track to diagnose properly. I still worry about your 85.15% load factor without calculated wind resistance drag. The trailer they will be using will be much closer to the 50% load factor to see operational outcome. If the jerking is still present at the new lower load, head for trans torque convertor clutch solenoid engage / disengagement "mechanical operation". If the problem disappears, it's the truck being over the maximum tow capacity with all the drags added on, that have not been calculated. Too bad you never scaled (full tank of gas) the truck / trailer for full loaded weight. That can be found at truck stops, moving companies and metal scrap yards. Some of these places have "truck scales". You'll be shocked at what your true actual weight will be. -
2016 GMC 2500 6.0
Motor City Rick replied to royg6677's topic in 2015-2019 Silverado & Sierra HD Troubleshooting
When the torque convertor unlocks, yes the rpm's will slightly climb on any vehicle. It's somewhat the same principal as a stick shift. When the clutch is not depressed on a stick, you have direct mechanical connection. When you depress the clutch, rpm's slightly rise, and no mechanical connection. Now with a torque convertor clutch system, you have a "fluid" mechanical connection which constant slippage is occurring in the torque convertor at all speeds (like a slipping mechanical clutch). When certain specified requirements are met in the ECM, the torque convertor clutch solenoid engages the torque convertor in a direct 1 to 1 mechanical engagement. Listening to all your input, the 2 areas I would look at is torque convertor solenoid engagement / disengagement at a "mechanical level". The other is, ...the dealer is clueless to correct, the input / output values already set in the software map for transmission torque convertor solenoid activities. Another test not mentioned put on a "much lighter trailer" (under 6,000 pounds) and see if the jerking is still present. If the jerking is greatly reduced / or gone, ...I will stand by my argument. If it's still there, head for the "mechanical operation" of the torque convertor clutch solenoid. -
2005 v6 silverado high idle
Motor City Rick replied to 05grey43v6's topic in 1999-2013 Silverado & Sierra 1500
I've done complex diagnostics for the car manufactures in a 36 year span. Seen it all, heard it all, and cleaned up all the bull chit "guesstimate repairs" that people do. It's like looking at kids trying figure out how to turn a door knob.


-
Forum Statistics
246k
Total Topics2.6m
Total Posts -
Member Statistics
333,535
Total Members8,960
Most Online
-
Who's Online 20 Members, 1 Anonymous, 1,883 Guests (See full list)