
250motorsportz
-
Posts
457 -
Joined
-
Last visited
-
Days Won
1
Recent Profile Visitors


250motorsportz's Achievements
")
Enthusiast (5/11)
54
Reputation
-
Post your 2014+ wheel/tire set-up
250motorsportz replied to BlueWrapper's topic in 2014-2018 Silverado & Sierra Mods
22" GMC Accessory Wheels - Factory setup, probably my favourite 22" design!! -
Anybody put these OEM 22's on your truck
250motorsportz replied to Brad817's topic in 2014 - 2019 Silverado & Sierra
Has anyone purchased chrome reps? I'm going to order another set in March and would like to get chrome but not sure what the quality will be like... http://www.ebay.com/itm/22-inch-chrome-2014-2015-GMC-Sierra-Yukon-Denali-CK-156-OE-replica-wheels-6x5-5-/291354382847?hash=item43d61311ff -
Anybody put these OEM 22's on your truck
250motorsportz replied to Brad817's topic in 2014 - 2019 Silverado & Sierra
22" CK164 reps in Silver with chrome inserts - they look alright, not what I expected...I think they'd look better in the darker charcoal grey or Silver with black inserts. -
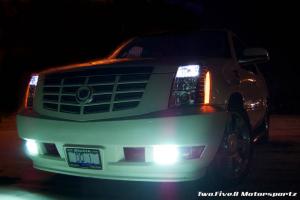
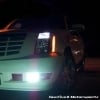
Brighter LED DRLs? Yup!
250motorsportz replied to 250motorsportz's topic in 2014 - 2019 Silverado & Sierra
Ya, I'd also like some more info on this. Let's put it this way: Scenario 1: Truck drives 60,000KM in daytime only = uses DRL's only. Scenario 2: Truck drives 60,000KM at night only = uses low beams along with DRL's. What would the difference on "wear" be? The diode isn't increasing voltage or power, all it is doing is sending the signal for them to turn on. -
Brighter LED DRLs? Yup!
250motorsportz replied to 250motorsportz's topic in 2014 - 2019 Silverado & Sierra
Sorry, I also did the reverse/cargo light diode mod at the same time. Now when I unlock I have reverse, cargo and box lights on. And I'll also have the cargo light on when the truck is in reverse. -
Brighter LED DRLs? Yup!
250motorsportz replied to 250motorsportz's topic in 2014 - 2019 Silverado & Sierra
I think it's more than just supplying the top row with more power. If I'm correct, the bottom row has two sets of LEDs, 1 set used for night time parking lights and then both sets are lit during the day causing them to be brighter. If this is true, then the top row only has 1 set of LEDs so technically they can't get brighter unless you add more LEDs. -
Brighter LED DRLs? Yup!
250motorsportz replied to 250motorsportz's topic in 2014 - 2019 Silverado & Sierra
I really wish it did but unfortunately the top row only has one functionality, and that is to be lit at that brightness only at night. -
Brighter LED DRLs? Yup!
250motorsportz replied to 250motorsportz's topic in 2014 - 2019 Silverado & Sierra
No additional light output. Looks much better at night. Along with others, I hate the dimmed look of the LEDs...knowing that they are way brighter in the day time. -
Brighter LED DRLs? Yup!
250motorsportz replied to 250motorsportz's topic in 2014 - 2019 Silverado & Sierra
They are connected to the Low Beam Pins so they will come on anytime the low beams are on. No difference on the road as these are not high power LEDs - they do not have high light output, only for looks. Stripe on the diode goes toward the DRL as that will prevent the flow of electricity from the DRL circuit to engage the low beams in the daytime. I will have night time pictures after I install my HIDs. Yes they will stay lit when the high beams are activated. These connectors are located in the BCM which is under the driver side dash. -
To all the GMC guys...I've got the fix! Firstly, just want to thank @spurshot for inspiring me to put this into motion. Ever since I saw the 14+ GMC's, I thought to myself hmm...I wonder if it's possible to make those bright DRL LED's run the same at night. I probably wouldn't have dived into this if it wasn't for Spurshot's How-To on the Fogs w/Highs as I used the same idea with this. So here it is, using the same 1N4004 diodes: BCM X4 (Black Connector) Pin 1 to Pin 7 Pin 2 goes to Pin 7 on BCM X5 (Brown Connector) See pictures below for the schematics. BEFORE & AFTER And yes...I'm putting in HID's this weekend. Just picked up a 2015 Denali CC 6.2L/8spd in exchange for my 2014 High Country and the mods are still in progress! Enjoy
-
Sierra Painted Fender / Wheel Arch Moldings
250motorsportz replied to MotoMedic's topic in 2014-2018 Silverado & Sierra Mods
In the process of painting a customer's flares and front valance right now. Roughly $220 for removal, sanding, primer, paint and install. -
2014+ Color Match Topic
250motorsportz replied to brentadams646's topic in 2014-2018 Silverado & Sierra Mods
I've painted chrome many times. You can: a) get it burnished (think that's the right word). Which is sort of like sandblasting > prime it > paint it. Costs more $$ but will definitely not flake off. b) scuff the chrome with sandpaper, prime and paint. I haven't seen this flake off yet either. The only time I've heard of paint flaking off painted bumpers is when proper preparation isn't done. i.e. painting right over the chrome without primer. -
2014+ Color Match Topic
250motorsportz replied to brentadams646's topic in 2014-2018 Silverado & Sierra Mods
Wow, I didn't know that many people already colour-matched their front ends. Who's truck is this above? Are the headlight trim pieces easy to remove? I will be painting my headlight trim and grill in the spring time but have them plasti-dipped for now. -
Great trucks guys. I still remember when this paint code was referred to as "Cadillac White" It was a great day when this colour became available on the GMT900's and into other division of GM vehicles.
-
HID Headlight Bulbs / HID Projector Retrofit
250motorsportz replied to MotoMedic's topic in 2014-2018 Silverado & Sierra Mods
My HID headlight bulbs install on a 2014 Silverado: Parts used: (1) 35W H11 HID Kit 6000K (1) Relay Harness (2) Error Cancelers / Capacitors Tools used: Utility knife 3M/Double Sided Tape for mounting ballasts Side cutters/pliers to snip end of zip ties Zip Ties Retainer Clip Remover/Flat Head Screwdriver 10mm/7mm socket 3/4 Spade Bit/Hole Saw Impact/Drill [/url] [/url] 1. Remove Air Box: Air box is clipped in so just give it a good pull and it will pop out [/url] 2. Wire Relay Harness: power to (+) to battery connection, ground to (-) battery connection 3. Remove two clips holding in cover behind headlight and remove dust cover from headlight, unplug bulb and remove. 4. Using 3/4 Spade bit, drill a whole in center of dust cover. 5. Insert bulb, pull wires through and install grommet that comes with bulbs. 6. OPTIONAL - I used Rubber Butyl Tape to seal grommet from moisture (you can use silicone, putty or just roll the dice) [/u 7.Install HID bulb into headlight. Connect other wire to Factory Plug (picture shows it's reversed polarity, since this is a DUAL relay harness, you'll plug it in red to red and black to black) then re-install dust cover. 8. Error Cancelers Install male plug (coming from dust cover) to female end of Error Canceler Install male plug from Error Canceler to female plug of relay harness Install male plug from relay harness into ballast [/url] 9. Mount Ballast - apply double-sided tape to back of ballast. I installed ballasts next to headlight on rad support/frame 10. Run remaining two wires from relay harness to driver side. Repeat Steps 3-9. 11. Zip Tie all wires and tidy up the install to your liking. TROUBLESHOOTING 1. Headlights don't come on at all: Check power and/or ground wire. 2. One headlight turns on but not other side: Check connections and ensure ballast is plugged in. 3. Headlights work but when I start the truck, they turn off: You probably don't have the Error Cancelers installed/wired correctly. 4. Headlights work but the relay makes a loud buzzing noise: See #3 For the courtesy of others and to avoid confusion and clutter, please PM me or feel free to email me directly at [email protected] for any questions or troubleshooting issues.- 3,357 replies
-
- 4
-

-
- hid
- headlights
- (and 1 more)
-
Forum Statistics
246k
Total Topics2.6m
Total Posts -
Member Statistics
333,532
Total Members8,960
Most Online
-
Who's Online 20 Members, 0 Anonymous, 1,732 Guests (See full list)