Search the Community
Showing results for tags 'overhead'.
Found 4 results
-
I have the 2020 2500 LTZ trim level with back slide window and without sunroof. So i want to remove the overhead console to install a panel of rocker switches posterior to the console right where the roof liner scoops down. I am stuck on how to remove the single button switch for the rear slide window. I tried what i know but don't want to break it. Please share if anyone have come across this. Thanks
-
 I am looking for some insight from other people that specialize in wiring and electrical. I own a 2006 Chevrolet Silverado Ext. Cab and I have recently installed an overhead console and wired it to a 10 amp circuit in the interior fuse panel using 16ga wire. Doing it this way, the LEDS are very bright, like I want them. Now I want to switch the wiring to the existing wiring from the BCM for OE functionality when I open the door or use the dimmer switch to turn them on. The original wiring is a GRY/BLK 20ga(?) wire that runs up the pillar on the driver side. When I tapped into this wire, the dome lights work like they should, but are very dim. What should I do about this? I have considered running the oe wiring to activate a relay and running the 16ga I have installed through the same relay for power and ground to the dome lights. That way I get the brightness I like, and it retains OE functionality. Is this the way I should go or are there other options?
 -
 Does anyone have a pin out or wire diagram of the overhead console of a 2016 Silverado? I have searched everywhere for days and cant find one. Here is what I'm trying to do. I put in the home link system in my truck but the only cover I could find was one with the opening back window. My truck doesn't have one. I installed a bull bar that has an led light bar and want to replace the window switch with a switch for the light bar. The wire I am looking for is the one that turns on the backlight when the headlights are on, and if separate dims the light. Thank you in advance, Rick
 -
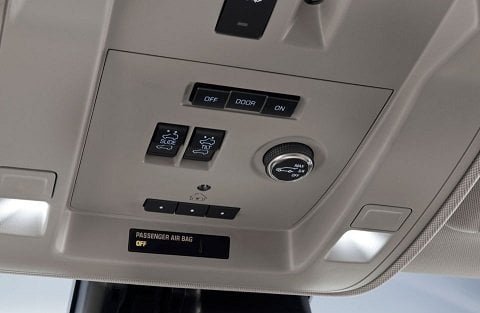
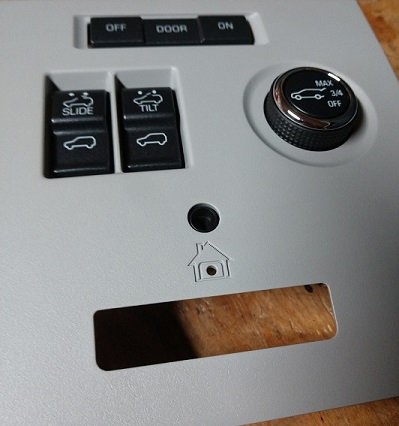
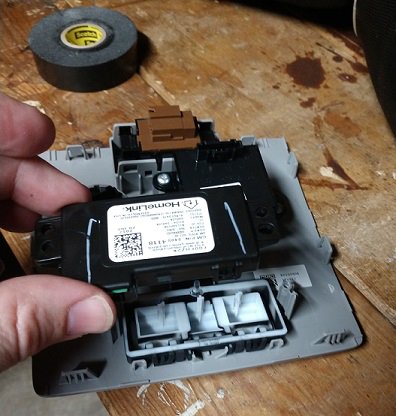
Many people have upgraded the bass in their newer model Chevs/GMC/Caddys and have found that with that comes some new vibrations and rattles associated. Below is a run down how to solve one of those problem areas which is the homelink buttons. Problem: Homelink buttons rattle/buzz/vibrate with bass of stereo Vehicles application: Any with homelink buttons (example vehicle shown is a 2018 Suburban) Test: Turn it up (to 11 if you have to) and listen to your homelink buttons, or if you just lightly touch on them and you feel them very loose and not sturdy, odds are that is a source of one of your new rattles. Solution: Electrical tape and some minor disassembly of the overhead console and homelink buttons. Process: Step 1: Test it to see if you have the issue. I added a 10" sub in the back that now vibrated the homelink buttons on certain frequencies, very annoying. It also did the window switch buttons but that is a different fix although very similar. Tap on the buttons lightly, if they are wobbly and loose then you probably do or will have this problem, or turn the volume up with your favorite bass track and listen to the buttons vibrate. Example Image of this part on 2018: Step 2 (VIDEO): Disassemble the control unit. Here is a great little video on a 2015 Tahoe that is identical procedure to get the panel out that holds the homelink. Video Link: Overhead homelink removal Remember you will need to disconnect plugs before the cover panel will actually come out and DO NOT just pull down hard on the entire overhead console center. There are two screws (phillips on the 2018) retaining the full overhead piece in. Just open the sunglasses holder if you have it and we only need to take down the middle cover plate to perform this fix. Step 3: With the piece out on a workbench you can now disassemble the homelink buttons using a torx bit screw driver. It is very small and there are two screws holding the homelink into the cover/trim plate. Step 4: Is to take any decent vinyl electric tape/felt tape/flocking tape and add it to the trim plate like the below. You can trim the excess if you want to. The goal is to make sure you cover the bulk of the perimeter where the buttons themselves will rest against the cover/trim plate. The addition of two layers of Vinyl electric tape cured the problem I was experiencing. This additional thickness added pressure to the buttons mount tab itself which created a more snug and tight fit, that also made the buttons more rigid in the mount. Step 4: Reassemble the homelink to the cover plate, and then put everything back together in reverse order and you should now be vibration noise free at the home link button spot on your overhead console. Make sure to reconnect all plugs and test function before final pressing of the control plate back into the overhead console. Any questions let me know. I only had electrical tape to perform this task. I have some felt tape and flocking tape on order to do more vibration and rattle killing with the addition of the sub. Below is the two versions of tape I ordered that I will also have on hand other than black vinyl electric tape on this quest for vibration and rattle free music listening. J.V. Converting FLOCK-1/BLK05833 JVCC FLOCK-1 Flocking Tape: 1/2" x 25 ft., black J.V. Converting FELT-06/BLK15 JVCC FELT-06 Polyester Felt Tape: 1" x 15 ft., black