Search the Community
Showing results for tags 'upgrade'.
-
Has anyone tried or researched upgrading the factory backup camera? My camera is very blurry in my 2014 Sierra SLT and am looking to improve the quality. I’ve seen cleaning the lens on the current camera so I’ll try that but I’m not ruling out a replacement camera if there is a higher resolution option on the market. Before anyone asks, yes I cleaned the dust and dirt off.
- 15 replies
-
Anyone know how difficult it would be to upgrade the rear view mirror? My trail boss came with a "dumb" mirror. No auto dim, no compass, no onstar, no temp read out, nothing. I'd like to at least have auto dimming, compass, and temp read out. Rear view mirror camera would nice too. Is there any chance that the wiring is already there for it and I just need to simply replace the mirror and plug it in? I've seen a lot of aftermarket options and some of them look pretty neat, but for the most part they attach to the existing mirror and I'd like to find something that is as close as possible to stock looking. Thanks!
- 236 replies
-
- 1
-

-
- 1 reply
-
- retrofit
- center console
- (and 6 more)
-
Hey, I've got a 2019 Silverado with the 6.2L. I want to upgrade the throttle body and intake manifold for some more horsepowers. Has anyone done this on there 6.2? All i am seeing online is throwing the 6.2 manifold on a 5.3. Thanks in advance.
- 4 replies
-
- upgrade
- intake manifold
-
(and 2 more)
Tagged with:
-
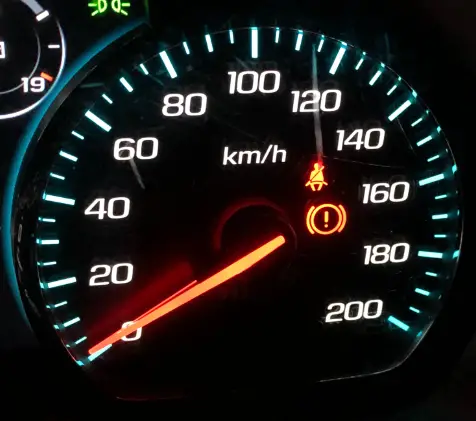
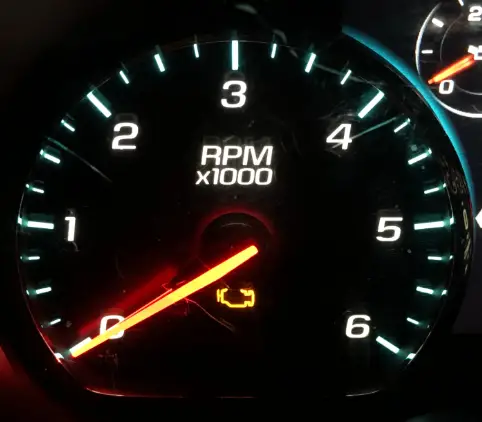
Hey everybody, Just wanted to check in again and let you all know about another exciting service we're happy to be offering... The Denali Cluster Upgrade! Many of you have requested this upgrade and I'm happy to report we have successfully completed the mod. If you're interested in this, you'll need to know a few things. Acquire a new or used GMC Denali cluster. This can be a Sierra or a Yukon cluster. (Please note: If you buy your cluster 2nd hand, DO NOT plug it into your vehicle.) Diesel/Gas: The cluster will need to match some aspects of your current vehicle. For example, if you have a gas spec vehicle you'll need to find a cluster that has an RPM gauge that goes to 6000rpm. If you have a diesel spec vehicle (2500, 3500) you'll need to find a cluster that has an RPM gauge that goes to 5000rpm. Both shown below. MPH/KPH: We can do BOTH USA and Metric market clusters. If you live in the USA, you'll want to get a cluster that has a speedometer that goes up to 140. If you live in a metric country, you'll want a cluster that goes to 200. Both options shown below. COLOR: If you have a GMC and you want to keep your RED color theme, you'll want to find a 2016 GMC Denali cluster. If you have a Silverado, have done a blue conversion, or have upgraded your HMI to the newer blue theme and you're looking for a BLUE gauge theme, you'll want a 2017-2018 Denali cluster. Android Auto/Carplay: For all of you Android Auto users wanting the use of your volume and track selection flippers back, this fixes it!!! once installed you'll once again have access to your flippers. This also allows for the long press of the voice button on the steering wheel to activate Google Assistant as well as Siri for Apple Carplay. Year Matching: There has been a lot of talk that all modules that are installed into the vehicle need to be of the same year. After extensive testing we have found this to be mainly false. As long as the modules are of the same generation you should be A-OK for the install. That means if you have a 2.0 HMI vehicle (2014-2015) you can use a 2014-2015 Denali cluster. If you have a vehicle with a 2.5 HMI (Carplay Enabled, 2016-2018) you can use any 2016-2018 cluster so long as it matches your vehicle specs as mentioned above. And if you have a 2014-2015 and would like to upgrade to a blue themed cluster while adding Android Auto / Carplay, we are more than happy to facilitate the upgrade all at once. Please reach out to me if you have any questions or are interested in getting this mod done to your own vehicle. Thanks for watching and enjoy the demo.
-
Anyone updated a 2016 Sierra to 2020 Sierra (Bose 7 speaker on both?) I am looking to update my 2016 SLT crew to a 2020 Denali, and want to confirm I am dealing with the same (or similar) animal. The 2016 has PAC AP4-GM61, old school PPI PC450 running 100x4 at 2 ohm, Infinity Kappa 60CSX component front, 62IX 2 way rear, Rockford Fosgate R500X1D running 500 watts at 2 ohms, and a sealed JL 10w1v3-4. Embarrassed to say factory dash speakers, but you do not hear them except for a phone call... Incredible sounding system, but I do not want to have to do it again. Does 2020+ no longer use "MOST" bus communication? Anyone measure wattage from Bose? Any difference between SLT, AT4, and Denali Bose amps? Thanks in advance for your research assistance.
-
Looking for what else you guys recommend to replace. I Noticed one of my tie rod grease boots was busted, planning to replace both inner and outer tie rods, sway bay end link, sway bar bushings. Anything else while I’m under there and have to get an alignment? Mileage is at 78,000 miles. Looking to use MOOG parts. Running 33’s so if anyone else has upgraded to something beefier let me know!
- 5 replies
-
- front suspension
- upgrade
-
(and 3 more)
Tagged with:
-
I'm about to install the Chevy Performance Brembo Brake Upgrade on our Silverado. Has anyone else installed this kit? Anyone thinking about it? At first glance, it seems pretty straightforward. After reading the manual, however, I'm realizing I need to take the front wheel bearings off to access the dust shield. Other than that, it seems to be a easy rotor/caliper replacement. Big thanks to @RyanbabZ71 for recommending a great brake bleeding tool! The front set is a true six-piston caliper. The rear calipers are stock calipers painted red to match the fronts. The size increase on the front rotors is significant. I'm gathering the tools I'll need right now. Hopefully I can tear into it next week. I expect the entire process to take me at least a whole day and maybe two days depending on how it goes. Why so long? I'll be photographing and taking video of the entire process. Can't wait to share that with you all. Check back in this thread for progress updates.
-
I have a 09 silverado 1500 WT It has heated rear window but no heated mirrors. And I can't see a wire for heated mirrors in the door compartment (although I haven't opened the door panels in a few months) I do seem to have 2 wires (it feels like 2) going through the door boot (I haven't opened the boot to see the colors but I assume it is for the door open sensor, but I could be wrong) I am wanting to add tow mirrors to the truck and especially heated mirrors ( I plow with the truck and really would love the heated mirrors) I was wondering how I would go about adding heated mirrors ( like I said I have the heated back glass so shouldn't the wiring for heated mirrors already be in the truck as I think they run off the same switch and I'm gonna assume the same harness ( I could be completely wrong and they could be different harnesses) Looking for help as I am wanting to do this conversion if possible
-
My 2018 GMC sierra has a 150 watt inviter. I've hear the newer trucks with the plug in the cab and the box have 400 watt inverters. Anyone try to upgrade or retrofit these inverters into an older truck? I'm looking for a little more power and so far this is how I want to go about it instead of installing a separate inverter.
-
So I have a 05 Gmc and I want to upgrade the front suspension specifically the shocks it has a 6" lift on 35s any suggestions
- 1 reply
-
- suspension
- shocks
-
(and 2 more)
Tagged with:
-
I have a 2019 Chevy Silverado 1500 and my key fob only has the lock/unlock, and the panic button on it. I saw that the official Chevy accessories page has the key fobs with remote start, tail gate unlock on them as well. If I get one, will I be able to have the dealership program it on my current truck so I can have remote start or is this only for replacement for owners that already have the same key fob? 5 Button Keyless Entry Remote Key Fob Part No. 84312372 https://accessories.chevrolet.com/product/2019/Chevrolet/Silverado 1500/5-button-keyless-entry-remote-key-fob-84312372?categoryId=12001 Thanks much!
-
Hey there all I've done as much digging on my own before coming here but Im needing some help. I currently have a 1997 Chevrolet c1500 extended cab, my RPO code tells me that i have a factory GU8 rear differential and I'm looking to upgrade. I've always been weary of clutch style lsd differentials so I've been pouring over information on torque sensing positrac diffs. I think I've come down to my final run down on what I'm wanting to do but I want to get some feedback before I spend the money From what I can gather, the rear axle under the 98-2001 Camaro is the same series as the axle under my truck, and I believe has the zexel t2 series torsen differential I'm looking for. So I'm hoping that I can take the zexel from a Camaro and mate my current ring gear to it to use in my truck. If anyone has any more Info I'd be really appreciative.
- 5 replies
-
- 1
-

-
- fitment
- Differential
-
(and 1 more)
Tagged with:
-
I recently installed two audio control amplifiers (D.4-800 and LC-800) coupled with infinity kappa CSX 90 and CSX 60 component system for the highs and (2) P3 15” subs for the lows. I’m having trouble getting a frequency ranges from 15 kHz to 35 kHz from the factory radio to the amp. We double checked the wiring coming in from all the inputs from the Bose system and everything checks out. I am very disappointed with the way my new system sounds. Do any of you guys know what’s the fix on this? Long story short my tweeters sound like ******.
-
*************Radio and HMI sold. Cluster was returned to vendor on eBay.************* Hey guys, If anyone is interested, I have a radio and 2.5 HMI I purchased from White Auto and Media Services (WAMS) on August 20th for my 2015.5 1500. It was programmed to my VIN, but in the short time since, my truck got hit and I am no longer in need of them. You would need to ship them to get reprogrammed, which is just $100. I’d like to get something for them. For both parts, $300 plus shipping (I’ll confirm what they charge me to ship them back to me). That’s half the price they charge for asking them to source both components for you. Send me a message or reply and we can work out the details. I definitely would trust WAMS for any radio/HMI and cluster upgrades. Their service is fantastic and turn around time is great.
-
For Members with Factory Rancho shocks on your K2, Do you still have them and Like/Love them or Have you ditched and upgraded to New Shocks?
-
Hey guys I know there are threads out there for it but I have looked and can't seem to narrow it down. I currently have a 2016 GMC Sierra All Terrain leveled 2.5". I am looking at upgrading to a Zone 4.5" and running bigger tires on my stock 20" All Terrain wheels. The question I have though is about the shocks. I want to upgrade my shocks right now, looking at the bilsteins. But my question is if I bought the bilstein (5100's) would I be able to run those on the 2.5" level and the 4.5" lift? I appreciate any help and information! Pictures or experience with either setup or future setup is helpful as well!
-
Good Afternoon fellow 6.2L enthusiasts. I apologize if this sounds like a commercial or a rant. I just like to share what I've experienced and discovered. So, I don't know about you, but I've been searching for a way to cram more air into my L86 that won't break the bank. I've done hours upon hours looking for the perfect bolt on's or practices that will help the block breath deeper. I've learned that swapping intake manifolds are not worth it however, porting makes it one bad ass manifold. (which i've done) I threw on an AFE CAI and that really helped get the air moving. (momentum GT pro 5R) Headers and a bigger full exhaust helps get the flow rolling. (I'm rocking TSP 1 7/8 Headers with a 3.5" full exhaust (catted with Cal Cats) and a Flowmaster Pro series Muffler) Cylinder Heads and a Cam shaft will transform your truck. (going with TSP Heads and a Trick Performance Cam package) And a basic tune wakes these bad boys up. (local dyno-tuner) That being said after the above you're looking anywhere between 430-530 HP N/A. Obviously the Cam specs are going to swing that number. Now, The one thing that I have NOT been able to find is a Larger Throttle body that will fit the L86 Stock Manifold. So I did what most have done and ported that sucker out. The only issue is it will never be larger than 87mm. Until this came along. https://www.bbkperformance.com/92mm-throttle-body-14-18-corvette-camaro-lt1.html FYI slight modification is required to the stock Manifold. You need to shave the base of the Vacuum port as well as the MAP sensor base for the frame to fit. Once that is done you're rocking. I was able to Port match the TB Bore to the manifold inlet and smooth out the transition. Honestly I can immediately feel the difference. When I get a little bandwidth I will throw on some videos of Cold/warm starts, take offs etc. If you have any questions feel free to reach out!
- 42 replies
-
- l86
- throttle body
- (and 4 more)
-
Hello, I have been helped by various posts on this forum for a long time but now joined mainly to ask some questions about upgrading my van. Here is the scenario; my dad purchased the 2000 Chevy Express Conversion Van new from a dealership back in 2001. We used it as a family vehicle for many years but as us 'kids' grew up and married off, the van was left unused. So I purchased it from my dad and have been fixing it up. Whoever did the conversion was an idiot. They took an Express 1500 and made it into a conversion van that weighs 6,800# empty. *The front doors are so heavy we had to reweld the hinges because the factory spot welds were peeling off. *The van had front DRUM brakes which we changed out for a set of Brembo slotted disk brakes. *Changed rear axle ratio from whatever stock was down to 3:73 *I upgraded the wheels from 15" to 17" and the tire size from 26" to 30.5" (yes the front tires rub sometimes, but it is 10X better in snow and rides better.). *I replaced the rear leaf springs with 3/4 ton leaf springs and coil-over heavy duty shocks. *Upgraded the full exhaust system from the manifolds back with 3" pipe and a high flow cat and Thrush muffler. *Replaced the engine after I was a dumbA$$ and never refilled the coolant with coolant after having to add water due to a leak and the block froze and cracked. The replacement engine was taken from a 1999 Chevy Suburban. *The transmission was replaced with a Monster Transmission brand 4L60-E rated up to 600hp and tuned for towing (quick firm shifts) and a heavy duty torque converter. *Replaced all ball-joints and steering bushings. *New "heavy duty" shocks for front suspension - which didn't change anything like I was hoping. Anyway, now I want to upgrade the front suspension because it is SO SOFT that the van struggles to ride flat if the road has any bumps in it. It is 2WD, so no front axle. 1: I want to upgrade the front and rear sway bars, can I just put 3/4-ton or 1-ton sway bars on it? Will they fit? 2: I want to upgrade the front springs and shocks with 3/4 ton springs and shocks. Is this possible? 2b: I would also be happy if anyone new of an air suspension or air-adjustable shocks that might work as well. I can't seem to find anything for front suspension for 2wd Chevy vans or trucks. Thanks for any help.
- 3 replies
-
- conversion
- van
-
(and 12 more)
Tagged with:
-
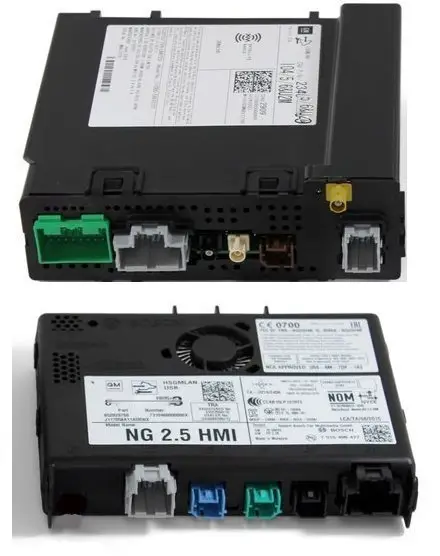
See a lot of questions asked about this and not a lot of set info on the upgrade. Hope this helps even anyone trying to set it up. **READ ALL INSTRUCTIONS AND WATCH ALL VIDEOS PRIOR TO ATTEMPTING PURCHASING OR INSTALLATION** Apple CarPlay / Android Auto functionality is not supported in any 2014-2015 (Many 2016) Silverado/Sierra’s. This is due to neither application being available from Google or Apple when these vehicles being built, therefore not an available option during these model years. The following instructions are designed to simplify the process as much as possible. Three things are required for this upgrade (ONE) Radio Module, (ONE) HMI Module, and (ONE) USB Hub 2016+. Search around for the modules, they are available for purchase from many different locations. EBay, totaled vehicles, junkyards, or other various websites to find them. AGAIN, if the part numbers are not listed below DO NOT purchase them. It is highly encouraged to not try and cut corners with purchasing part numbers of modules not listed as they cannot be flashed to work properly. **DISCONNECT THE BATTERY PRIOR TO INSTALLING FRESHLY UPDATED MODULES** TOOLS REQUIRED: Trim Removal tool 10 mm Socket 7 mm Socket PARTS REQUIRED USB HUB P/N 13519224 (BLACK) P/N 13509943 (WHITE) HMI Module USE ONE OF THE BELOW P/N’S IF YOUR TRUCK CAME FROM THE FACTORY WITH NAVIGATION. ONLY REQUIRED TO PURCHASE ONE P/N. 84006103 84048396 84096817 84156701 81431943 84296482 USE ONE OF THE BELOW P/N’S IF YOUR TRUCK CAME FROM THE FACTORY WITHOUT NAVIGATION. ONLY REQUIRED TO PURCHASE ONE P/N. 84096815 84156699 84131941 84296480 84004948 84048398 84131941 84296480 RADIO MODULE USE ONE OF THE BELOW P/N’S IF YOUR TRUCK CAME FROM THE FACTORY WITH BOSE. ONLY REQUIRED TO PURCHASE ONE P/N. 84062073 84293226 13506371 23402903 USE ONE OF THE BELOW P/N’S IF YOUR TRUCK CAME FROM THE FACTORY WITHOUT BOSE. ONLY REQUIRED TO PURCHASE ONE P/N. 13506387 23402909 84062056 84293243 Once acquiring the parts you can now send them to be flashed. These modules will be flashed to your VIN and will then be plug and play. Copy the link and follow the prompts. http://www.whiteautoandmedia.com/index.php?page=shop.product_details&flypage=flypage.tpl&product_id=98&category_id=44&option=com_virtuemart&Itemid=54 If you have followed all the directions up and to this point, select yes for hardware match. You can chose if you would like the maps updated on your NAV if you so choose. You will be emailed your order number from WAMS, this is EXTREMELY IMPORTANT. You will be required to ship your parts either FedEx or UPS, they will not accept packages from USPS. You will need to write your order number on the box to ensure your order is properly handled. Turn around is approximately one week from shipment to return. ONLY ship your (ONE) Radio Module and (ONE) HMI Module. Maintain your USB Hub. Once you have received your parts from WAMS you can begin installation. Disconnect your battery prior to installation. To install the radio module watch https://www.youtube.com/watch?v=I2MYuuyqLrs. For the purpose of this install start the video at 1:00. Stop the video at 2:04, the radio module is visible with a green connector on the far left. Simply begin disconnecting all of the connectors plugged into the module, once all are removed you can slide the module out of the dash. It is retained only by the tension of the cables plugged into it. Replace with your new module, you can now continue the video and finish putting the dash back together. Stop the video at 4:10. To install the HMI Module watch https://www.youtube.com/watch?v=sFe2gwlOsD4. Stop the video at 2:00. The module being described behind the crossbar is what you are replacing. Remove all connectors, the module is retained with a plastic clip on top. Installing the module along with the glove box, is self explanatory. Take note of the plastic tabs on the sides of the USB Hub you are preparing to install. Those tabs can be depressed with a dental pick and gradually removed out of place. Once removed, disconnect the harness and reconnect. Installation is now complete. You can now reconnect your battery and start your vehicle. Initial start up might take a few seconds to initialize, and temperature defaulting to 32 degrees is normal. Android Auto and Apple CarPlay require hardwire connection, so to test functionality it needs to be connected to the newly installed USB hub. MVI Inc (https://www.gm-navigation.com/) offers kits and other customization options if the above is not something you feel comfortable acquiring on your own. Hope this helps, should be pretty cut and dry. There might be other methods, but this was the cheapest I discovered. If you have any questions don’t hesitate to ask.
-
Hey guys, I have a 2015 Sierra 1500 Z71 and I want to replace the bumper with a new one due to chrome starting to pop. I’m thinking of going with a aftermarket full metal with light bars in it. Any idea on a good place to start looking for them? I searched a few websites and didn’t really find much. Rough country has one for the Chevy but it said that it wouldn’t fit my GMC. thanks!
- 3 replies
-
- GMC
- front bumper
-
(and 1 more)
Tagged with:
-
Hey all, we're a local Chevy dealer with a strong ecommerce presence. We have the lowest prices on the Kicker subwoofer package for the 2014+ Silverado & Sierra Crew & Double/Extended Cab sizes. Installation does not require dealer install. it is a plug and play package. We have guaranteed low prices that shouldn't be beat! GM offers a few versions of these units: -Double Cab and Crew Cab models have different parts numbers -GM offers just a sub upgrade, or the sub upgrade plus amplifier on the door speakers. *The standard Sub upgrade works with the Bose system. *The kit including Sub plus Amp on the door speakers will NOT work with Bose systems. For a price, please send us a message with your body style truck, and which kit you would be interested in plus your Zip Code for shipping. Everything is in stock ready to ship. Forum members will find that our prices on all GM accessories will be hard to beat. Please message me with any questions on this or any other accessory you may need for your truck. *** Currently running a little bit of a deeper discount on the crew cab models, with just the sub upgrade. Buy cheap, sell cheap is the name of the game ***
-
Hello, I’m new to this so please bare with me. I have a 2018 Silverado LT With DL8 Mirrors And I just purchased the DL3 Mirrors Online. I connected the driver side mirror to the factory switch harness and the only function I’m getting from it is the mirror adjustment settings. The problem I’m having is that the turn signal and puddle lights are not working. im hoping to get some advice, I’m not worried about making it look nice I just really would like to get it to work. I came to think that if I were to tap into the power wire in the mirror harness for the mirror turn signal, and possibly run a wire from there to To the headlight turn signal wire harness that would get it to work? Then maybe run a wire from puddle light but run that to something that turns on when the doors are unlocked? The problem is I’m worried that it might be pushing too much power to the mirror and blow something out? if that can work I’m not sure witch wires in the mirror harness to tap into? I can’t find anything online showing what wires do what? Thanks!
-
I am trying to install courtesy lights with the GMC logo on my 2008 Sierra but after getting the first one drilled I realized there is not a light in the reflector on the door. Can anyone provide the related diagram for the wiring within the door / does anyone know if any of the door lights are only activated when the door is opened so that I can tie into those wires? It's a crew cab so I will be attempting to install them on all four doors. TIA.
-

Replacement Battery Upgrade Options
Darksky posted a topic in 2014-2019 Engine, Driveline, & Exhaust
I’m starting to consider a replacement battery for my 2015 6.2L High Country 1500. It has the 94R type battery, I believe. I have looked over the threads I could find with the search function without any specific results. One type that came up in a few of the threads is the XS Power brand, but there is not a recommendation for which series is most desirable. I also wasn’t able to find one in 94R. it seems that the majority of newer batteries have lower CCA than I recall in older “heavy duty” batteries. I’ve bought 1000 CCA batteries in the past, but now 800 -850 seems to be about the highest. The new Absorbent Glass Mat (AGM) batteries may be more efficient and therefore can operate reliably with less CCAs, I don’t know. My truck has to be relied upon in rural, cold weather situations, I need a strong, long life battery. That said, my questions are; Exactly which replacement battery have you used? What is good/bad about it and why? What would recommend for an extreme duty battery? What else would you recommend replacing? -I don’t know if these trucks need the “Big 3” replacement -my alternator is functioning within normal limits, but I’m open to replacement options as needed. -my cables seem clean, undamaged and corrosion free.


