

jaeisber
-
Posts
10 -
Joined
-
Last visited
Content Type
Profiles
Forums
Gallery
Events
Articles
RPO
Store
Blogs
Everything posted by jaeisber
-
Add Bed Light Switch to Truck Bed
jaeisber replied to jaeisber's topic in Modifications & Accessories
It should, its just a matter of taking a look at the wiring for the bed lights in the 2019 Sierra and adjusting accordingly. The idea is the same regardless of truck. You just need to find the harness to the bed lights to allow for control from the in cab cargo light switch as well as a hot 12v source to power the switch and lights from the bed. -
Add Bed Light Switch to Truck Bed
jaeisber replied to jaeisber's topic in Modifications & Accessories
Thanks for the info guys! One of the reasons I love these forums is learning something new. I have some of the heat shrink butt connectors, but not the ones with the low temp solder in them. I will definitely have to look in to getting some of those for future work. I like that idea a lot as it would make the connection much more secure rather than just relaying on the crimp. -
Add Bed Light Switch to Truck Bed
jaeisber replied to jaeisber's topic in Modifications & Accessories
I am curious, what would you do/use instead? I am always willing to learn something if there are better or more appropriate ways to do it. I have had no issues with t-taps, especially when used properly (sealed with tape and heat shrink wraps) and have used them on my trucks and cars for years when wanting to make a non-intrusive connection. Most of the time I will splice in wires, but for tapping in to wires I do not wish to cut, a t-tap has served me well. -
Add Bed Light Switch to Truck Bed
jaeisber replied to jaeisber's topic in Modifications & Accessories
Unfortunately not. However, you could do something like I mentioned in the post above yours. If you are not using your tie-downs, you could modify the plug for the tie-down hole to hold the switch or you could use a SPDT toggle switch installed under the bed rail (where the lights would go). Either of these would still provide easy access to the switch to give you light when you need it. -
Add Bed Light Switch to Truck Bed
jaeisber replied to jaeisber's topic in Modifications & Accessories
If you don't have any tie-downs, you could also modify one of the tie-down hole plugs to take the switch and use that location if you didn't want to drill a new hole. Would be fairly simple to do, just drill a hole in the plug just large enough for the switch to fit through and run the wiring there instead. You may have trouble getting the switch installed in a hole you drill below the existing hole in the stake pocket since it is a tight fit to be able to get your hand or pliers in to tighten the nut on the back of the switch to hold it in place. Might be better off using the tie-down plug or even a SPDT toggle style switch under bed rail. It would still be easy to get to, easy to wire, and be out of the way. -
Add Bed Light Switch to Truck Bed
jaeisber replied to jaeisber's topic in Modifications & Accessories
Thanks! I was surprised this mod didn't have a write-up already so I knew I needed to get it out there for others like myself. I would love to use another set of factory bed lights to add to the set I already have, but I am weird about drilling holes in my bed. I know a ton of people do it....its just not something I've ever been able to do, especially when the truck is only a month and a half old. I would love to have one of the AMP bed extenders, but I just cannot bring myself to drilling the holes. I have a set of outdoor LED strips off Amazon that I used on my Canyon that I am going to wire in. Plenty bright and I can use some 3M heavy-duty double-sided adhesive strips and they will not budge. -
Add Bed Light Switch to Truck Bed
jaeisber replied to jaeisber's topic in Modifications & Accessories
No problem! A pair of 3-way switches and a fuse tap would work here as well, but you would lose the integrated functionality of using the in-cab cargo light switch. The nice thing about the way that I did it is I still maintain the use of the switch I already have, while adding a switch to the bed of the truck. I find this works best for me, but there is no one solution for everyone. -
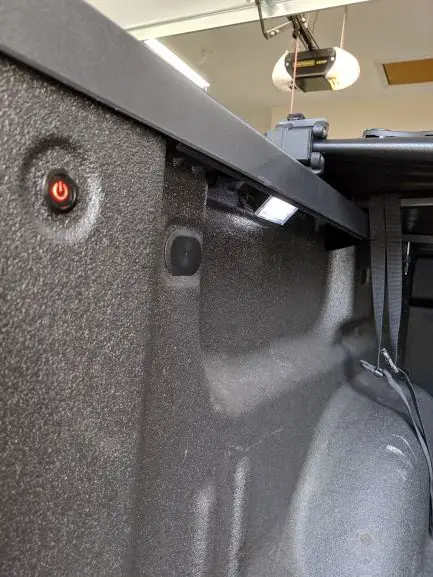
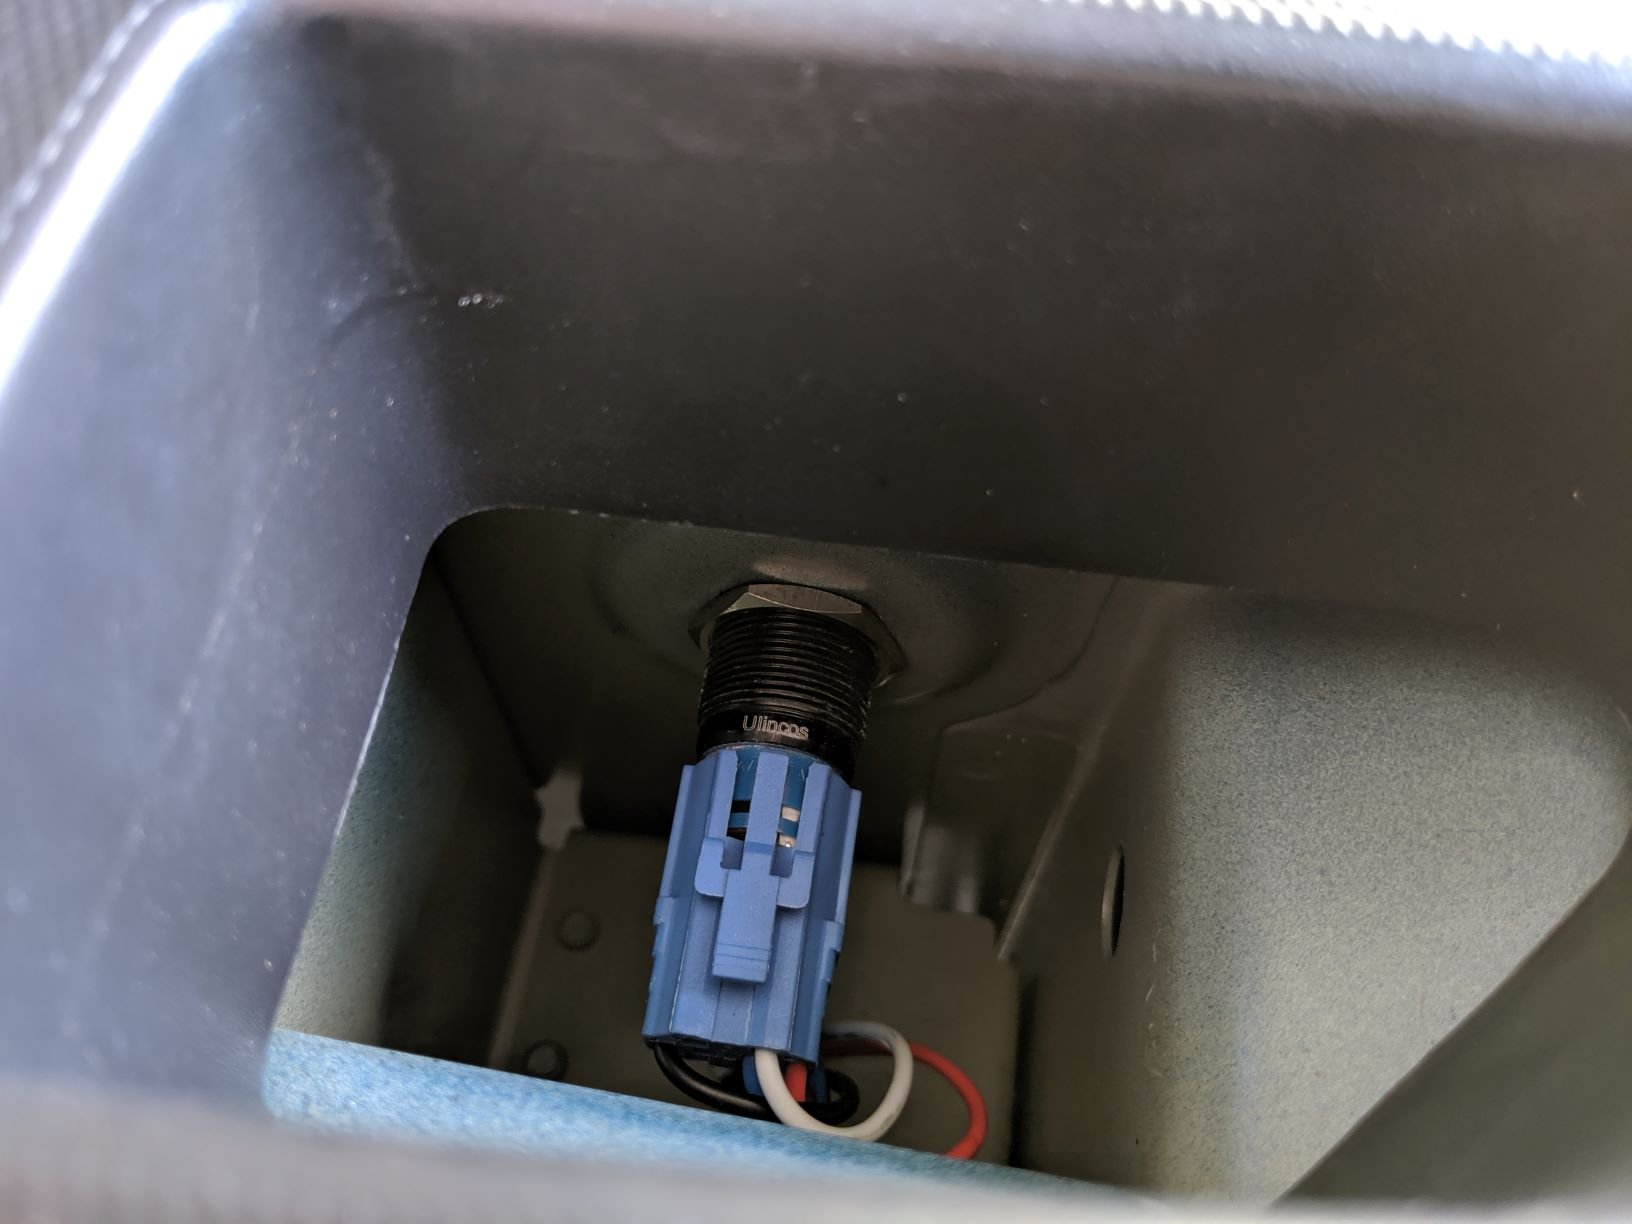
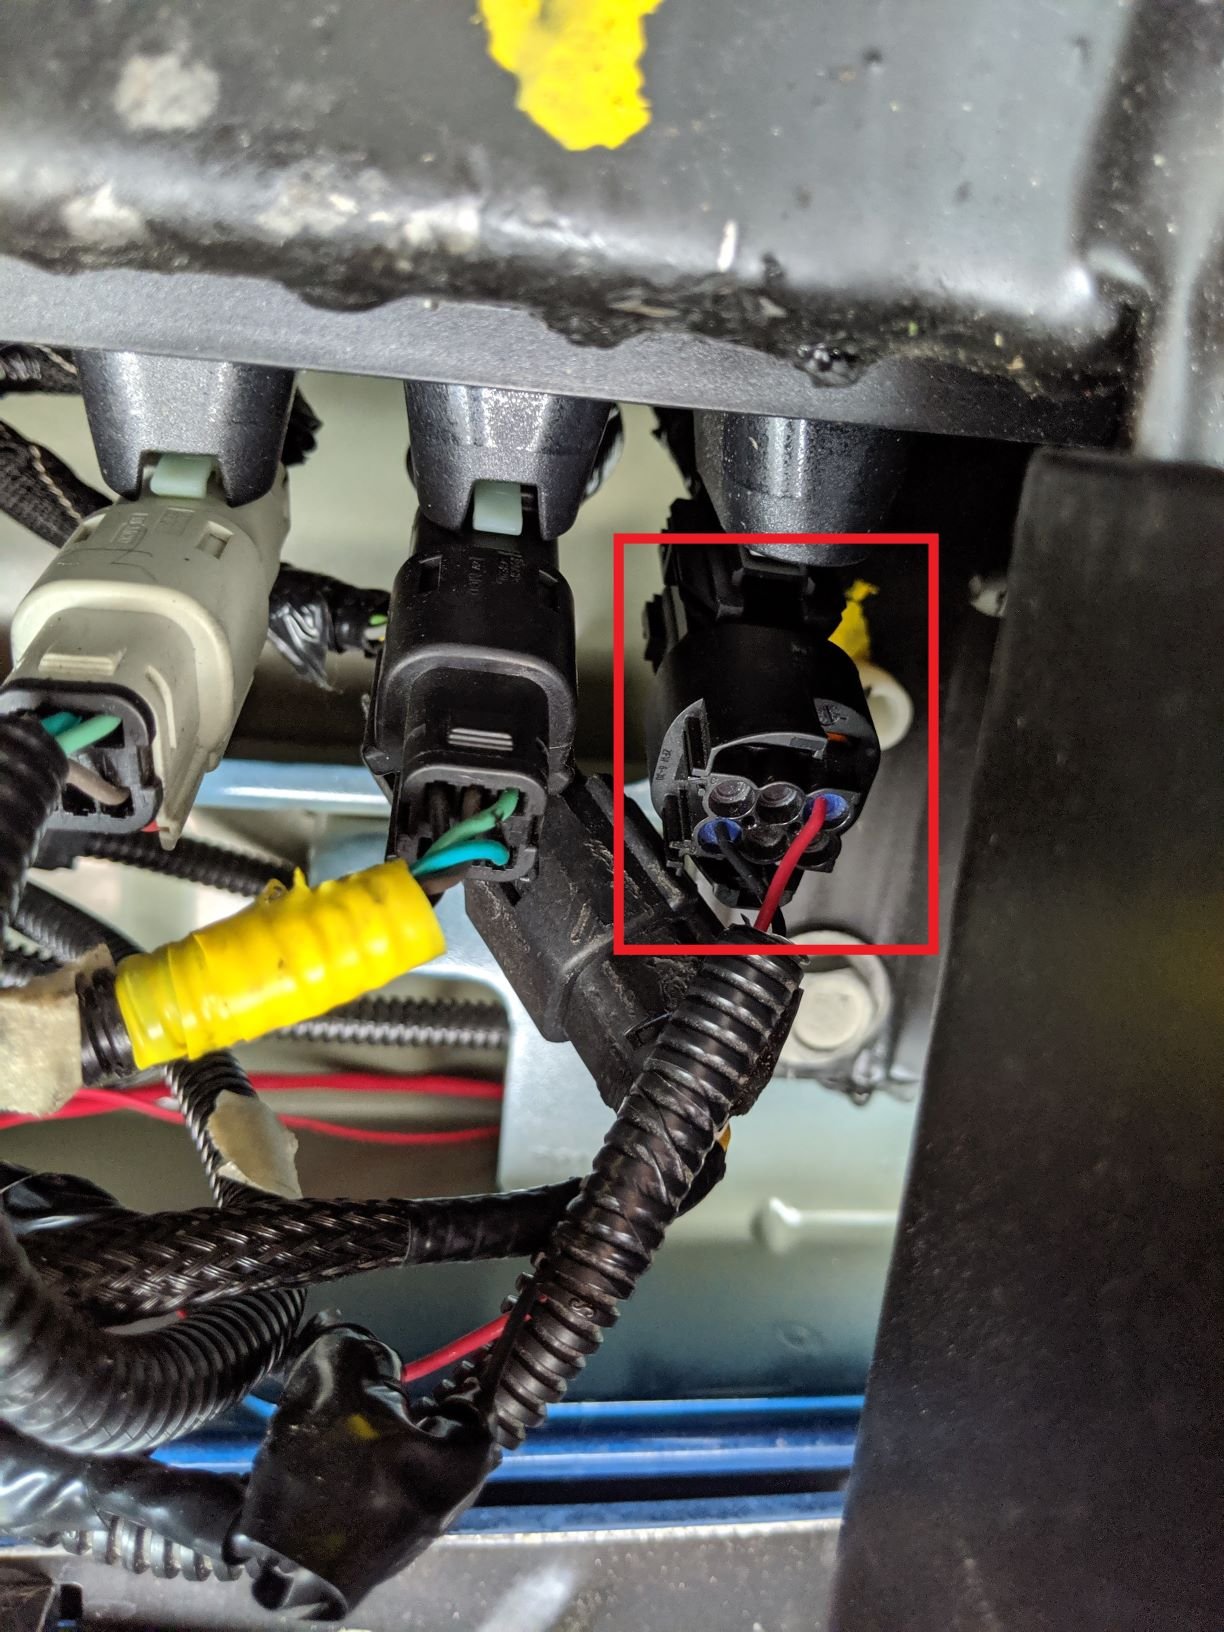
This is a mod that I did on my Canyon a few years ago before I traded it in for my new 2018 Silverado. When I added it to my Canyon, I knew I would like it, but it quickly became one of my favorite mods. It makes the bed light much more functional since I usually need the light in my bed when my truck is parked. Having to go into the cab to turn the bed lights on is inconvenient. Having a switch in the bed to turn the bed lights on is a must-have for me on any truck going forward. This mod does not impact the functionality of the cargo light switch in the cab, it merely adds the ability to turn the lights on from the bed in addition to the in-cab switch. Needed parts: Switch (1NO1NC SPDT) - https://www.amazon.com/dp/B017KP67GI/ref=cm_sw_em_r_mt_dp_U_Zv6hDb5QSWA67 Switch Pig Tail - https://www.amazon.com/dp/B01H5BXC0G/ref=cm_sw_em_r_mt_dp_U_Rv6hDb6T81SZV Stake Pocket Covers - https://www.amazon.com/dp/B07L8BJXTD/ref=cm_sw_em_r_mt_dp_U_xz6hDbX64C8WD Quick Splice T-Tap Wire Connectors Heat Shrink Butt Connectors Wire Loom **DISCLAIMER** This is performed at your own risk, I am not liable for any damage caused by attempting this mod...yada yada yada **DISCLAIMER** Process (Note, this assumes you already have the factory bed lights installed, if not, you will need to procure a factory pig-tail for the bed lights to use as an alternate power to turn the bed lights on with the in-cab switch): Remove driver side tail light by removing bolts in the tailgate area. Taillight will pull straight out. There are retention clips, but pull straight out and the light will come free. Once the taillight is free, remove the bulbs from the light and set the tail light aside. You will now need to run 4 wires (3 black and 1 white, or whatever color scheme you prefer to work with) from the tail light area, down under the truck. I recommend labeling each end of the black wires so you know where you have connected them. Under the truck near the driver side of the spare tire, there is a plug area for wiring and powering a number of things at the rear of the truck (namely, the plug controlling the cargo and bed lights). This is the plug shown in the picture, it is the furthest towards the driver's side and only has 2 wires. This is where we will tap in to wire in an additional power source as well as splice into the neutral for our secondary power source. Remove the cargo light plug, this will make it easier to work with. Find the red wire coming out of the plug. You will cut this wire. Give yourself a few inches of wire back from the plug so you have some room to work with. Using heat shrink butt connectors, connect 2 of the black wires, one to each of the cut ends of the red wire out of the plug. Using a t-tap, connect the white wire to the black wire coming out of the cargo light plug. Now find the wiring going to your 7-pin trailer hookup. I found that lowering the spare tire gave me more room to work here. I didn't remove the tire, I just dropped it down and gave enough slack to slide it out of the way while I was working. You will be looking for the large 12v always on lead, it was red with a green stripe on my truck. It is one of 2 larger gauge wires in the harness. Use a t-tap and connect the remaining black wire. This will be your secondary power source allowing you to turn the lights on without having to use the in-cab switch. Route all 4 wires up and out through the stake hole pocket so you can connect them up to the switch pigtail. Connect the wires up as follows: Black Wire out from cargo light plug > Green (NC) Black wire to t-tap on hitch harness > Blue (NO) White wire to t-tap on the black wire in cargo light plug > Black (-) Black wire out to lights (other end of cut red wire) > Red (+) and White (C) - These are tied together in same butt connector Insert the switch into the small round hole on rear driver's side of the bed. There is a silver nut that should be removed before inserting the switch. From inside the stake pocket, get the silver nut threaded on by one or 2 spins, but not all of the way as you will need to be able to maneuver the switch. Pull wiring down through the holes in the tail light area to remove excess slack from the wiring and pigtail. Install pigtail on to the switch. This was a bit difficult due to the size of the stake pocket, but using some pliers and patience, you can get it on. Once the pigtail is installed, screw the silver nut tight to hold the switch in place. At this point, I put some silicone caulk around the pigtail connection point to help keep water out, but I also have stake pocket covers that keeps water out as well. Run wires through wire loom and use electric tape to secure all t-taps, butt connections, and any harnesses you had to cut open to access wires. Plug in the cargo light plug (if still unplugged) and raise the spare tire (if dropped). I still have some work to do on my wiring, as you can see from the pictures. I thought I had some loom leftover from when I did this on my canyon, but I must have thrown it away. It's in the mail though. I had this mod on my Canyon for 3 years and never had an issue. My next steps are to add additional LED lights near the rear of the bed so that I have light all the way back. It will be as simple as tapping the wires to the existing LED lights.


-
Forum Statistics
250.5k
Total Topics2.7m
Total Posts -
Member Statistics
342,887
Total Members8,960
Most Online
-
Who's Online 4 Members, 0 Anonymous, 750 Guests (See full list)