

Minmax
-
Posts
16 -
Joined
-
Last visited
Content Type
Profiles
Forums
Gallery
Events
Articles
RPO
Store
Blogs
Everything posted by Minmax
-
Footwell lights 2022 refresh Silverado
Minmax replied to RedLT's topic in Modifications, Wheels & Tires
I used this kit off of Amazon for the lights themselves. I had another kit from Diode Dynamics, but the K rating looked weird in the vehicle. 12V Led Light Strip 18" Connectable White Led Strip Lights for Car Motorcycle Golf Cart Automotive Trucks Boat Waterproof Led Light Strip, 4Pack then I used the power off the interior lighting circuit with the GM wire off the module and connected the other end to a good body ground. The wire part number and placement is in this thread if you go through it. It’s been a while since I did it and it has been working flawlessly since install. -
Footwell lights 2022 refresh Silverado
Minmax replied to RedLT's topic in Modifications, Wheels & Tires
Hahahaha!!!! My wife would have never even noticed. To be honest, I checked everything right when I went to go get the vehicle, I basically hunted around the country to find what I wanted, and drove 4 hours to go get mine. I got in and was like “no vanity mirror lights? No auto up window on the pass side?? No auto dimming mirror??? No auto fold mirrors???? No footwell lighting?!?!?” I said “screw it, I’ll figure it out, gimme the truck” and here we are. On another ridiculous first world annoyance finally tackled. The auto up is not a feasible fix, and boost auto makes folding mirrors, but right NOW you lose 360 camera. So, I’ll stick with what I got.- 78 replies
-
- 1
-

-
- Footwell light
- 2022 refresh
- (and 1 more)
-
Footwell lights 2022 refresh Silverado
Minmax replied to RedLT's topic in Modifications, Wheels & Tires
As for which ones you want without having to convert wiring. I don’t know, and couldn’t guarantee. What I would do, is go onto something like CarGurus, and look up a 2022 refresh or 2023 AT4 or Denali trim with the same interior color as yours. The VINs are listed on that site. Take that VIN, call in to your local dealer and say you need visors for said VIN, and get that part number. -
Footwell lights 2022 refresh Silverado
Minmax replied to RedLT's topic in Modifications, Wheels & Tires
Yeah, I had the same situation with me and cancelled my order with them. I found them at a local dealer. The list price of that one little piece of wire is $67. They sold it to me for $27. I grabbed two. Already installed one, so now I have one extra. I too was puzzled by the “5 for around $50” and a single for around $30. Either way. That portion is behind me and I have one extra wire now. -
Footwell lights 2022 refresh Silverado
Minmax replied to RedLT's topic in Modifications, Wheels & Tires
Obviously, make sure you have them before diving in head first and getting everything, but they should be there as GM loves leaving remnants of higher trim options buried in their wire harnesses as it’s cheaper. Remove the A-pillar trim, and remove the visor off the same side. I believe it’s a 10mm for the A-pillar, and like a torx 15 or 20 for the three screws on the visor. Then untuck the headliner from that corner from the door weatherstrip and you should see a taped and/or glued up 2 pin connector hanging around up there within about 6 inches of the hole in the headliner where the visor base went through it.- 78 replies
-
- 1
-
-
- Footwell light
- 2022 refresh
- (and 1 more)
-
Footwell lights 2022 refresh Silverado
Minmax replied to RedLT's topic in Modifications, Wheels & Tires
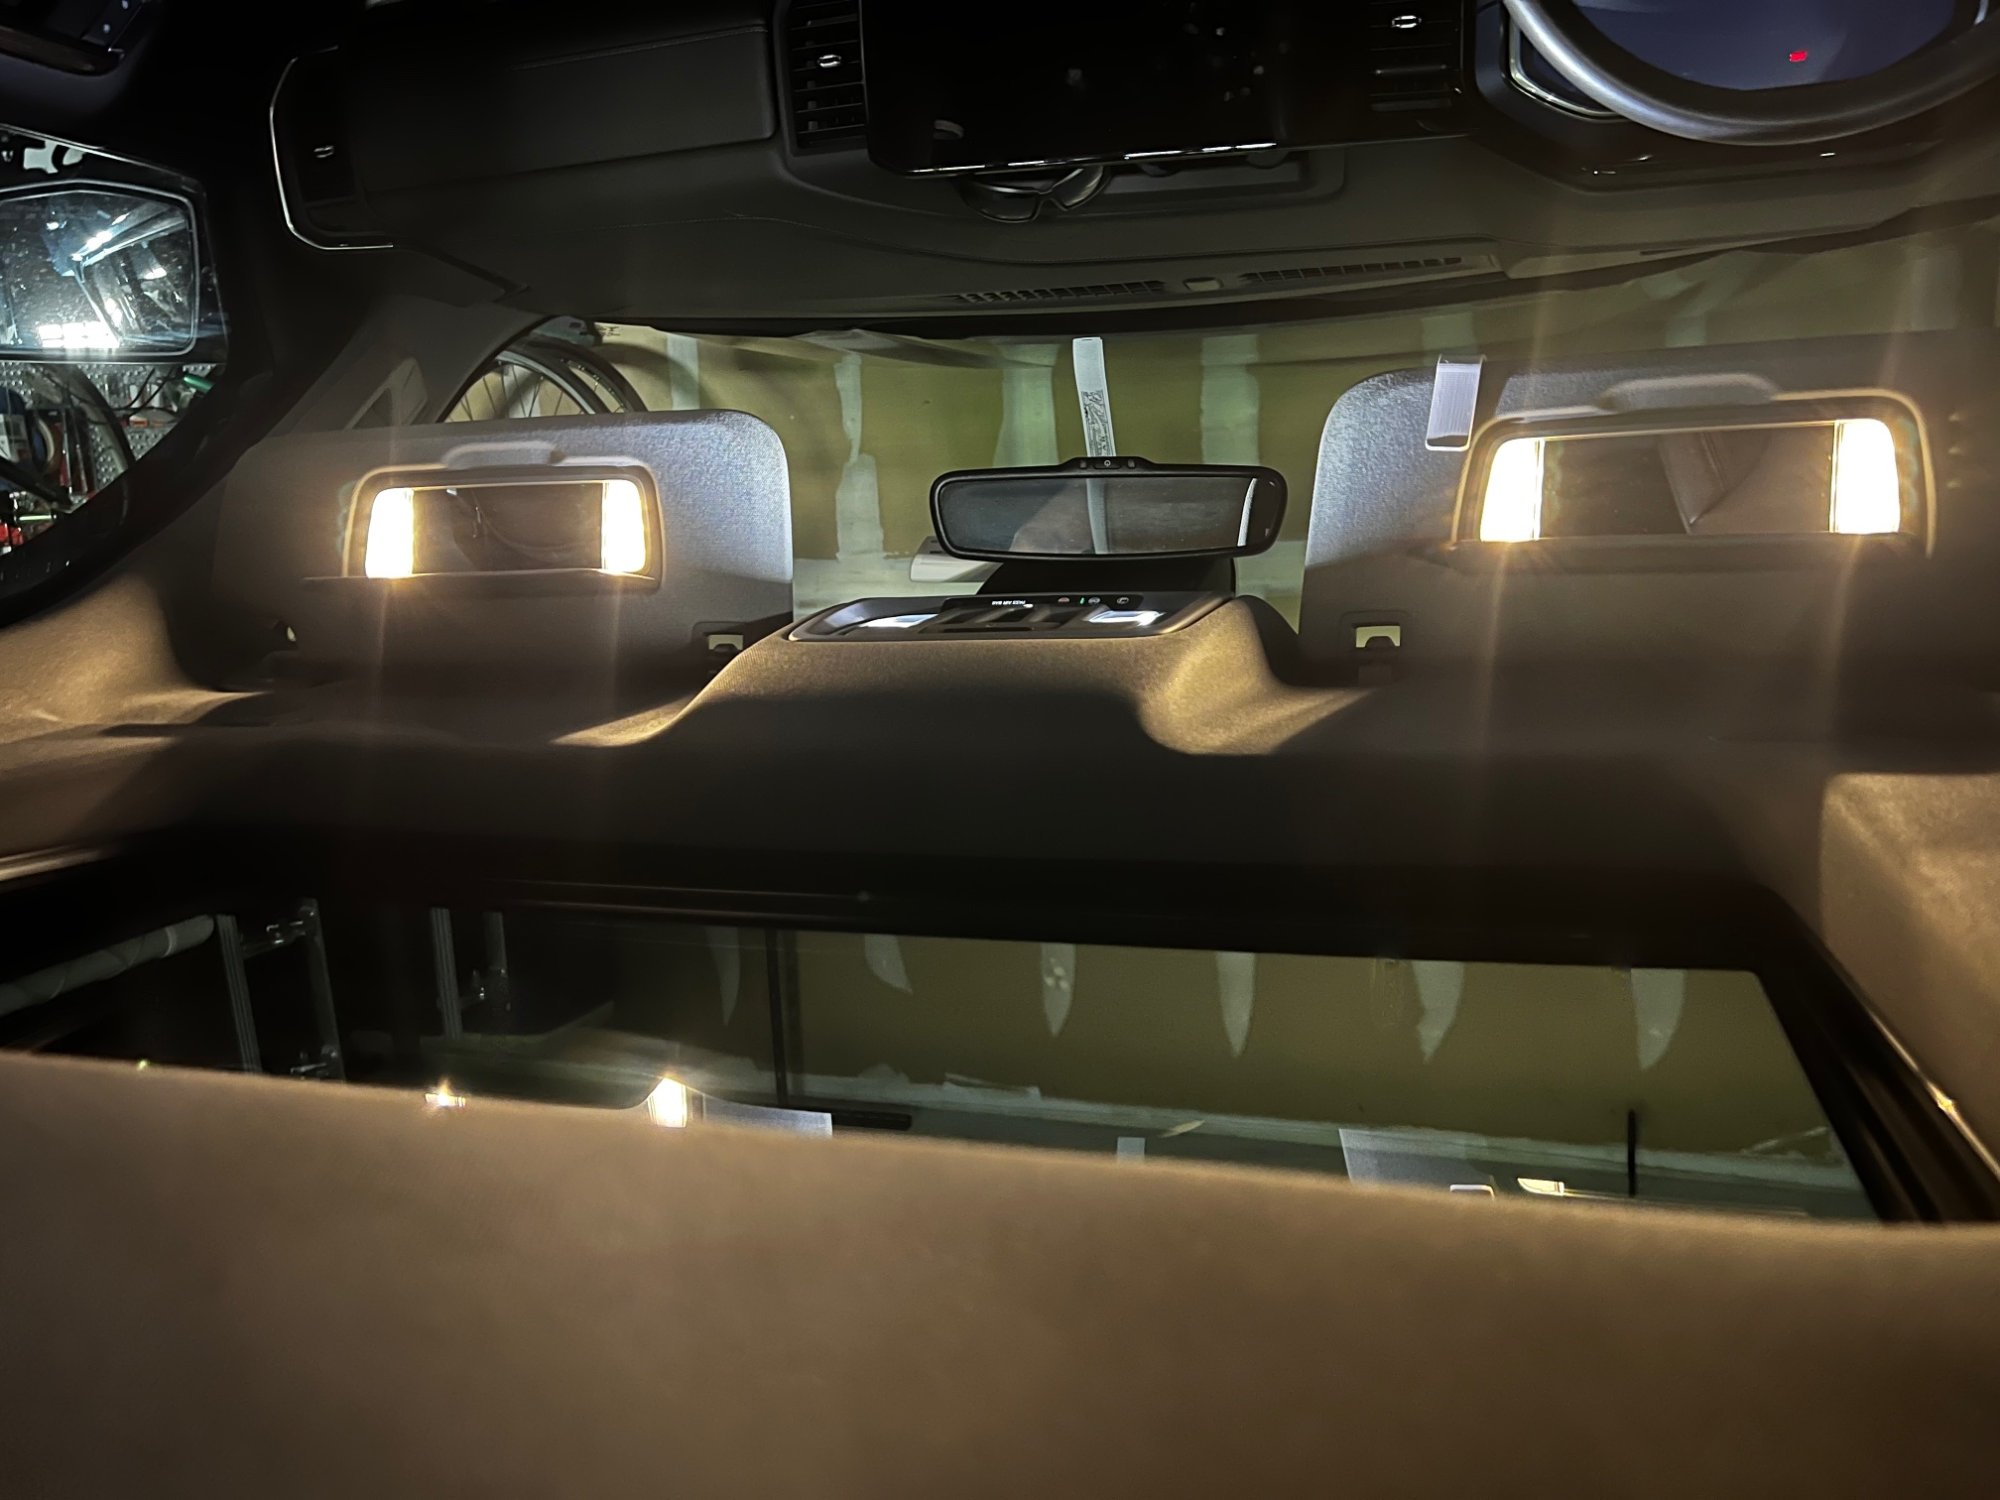
It should also be noted that the lighted visors I got I BELIEVE came out of a 2019 AT4. The connectors in the roof did not match the connectors on the visors, so I went through all the different connectors and ordered a pigtail harness for both sides so I only had to modify the visors, and not hack and mangle the truck. They are perfectly color matched and look fantastic. Apologies if the pic is upside down, it keeps reverting it to upside down no matter if I post it right side up OR upside down. part numbers: 13584278 (connectors) 84637506 and 84637521 for visors. There may be updated parts for 2023 lighted visors that are the correct connector and may work better, but at the time, I didn’t have the patience to wait around.
- 78 replies
-
- 1
-

-
- Footwell light
- 2022 refresh
- (and 1 more)
-
Footwell lights 2022 refresh Silverado
Minmax replied to RedLT's topic in Modifications, Wheels & Tires
I can confirm that there is a connector on each side of the headliner. I installed lighted visors from an AT4 about 3 weeks after receiving my truck. Aside from messing with connectors a little, that was pretty much plug and play. The lighting modules do get a little confused with it at times though, as the lighted visors kind of “fade” on. So, since my truck should NOT have them, it sometimes hiccups when they’re opened and the lights take longer to turn on, but they always work and come on. That was a good modification, along with the gentex rear view mirror that auto dims. I believe I installed that within 3 days of ownership.- 78 replies
-
- 1
-
-
- Footwell light
- 2022 refresh
- (and 1 more)
-
Footwell lights 2022 refresh Silverado
Minmax replied to RedLT's topic in Modifications, Wheels & Tires
The strips I have are VERY nice (from diode dynamics), albeit, incorrect K value, so I am sticking with those for now. This item on Amazon would likely work well, although not as “weatherproof” as the ones I have, if water ever gets that high up in the vehicle, your footwell lighting will be the least of your worries. You can likely leave the potentiometer installed and make little strips for each footwell, all spliced off of a four way splitter to make each strip controlled by the potentiometer. Or snip after the potentiometer and let the truck give it full voltage. They big part is the four way pluggable splitter that came with the Diode Dynamics footwell kit I got. Lepro LED Strip Light White, 16.4ft Dimmable Vanity Lights, 6000K Super Bright LED Tape Lights, 300 LEDs 2835, Strong 3M Adhesive, Suitable for Home, Kitchen, Under Cabinet, Bedroom, Daylight White -
Footwell lights 2022 refresh Silverado
Minmax replied to RedLT's topic in Modifications, Wheels & Tires
I bought a Diode Dynamics footwell lighting kit specifically for this application. Unfortunately, the LED strips supplied are 4000K which is good, but not exactly matching to what I believe is more of a 6000K hue to the rest of the interior lighting. I’m going to stick with it for the time being, if it bugs me I’ll wire in new whiter/bluer weatherproof LED strips. I’m not sure how much that one little pin from the BCM can handle as far as output. While LEDs are low consumption, it’s quite a few LED’s to power 4 separate floor spots. Also worth noting is the wire leads I ordered from Everett Chevy Buick GMC they were selling as just single wires. While technically that is all I needed, I would rather have a couple back ups, so that order has been cancelled and am still on the hunt for the wiring. -
Footwell lights 2022 refresh Silverado
Minmax replied to RedLT's topic in Modifications, Wheels & Tires
Ok, I went out and tested on my 2022 refresh Sierra Elevation in response to Cluemaster and Low Ufo's post from 2/15 that BCM (K9) connector X1 (black) pin 1 is not occupied, and is indeed where you want to wire into for footwell lighting. As Cluemaster noted, it will turn on and off with the interior lighting (including from the all on/off switch in the overhead lighting module). I tested it with just a small wire jammed in there for the time being and grounded it out to the nuts on the door jamb. Per the GM upfitters manual, the wiring to properly install this permanently would be GM part number 19370262. This is a 5 pack of pinned wires that will plug right in and be locked in place. Find a decent ground and you should be in business. I have only tested 2 of my four LED strips in it so far, as most of the parts from what I thought was a dead upgrade have been buried somewhere in parts bins, so I guess I will be finding all of those this weekend. Also, should be noted that the best pricing I could find on these wires (as of today 10/17/2023) was from eBay from Everett Chevy Buick GMC. -
Footwell lights 2022 refresh Silverado
Minmax replied to RedLT's topic in Modifications, Wheels & Tires
I will have to give Cluemasters approach a try later. I too have a ton of different molex pins and connectors. If it works for a 2023, it SHOULD be the same on a refresh 2022. I’ll post my findings once I have something to report. -
Footwell lights 2022 refresh Silverado
Minmax replied to RedLT's topic in Modifications, Wheels & Tires
I have not even attempted to delve further into it. Figured I would just get a truck that either already has em, or has easily installed upfitter switches. Was actually trying to trade up today to an HD AT4 today, dealer wanted me to take a $20,000 bath on the 1500 with 6,000 miles on it. Ridiculous. I have worked at 7 different car dealers myself, and that’s a big lowball. -
Footwell lights 2022 refresh Silverado
Minmax replied to RedLT's topic in Modifications, Wheels & Tires
I’m curious now. I’m sure it would work to at least power on floor lamps when the doors open, which is awesome, but I want them to come on with the “all domes” button as well. Not sure if it would come on in that instance. I suppose when I feel up to it I’ll have to get the old meter out there and try messing with it. -
Footwell lights 2022 refresh Silverado
Minmax replied to RedLT's topic in Modifications, Wheels & Tires
I have given up for the time being. Hoping someone comes up with a module or some sort of sure fire work around. I may install the set I have and install a separate switch somewhere to access them… but would rather they worked the way my old 2017 Canyon did, which was, they worked exactly how the ceiling lights worked, and they were fantastic.- 78 replies
-
- 2
-
-
-
- Footwell light
- 2022 refresh
- (and 1 more)
-
Footwell lights 2022 refresh Silverado
Minmax replied to RedLT's topic in Modifications, Wheels & Tires
I think the best and possible only way to do a footwell lighting retrofit is to tie in to the LED outputs in the roof module and rear roof module… but they’re soldered in, so it won’t be easy or pretty. That at least gets you a signal, but it can’t power the footwell lights as it’s too large a load on the circuit. So I believe it has to receive these signals, turned over to a bridging module, that will then be powered by another circuit off of the fuse panel to actually power the footwell lights. As the signal fades out on the domes, it fades to the bridge modules, and in turn fades the footwell lamps. I was a BMW master tech for a decade, never thought I’d see the day when GM’s wiring was as big of a pain in the ass, but here we are. -
Footwell lights 2022 refresh Silverado
Minmax replied to RedLT's topic in Modifications, Wheels & Tires
I too have been trying to chase down this issue on my 2 week old refreshed Sierra Elevation. I am thinking the easiest, most accessible place to do an input is in the rear seat map lights (it’s only 5 wires, ground, 2 PWM signal wires, and 2 12v wires). I tried patching in an LED strip to the 12 volt signal path, but it is a monitored circuit, it DID light the LED strip (dimly) and then also dimmed down the rear map light (even after it was all unplugged, the map light signal path was remembered by the BCM, so even with nothing hooked up, the map light was still dim, had to do a battery reset to get it back to full brightness). I think the way to break out these signals is to make a break out box of sorts to the rear map light. I came into this truck while coming out of a 2017 Canyon that I up fit a Diode Dynamics solid white kit to, and it worked flawlessly. It came up and faded in with the domes I converted to LED’s, faded out with them, and when any door opened, it came on, and when commanded for domes through the switch they came on just the same as the overhead lights. This vehicle is completely different with everything being a pulse width modulated signal, so it’s much harder to “tap” into without screwing it up. I want this same setup in this truck and I would be done modifying for the foreseeable future. If the guts of a rear map light were remodeled in a way that it could monitor the PWM signal, to then ramp up/ramp down a 12 volt circuit, the same way the PWM signal ramps up and down, I could see this being the best way to make LED floor lights come to fruition, but there’s an awful lot of resistors, capacitors, diodes, and small chips in the map light that may be harder to extrapolate out into what I want it to do. I managed to put lighted vanity mirrors in and an auto dimming rear view mirror without much issue, but this modification has had me stumped a bit.
-
Forum Statistics
250.4k
Total Topics2.7m
Total Posts -
Member Statistics
342,789
Total Members8,960
Most Online
-
Who's Online 7 Members, 1 Anonymous, 3,365 Guests (See full list)