Jump to content

Search the Community

Showing results for tags 'dual battery'.

  • Search By Tags

    Type tags separated by commas.
  • Search By Author

Content Type


Forums

  • GM-Trucks.com Original News & Product Reviews
    • General Motors Product and Industry News
    • The GM-Trucks.com Garage - Vehicle Testing & Product Reviews
    • The Newsroom Archive
    • The Garage Archive
  • Next-Generation 2026 Chevrolet Silverado & GMC Sierra Speculation & Rumors
    • 2026 Chevrolet Silverado & GMC Sierra
  • 2022-2026 Ultium Electric Vehicle Forums
    • 2022-2025 GMC HUMMER EV Pickup & SUV Forum
    • 2024-2025 Chevy Silverado EV & GMC Sierra EV Forum
  • 2019-2025 Chevy Silverado & GMC Sierra Forums - T1XX Platform
    • 2019-2025 Silverado & Sierra
    • 2020-2024 Silverado HD & Sierra HD
    • 2021-2025 Tahoe, Suburban, Yukon, Yukon XL & Escalade
  • 2014-2019 Chevy Silverado & GMC Sierra Forums - K2XX Platform
    • 2014 - 2019 Silverado & Sierra
    • 2015-2020 Suburban/Tahoe & Yukon/Yukon Denali
    • 2015-2019 Silverado HD & Sierra HD
  • 1999-2013 Chevy Silverado & GMC Sierra Forums - GMT-800 & GMT-900 Platforms
    • 1999-2013 Silverado & Sierra 1500
    • 2000-2014 Silverado & Sierra HD
  • Chevy Colorado & GMC Canyon Forums
    • 2023-2024 Chevy Colorado & GMC Canyon Forum
    • 2015-2022 Colorado & Canyon
    • 2005-2012 Chevy Colorado & GMC Canyon
  • Chevrolet / GMC / Buick / Cadillac Crossover & SUV Forums
    • 2024 Chevrolet Traverse, GMC Acadia & 2025 Buick Enclave
    • 2017-2023 Traverse, Acadia, Enclave & XT5
    • 2025 Chevrolet Equinox & GMC Terrain Forum
    • 2019 - 2024 Blazer
  • Classic Chevrolet & GMC Pickup Truck Forums
    • 1988-1999 Chevrolet & GMC C/K GMT400 Platform
    • 1973-1987 Chevrolet & GMC Square Body / Rounded Line Pickups
    • 1967-1972 Chevrolet & GMC Glamour / Action Line Pickups
    • 1960-1966 Chevrolet C/K/Apache & GMC 1000-3000 Pickups
    • 1982-2005 Chevrolet S-10/Blazer & GMC S15/Sonoma/Jimmy
    • 1969-1994 Chevrolet K5 Blazer & GMC Fullsize Jimmy
  • Silverado, Sierra, Trucks, Parts & Accessories For Sale
    • For Sale/Wanted
    • Member & Vendor Rating Forum
    • Member Product Reviews
  • The Lounge
    • Off-Topic
    • Future Vehicle Speculation & Spy Shots
    • Automotive Industry & Market Discussion
    • New Member Introductions
    • Meetups, Events, & Gatherings
    • GM-Trucks.com Comment Box
  • Hobbies & Lifestyle
    • Photography
    • Major League Sports, Outdoor Recreation, Firearms, Hunting, OHRV
    • Racing, Strip, & Track
    • Trailers, Hitches, & Towing
    • Garage & Home, Snow Plowing, Landscaping, & Lawn Care
    • Technology, Devices, & Gaming
    • Vehicle Buying, Financing, Incentives, & GM Card
    • Vehicle Builds
  • Technical & Advanced
    • Vehicle Appearance, Care, & Maintenance
    • Ask the GM Technician
    • Performance Engine Tuning
    • Transmission, Suspension, Transfer Case, & Axles
    • Wheels, Tires, & TPMS
    • Audio, Electronics, OnStar, MyLink, Intellilink & SiriusXM
    • How-To
  • Commercial Vehicles
    • 1980-2009 Chevrolet Kodiak and GMC Topkick
    • Chevrolet Express & GMC Savana
    • Chevrolet Silverado Chassis Cab 4500HD/5500HD/6500HD
  • Black Truck Club's Topics
  • Texas Owner's Group's Topics
  • California Owner's Group's Topics
  • New England Owner's Group's Topics
  • Midwest Owner's Group's Topics
  • South Carolina Silverado Owners's Topics
  • Canadian Owners Club's Topics
  • SCUBA divers of GM-Trucks's Scuba Talk
  • Red Truck Club's Topics
  • Idaho Sierra & Silverado Owners Club's Idaho
  • Colorado Trucks's Exhaust Setups
  • Colorado Trucks's Pics of trucks
  • SEO Paint's seo color ordered
  • NorthSky Blue Club's NorthSky Blue Metallic
  • NorthSky Blue Club's Pics
  • diesel 3.0's Topics
  • MIAMI TRUCK LOVERS's YOUR FAVORITE CHERVROLET MOD?

Calendars

  • Events
  • Birthdays
  • Texas Owner's Group's Events
  • California Owner's Group's Events
  • Midwest Owner's Group's Events
  • Red Truck Club's Events

Categories

  • Articles
  • News
  • Reviews
    • Project Sierra
  • Resources

Blogs

There are no results to display.

There are no results to display.


Find results in...

Find results that contain...


Date Created

  • Start

    End


Last Updated

  • Start

    End


Filter by number of...

Joined

  • Start

    End


Group


MSN


Website URL


Yahoo


Skype


Facebook


Twitter


Name


Location


Interests


Drives

Found 6 results

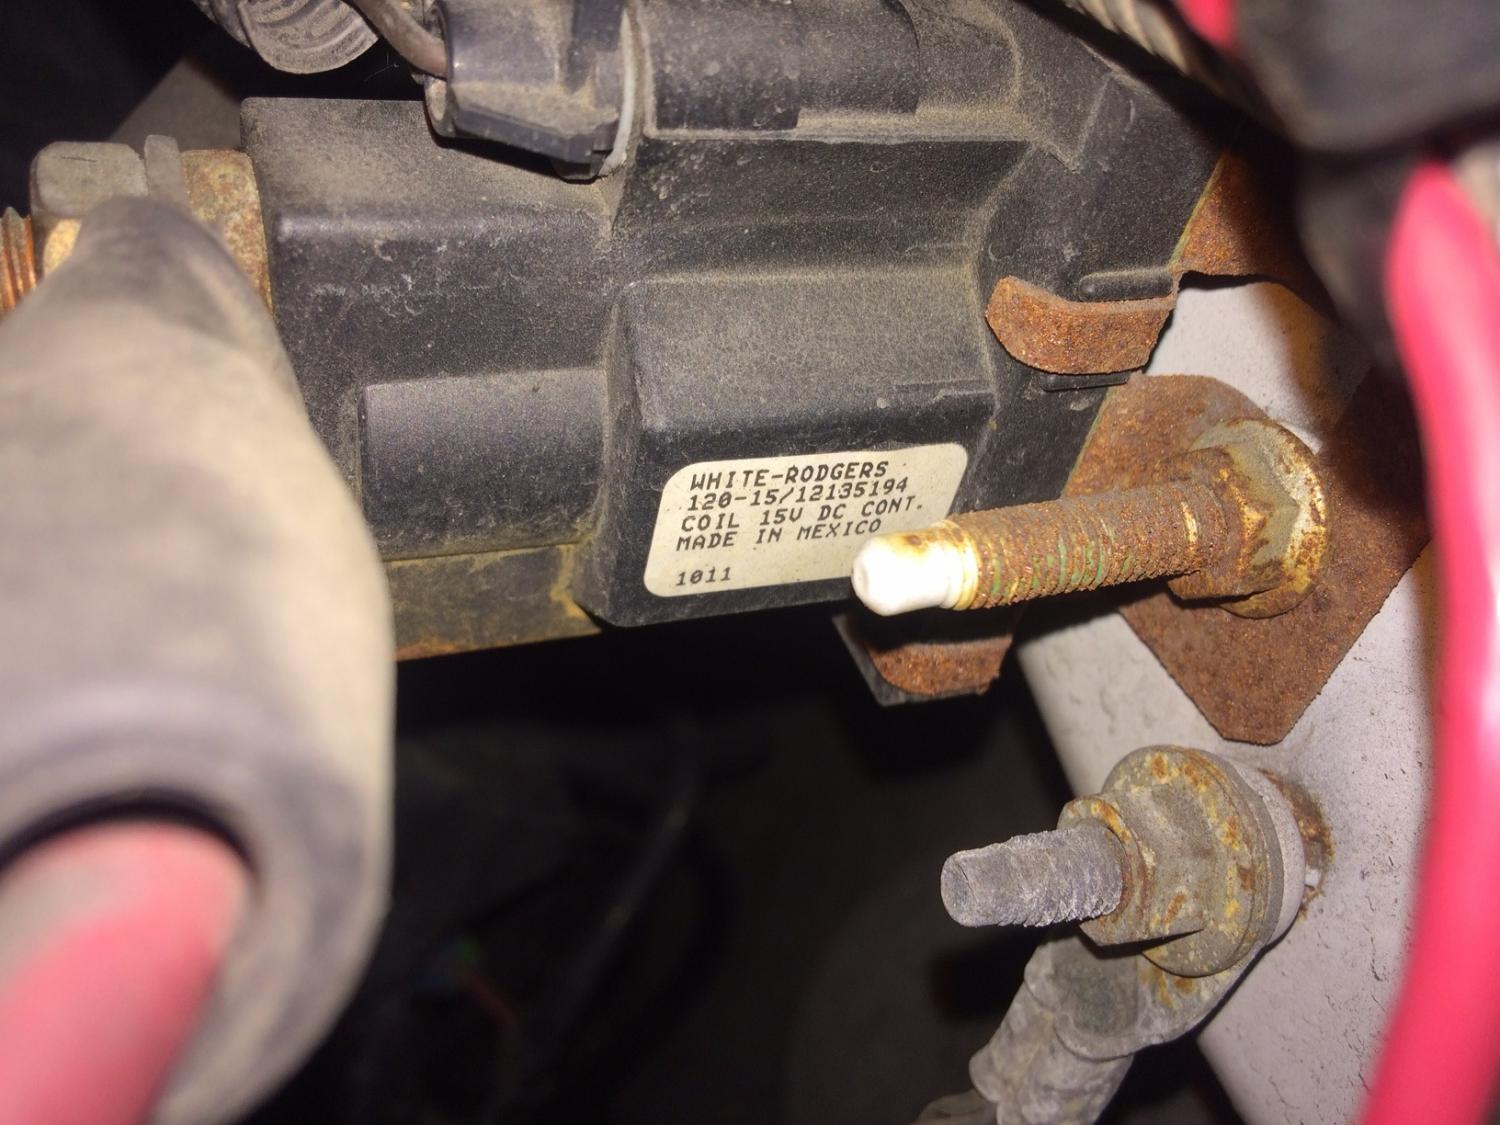
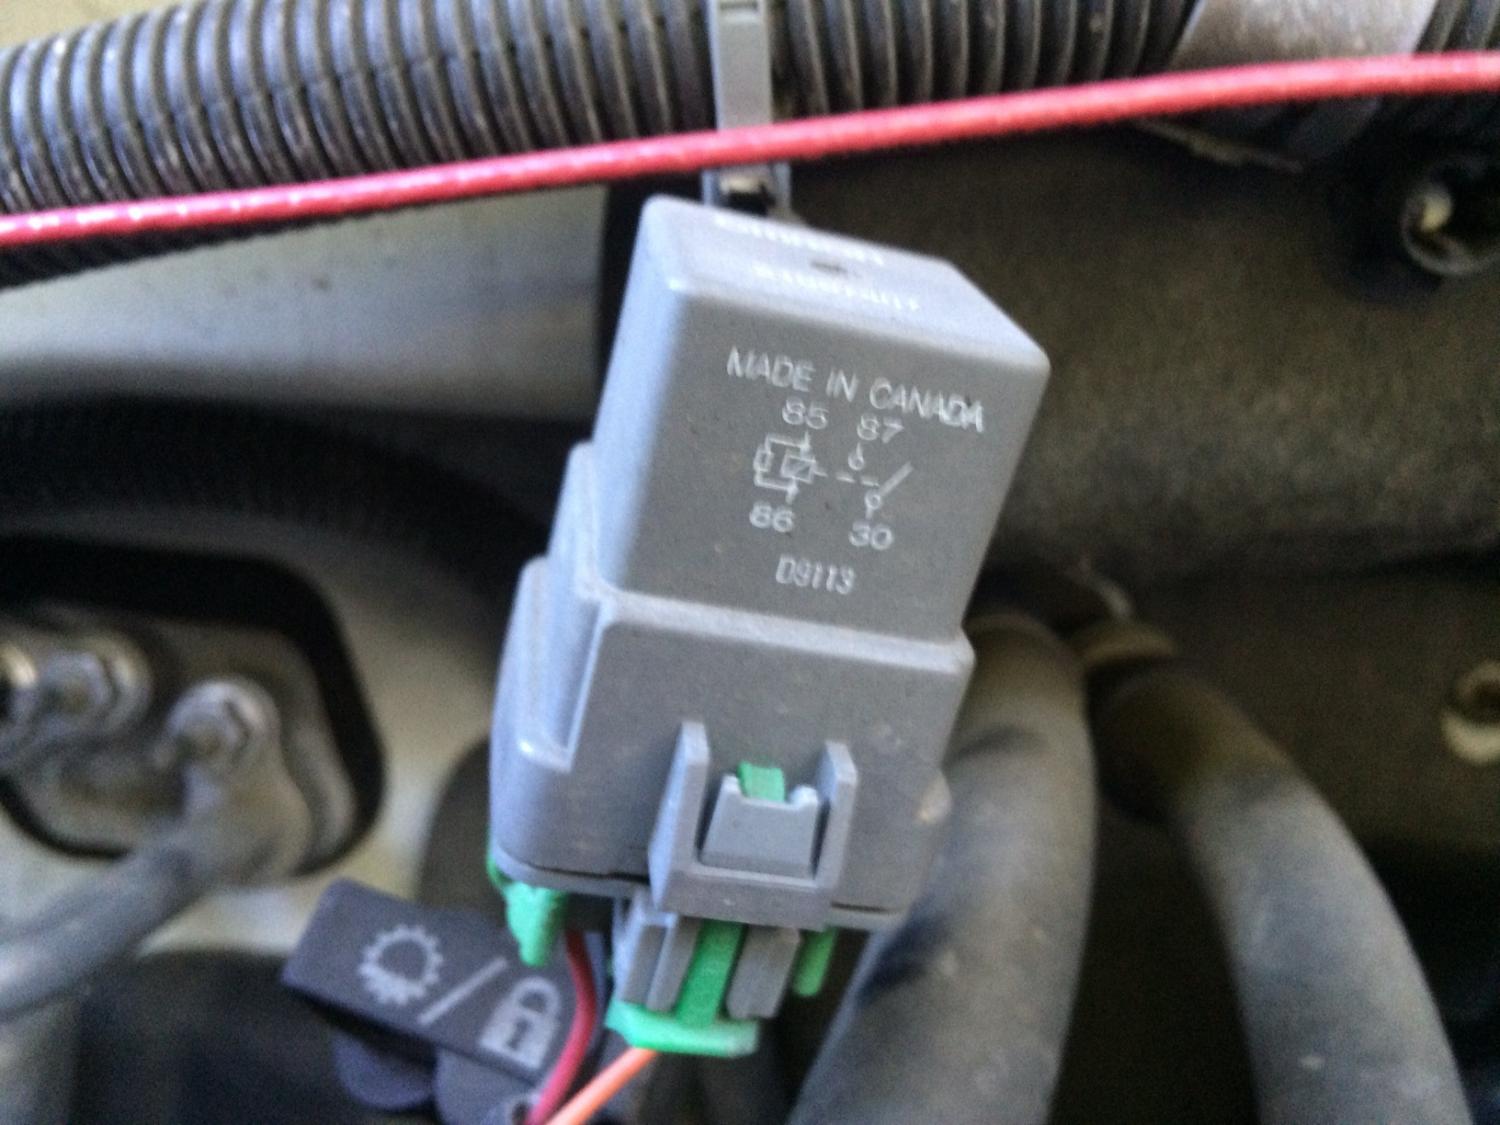
  1. I have a 2011 Sierra 2500 HD with 6.0L. I bought it from the original owner. It has the Factory Dual Battery setup. I started noticing a problem with My snowplow and then the external Jumper cables, Both of which are connected to the Secondary Battery. I had Replaced Both batteries with New ones thinking one of the batteries were older and I just like to make sure I always have a good battery. a couple months after replacing them I noticed a problem I was having with a Ham Radio that I just ran a power line from the secondary battery. I ended up putting a meter on the second battery and got about 10 Volts. The Primary is 12V when sitting and 14V when the engine is running. So traced the wire from the primary to the secondary and identified the solenoid / coil "part number 12135194" that keeps the battery separate when the truck is not running so the primary won't get drained. On the solenoid I have 14V on the primary battery side and 10V on the secondary side with engine running. This made me believe the solenoid was bad and not opening to allow the 14V to pass through to the secondary. Only $60 so not bad. Problem is I still don't get the 14V being passed through the solenoid. The next part I'm looking at is a Relay 21997407 Am I barking up the wrong tree or Is there something I should check first??
  2. I know I'm not the only guy who has gone with this setup, but I'm posting this to refresh and refine the topic. My setup is slightly modified, and I also have some questions at the end for others who already went this route as well. I deliberated on this project for quite awhile, because I've had negative experiences with electrical systems in the past. You can do everything right, and in spite of best efforts the vehicle's PCM just doesn't cooperate sometimes. I initially wanted to make this OEM true using strictly factory auxiliary battery option components. The factory option for the auxiliary battery is "TP2." I ultimately decided, though, that there was a better way to get what I wanted while still keeping it very close to factory and much more cost-effective. The only real choice that needed to be made was how I would connect the two (isolator, solenoid, direct connection, etc). I researched and went back and forth for about a year before I finally chose the marine-grade Blue Sea Systems ML-ACR. The acronym stands for Manual Lever Automatic Charging Relay. The ML-ACR is proven and very popular in the overlanding community with nothing but great reviews. It offers three settings with a magnetic lever under the hood. 1. Automatic - the batteries are isolated until the alternator provides amperage necessary to begin charging the starter battery. Once this happens, the magnetic button on the lever is activated automatically, connecting the batteries. 2. Manual Off - the batteries stay isolated from one another regardless of amperage provided to the system. This is achieved by turning the yellow lever to its off position. The batteries will never connect while on this setting. 3. Manual On - this connects the batteries even with the vehicle off. The benefit of this option is never needing jumped again. If your starter battery loses voltage required to start the vehicle, simply push the magnetic button in on the yellow lever. This connects the batteries, immediately channeling voltage (~12.5v) from the aux to the starter battery, allowing you to start the vehicle. There's also a remote switch included that can be located in the cab, but it's use is optional. The remote switch is the typical rectangular auxiliary switch that fits aftermarket panels. I did not use it, because I like keeping my cab factory clean and didn't want to cut anything inside. Tools needed: Something to cut copper cable, Any style terminal crimpers, Something to shrink heat wrap, Razor or knife to strip copper cable sheath, Socket set. Parts needed: My model came stock with the aux battery tray, so I only needed the bolt and plastic clamp to retain the battery in that tray. GM #11519527 (bolt) - $6.23 GM #14005061 (plastic retainer) - $5.49 GM #84043745 (fuse block) This is the same fuse block that clips on the top of your main battery. I wanted to have a few high-amp fuses for my winch connections, and I like that it looks factory. This is not necessary to complete the project. - $58.55 GM #84180633 (fuse block cover) This is the plastic cover that snaps onto the fuse block. - $12.76 Factory-specific battery model #48-AGM. I went with the Diamond model from Battery Source. - $179.99 Blue Sea Systems ML-ACR - $185.45 Ford OEM negative terminal clamp...I just needed something simple. - $12.75 Materials specific to wiring (all from Amazon.com): 10' combo pack of both 1/0 AWG copper red and black welding cable. This is high quality and rated for 300 amps at 25', which is much more than I need. I ended up with about 2' extra of each color when I was done. - $64.80 15-pack of 1/0 AWG marine-grade terminals. I only used six of them for this, but I needed the rest for another project, and it's cheaper to buy in bulk. - $19.61 4' red and 4' black adhesive lined marine-grade 3/4" heat shrink. I only used about 12" of red and 6" of black for this project, but again it's cheaper in bulk. - $13.00 2-pack of Fastronix 3/8" stud red terminal covers for the ML-ACR. - $7.99 20' black fire retardant 1" inside diameter split wire loom. I used this where I ran both pos and neg together across the back of the engine bay. It looks factory. I probably only used about 7' for this project. - $9.97 10' black fire retardant 5/8" inside diameter split wire loom. I used this to cover the individual strands of cable, which was only about 3' total. - $12.95 20-30 black zip-ties. I use zip-ties for everything, so they were already on hand. My total for materials came to $589.54, but I'm sure I could have cut down on the cost if I hadn't purchased so much overage for other projects. I also used the OEM fuse block and cover, which aren't necessary. Given that, this project can definitely be completed in under $500. That's about 1/3 what any dealership will quote you, assuming they're even willing to retrofit your truck with the TP2 factory option. Most are for whatever reason hesitant to take on the project. The actual job of connecting everything is pretty simple. I spent less than five hours in all, but it can be done in three hours. I spent a lot of time deciding how I wanted to route wiring and where I wanted to mount the ML-ACR. There aren't many places in the engine bay that make sense. I ended up mounting it on the fuse panel lid adjacent to the aux battery location. I used four mounting screws to do so, and I'm very happy with that location and method. The fastest process to complete the project follows. 1. Clamp the negative terminal on the stud, put the battery in the factory aux location, bolt it down loosely, and clip the optional fuse block on. 2. There's a fuse panel directly adjacent to the battery location. Remove the fuse panel lid and mount the ML-ACR in the center of the fuse panel lid with the terminals facing the body and the yellow switch facing the engine. 3. Route copper cables closely to what you intend to be their final positions. One single length of black cable should be routed from the starter battery neg terminal to the aux battery neg terminal. Two lengths of red cable will be used. One from the starter battery pos terminal to the ML-ACR, and one from the ML-ACR to the aux battery pos terminal. Mark the cables for cutting. 4. Remove the cables from the engine bay, cut, strip, and crimp the cables. 5. Reroute copper cables into their final locations. Use caution when connecting cables to avoid crossing and shorting. Tighten all connections. 6. The ML-ACR has a ground wire that must be grounded to the neg battery terminal on the aux battery. 7. Dress cables with the loom and zip-ties. 8. You can test the system with a multimeter and your dash voltmeter. - Batteries should be at ~12.5v when the vehicle is off. When isolated, each battery will likely read a slightly different voltage output. When manually connected with the yellow button in (vehicle still off), both batteries should read identical voltages. - Lock the yellow switch to isolate the batteries and start the vehicle. The voltmeter in the dash should read ~14v. The starter battery should be ~14v when tested with the multimeter. The aux battery should still read ~12.5v. - Rotate the yellow switch to its automatic position and wait. Revving to 2,500 RPM will expedite this step. It could take as long as 5 min, so be patient. Observe the magnetic push button on the yellow switch, which will automatically retract once the alternator provides necessary amperage. - Once the push button is automatically retracted, both batteries will read identical voltage at ~14v. - Shut the vehicle off and immediately move back to the engine bay to observe the push button. It will automatically pop out in approximately 30 sec.
  3. Hey, Iv seen a bunch of posts about setting up a dual battery system and what to use, and i understand all that. Problem is i keep seeing articles about standard relay style isolators and smart isolators (VSR) not working if you have a "smart alternator" because of the fluctuations from the alternator based on driving conditions, and therefore have to go and spend a load on a DC-DC charger. $50 vs $300 Anyone have any issues with their standard relay style or smart isolators on their dual battery setup? Articles below, https://www.12voltplanet.co.uk/auxiliary-battery-charging-in-vehicles-with-smart-alternators.html https://www.redarc.com.au/faq-tech-tips/new-vehicles-technology-can-affect-dual-battery-systems-charging-performanc
  4. I have a Painless wiring kit #40103 and have mixed info on the proper install on my 2015 Sierra. The confusion is the terminal box on top of the primary battery, what wires need to be upgraded to larger gauge, and how does the auxiliary battery get charged. I have also read that you have to ground both batteries to the same location. This originally seemed fairly straight forward, but is getting more confusing, I wanted to isolate a spare battery to make sure I always have starting power. I originally was going to add a 4ga wire from the the stud that the short wire that goes to the pos terminal on the primary battery and to the left side of the solenoid and from the solenoid to the starter. For the auxiliary battery I would run a 4ga from the pos terminal along the firewall to the left stud on the solenoid and add a wire from the neg terminal to the frame below it. The solenoid would be mounted behind the primary battery. The switch part is easy. Note the diagram below for the solenoid. Dual Bat.bmp
  5. Read a post on here about the dual battery install on a 1500. Thought I would post some pics and info, as the post I read stated a Gm part number for a new try. However I found I didn't need this at all and other than the battery it's self (comes with adapters and mounts) nothing is needed to mount the battery. I bought the $7.00 battery hold down with bolt. But this wasn't needed I could have just bought the bolt. NOTE. there is a tab on the tray on the front side by the headlight. With nothing more than a pair of vice grips I bent it, only a little. Say about from the 1 o'clock position to the 11 o'clock. I then installed the snap in adapter in the optima battery, this simply added a larger lip. Then drop in and bolt down. easy no more than 5 minutes. I did the ground cable to the engine block, as the 2nd battery is a protection/ jumper. So need the starter to get the best voltage path. As you can see the isolator is a Stinger 200amp. It is wired to through a 2 way switch and a rely. so it can work two ways. One is "normal" car starts on main battery then a RAP source powers the relay. If the main is dead I can see it on the dual voltage gauge and simply push the switch to connect both batteries and truck starts. Any time truck is running both are charging.
×
×
  • Create New...

Important Information

By using this site, you agree to our Terms of Use.