

kgkern01
-
Posts
94 -
Joined
-
Last visited
kgkern01's Achievements
")
Enthusiast (3/11)
24
Reputation
-
I need to change out my stock Magneride shocks on my 2015 Sierra Denali, and I've read older threads where Arnott shocks may be shorter than stock due to being made for Yukon and not Sierra, and I've read of some people having issues of some other cheap replacements. Are there any suggestions that people have experience with that have had good luck with non-OEM brand Magneride shocks, to avoid the OEM price markup vs all others? Trying to save some money vs $1500-1600 for OEM GM shocks if possible, but also don't want them to go out in a year. **No I do not want to get rid of the Magneride system and go to Bilstein or other non-mag ride system.
-
Magneride replaced - ride height seems off
kgkern01 replied to Hystiker's topic in Troubleshooting & Recalls
I'm looking to replace my Magneride shocks too, so basically if I don't want the lower ride height, I'm stuck buying the GM OEM shocks it sounds like? -
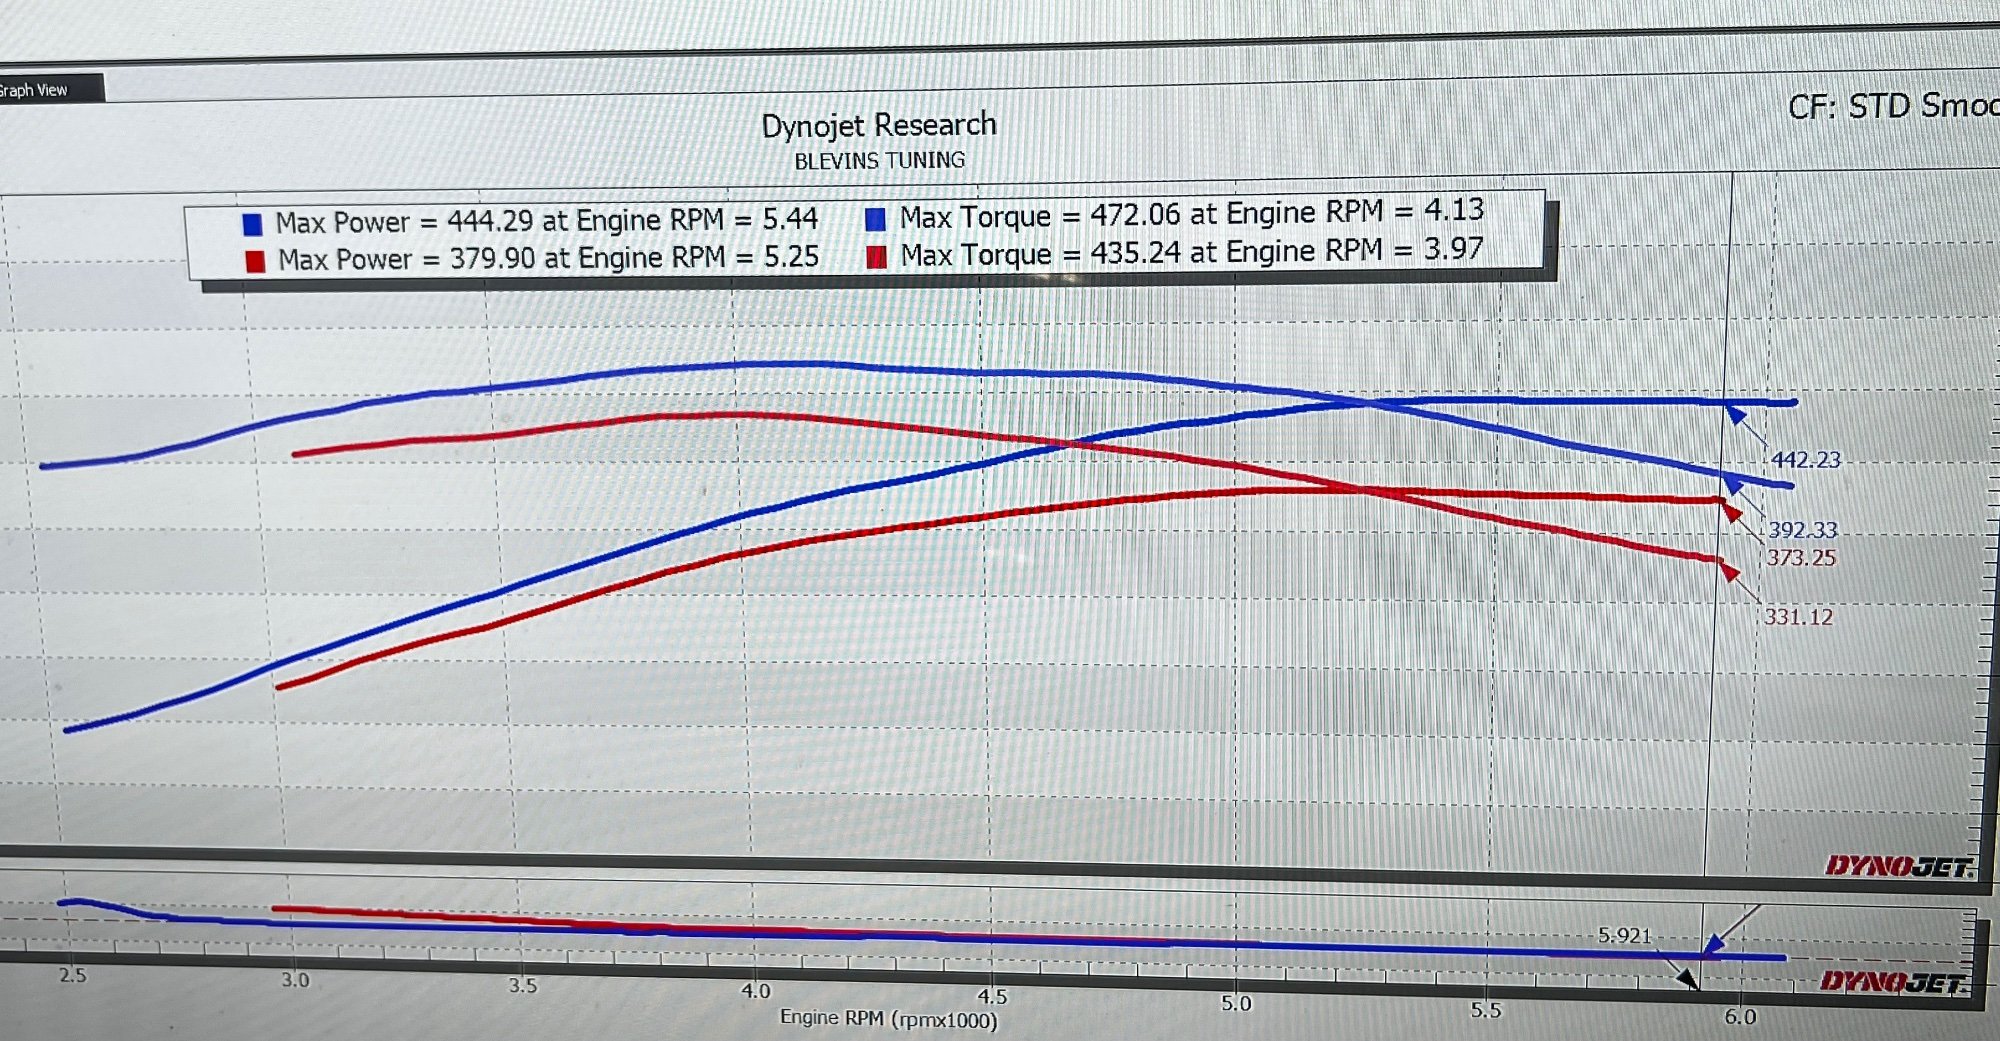
Just finished up a cam and headers swap on my 2015 L86 Sierra, and got a dyno tune. I figured I’d post details here for anyone interested. Mods on last tune: E85/Flexfuel conversion Volant intake Dyno tune New mods: Cam: GPI L86 Low Lift Stage 1 cam, with 4* VVT limiter Headers: Speed Engineering 1 7/8” with y-pipe, stock catback. Cosmetic .028” head gasket 65rwhp and 37rwtq with just the cam and headers, with torque gained across the whole powerband. Has a nice small lope at idle but still drives like stock (after the tune of course). It liked 0* VVT best until 4800 anything else and it lost 10# of torque, then 3-4* ****** up top above 4800 for best hp and tq above this RPM. If you notice the curves and peak numbers are almost at the same RPM range as stock cam as well, only 160 RPM higher on tq and 190 RPM higher on hp.

- 1 reply
-
- 2
-

-
So I just did a cam and header swap in my L86, including a brand new GM oil pump from the dealer. Since getting to back together it has been blowing the #50 fuse for O2 heater. I tried removing the O2’s and extensions and still popped the fuse on key ON. Looking at the wiring schematic, the oil pressure solenoid, and EVAP purge are also on that fuse. So I started with unplugging the solenoid wire from the timing cover, and no more blown fuse, but as soon as I plug it back in, pop! So my question is this, my oil pressure is good with the brand new pump, 60 at startup, 40 at idle, 40-60 when driving and warmed up, 5w30. Is the solenoid critical to the engine running, or is it fine since it just defaults to higher oil pressure? I really don’t feel like pulling the front of the engine and dropping the axle and steering rack again right now, if it’s something I can just attend to later on?
-
I just finished up a cam swap, headers, new oil pump in my L86 Sierra, and now I am getting an O2 heater control circuit code P0030, and the fuse was blown. Replaced the fuse, blew immediately upon turning the key on. Unplugged both O2 extensions from the factory harness, immediately blows the fuse again. Plugged the sensors back in, with no fuse, the tuner showed the O2's as not working at all, but when he drove it up the street and back after tuning out the basic cam related stuff like the VVT, idle, etc. The sensors were reading with no heater circuit fuse, but offset from each other, one bank leaner/richer than the other. I'm assuming the bad heater circuit may have something to do with that? So I'm assuming a wire may have gotten pinched somewhere during the cam install and is grounding out with the immediate fuse blowing. Does anyone have a wiring diagram or good tips or way to try to track this issue down? The truck is drivable but obviously the tuner couldn't do anything with the fueling with the O2's reading inconsistent. Side note, I also show a "Freeze Frame" DTC of P06DB, but this is a brand new oil pump from the dealership and oil pressure seems good, initially 60 but it seems to settle back down to 40. The tuner also showed a injector #1 open circuit code in HPTuner, but my scanner app isn't reading that and there are no #1 misfires. Any help on tracking down these issues is appreciated!
-
I just got done installing a cam/headers on my truck, and took my truck to my tuner. We noticed that the O2’s weren’t reading and so checked the fuse and it was blown. Put in a new fuse and it blew as soon as the key was turned. Disconnected both O2 sensors and extensions at the factory plug, same thing, blew immediately. I don’t visibly see any pinched wires. Any suggestions?
-
In hindsight with everything involved with a cam swap, removing the heads, oil pump, etc, I would have to agree, on an engine stand would be much easier than in the truck.
-
I got the oil pump and pan in this weekend, and while it wasn't the easiest thing to do, I will add a few notes as to what I did to not have to drop the front axle and steering rack completely out of the truck. Hopefully this helps the next driveway jackstand mechanic a little bit. To get the oil pump and pan out, as mentioned before, I drained the oil, unbolted the engine mounts, 3 15mm bolts per mount, and raised the engine up with a engine hoist. I remove the lower oil pan, which is 10 10mm bolts, then removed the trans cooler lines from the trans to move them out of the way, and disconnected the oil cooler lines from the pan. Then unbolt the pan from the block, remember the 2 10mm long bolts at the back and the 2 15mm bolts going through the bellhousing. Once the pan is loose, you can remove the pump, 4 13mm bolts, and disconnect the solenoid plug. This gave me just enough clearance I needed to remove the pan out of the truck. Once the pan was out, I also remove the long stud that is on the drivers side mid/front half of the pan to get a little more clearance for re-installation. Putting the pan back in, however, you need more clearance than you did to remove it. This is because the pan is sealed to the block with RTV and not a gasket, so you cant just slide it in, you have to make sure the RTV bead stays where you put it on the pan and doesn't scrape off when re-installing. To get the extra room that you need, you will need to drop the steering rack, front axle, as well as the front sway bar. However, they do not need to come out of the truck completely as in the video, that is unless you feel you need all the room you can get. If you want that extra room, the front differential unbolts pretty easily from the axle shafts with I think 6 or 8 bolts. If you want to do that and give yourself just enough room to get the pan back in, they just need to be lowered, I used a HF low lift transmission jack, but a floor jack with a board may work as well to support the steering rack and front axle. For the steering rack unbolt the bolt that connects the steering column to the rack to allow it to drop. 4 bolts to disconnect the rack from the frame, and 4 bolts to disconnect the axle from the frame and you will gain another few inches of clearance. This gave me the room I needed to get the pan back in with a bead of RTV/gasket sealer on the pan. Make sure you also put in new o-rings while the pan is out. Do not put the bead on the front rail of the pan yet, as it is only needed on the sides and back for now, since the timing cover will need sealed to the front of the pan. Before I put the pan back in, I had the new oil pump primed and ready but did put it on the crank yet. With the RTV on (I would recommend the GM or Ultra Grey sealant, Right Stuff while seals great, it also only gives you a 5 min working time), I carefully put the pan back in sitting on the front diff, but did not put it on the block yet. With the pan resting on the diff, I slid the oil pump on the crank, and plugged in the solenoid plug. Then went back under the car and raised the pan into place on the block and torqued it down. RTV stayed on where it needed to and never touched anything but the pan and block. Once the pan was bolted up, I torqued the oil pump to 18ft/lb. Went back under the truck, raised the diff and rack back into position and re-installed the sway bar, transmission cooler lines, and oil cooler lines, and their associated mounting brackets. At this point you should be left with just the timing cover and front rail of the oil pan to seal back up. In hindsight, honestly, just removing the front differential would make it a little easier and give a lot more room, and you can leave the axles in and steering rack in (just lowered down, to do that. If you want to try it without doing that, then it is possible, just take your time, double check everything, and practice sliding the pan into place a couple times without RTV first to make sure that you have enough room to do so without touching anything before you try it for real. Having to pull the pan again because you scraped off RTV while putting the pan in is not worth it.
-
I was able to get the pan out by removing the cross member, sway bar, removing the lower pan, then lifting the motor up from the front with a cherry picker to give more clearance from underneath. Cam, oil pump, etc is all out. Once I clean everything up if I determine the engine has to come out to reassemble, I will, but it appears I’ll have enough room to finish reassembly as is. To be updated as I reassemble…
-
At this point I almost wonder if it would be easier to just pull the engine and finish it up on the stand?
-
Yeah the main thing I’m looking for is what I need to remove, loosen, move, etc to get to the pan while it’s in the truck. Heads are off, exhaust is out, radiator is out, picked up a new GM oil pump today, just need to pull the old one, install new tensioner, then finish my cam install and reassembly.
-
So while doing the cam swap on my L86, I accidentally cracked the timing chain tensioner while trying to pin it. To get to the tensioner bolts to replace it, the oil pump has to come out. So on the 4x4 trucks, what’s involved with replacing the oil pump? Is it as easy as dropping the pan, or do I need to lift the engine, or is there a better way to do this? I can’t seem to find any good tutorials or videos online that show dropping the pan on a 4x4 L86 or L83?
-
Issues with 2015 silverado 2500hd
kgkern01 replied to ryanhardy's topic in Troubleshooting & Recalls
@ryanhardyDid you ever find the issue? Mine is throwing the same code now all of a sudden. -
So yesterday I went to leave the house in the morning, and when I started the truck, the traction control light is on on the dash, the engine is missing pretty bad, so I scan it and I had the following engine codes. P0301, C0800-03, U0401-71, secondary codes P0174, P0171 New AC Delco O2 sensors, and swapped the coil, wire, and plugs from cyl 1 with cyl 3 (plugs and wires are less than a year old), and check the battery voltage. Rescan it, still have the same codes. I had no codes the day before (but did have a slight ticking, which I'm guessing may be the AFM lifters on cyl 1). Voltage on dash while driving is between 12.5-14. Could a bad cell in the battery or ground cause these codes to suddenly come up when they weren't there the day before? Any other things to check beyond getting the battery tested, ie any specific grounds or other cables to check?
-
What cam should I go with? L86 daily driver
kgkern01 replied to kgkern01's topic in Modifications & Accessories
No reason not to go with the thinner gasket for a little more compression either. I run E85 99% of the time, except on road trips when it’s not available I run 93. More compression is more efficient and slightly more power.

-
Forum Statistics
250.4k
Total Topics2.7m
Total Posts -
Member Statistics
342,860
Total Members8,960
Most Online
-
Who's Online 10 Members, 0 Anonymous, 762 Guests (See full list)