garrett0151
-
Posts
9 -
Joined
-
Last visited
1 Follower

garrett0151's Achievements
")
Enthusiast (2/11)
2
Reputation
-
Finally Fixed Chevy Shakes!!
garrett0151 replied to garrett0151's topic in Troubleshooting & Recalls
I warmed the transmission up to operating temp and waited 20min before I started the flush. -
Finally Fixed Chevy Shakes!!
garrett0151 replied to garrett0151's topic in Troubleshooting & Recalls
Hey John, Good thing you were able to get it to the dealership before your warranty was up. I had a hard time getting them to do anything. Luckily, I bugged them enough to get some information out of them. For my situation, GM extended drivetrain warranties for only a select number of 2016 Silverados. My VIN was not one of them. Same situation for a bad a bad condenser. They wanted $1,800 and I fixed myself for $150. I can't believe GM would allow an engineer to design a transmission with no dip stick on it. Blows my mind! Follow up in the future and let us know how it's working out for you. Garrett -
Finally Fixed Chevy Shakes!!
garrett0151 replied to garrett0151's topic in Troubleshooting & Recalls
David, I wouldn't flush your transmission unless you're certain that there's been prior maintenance (flush and or pan drop) on the transmission. If you aren't sure and don't intend on using the Mobil 1 Synthetic LV ATF HP 124715 to flush it, I would recommend a pan drop with the recommended transmission fluid that is provided in your owners manual. Keep up with these pan drops every 30k. The reason I say this is because ive flushed my transmission at 120k on a 2012 Avalanche with no prior pan drop or flush and ended up having to rebuild it. This was also the case for a 2007 Avalanche with only a pan drop at 110k and a flush at 160k. I lost both of these transmission with no more than -2k on it after the flush. From my understanding, if you do not flush or pan drop before 60k, the clutch material in the fluid helps the clutch disks grab so that your transmission can shift. If you remove this material, your transmission can start slipping. I did a pan drop at 61k on my vehicle so I was comfortable on this one to do a proper flush and cut the risk of damaging the transmission. From my research, if you dont pan drop ever 30-60k, DO NOT flush UNLESS you're having issues that your mechanic or dealer recommends you flushing it. AKA Torque converter shutter. If the fluid in your transmission is bright pink then you could assume there's been prior maintenance. If its really dark pink with some or a lot of black, DONT FLUSH! Pan drop if it still has some pink. If its stone cold black, ride it out as long as you can. The probability of it slipping are extremely high. If you're 80% certain its a shutter then "I" (NOT A MECHANIC) would recommend flushing it. Dont flush unless you want to spend 3k-5k on a rebuild. Garrett (NOT A MECHANIC or a DEALER) -
Finally Fixed Chevy Shakes!!
garrett0151 replied to garrett0151's topic in Troubleshooting & Recalls
David, If you ever have the opportunity to record it and stick it on YouTube. Post the link on here so that I can check it out. I'm interested in the issue your truck is experiencing. Its ironic that were having different issues right around the same speeds. You might look up some information on the torque converter shuttering in transmissions. Its not just the Silverados that are doing it. Its been a recurring issue on various vehicles transmissions. Good luck, Garrett -
Finally Fixed Chevy Shakes!!
garrett0151 replied to garrett0151's topic in Troubleshooting & Recalls
David, The "shake" occurred around 55mph (It was slight vibration around this speed) and around 73mph-75mph+ my console would shake back and forth. I did not record it but i will attach a link, from a guy on youtube that was experience the same issue. -
Finally Fixed Chevy Shakes!!
garrett0151 replied to garrett0151's topic in Troubleshooting & Recalls
Its not necessary, but I have done a lot of research and to me, it wont hurt to put 1 or 2 bottles in your transmission. Its supposed to help your transmission as they get older. Its personal preference, I try and take extra measures. That way I know I tried everything. Follow up on here so I know how it goes. I hope its the solution for your problem. I almost sold the truck because of it. -
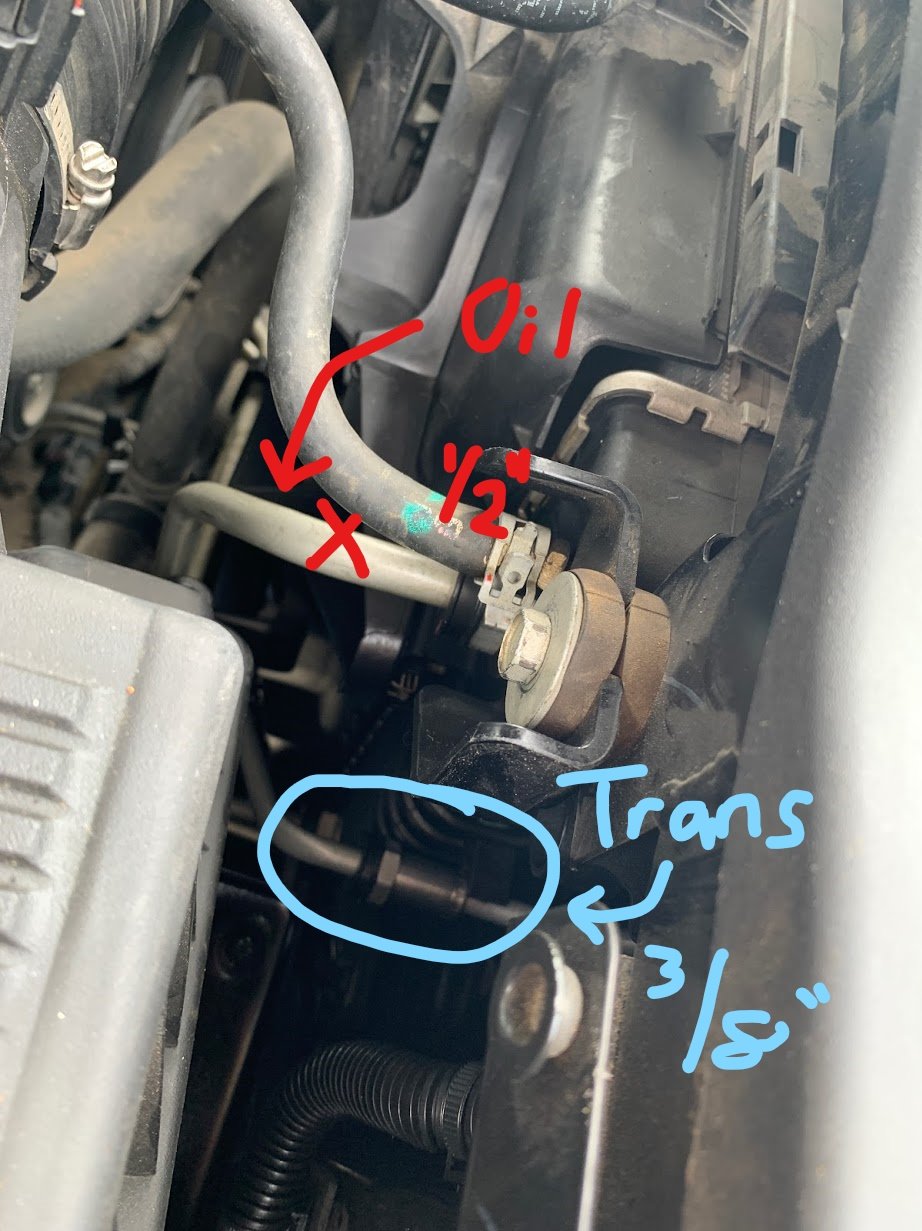
Fixing the Chevy Shakes! Mobil 1 Synthetic LV ATF HP 124715 \ My 2016 Silverado with 82,000 miles has had the shaking issue for a couple years or the 30,000-40,000 miles. This issue for me occurs around the 70 mph-80 mph range. The center console would shake so bad that I would have to dial back the speed to below 72 mph. Measures I have taken to resolve the “Chevy Shakes” None of these worked. 1) Re-balance old tires Free 2) Purchased new tires $1,200 3) Alignment $84 4) Re-balance Drive Line $160 5) Road-master Shock Absorbed $500 (This did help some of the shake mostly the handling and ride) Fixed the issue!! 1) Transmission flush with the correct transmission fluid $200 (Which does not come in transmission from factory) Mobil 1 Synthetic LV ATF HP 124715 I was able to flush the transmission myself. There are guides online that can walk you through it if you have the time and skill. Here is a Link: 4L60E Transmission Flush Guide https://www.newgmparts.com/4l60e-transmission-flush-guide Took me 4 hours and I was able to flush transmission and change motor oil as well. The dealership wanted $140 for diagnostic and $750 for flush. Since the transmission was my last hope. I purchased the fluid from Summit Racing for $160 and flushed it myself. Amateur tips: If you decide to do the flush yourself, do not pull ½” line on the cooler or the top one You’ll being changing your motor oil too! Do not ask me how I know this. A quick overview of how I flushed my transmission. 1) Pulled 3/8” transmission line out the cooler on the passenger side. I did the by pulling the black keeper down and removing the E-Retaining clip. I then pushed a 3/8” hose in the cooler and a 3/8” hose over the trans line and fastened them into a 4-quart bucket. a. If you are doing this by yourself make sure to be careful. If the hoses are not fastened or held down into the bucket, you could make a big mess. 2) You or your helper (Preferably a helper) turn the vehicle on. Fluid came out of the transmission hose and not out of the cooler. I am not a mechanic but, in some videos, I watched, I have seen fluid pushed out of the cooler. There is a lot of pressure from the pump in the transmission, if a hose pops off, you are going to want someone to turn the vehicle off. 3) With both hoses placed inside a bucket with measurements on it, have your helped turn the vehicle over until there are four quarts or you start seeing bubbles. Kill the truck and do your pan drop. a. Pan drop pro tip. The pan is extremely difficult to get out because the exhaust is right under the pan. If you place a jack on a board and a strap under the board rapped around the exhaust. Pump the jack up to the frame and tighten down on the strap, slightly pulling the exhaust down (1/4”-1/2”). It does not take much. b. Second pro tip. Purchase a handheld pump from the part store or Walmart. They range from $7-$20. Use it to pump the fluid out of the pan when drop. It will prevent you from making one big mess and covering you and the floor with transmission fluid. Trust me, its worth it! 4) Pull the pan and clean it. The gasket is reusable. You can purchase just a filter from the part store for less than $40 or both for less than $50. 5) Tighten bolts in a cross pattern and re fill transmission with either 8 quarts or however much you were able to get out. I measured exactly 4 quarts in the pan. 6) Once its filled, have your partner drain another 4.5-5 quarts out while shifting through P,N, and Drive. This way you get out as much as you can in the transmission. The fluid should be clean and pink. 7) Fill the transmission back up with however many quarts you pull out MINUS ONE!. This way you can put one or two bottles of Lucas Transmission Non-Slip. This is also supposed to help with the shuddering issue and allowing your seals to swell. This is to prevent leaks. a. I was able to put two bottles in. ? Do not add Lucas additive until the transmission is at operating temperature. You will need to fasten the trans line back to the cooler making sure the E Clip is fastened securely. 9) The transmission should hold somewhere around 12.5 quarts. I purchased 14 from summit to make sure I had enough to flush out the old (Fluid comes out clean and pink) 10) DO NOT OVER FILL TRANSMISSION. Watch tons of YouTube until you are comfortable. Add a half a quart at a time and allow it to run down the tube (where the dipstick goes, 10-15 minutes) before you check it again. If anyone would like to reach out to me regarding this issue, feel free. Fluid: https://www.summitracing.com/parts/mob-124715-1 Here is a helpful link provided by Chevrolet giving details on the issue. https://gm-techlink.com/?p=11127