

Old School Mechanic
-
Posts
36 -
Joined
-
Last visited
Content Type
Profiles
Forums
Gallery
Events
Articles
RPO
Store
Blogs
Everything posted by Old School Mechanic
-
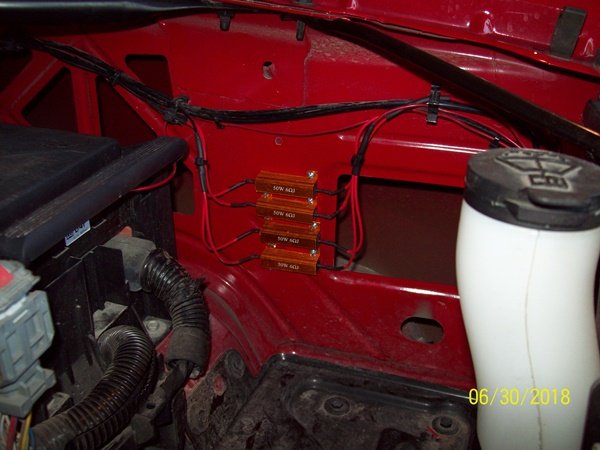
 First, both black wires are ground, but don't wire it there at the socket, there should be another connector that runs both sockets per corner, that is a lot easier to get to. In the front they are on each side of the fans. In the rear there is a junction block above the spare tire on the left side. Use a test light to determine which wire is the turn, the other will be your parking light. Hook your test light ground to any clean non painted metal then probe your wire, like I see you have done. Turn your lights on and the test light should come on and stay on with parking and will flash for the turn. Your resistors can be hooked up from either end into the power wire, can't mess that up. You only need to splice into one wire, but you will have to use two resistors (you have two turn signals in each corner, right?) Hook two wires from one end of the resistors together and splice into the power wire. Hook the other two ends together and I would run them to a good ground, you need to mount those resistors because they will get hot, don't just wrap them with tape to something that will melt or let them dangle. Don't use those scotch locks...they will cause trouble in the long run, make a good solder joint. So here's what I did. One end of the resistor has to go to power, the other end goes to ground. It does not matter which end goes where... On the front, I ran two resistors in parallel, two wires down to one and spliced into the 6 pin connectors on each side of the shroud. One wire spliced into the turn signal power wire. The other ends of the 2 resistors, I did the same way, 2 wires into 1, and ran that wire to the body ground located on the firewall. Works great. Mounted my resistors on the inner fender, easy to get to. (See pics below) I tried to use just one resistor, no go, still hyper flash, you have to use two. I didn't try to wire them in series, since I found wiring in parallel works. I found that you really only need one wire going to the connector, the hot side of the turn signal, and the other end of the resistor can be grounded anywhere that is ground, even if you have to make the wire longer to get there. You don't have to wire the ground to the ground wire at the 6 pin connector going to the bulb is what I'm saying. You can, but you don't have to, make it easy on yourself. One splice for each corner instead of four. On my 2015 Front left turn 6 pin connector X110 wire was BU/WH Front right turn 6 pin connector X120 wire was GN/VT ---Check the wiring diagram for your truck ! The right side connector is a pain, you have to remove the air filter box to get to it, and also to replace the bulbs. On both sides you can get to the bulbs through a small opening on the inner fender. Two resistors for each side, just ran a wire to the right side and spliced into the 6 pin connector over there. Run the other end of the resistors to the stud. The same thing can be done for the rear turn signals with two bulbs on each side...there is a junction block just to the left of the spare tire, one wire one splice, then just find a good ground. Both wires for rear turn lights were D-GN but in different connectors. Rear left turn junction block X63A connector X2 Rear right turn junction block X63A connector X3 ---Check the wiring diagram for your truck ! To get to the rear turn signal bulbs and back up light, you must remove the tail light housing. With the tail gate down you will see 2 screws to remove, then carefully pull the housing straight back. There are clips on the very end that fit into holes in the bed, that I broke when removing the housing, that are replaceable... GM part # 22876572, good luck. Rear resistors mounted to reese hitch, single wire to junction box plug. Other end going to ground. TEST ALL THE BULBS BEFORE YOU INSTALL THEM BACK IN THE HOUSING. If they do not work take them out of the socket and turn 180 degrees and push back in to the socket and try again. Most LED's are polar. Resistors mounted front turn signals Here's a good ground under the hood Rear resistors mounted. I made my own "good ground" in the rear. I have some marker lights grounded there also. Hope this helps.
-
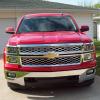
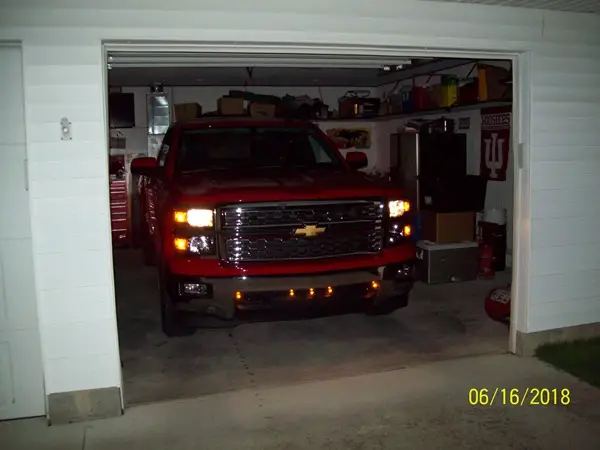
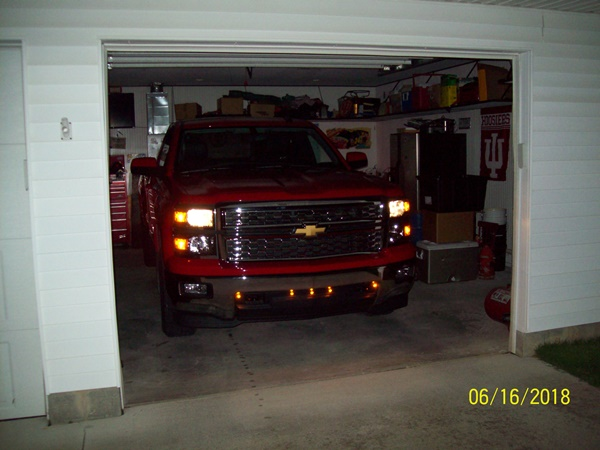
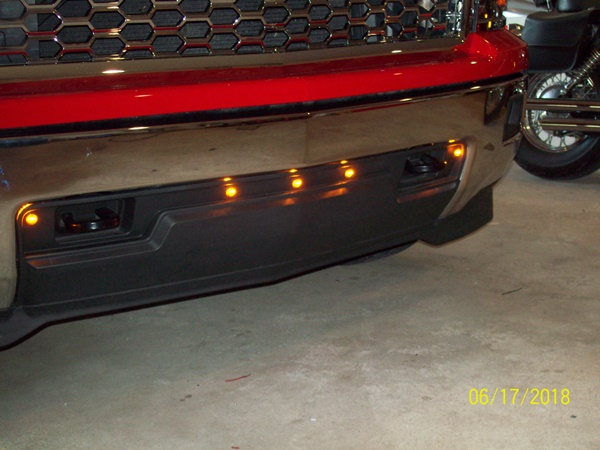
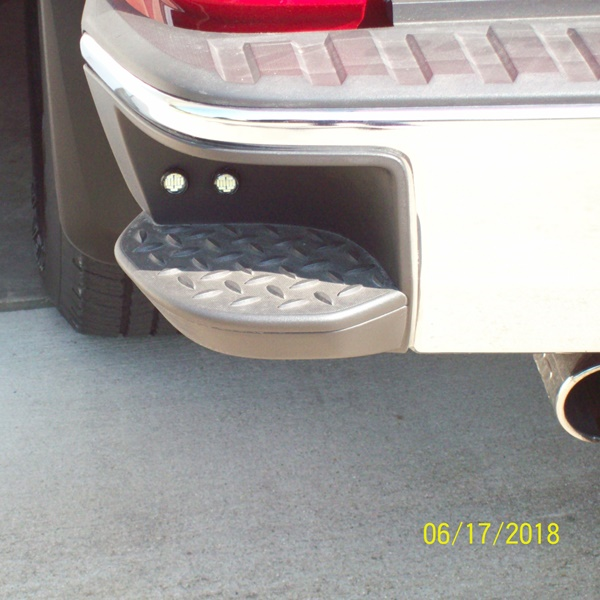
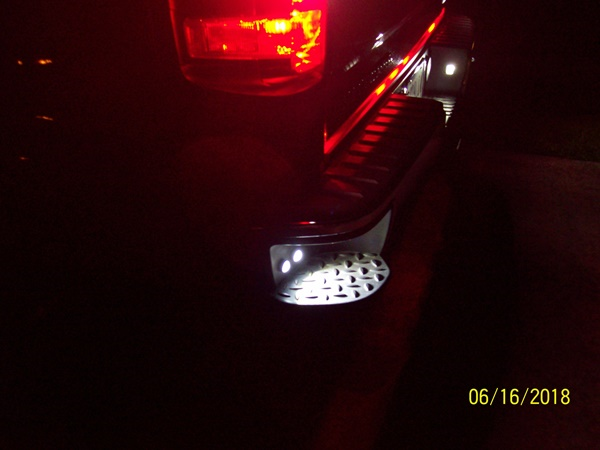
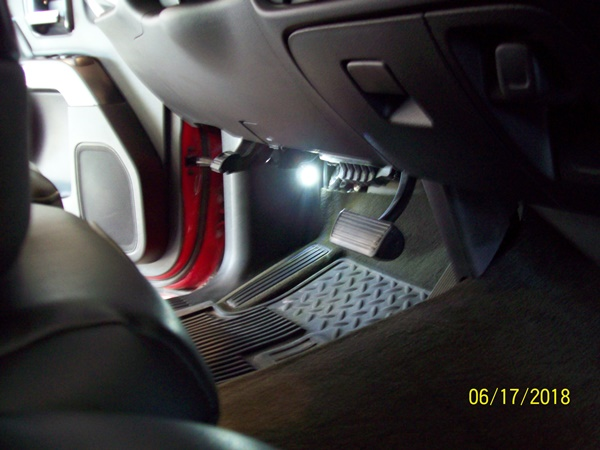
Yea, old fashioned pick-up. Did some light work to it over the weekend. Put on some marker lights and I too was about to cry when I was drilling holes in my truck Front Markers Put some led back up lights in the step, worked out well. I usually back into my garage, the regular bulb back ups just weren't bright enough. Did the back-up light / cargo light mod and put led's in, now I can light up the neighborhood. Of course I needed rear markers. And I thought what the hell, might as well put some on the inside too. I don't know why Chevy doesn't put some lights on the floor board ? Now inside lights up nice. These aren't the bright ones like I put on the rear step, I think these are 3watt and the ones on the step are 15 watt. At least that's what the package said.... Now I'm waiting on some resistors to arrive so I can put led's in the parking and turn signals.
-
Cargo Lights on with Reverse Lights
Old School Mechanic replied to El Conquistador's topic in Modifications & Accessories
Here's what I did. I wanted mine to work in both positions, come on in reverse and with the switch the back up lights would light. So all I needed was a wire that would fit and not fall out. It's a paper clip with a piece of shrink tube on it bent in a "U" so you can push it in there. Guys were having trouble with the diode because the wire is too thin, you only need about a half an inch of wire exposed. As far as it being dark out for them to come on with the fob...that's true...or you could just cover the light sensor in the middle of the dash. I put some bright led's in the step too.
-
RED TRUCK CLUB I like it. Nice rides guys/gals. Wow the old 86 brings back memories. Before computers took completely over. Had a 2008 short bed like Grumpy's, yes it was red, traded for this 2015, with a few more bells and whistles.
-
Mylink or 8" radio touch Screen.... QUIT!!!!!
Old School Mechanic replied to brendon444's topic in Troubleshooting & Recalls
Sorry you are having so much trouble with your Chevy.... My '15 Chevy Impala has had a radio problem ever since I bought it. Bought it used with Certified Warranty. Just really pissed me off...try to go somewhere and the damn radio doesn't work. It was delivered in 2014 and they were looking for a 2015 update, which there wasn't one, but there was one for 2014, which apparently my car didn't get for some reason. I'm a mechanic and used to be one of those kids in the dealership, (many moons ago) I asked the dealer to check for an update for 2014 because the rpo number on my Impala matched the one in the bulletin mentioned above, and that turned out to be the fix. (sometimes you gotta be just a little smarter than the car, and look a little deeper) My dealership down here treats me good...they want to make sure I'm happy.... I love my '15 Chevy truck. I haven't had a minutes worth of trouble with it. Just lucky I guess. If you must trade....I'd rather see you driving a Toyota than a Dodge or a Ford :lol Toyota's are made here in Indiana, just a few miles from here. Good luck! -
Mylink or 8" radio touch Screen.... QUIT!!!!!
Old School Mechanic replied to brendon444's topic in Troubleshooting & Recalls
If you have had this problem before it ran out of warranty and they looked at it but didn't fix it while still under warranty, you still should be able to get it fixed under warranty. All of the things you had done at the dealership is documented. This is a software update. According to my work order it took .5 hours to update. That's all you should have to pay for if it's not under warranty. They download it to usb and install it. All computer stuff....I agree with you though on the bull crap that has to be put up with, they should warrant this kind of thing longer. Good luck...hate to see you drive a Dodge , but a man's gotta do what a man's gotta do. -
Mylink or 8" radio touch Screen.... QUIT!!!!!
Old School Mechanic replied to brendon444's topic in Troubleshooting & Recalls
I think the boys at the dealer fixed my Impala, after I told them what to look for. Apparently there actually was an update for the radio. Document ID 4481927. Have had no problems for over a week now. Usually have at least 2-3 problems per week. -
Mylink or 8" radio touch Screen.... QUIT!!!!!
Old School Mechanic replied to brendon444's topic in Troubleshooting & Recalls
Hey Guys, Found this while I was looking up the same problem for my 2015 Impala. http://sandyblogs.com/techlink/?p=2872 Worth a shot.


-
Forum Statistics
250.4k
Total Topics2.7m
Total Posts -
Member Statistics
342,869
Total Members8,960
Most Online
-
Who's Online 9 Members, 0 Anonymous, 607 Guests (See full list)