Search the Community
Showing results for tags 'DRLs'.
Found 2 results
-
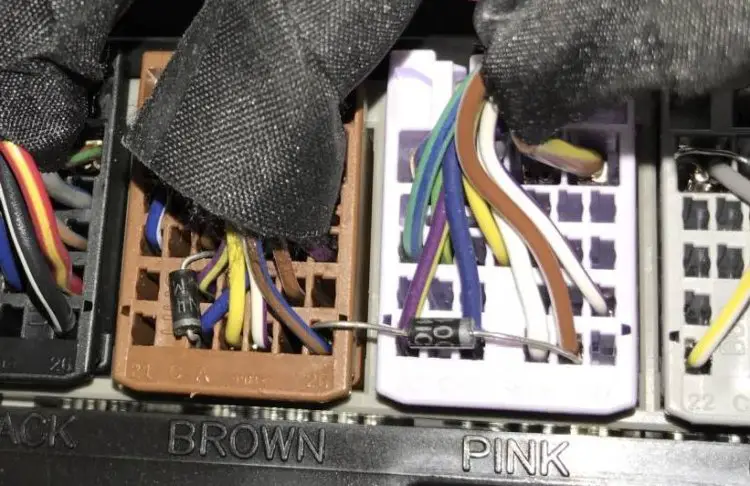
 2020 Sierra 1500 SLT After searching and reading through many threads without the specific answers I'm looking for, I'm hoping for some information and advice. I'd like to have 1 )the fog-lights come on with the parking lights, so the fog-lights are on all the time (even staying on with high beams if possible) 2) the Cargo Lamps illuminate when the truck is in Reverse. I'd like to know what plug/pin number to jump with the diode and what size diode/direction the diode goes (which way the stripe faces). Bonus points for photos (see below) I found this photo in a 2014 - 2018 GMC thread. The thread said the brown to pink is the cargo-reverse light mod and the brown to brown was the parking lights-fog lights mod. Are the plugs/wires/diode direction the same for the 2020? Is the 1Amp D1 diode the right one for these mods? Is the diode just pushed into the back of the plug, alongside the wire? I'd appreciate any help that can be provided. Please be sure to dumb it down for me and any other future searchers. I know I need all the help I can get!! Thank you for your time, DC
-
2020 Sierra 1500 SLT After searching and reading through many threads without the specific answers I'm looking for, I'm hoping for some advice and information. I'd like to have 1 )the fog-lights come on with the parking lights, so the fog-lights are on all the time (even staying on with high beams if possible) 2) the Cargo Lamps illuminate when the truck is in Reverse. I'd like to know what plug/pin number to jump with the diode and what size diode/direction the diode goes (which way the stripe faces). Bonus points for photos (see below) I found this photo in a 2014 - 2018 GMC thread. The thread said the brown to pink is the cargo-reverse light mod and the brown to brown was the parking lights-fog lights mod. Are the plugs/wires/diode direction the same for the 2020? Is the 1Amp D1 diode the right one for these mods? I'd appreciate any help that can be provided. Please be sure to dumb it down for me and any other future searchers. I know I need all the help I can get!! Thank you for your time, DC