

Jullian is not my name
-
Posts
72 -
Joined
-
Last visited
Jullian is not my name's Achievements
")
Enthusiast (3/11)
24
Reputation
-
Bilstein shocks thread
Jullian is not my name replied to yanzhixiang's topic in Modifications & Accessories
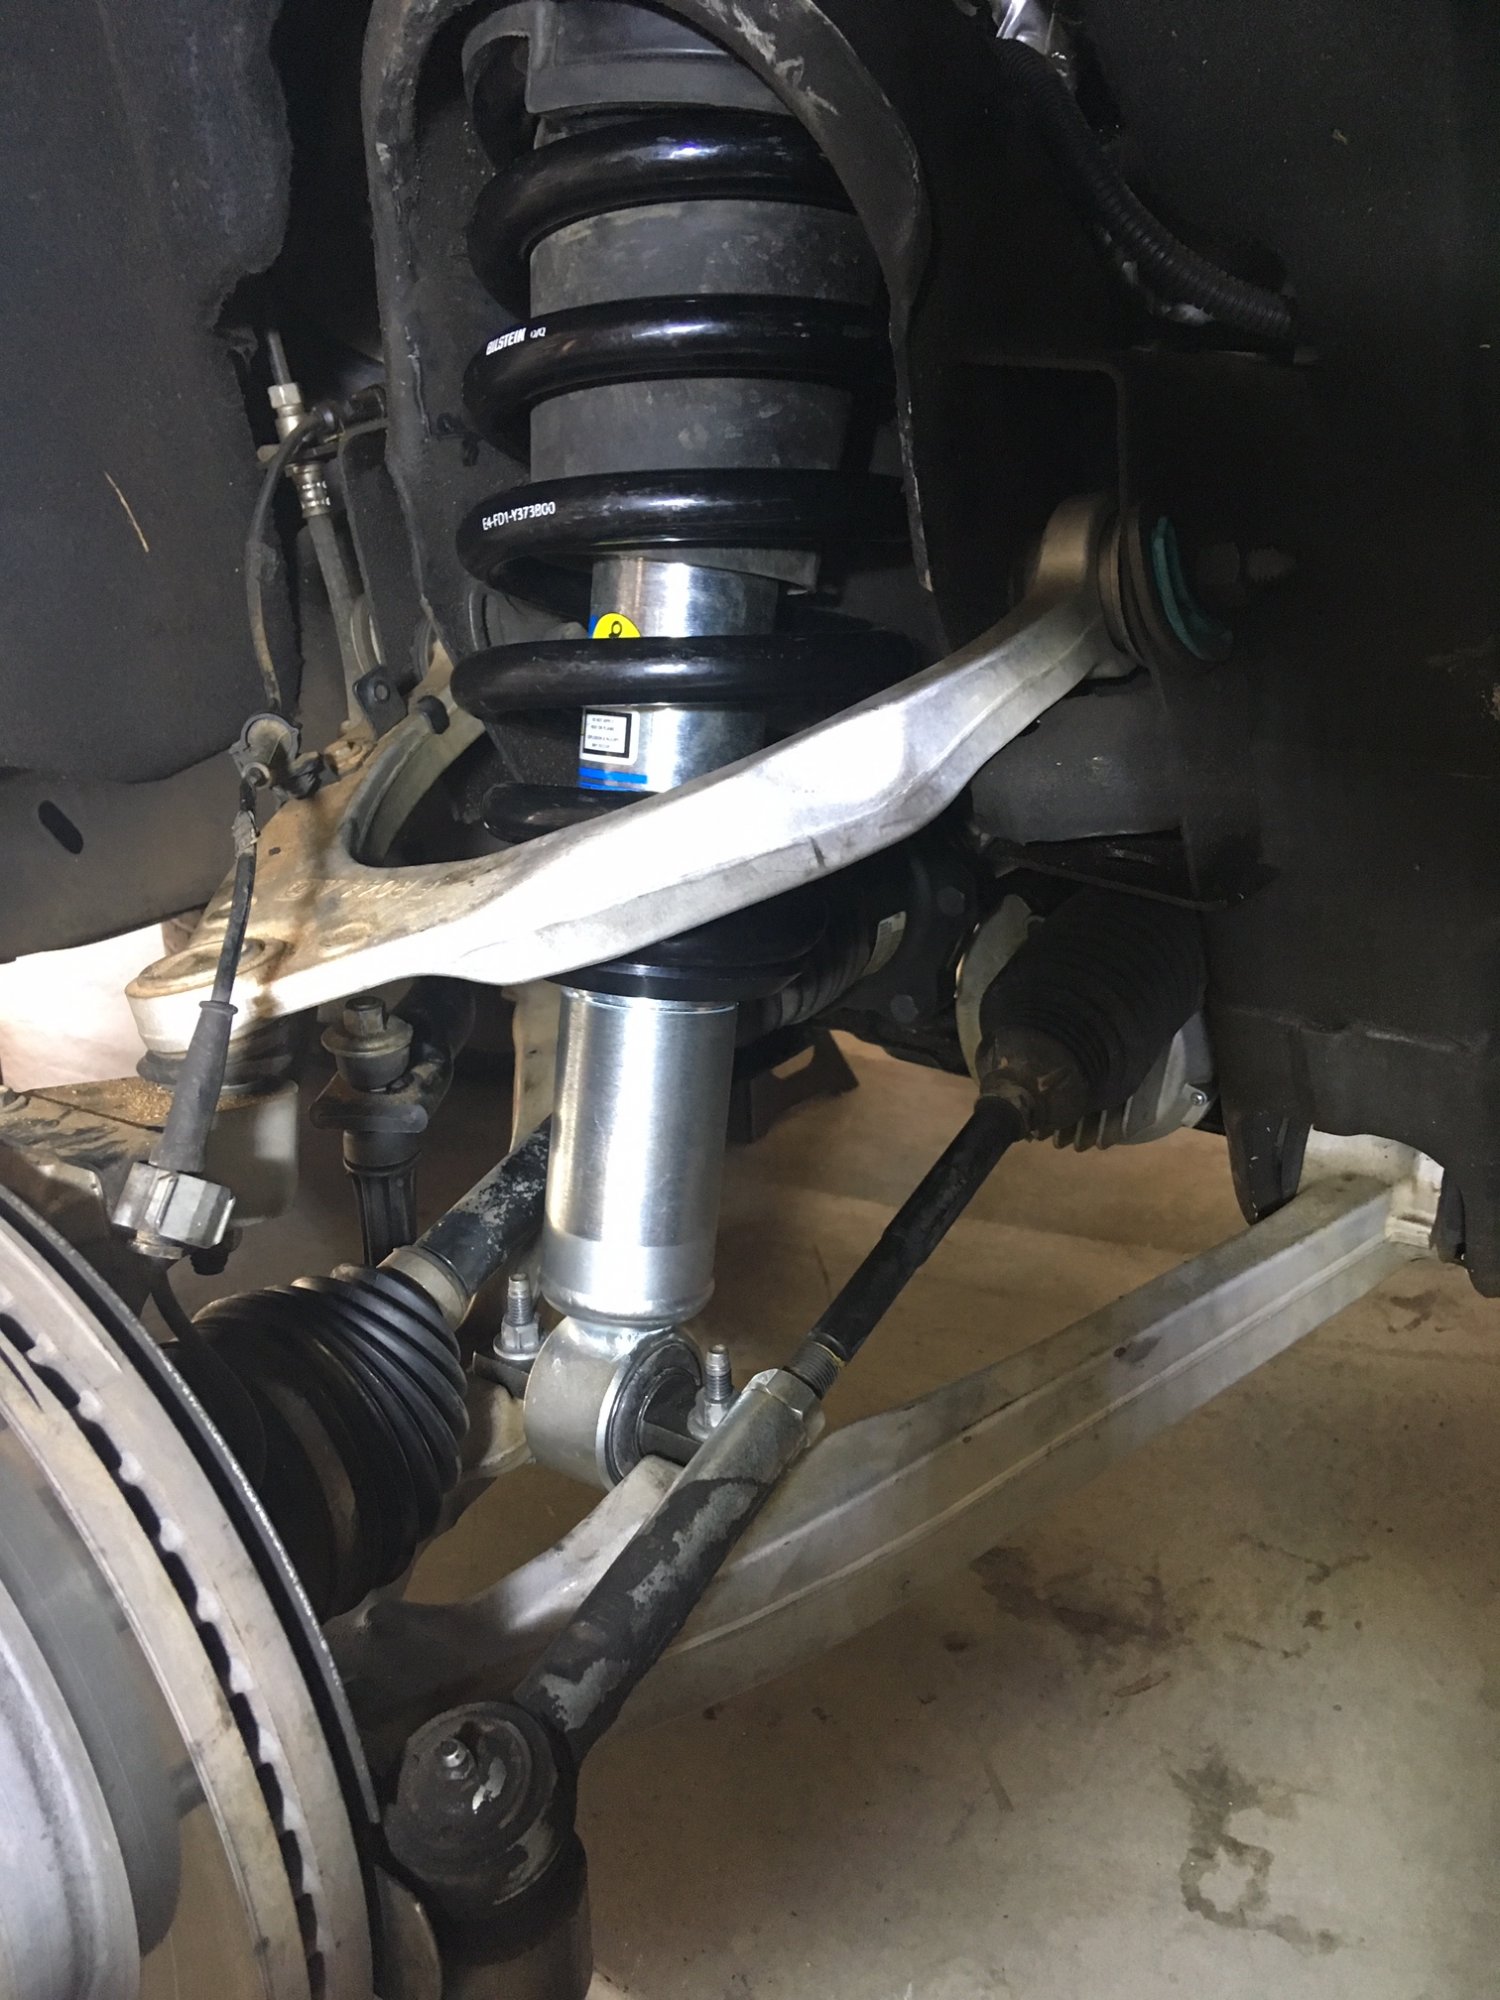
I just got done with installing my 6112's on my 2014 GMC Sierra Crew Cab. Reading some install guides on here really helped, along with printing some Chilton Repair guide torque specs that I got from my local library's online account. I think the hardest part was getting the new assembly into place, but using a pry bar to help lift the new unit up by the springs against the upper control arm, it eventually got into place and bolted on. I only lifted my truck 0.5" (1 rings space up from stock height). So far I've only driven around my neighborhood, about 1 mile. No problems at all so far. I hit a few bumps that would normally give me a bouncy rebound, and the recovery now is more plush and controlled. I'll have to spend some more time with it and give a follow up. But so far so good. Took just over 3 hours to complete the install too with 2 sets of hands working. Edit Updated +1 day: After driving for about 15 miles now, the comparison to stock is a huge improvement in ride over any condition. I am surprised that its not just how much better speed bumps feel (which is night and day different), its even freeway driving and smooth dips at 70mph where stock felt like you rebound too high/fast and loose adherence to the road, and now its more controlled. I can't wait see what the difference feels like on bumpy dirt roads where I would be tossed around before.
-
Bilstein shocks thread
Jullian is not my name replied to yanzhixiang's topic in Modifications & Accessories
Just wanted to post that I received my Bilstein 6112's from Battle Born Offroad yesterday afternoon (drop shipped direct by UPS from Bilstein). i didn't have any tracking info, so it was a nice surprise. Ordered them around March 29th. I'm hoping to do the install this weekend if I can find the time and I'll post my impressions. They look crazy stout, can't wait to feel them in action! -
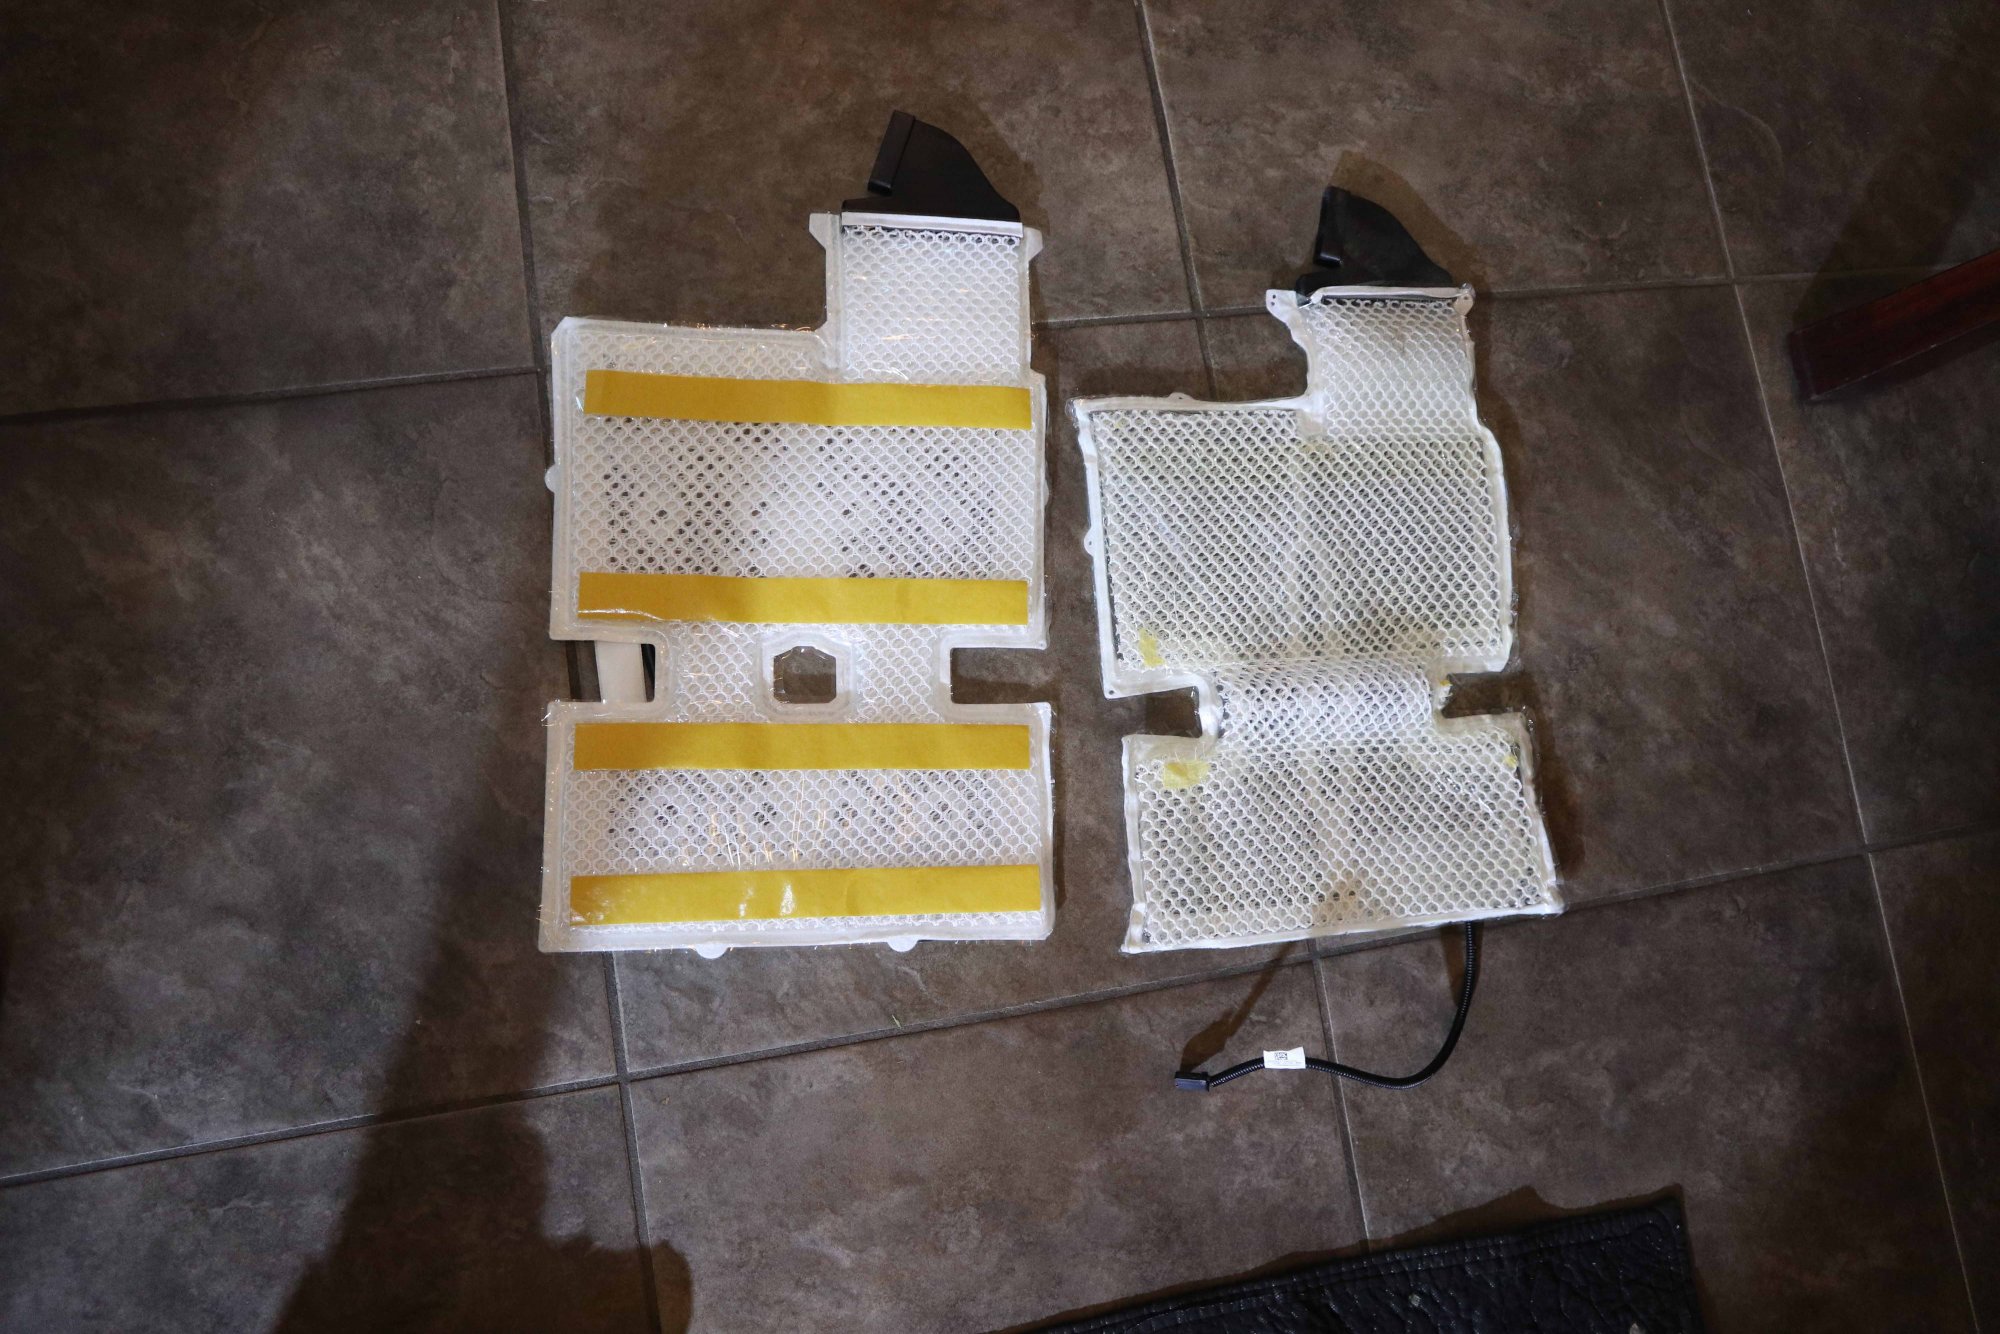
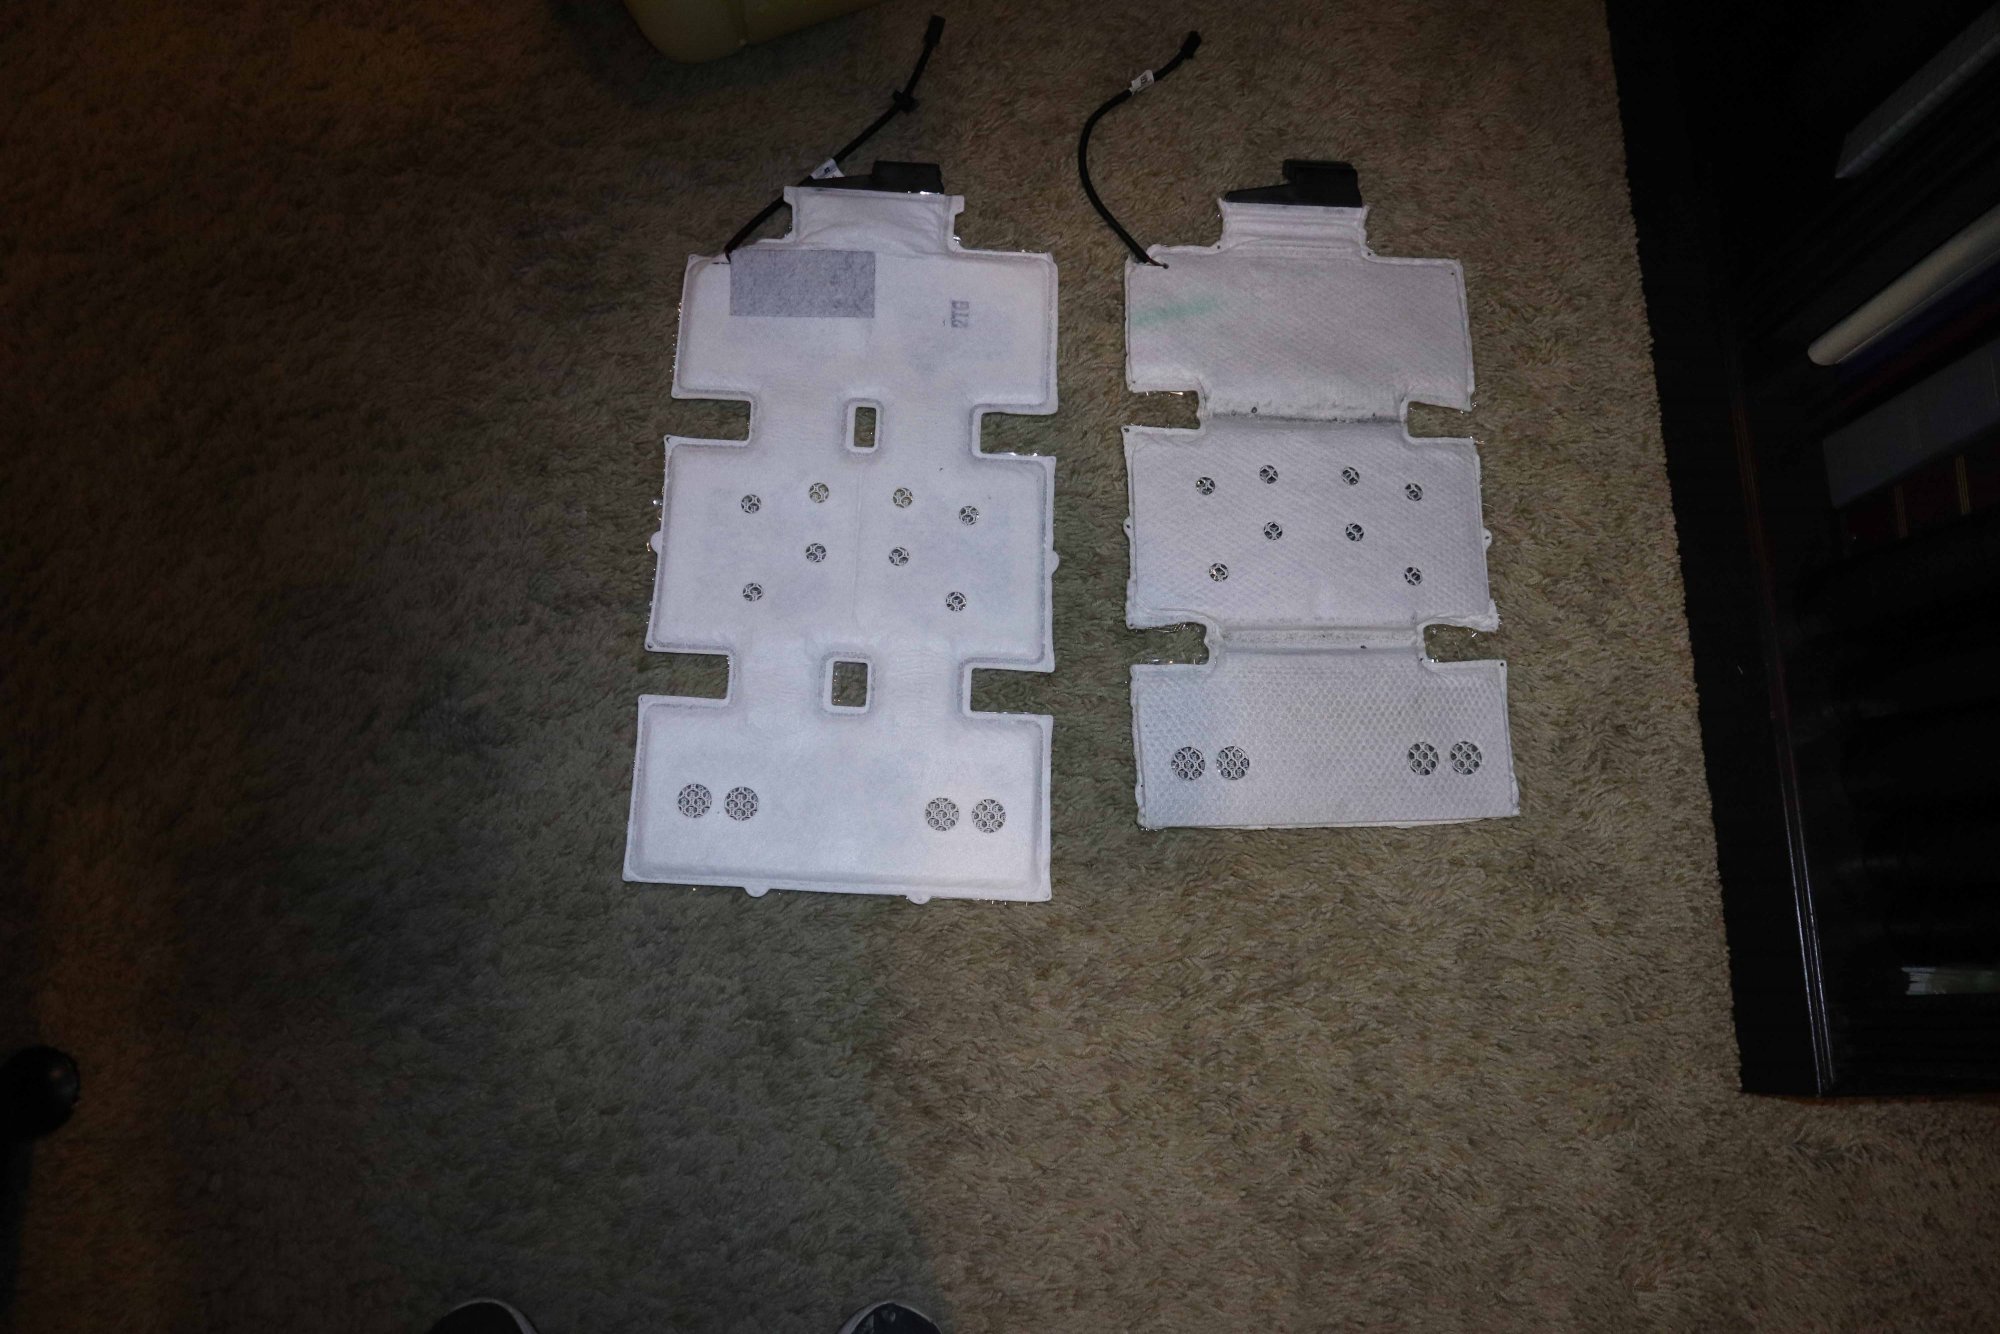
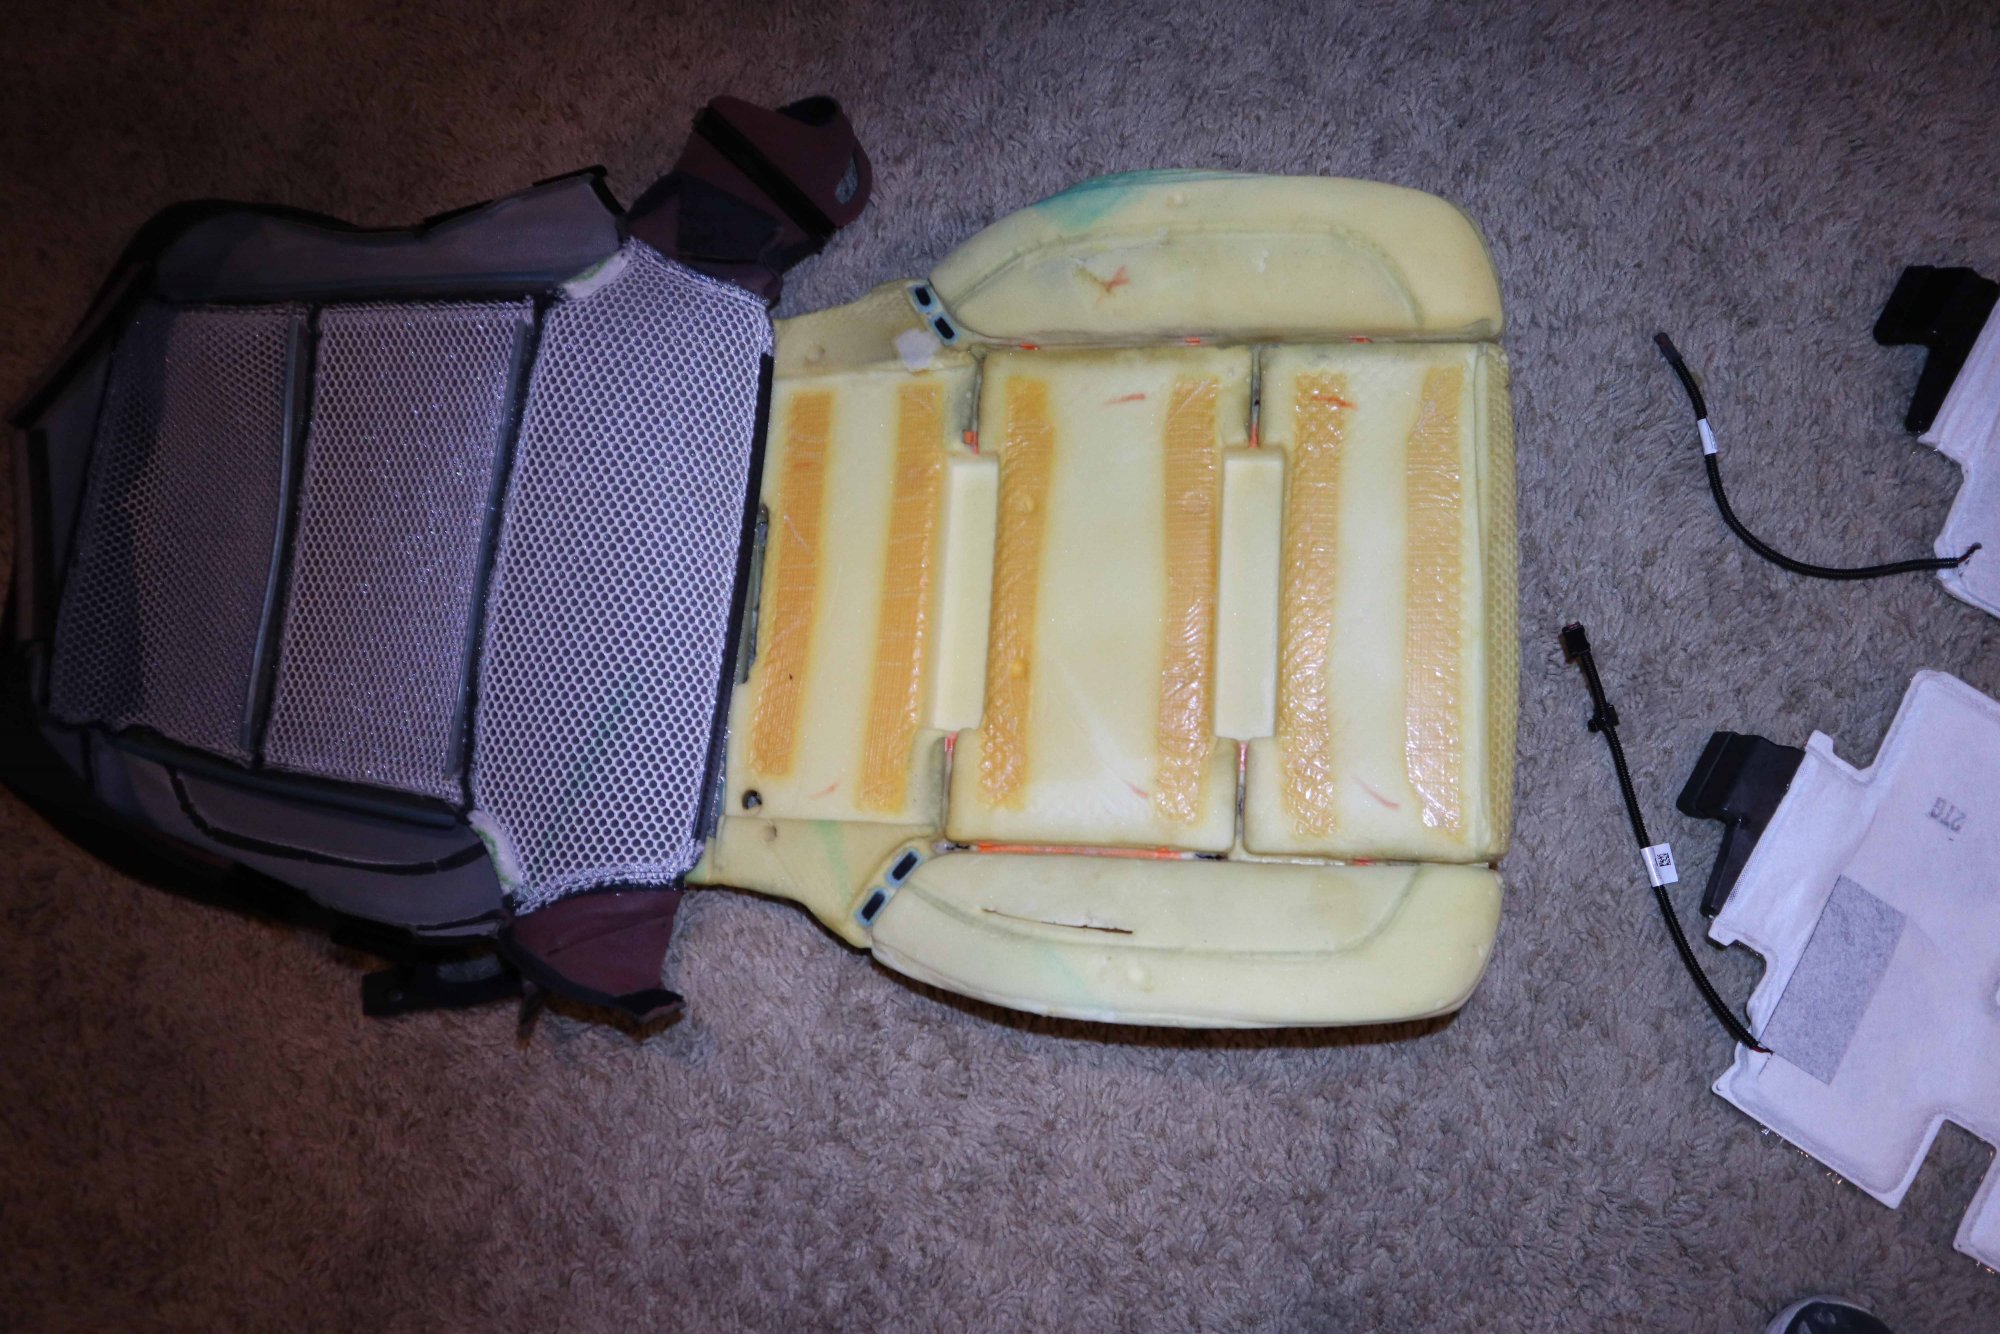
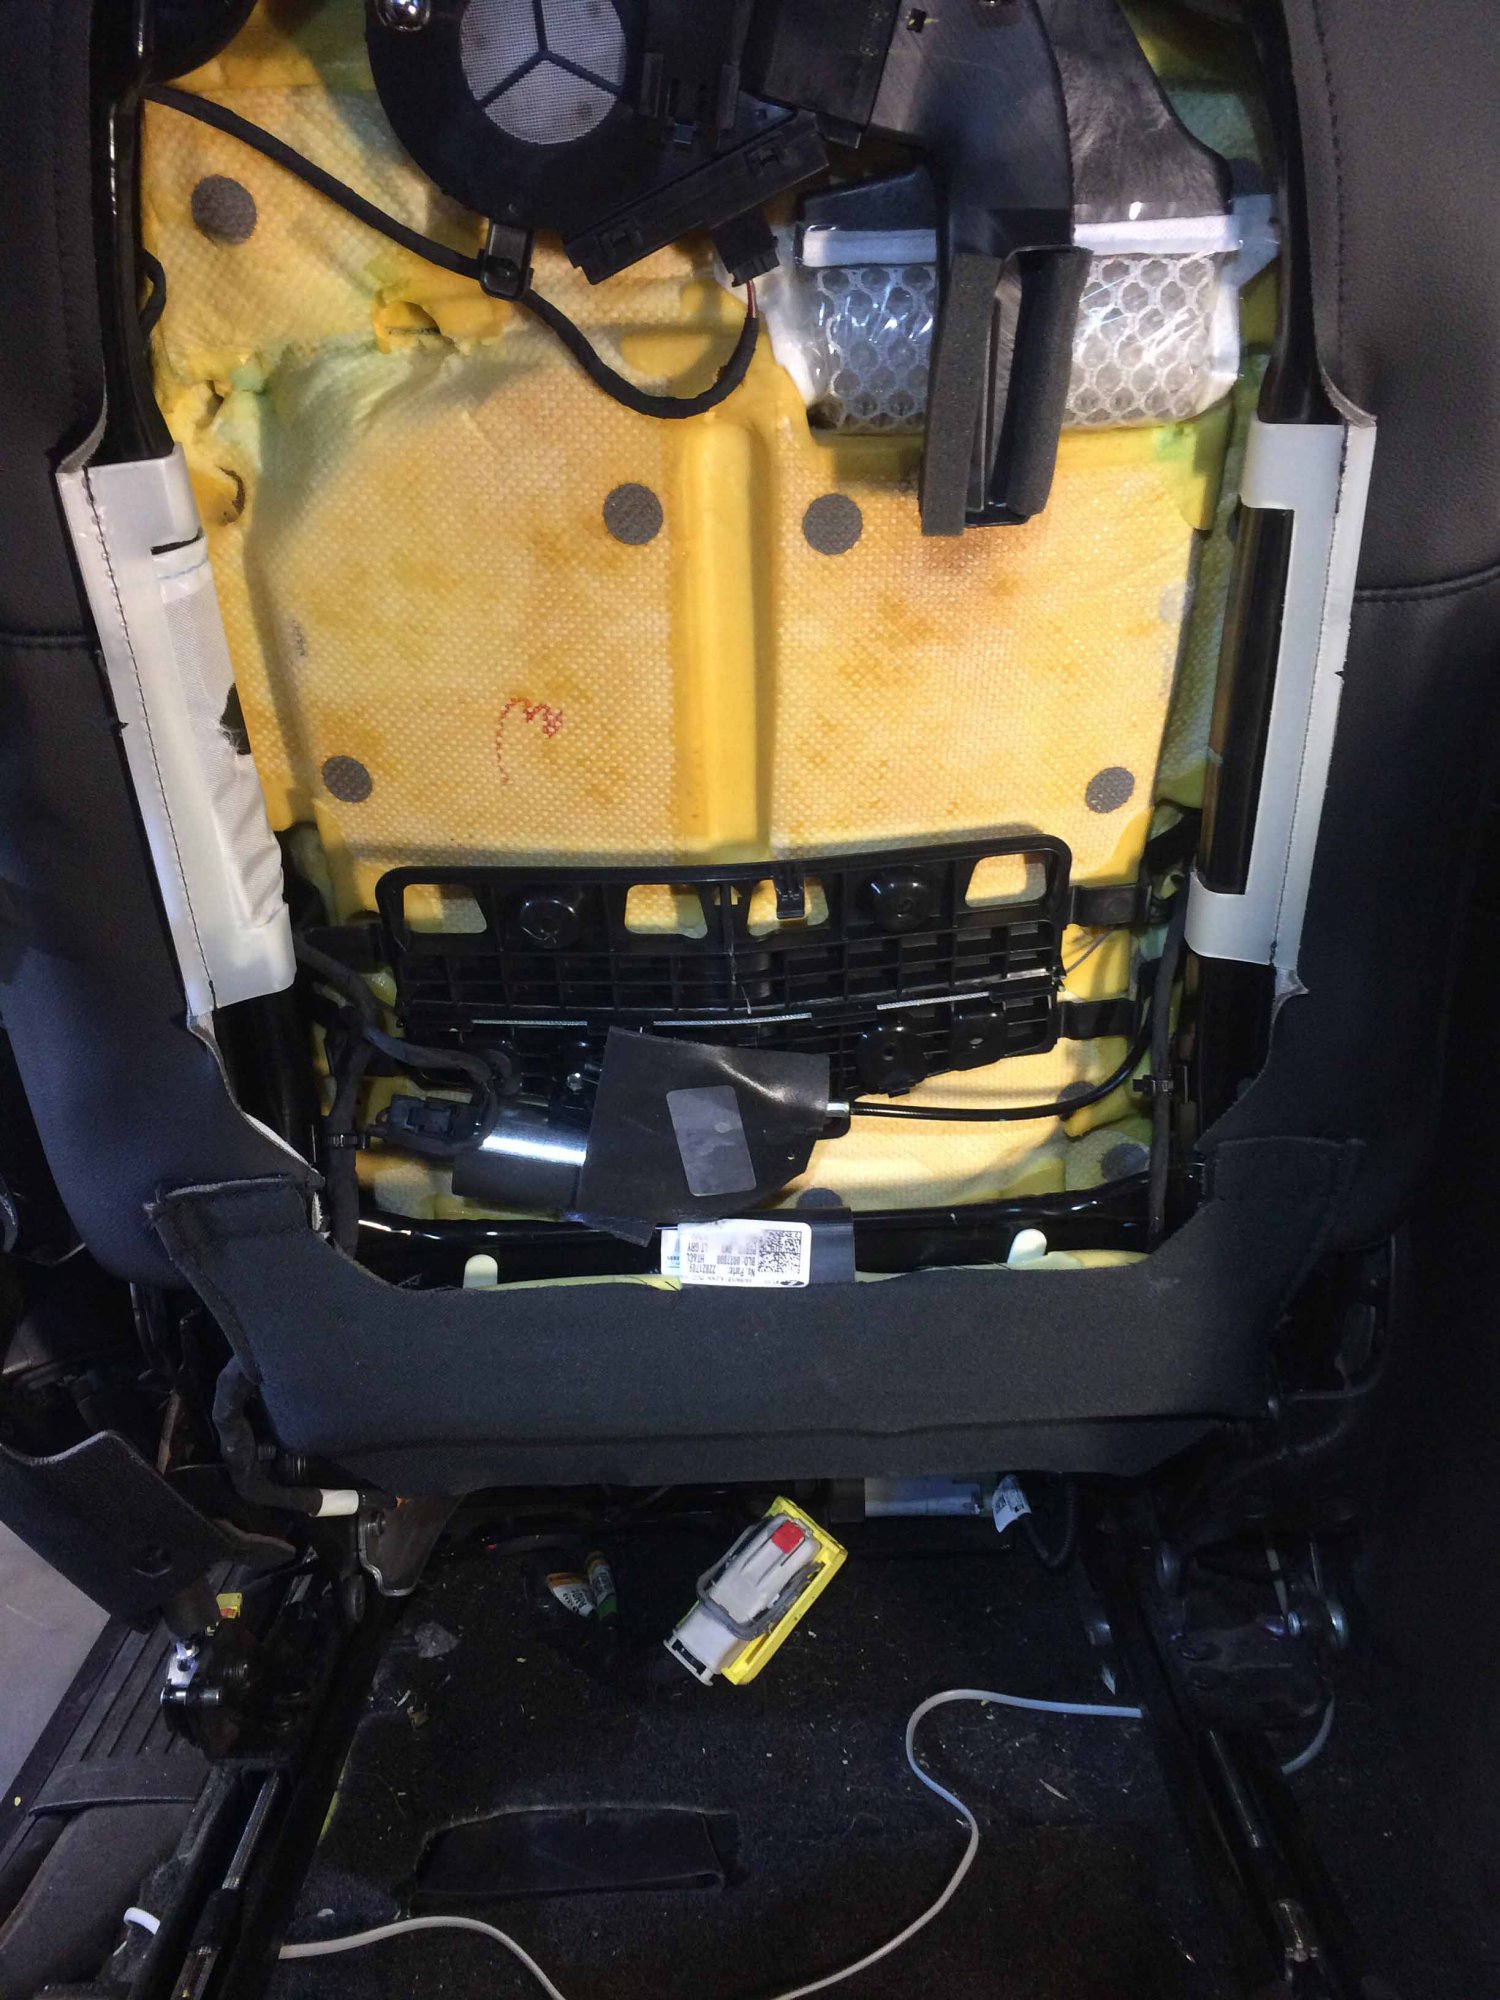
(Pictures) Driver's Seat with trim coming off Rear of Driver's Seat with back pannel removed Seat getting worked on Seat Bottom with foam exposed and upholster folded back out of the way and old heating pads removed. The splines fit into the channels in the foam and you can barely see the orange pinch clips. The 6 orange stripes are from the old adhesive. New seat back pad on left, old on right. This is the cooling layer facing up. New seat cushion pad on left, old on right. This is the heating pad layer facing up.
-
(Step 2 continue) You can now tilt the seat forward so it lifts out of the front slots, and then out of the truck, just be careful not to scratch your paint or interior with the seat rails. With the seat out, it was pretty straight forward what needed to be removed. I just started unclipping all the upholstery clips around the seat frame, unplugged the pigtails coming off the seat heater elements, and pulled the 2 haptic vibration motors out of the seat cushion. The real challenge came when rolling the upholstery up and off the seat back. The seat leather/vinyl material is held to the contours of the seat by these long blue plastic splines that are sewn into the seat material. These splines are clipped into the seat foam by orange pinch clips that are embedded and glued into the foam. There's probably about 10 on the seat back that have to be unclipped. I watched some YouTube videos on older trucks, and it was exactly the same process for mine. You just have to carefully use your hand or a pry tool to unclip the spline. I ended up breaking 2 of the clips, but when I was finished, it really made no difference to the appearance or feel of the seat. For the seat back, I only folded the leather up high enough to get the heating pad off. For the seat bottom, it was very easy to just remove the upholstery entirely. The easy part was replacing the heating pads themselves. The old ones came off with no problem, there is some adhesive that is used to hold them in place, but it won’t rip any of the foam when you remove the old pads. The pads have a connection to the cooling blower vents integrated into them, and removing the old connection took some force and prying, but they eventually came off. The new pads come with the adhesive backing covered by some wax paper. So now everything just goes back on in reverse. Again, dealing with upholstery splines and trying to pop them into their clips in the foam was the biggest pain, but nothing too complicated. Everything else was easy from there on. The clips that hold the upholstery to the seat frame are rugged and easy to deal with. Also, I was a little worried about dealing with the air bag in the seat, but it was a non-event. You don't mess with it or any clips for it and hardly even see it. The good news is that my seat heaters are working great. It costs $177 shipped to get the 2 pads, and it really wasn’t too much work to get it done. If it wasn’t for the pinch clips and splines making things difficult, it would have been even easier. So just watch some leather seat or katzkin replacement videos, but again, overall it wasn’t a big deal to do. In all, the things I’d suggest needing to complete this are a multi-meter and back probe kit for diagnostic, a T50, T15, and Philips screwdriver, some blue Loctite, and a breaker bar helps a lot when loosening the seat bolts. Thanks to this forum for helping get this taken care of!
-
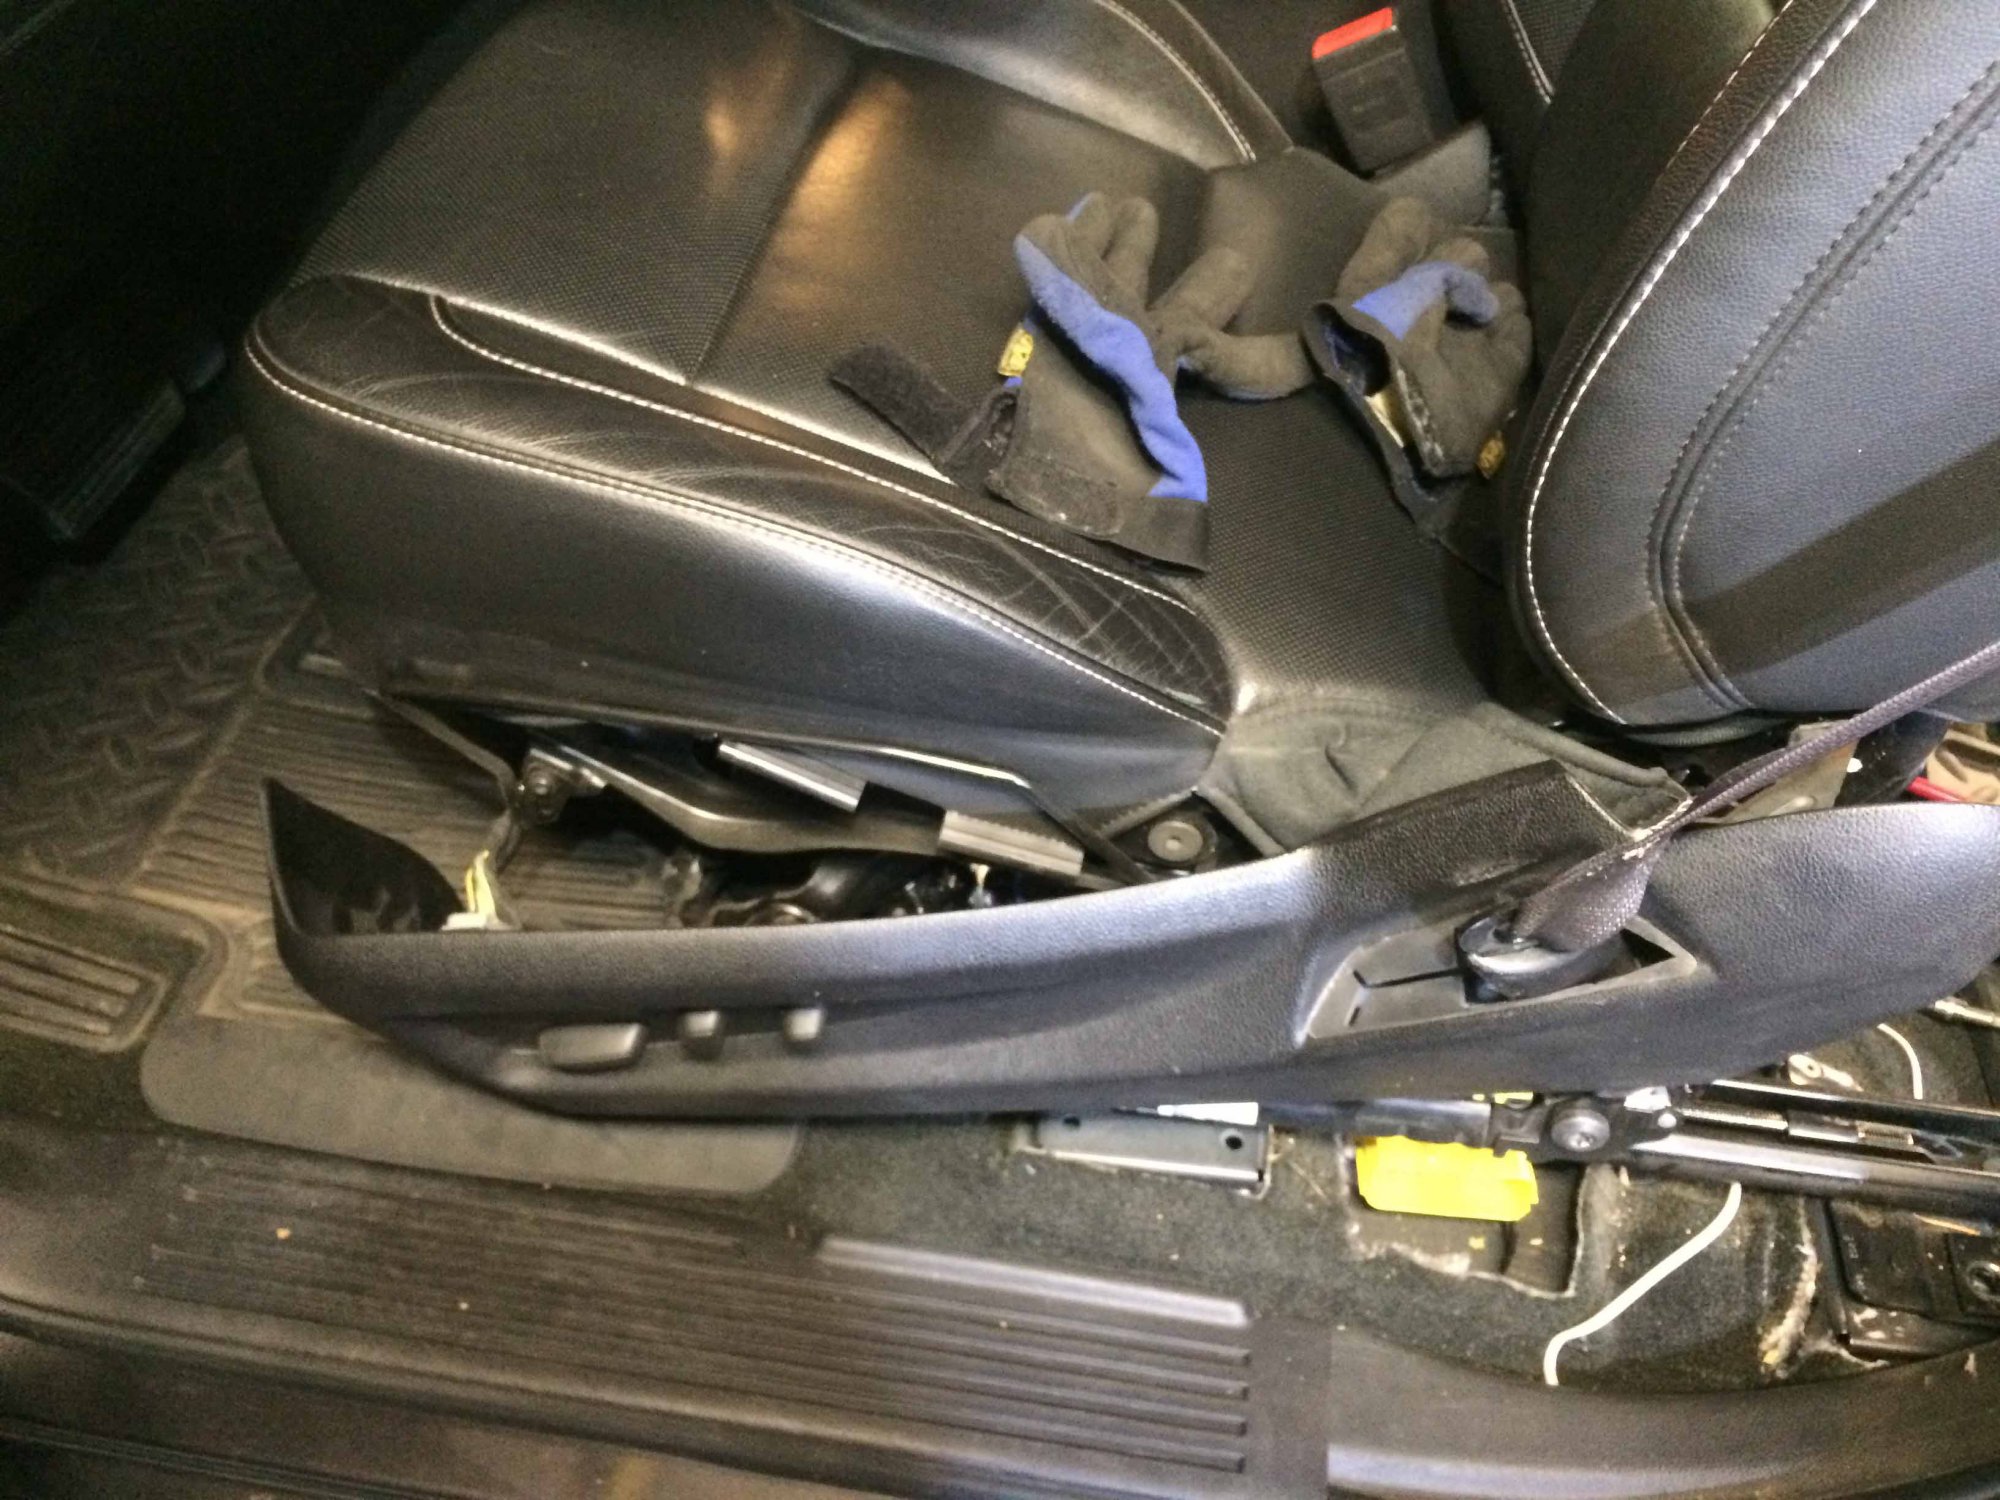
I finished replacing the seat heater elements on my driver seat over the weekend and wanted to post a bit of the process to replace them. It took me less than 3 hours, including a break for dinner. In my post under the topic Heated seats not working, page 14 I posted about my troubleshooting using PIT543A (Diagnostic Tips – Front Heated Seats). In brief, I went through the troubleshooting steps and identified the problem as both of my heating elements that were impeding with too much resistance to function. I have a 2014 Crew Cab SLT with Heated and Cooled seats and the safety seat vibrator. The part numbers I ordered were 23170194 and 23223775. They were perfect replacements, and I could also tell that there were some minor updates I could see from my originals. Hopefully GM has fixed the garbage heaters that were installed originally and this time they’ll last a lot longer. The heating pads have the cooling layer built-in to allow the seat venting to blow through the seat. The heating element is covered by a felt material that sits right against the leather. Under that is the layer for the ventilation material, which feels a lot like bubble wrap and allows the air to flow out through nickel sized holes spaced around the heating pad layer. So contrary to some reports from dealers trying to explain poor performance, the heating element is directly against the leather… the venting layer is thus under the heating layer. On to the actual work. The first step to the repair was removing the seat. Take the headrest off, it'll be easier to if you just get it out of the way right away. Removing the rigid seat back is easy, and you can follow PI1091 for more info on that. There are only 2 T50 bolts holding the seat in place. Remove the plastic trim covering the seat tracks, and move the seat forward enough to get access to the bolts at the rear of the tracks. With the trim removed, you can break the bolts loose and remove them. I read this next tip online, but disconnect the negative battery lead before removing the big yellow and grey wire connector that you can now see with the trim removed. That way you avoid potentially, yet unlikely, causing an air bag light to come on in your dash that your dealer would have to reset. Slide the red safety tab back on the connector, then rotate the grey latch to disengage the connector. This is the only connector going between the seat itself and the vehicle body. At this point I took off all the seat trim I could get to. The trim piece with the power seat controls has a hidden philips screw that is on the lower front of the seat that you have to get to from behind the trim. Otherwise, all the other trim has visible screws. Next, remove the seat belt anchor (another T50 bolt). You'll have to take off another piece of seat trim covering the pretensioner assembly, and disconnect a wire that runs to the seat belt pretensioner trigger. The pretensioner wire comes off by first prying up on the red safety tab, and then it just lifts straight off.
-
Letter - Cycling Thermostat
Jullian is not my name replied to gmcleer's topic in 2014-2018 Silverado 1500 & Sierra 1500
I just discovered that I have a leak in my radiator as well. I'm at 55k miles on my 2014 Sierra CC, built in Mexico. When the dealer told me I had a small leak, I found this post and called him back. Of course he says that my vehicle does not fall under the TSB. There is no way he is willing to do the repair for me under warranty unfortunately. I also talked with GM customer service, and they simply say that I need to talk to the service center to find out if my vehicle is covered. It is frustrating how much discretion the service center has to complete a repair and cover it under warranty or not. Anyway, I'm planning on having the repair done elsewhere and save a lot of money not going to the dealer. Does anyone know for sure if doing so would exclude me from a reimbursement offer if this ever expands to the Mexico built pickups? (edit to answer my own question). I was told by my service advisor that if I do have the repair done by a non-GM repair center and GM decides in the future to expand the reimbursement to cover my vehicle, that I would be eligible for reimbursement up to the amount that I would have been billed by GM had they done the repair. -
Adjustable Pedals not working
Jullian is not my name replied to Mpulse2k6's topic in 2014-2018 Silverado 1500 & Sierra 1500
So yes, confirmed with the service advisor, the power seat module would have to be programed by the dealer. Their charge is $145. I think I'm going to hold off since the total cost of $250 (assuming I can get to it without taking out the seat) is probably more than it's worth fixing a feature I almost never use. -
Adjustable Pedals not working
Jullian is not my name replied to Mpulse2k6's topic in 2014-2018 Silverado 1500 & Sierra 1500
I took my truck to the dealer to get my adjustable pedals (and something unrelated) checked out. I was told that the power seat control module located under the driver's seat was bad. He specifically said the technician found that there was power going into the module from the switch, but none coming out for the wires going to the motor (as described by myself and others above). He quoted me $728 for the repair, so I said no thank you. I asked for the part number, and he said it was 23338340. I can buy the part for about $100. I think i can swap the module without having to remove the seat (which is a HUGE pain to remove from what I see), so I'm planning on replacing the module myself. The one problem I foresee is that I worry that this module has to be programed or flashed by the dealer to the specific application that it will be installed in. Does anyone know if that is true? I'll update on here if I learn anything while I research this. -
Adjustable Pedals not working
Jullian is not my name replied to Mpulse2k6's topic in 2014-2018 Silverado 1500 & Sierra 1500
Did anyone find a solution from the dealer for this problem with the power adjustable pedals? My 2014 has been intermittently suffering from this too and has gotten worse to where it hasn't budged in quite a while. I toggle the switch and can hear a rely located under the driver's seat clicking, but no movement from the pedals. The underside of the dash is so strewn with cables and connections I'm not sure I'll be able to follow them to check and clean connections, but that'll be my little project this weekend. -
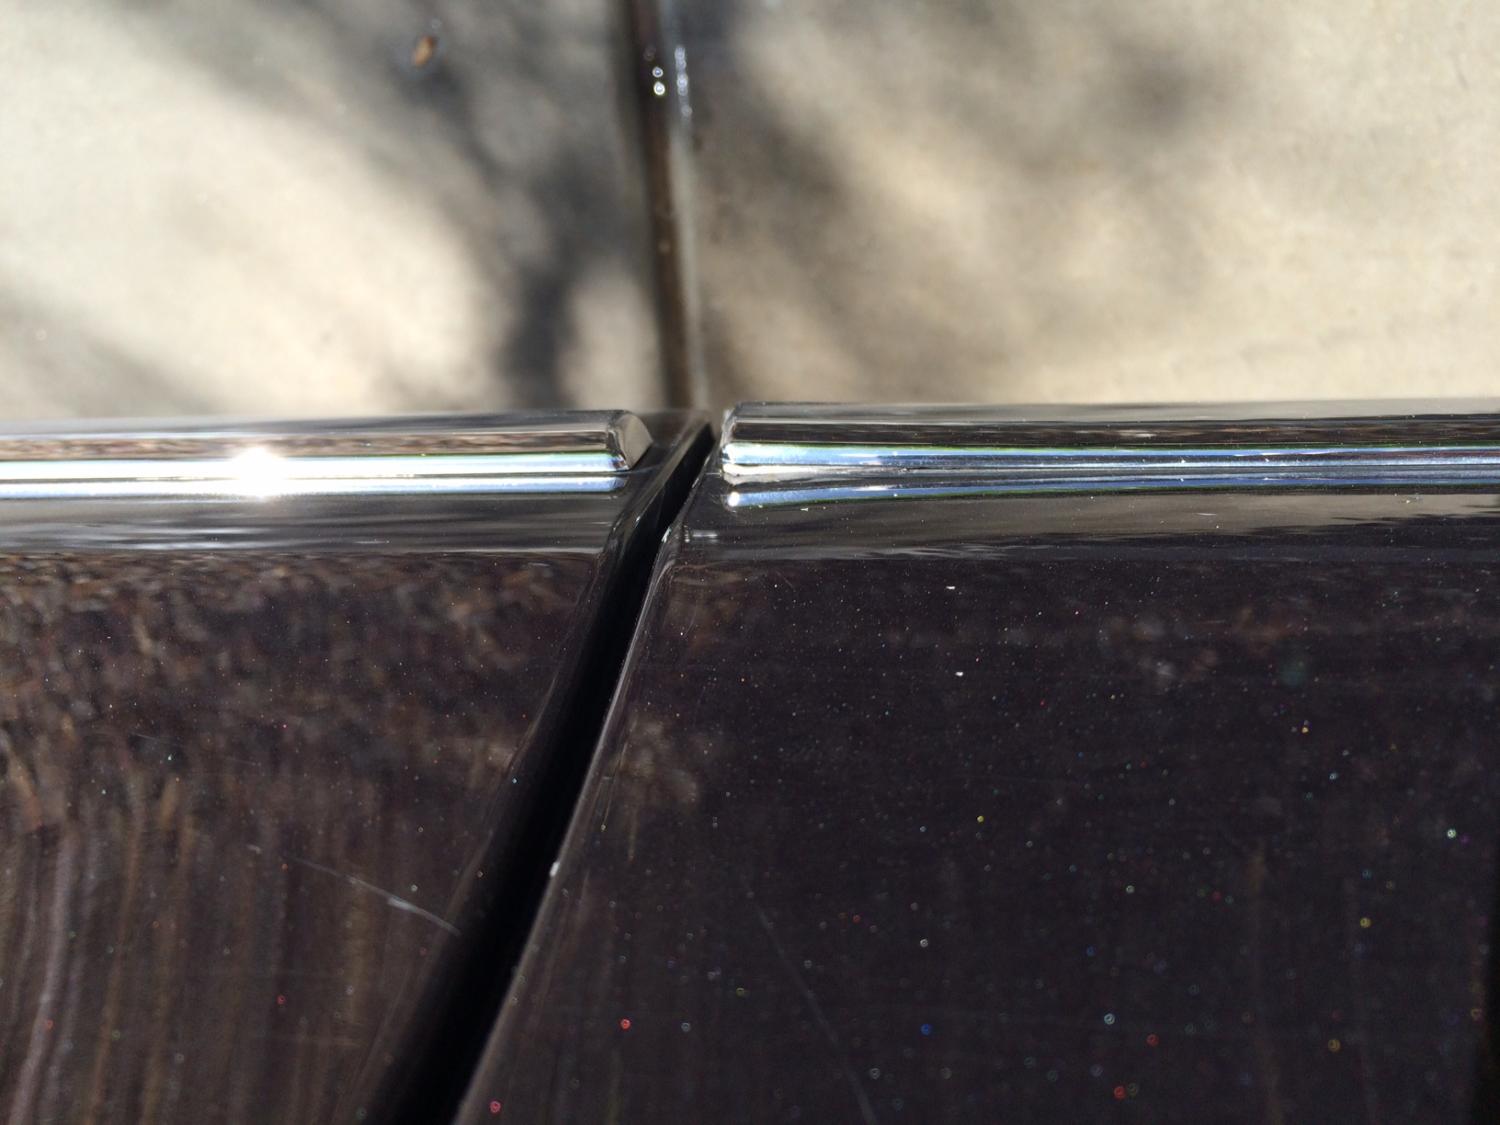
Well, my moulding problem has just been resolved. I persisted and finally got through to the service manager. I told him I'd bring some palo verde branches down there and he could help show me how it could have caused the moulding to separate on the trailing edge. Thankfully he didn't make me go that far, and he said they would take care of it and it wasn't that big of a deal. As for the paint pealing, I'm fine just cleaning it up myself with touch up paint at this point. Its down low and won't be very visible and at least the primer is still there to protect the metal. Thanks for everyone's comments.
-
This has become such a fight. GM Customer Service has been discussing this with the service manager at the dealer. I've given up on the paint issue, because it is not a far stretch to say that a chip caused the paint to come off and start peeling (even though the paint should not be peeling). But, the dealer is reporting to GM Customer Service that the moulding is coming off because I must have driven through tree branches (as evident by the scratches on my paint), and a branch must have ripped the trim loose. The dealer did see that I have small scratches on my paint from "AZ pinstriping" as we call it here, but he never discussed his theory with me when I had my truck there. The trim is unattaching on the trailing edge of the moulding... so I would assume they think I was driving in reverse through trees and snagged the moulding on a branch? I really don't see why my dealer is being so stubborn on this. I've only been communicating by voicemail today with the GM customer service rep who's helping me, so I'm not sure what her reaction will be when I ask her to explain the physics of this to me. Anyway, this has been slow moving and unpleasant experience with GM. Small potatoes in the grand scheme, and I still love my truck, but my dealership's service center is doing their best to drive me away.
-
I wonder if its related to the truck needing to re-learn the key. I agree that taking it to the dealer is the best thing, but if it was out of warranty I would consider following the programming keys section in of the manual (2-2). My 2002 would occasionally not recognize a key and I'd have to do the re-program, but while that could cause it to not want to start, it would not to just die while running. Other people here have mentioned issues with a bad ground causing issues. Will be interesting to hear what the dealer told you.
-
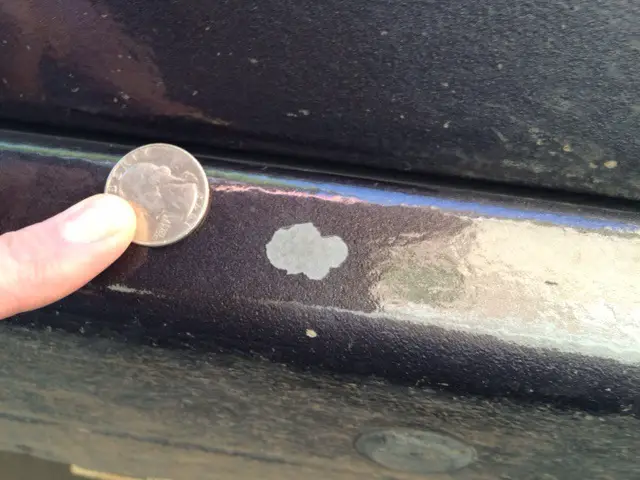
I have a 2014 Sierra in Iridium with 35k miles and was purchased in June ’13. I’m coming up on the end of my warranty, so I took my truck to the dealer with a short list of low priority items that I wanted them to fix before the warranty expires. I want to make it clear that I am very happy with my truck and these are just small complaints, but still, I think they should be taken care of. Just below the passenger front door in the anti-chip section, there is an area where the paint is peeling off. I showed this to my service rep (who spoke with his service manager) and their response was that a chip probably caused the paint to initially flake, and then water and moisture caused the paint to peal. Since it was a chip that caused the initial problem, it is not a warranty item. My counter argument was that there is no way the paint should be continuing to separate from the primer and that I argue that there’s a problem with the pain adhering to the surface properly. I will say that I scratched the surrounding area with my finger nail, and it doesn’t seem to be coming loose, so may be isolated and I can understand their side of the argument despite disagreeing. The 2nd issue I had was that the chrome trim on the driver’s side door was separating and coming un-glued. They inspected it and said that the trim was bent slightly, so it wasn’t a warranty item. I don’t know what bend they’re talking about, but the trim is coming unglued and has bowed out where the foam backed adhesive has puffed out. Seemed like they are trying to say that I must have inadvertently pulled the trim myself. So, my question is if I should fight them on this, or if they have a legitimate point. Has anyone else had a problem with their paint doing this and been able to get GM to repair it (note that this is not the same issue as PIT5313C that is discussed on the forum, this pealing is in the anti-chip area itself, and I have a Silao crew cab half ton). I think I'm more upset about them not fixing the chrome molding since it wasn't brought on by any outside activity like the paint chip. Is this worth contacting a GM Rep to sort out or will they just tell me to respectfully piss off. Pictures included. first picture close up of paint peeling area second picture of paint peeling third picture of chrome trim looking straight down on driver's door
-
Bull Ring Tie-downs on 2014 Sierra 1500
-
-
Turning Off Parking Assist Permanently
Jullian is not my name replied to dugstruble's topic in Troubleshooting & Recalls
This may help, but it is not directly talking about the new 2014 half tons trucks. Read the section about "removing rear park assist". Here's a link and an abstract from the article: http://sandyblogs.com/techlink/?m=201404 1. On all model years, disable the Rear Park Assist Module (in most cases, by removing the OBS DET fuse 20, 10 amp, from the left I/P fuse block). 2. For 2007-2009 models, contact the Techline Customer Support Center to obtain an Instrument Panel Cluster (IPC) calibration to disable the option. 3. For 2010-2014 models, remove power to the IPC for several minutes by disconnecting the battery. When power is reconnected, the IPC will not see the Park Assist Module on the low speed data buss (because it was disabled in Step 1) and reconfigure the IPC without Rear Park Assist. After this is complete, there will be not any Rear Park Assist warning messages displayed.


-
Forum Statistics
250.3k
Total Topics2.7m
Total Posts -
Member Statistics
342,720
Total Members8,960
Most Online
-
Who's Online 3 Members, 1 Anonymous, 696 Guests (See full list)