bdmd5093
-
Posts
8 -
Joined
-
Last visited
Content Type
Profiles
Forums
Gallery
Events
Articles
RPO
Store
Blogs
Everything posted by bdmd5093
-
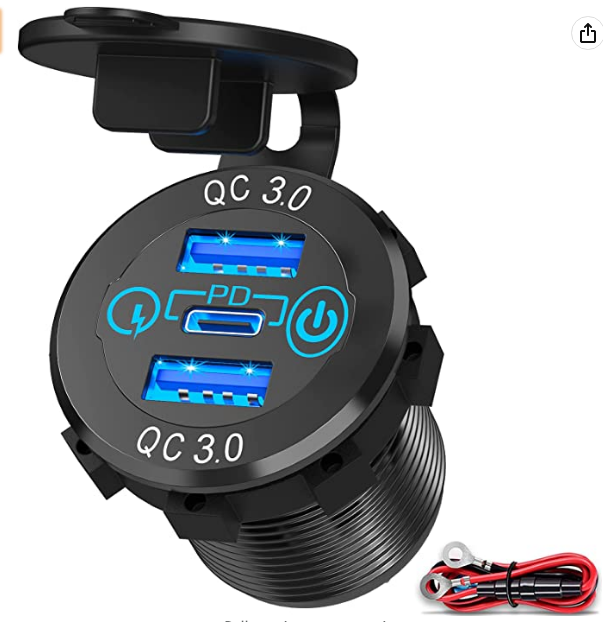
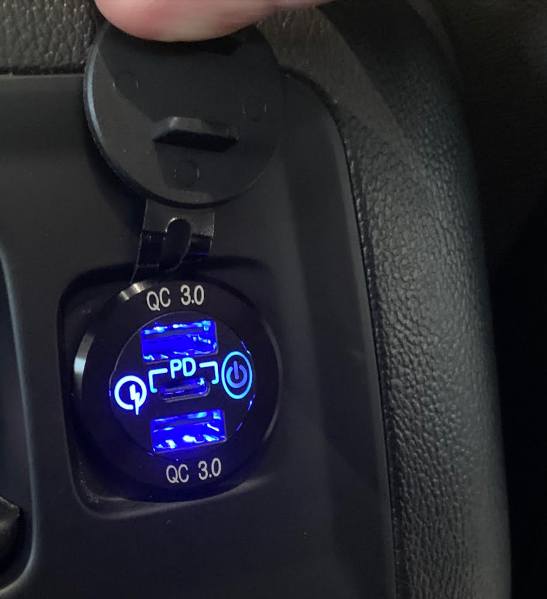
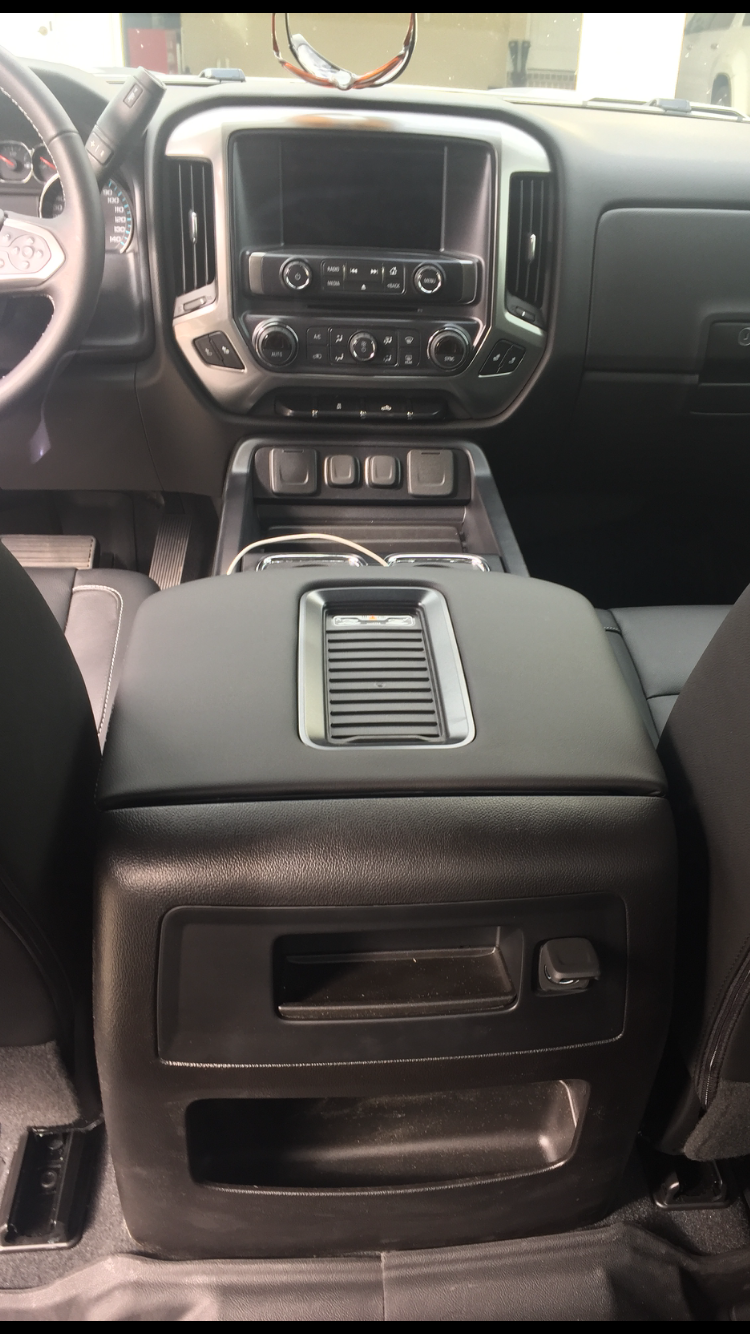
Silverado1475, I was able to complete this project. I added one in the rear portion of the console, it has 2 usb-3 and one USB-c ports. Here is what I used. $15.89 on Amazon. works perfectly, backseat riders love it and was a clean finish. Only difficult part was pulling off the rear face of the console. It takes ALOT of force-you just have to keep working with it and pull up at about a 20degree angle towards the back seat. 56W USB C Car Charger Socket, Ouffun Aluminum Metal 12V-24V Multiple USB Outlet 20W PD USB-C & Two QC3.0 Ports with Power Switch Fast Car Adapter for Car Boat Marine Truck Golf RV Motorcycle

-
Once you removed those four torx screws, how did you actually get that back panel to pop off? I have a 2018 with center console and the back of it looks just like yours. I want to replace the 12v outlet with a hardwired 12v usb fast charger. I removed those 4 screws but I can’t get that back panel to budge. Did you use a pry tool? Any tips you can share will be greatly appreciated.
-
STRMTRPR and bc-Chris, I want to replace that 12v outlet with a hardwired 12v fast charging dual USB outlet. I have a 2018 with center console and have removed those four torx screws but cannot get that rear trim panel to budge. Did you use a pry tool? How much force is needed? Any tips will be greatly appreciated! Thanks!
-
Just did this fogs on with brights and cargo lamp/bed lights on in reverse mod. Took about 10 minutes but that was only because I was not sure how far I needed to push the diode leads in so I fiddled around with it for a bit. Also, I left the connectors plugged in to do it and had no problems. I may put a piece of electrical tape over the diodes just to keep them from falling out since I ride on a lot of rough roads. Great, cheap, simple mod and thanks to all for the pointers here and to @pgamboa for the pic on page 46 of this thread. I can understand why the fogs with brights is not standard (since it may not be legal in some areas), but the cargo lamp/bed lights on with reverse and remote unlock should definitely be standard in my opinion.
-
Here is the video I found helpful. getting the plastic trim piece off of the front of the seat track closest to the middle seat section is definitely the hardest part— just keep working with it and it takes a lot of force. Also, this video does not show how to remove the seatbelt, so I just left it attached. I was still able to move the seat all the way into the back row and had plenty of room to work. Good luck!
- 1,234 replies
-
- 2
-

-
- jump seat
- sierra center console upgrade
- (and 8 more)
-
Hi John, Yes my interior is the Jet Black leather. My trim is “Synthesis” which is the silver/ gray color that does not have the herringbone (aka “tartan”) pattern. The stitching is a whitish gray color. I got everything through Phil. Send him pics of your interior and he will fix you up. Initially I tried to figure it out myself and order directly from the parts distributor, but there are so many color options/combos it is hard to know what you are getting. Also determining what parts to order for the actual console is very complicated. Phil made it very easy. You can’t go wrong with him!
- 1,234 replies
-
- 2
-
-

-
- jump seat
- sierra center console upgrade
- (and 8 more)
-
Huge shoutout to Phil Gamboa! I completed my center console install in my 2018 Silverado LT 4WD Crew Cab today. I bought the truck new in mid-December and within one day I regretted not having the full center console. I jumped on this forum the next day and fortunately found this thread and Phil’s harness and install video. I love my Apple CarPlay so this was the ticket. I purchased the console and all of its parts, Phil’s harness, and required cables directly from him which was super easy. Phil promptly responded to all of my questions prior to purchase, and he even coached me through a few of the install steps via texts and a phone call yesterday. I had a fantastic experience dealing with him. This was probably my most complex auto DIY project ( I’ve never even installed a radio lol) so I took my time and completed it over a few hours last night and this morning. I ended up haveing the known issue of no CarPlay from the console compartment usb’s when keeping the native green HMI to glovebox usb, but Phil includes the extra usb cable needed for the workaround described elsewhere in this thread. I lost functionality of the glovebox usb but was ok with that because I never planned on using it, and now have CarPlay fro all console usb slots? I have a few tips for other novices: - unbox the console and all accessories first and make sure nothing is damaged; mine was in pristine shape but when relying on shipping companies you never know -completely remove the passenger seat, it will make your life much easier. I disconnected everything but the seatbelt and just slid it as far back in the second row as it would go and that gave me plenty of room. There is a good YouTube video that details the passenger seat removal, hardest part is removing the trim under seat - use a pry tool and just keep working til they pop loose —on driver side there is a clamshell plastic trim piece covering a metal support to right of gas pedal. You have to remove this to put console trim skirts on, and it does not go back on -if you are going to install and use the front metal bracket, you don’t have to remove the radio or dash trim, just remove that ashtray/storage compartment and the piece that has the 12v and 110v plugs. For installing the bracket the top two bolt are not easy to get to but you can with a small 7mm wrench -place console in its spot and make wiring connections to check everything before bolting in. However run your wires like you want them before making any connections, especially Phil’s harness. Once you click those wiring connections in they are very hard to unplug especially the connection on Phil’s harness in the floor under the seat and the 110 outlet connections - I received an alert from onstar that my passenger airbag was disabled soon after I cranked the truck to test connections while the passenger seat was removed. The alert said to take truck in immediately for a check. I assume this was because you have to disconnect the yellow wiring harness under the passenger seat to remove the seat. Once everything was reinstalled and connected we drove to town and my son was in the passenger seat and airbag was on. However I don’t know if a code needs to be cleared or something on onstars end - you have to pull really hard to remove the tray trim from the console—just keep at it and it will finally come loose Overall a fun and satisfying project and I love the console— Phil is a lifesaver. If you are considering this just do it and get everything from Phil! Brian
- 1,234 replies
-
- 2
-
-
- jump seat
- sierra center console upgrade
- (and 8 more)