
Motor City Rick
-
Posts
148 -
Joined
-
Last visited
Content Type
Profiles
Forums
Gallery
Events
Articles
RPO
Store
Blogs
Everything posted by Motor City Rick
-
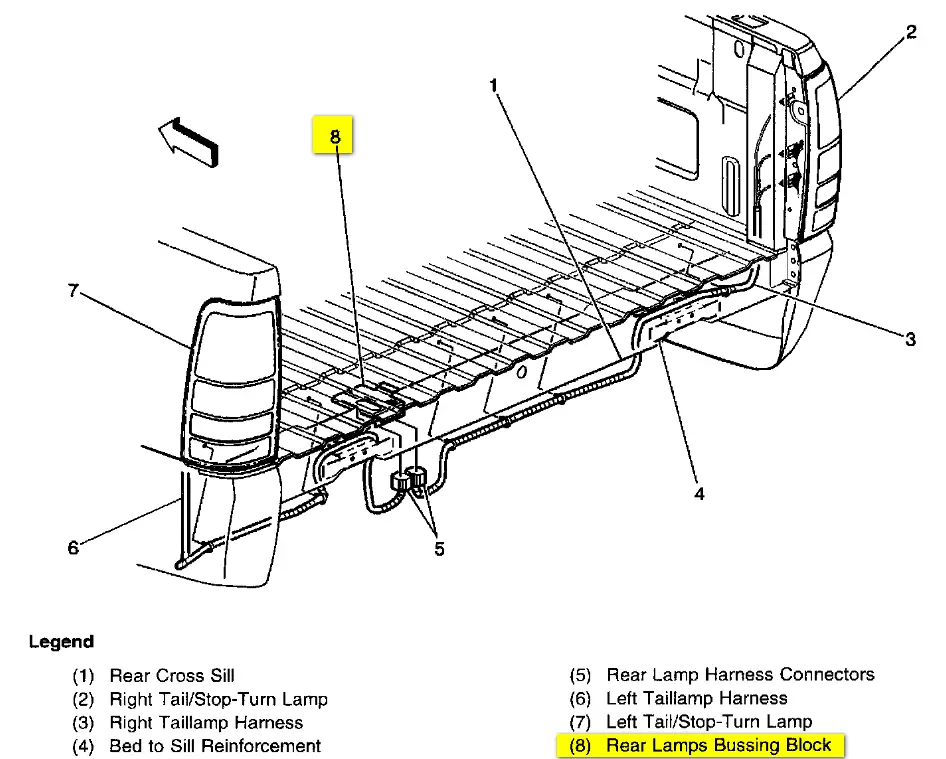
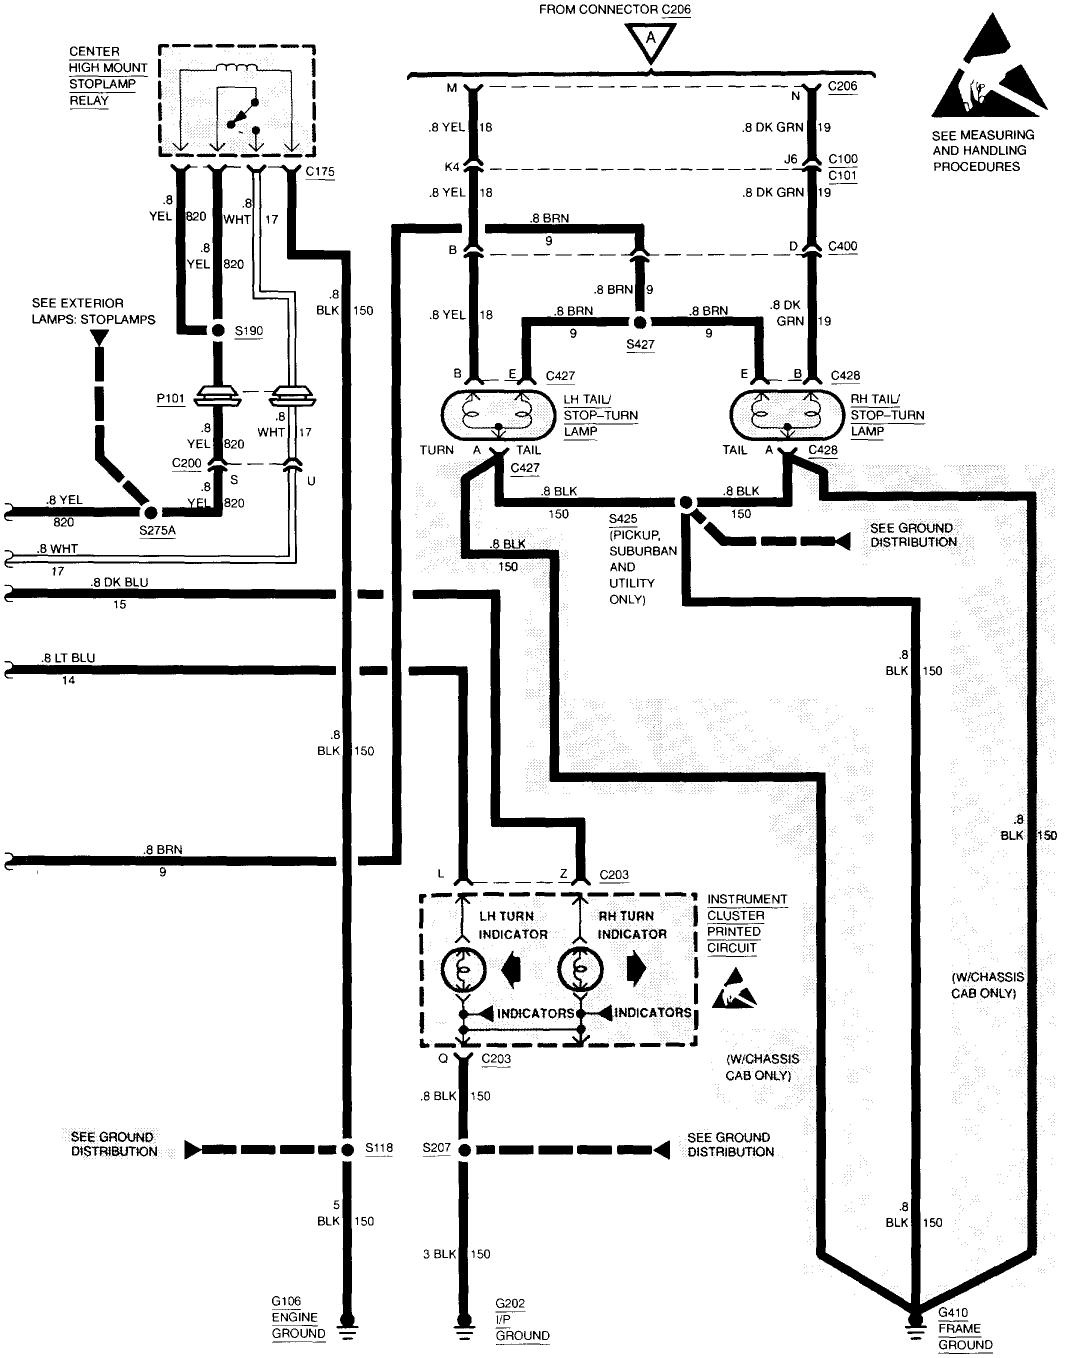
 I deleted the old schematic (2 bulb) and put in the one for 1 bulb taillights instead of 2 bulb system. My error. Yellow wire is left hand turn signal / brake light Dark Green wire is right hand turn signal / brake light Chocolate wire is running / license plate lights Every black wire is grounds Let me know if you have a light blue and or any white wire back by the rear bumper???
-
Okay michaelj329, Stop changing parts on guesstimates! Go to the rear of the truck near the left rear bumper area by the frame rail, locate the rear taillight harness connector. In that harness is a yellow & dark green wire. I need you to stick a 12 volt test light into that connector on both sides while somebody is pressing on the brake pedal. Is there 12 volts??? If yes, the problem could be at the trailer harness connection or an open in tail light harness leading to the left rear taillight. If no, go to the brake light switch and test the white wire there. If there is power, coming out of brake switch, then there an open leading back to the taillight harness. First check to see if the white wire is backed out of the bulkhead (firewall) connector. I will leave a very simple schematic to help you along. You can save it as .jpeg for your own personal use.
-
Transmission
Motor City Rick replied to Sid Dunn's topic in 1988-1999 Chevrolet & GMC C/K GMT400 Platform
Sid Dun, Here is some diagrams to help you understand what's going on. Chances are the temp sensor got damaged while doing the rebuild. That sensor is within the trans pan, tucked up in the valve body area. . The #1 location on the internal trans harness is where the temp sensor is located.
-
Go to" Ign0" fuse (10 amp). Measure the available voltage on both sides of that fuse. Is it the same as battery voltage? If yes, move on. If no, find high resistance back to the battery Now disconnect the ECM (ignition off), to keep things simple, test all pink wires for battery voltage on the ECM connectors. If any pink wire has no voltage, go check both sides of the fuses in the power distribution center (under the hood) and the fuse panel in the dash, check for blown fuse(s). Now I need you to focus on checking for battery voltage with pin # 75 (pink wire on ECM connector), that feeds the "E" pin down by the transmission. Is there battery voltage? If yes, that is good, now remove the trans connector with terminal "E" and measure for battery voltage to ground. Is there battery voltage? If yes, available electrical power (battery voltage) is available to the transmission. If no, high resistance issue back to "Ign0" fuse. Check pin # 63 also (pink wire) on ECM connector. Is there battery voltage? If yes, move to terminal "E" on the trans connector with the trans connector disconnected. Measure voltage to ground, is there battery voltage??? If yes, available electrical power is available to the transmission. If no, high resistance is in the circuit back to the power junction point.
-
Stating that you changed 2 transmissions, ...and the problem is still there, .....tells me the problem is with the circuits leading to and from the transmission. Broken wire, poor electrical connection, backed out pin, blown fuse or a failed electrical component that is controlling the transmission. Look at the commonality connection of all the problems, ....that will be your reference point of repair.
-
Your next area will be the wiring / connectors "to" the transmission. If there is "any" rust, corrosion, foreign material replace the pins (if you can), or replace the trans connectors as required. Look for broken / pulled out wires at connectors. Disconnect then reconnect one transmission connector at a time to see if that changed anything.
-
carkhz316, TSB's are everything in a repair. Would save a lot of time and grief. Can you list the TSB for PedroJ ?
-
Starting with the P0783 code: Potential causes of a P0783 code include: 3-4 shift solenoid failure Electrical short to power - pinched wires Electrical short to ground - pinched wires Open in power or ground circuit wiring - disconnected or loose connections TCM or PCM internal failure Potential causes of a P0785 transmission code may include: Damaged or defective shift timing solenoid Dirty Automatic Transmission Fluid (ATF) Low ATF Obstruction in ATF passages Broken or damaged wiring harness TCM issue ECM issue Pin/connector problem (corrosion, melting, broken lock tab etc.) P1860 CHEVROLET - TCC PWM Solenoid Circuit ElectricalPossible causes Faulty Torque Converter Clutch Pulse Width Modulation (TCC PWM) Solenoid Torque Converter Clutch Pulse Width Modulation (TCC PWM) Solenoid harness is open or shorted Torque Converter Clutch Pulse Width Modulation (TCC PWM) Solenoid circuit poor electrical connection Looking at all the codes, ...and their "commonality" I'd look at "all" the electrical connections going in and leaving the trans for corrosion, rust, broken pins. See if the wire harness is pinched / sliced back to the ECM. Another biggie, I need you to check both sides of every fuse in this truck. That includes any power distribution fuses. If any fuse is blown, that is a short to ground. First, clear all codes, turn key on to get vehicle power, what codes returned??? No codes, start motor and let warm up. What codes now??? Report what codes you have at this point not putting the truck into any gear. Now wiggle any wire harness from trans back to the ECM truck power on, motor not running. Check for new codes. Look for possible shorts to ground or severed wires. You said you replaced the wire harness, ...what wire harness??? Wire harness for this ECM to trans is over $1000. I'm confused??? It is not an ignition switch issue, I'm leaning towards a short to ground or open circuit at a connector.
-
Brakes make a "creaking" sound
Motor City Rick replied to Savinhillspyda's topic in 2014-2018 Silverado 1500 & Sierra 1500
For creeking noise brake pads, it's the composition of the pad and the glazing on the surface of the rotor that makes the noise. If the pads are still somewhat good, chamfer the leading and trailing edges of both inboard and outboard pads at a 45 degree angle. Add anti squeak material to the back side of the pad after it sets up for a bit to reduce vibration in the pad. Pads are worn, replace with different composition and chamfered edges. Harder pads will squeal. -
2015 YUKON NOISE IN CABIN
Motor City Rick replied to FOURKNUCKLES's topic in 2015-2020 Tahoe, Suburban, Yukon & Escalade
Got tired of reading all these entries. But you need help on diagnostics. First load front and rear axles at all 4 points off the ground in a quite area of the garage. Make sure "ALL" 4 tires are off the ground by a few inches. Best object to use is 4 equal / level jack stands with multiple shop towels insulating the jack stand from the axles / control arms to isolate any potential noise transmission. Run the truck back up to the speed of issue of noise / buffeting. If the noise / buffeting is gone, it's a tire tread design / wind resistance issue. I don't think the diagnostic techs have access to special made "test tires" with super smooth tread and super balance to eliminate tire issues. They "must" use a completely different tire / tread design as part of the diagnostic procedure or they are just screwing around. They must also change the tire pressure in 10 psi increments from 20 psi base to the maximum recommended pressure to see if the issue changes. The other part is they have to use some duct tape and heavy cardboard to redirect areas of airflow that could cause body / chassis parts to vibrate. If the issue is present, the diagnostic service people will have to observe / feel / move vibration sensors around to locate the greatest frequency disturbance. Does this problem change when you have 4 people in the cab??? I keep seeing driveshaft issues. The areas of diagnostics are, is any of the u-joints binding when the axle is loaded??? Is the pinon bearing preloaded correctly / or binding??? Is the driveshaft inclination near zero degrees??? Is there any bushings driveline mounts made out of urethane??? Is one of the brakes dragging??? What is the drive shaft lateral run out / balance at the speed of issue??? Are they using 2 or more large radiator hose clamps holding heavy washers to change the balance characteristic of the drive shaft??? There is a test I do with a small rubber mallet to see what might vibrate underneath the complete truck. Look for things that can catch airflow and vibrate. I've even beat the chit out of floor pans because the way they resonance vibrations and used sheet deadener. More I read, there is a corrective fix, but could be labor intensive. In my time I used sheets of sound deadener wherever sound was emanating through the cab. This sound deadener looks "Freeze Guard" like they put on the lower 6 feet of a roofing job with paper on both sides. Hand this entry over to the diagnostic boys. They will poo -poo my ideas, ...but I did driveability diagnostics for 36 years to their 2 or 3. If there's a problem, ...it can be fixed. Keep in touch on this. -
Another area to contact is GM's "Central Zone Office" in downtown Detroit Michigan and ask for the customer relations number in the "Central Zone Office". The info is: General Motors Corporate Office & Headquarters 300 Renaissance Center Detroit MI 48265 General Motors corporate phone number:(313) 556-5000 More numbers: Consumer Relations Department GMC Truck Division General Motors Corporation 16 Judson Street Pontiac, MI 48342-2230 1 (800) 462-8782 (toll free) 1 (800) GMC-TKTD (toll free TDD General Motors Customer Assistance Center Chevrolet/Geo Motor Division General Motors Corporation P.O. Box 7047 Troy, MI 48007-7047 1 (800) 222-1020 (toll free) 1 (800) TDD-CHEV (toll free TDD) 1 (800) 243-8872 (toll free roadside assistance)


-
Forum Statistics
250.4k
Total Topics2.7m
Total Posts -
Member Statistics
342,833
Total Members8,960
Most Online
-
Who's Online 6 Members, 0 Anonymous, 457 Guests (See full list)