Search the Community
Showing results for tags 'bose'.
Found 6 results
-
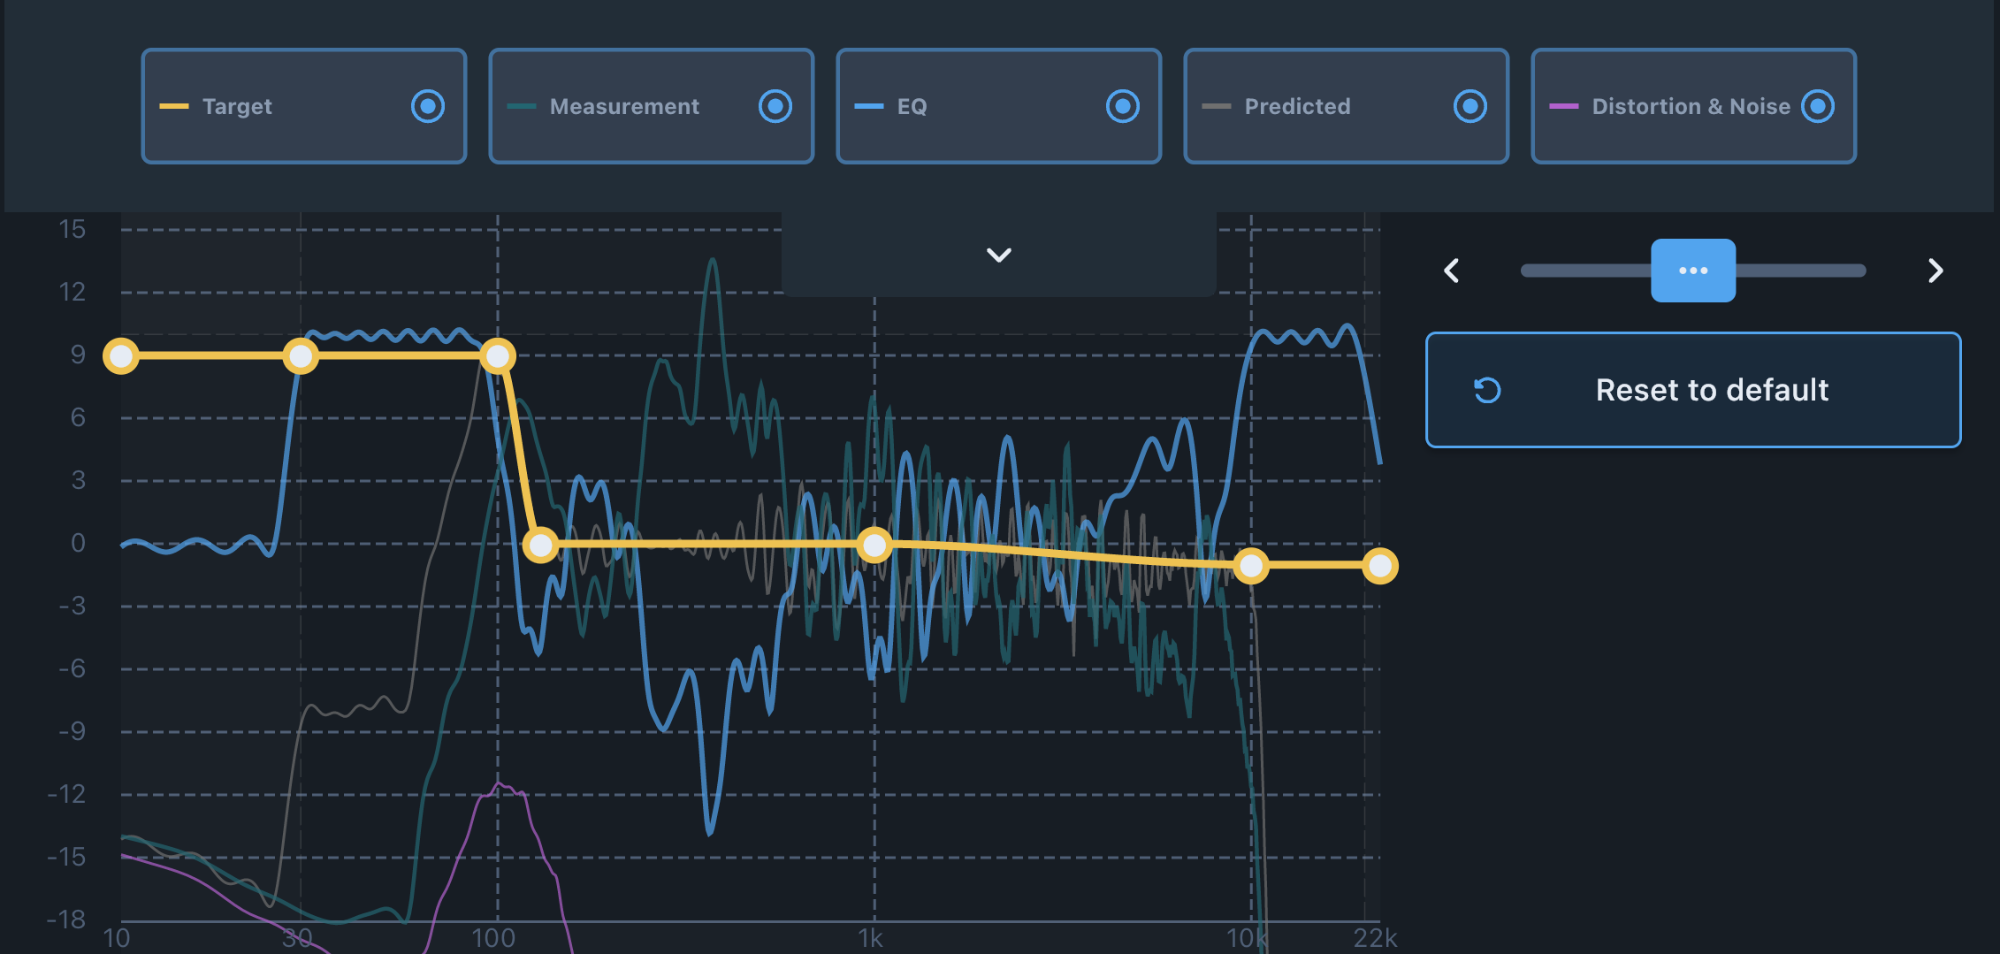
Hey all, I wanted to share my build log for my 2023 Sierra SLT. It's still a work in progress, but this information may be useful for anybody thinking of starting an audio project and navigating the mess of (mis)information between model years of the same generation truck. My goals for this project are Improve overall sound quality. My truck came with the Bose "premium sound" package with 6+1 channels of below average sound. Stock settings were not great and I was able to get passable sound by bumping bass to around +4, mids -2, and treble +4, but the configurability options are completely disappointing for a modern vehicle. I'm even more disappointed that somebody decided to brand this "premium" instead of simply writing "has speakers and amplification to reproduce sound." No need to lie to us... I think the only worse sound system I've heard in a modern car was from a Mazda MX5, but honestly, who cared about fidelity when the top was down? Be stingy where possible. I'm a sucker for punishment and doing things the hard way. I've been messing with car audio in some form for about 15 years now and while I learn and move forward, I've retained the "paying for installation is for suckers" mentality. Projects like these help keep me sane. Use quality components. Saving on the installation lets me spend just a little bit more on good equipment. Not the best, but not throwaway-tier trash. I try to source gear that will perform well and last. Rarely do I splurge for top-of-the-line stuff, especially for a loud pickup truck that's on kid duty for a nonzero amount of time. Keep some interior storage. I have pets and kids. It's useful to keep stuff under the rear seats for emergencies and I'd prefer to not have to resort to loose gear or worrying about cleanliness and upkeep of things kept in the bed. This means no monster multi-sub setups under the seats. Next up comes the component list. I'm aiming for SQ without breaking the bank. Full retail price (most of these can be had for less) is around $2k for a complete setup. Factor in another $100 or so for cabling and tools if you're starting from scratch. Pioneer TS-A709 2.5" speakers in the dash NVX XSP692 6"x9" speakers in the front doors Pioneer TS-D65F 6.5" speakers in the rear doors Alpine PXE-C80-88 DSP/Amp Fox Acoustics 12" vented sub box (passenger side) with storage cubby (driver side) NVX VCW122v3 12" 2 ohm DVC subwoofer (while the SI SQL12 is in transit, ETA March?) Stereo Integrity SQL 12" v2 2 ohm DVC subwoofer Dynamat Extreme bulk pack (referring to as CLD) Stage 1 I started out by replacing all of the speakers. Dash speakers are relatively straightforward to swap out. Two bolts behind each grab handle in the A pillars and some tactful pulling gives you access to pry up the entire front portion of the dashboard. Disconnect the blinking red LEDs and all that's left is two screws per speaker. The OEM speakers seemed to have identically sized magnets compared to the replacement Pioneers. I'm not entirely sure that the tweeter is real as I can't see any wires that run up to the center. If these end up disappointing, I've considered splurging for the Audiofrog GS25's as there's not a whole lot available in this size. Next up I replaced the rear door speakers. Removing two bolts in the middle of the pull handle of each door and an additional one along the bottom edge of the door card lets you tug the entire card up and out. Disconnect the wiring harness and then unclip and guide the little handle pull out and you can safely move the panel to another location. While in each door, I applied some CLD to approximately 25% of the skin of the door and around 50% for the inner portion, taking care to try and seal the cavity as best as I could. I then removed the OEM speakers held on by one bolt and pried the assembly out of the door. I didn't purchase any adapters, so I repurposed what the factory gave me. A large note of caution - do not use powered cutting tools while working on this plastic assembly. It smells absolutely awful and appears to be a fiber reinforced plastic. I first cut the cone and surround for the OEM speaker and tore out the top half of the speaker. I then used an oversized pair of channel locks to systematically break down the plastic support structure until I could remove the bottom portion of the speaker. I then channel-locked away some more until I was left with the shell with a roughly 6.5" speaker sized hole in the middle. It's a smidge too small for the Pioneer speakers I stuffed in with some foam to help the seal, but it worked well enough once motivated with some screws. If you go this route, you may have to modify the backside of the door card in the speaker area. I noticed that the replacement speaker is just large enough that the plastic supports collide with the metal mounting ring. In any case, I spend a little time applying more CLD to approximately 25% of the door plastic just in case. Might not be needed, but I'd rater not keep tearing into the doors. Replacing the front door speakers is largely the same as the rear doors. This time, the stock 6"x9" speaker mount could not be reused because the oval shape was too different. I drilled four small holes and mounted the NVX speakers directly to the door skin with some healthy amount of foam gasket material to keep the seal. One note is that if you apply aggressive sound deadening material to the door cavity, you'll either need to account for a protrusion from the door card or cut it off to allow for everything to come together. Photo of the area I'm describing. Stage 2 Here I performed a bose-ectomy in an attempt to gain control of the system. There's probably a dozen different ways of skinning this cat, but this worked out for my needs. You'll need to first run power from the battery to the back of the cab. I've taken a few photos of "lessons learned" areas that I'll upload later on. I found that running 4GA cable from the battery to the passenger side fender and through a grommet in front of the passenger front door was a great way to enter the cabin. Here, I ran the cable under and along the plastic trim all the way to the rear wall of the truck. There's some built-in conduit that GM has so kindly provided that works great. Photos of the passthrough for anybody who's curious. Next I removed the top portion of the rear seats. This entails removing all three headrests, prying the headrest receptacles out, and removing 4 bolts along the underside of the rear seat. You can then use whatever means available to release three latches along the upper portion of the seat to fully release the unit. Gently lift the seatback out and place it somewhere safe, because you may be spending a lot of time at this stage. There's plenty of space on the back wall for activities, but I wanted to keep the Bose amplifier close to the Alpine amplifier to minimize the amount of wirework I needed to do. I unbolted the black box (an inverter?) and placed it along the driver side of the cab with some toll pass velcro. It has worked well with heat in my experience. I then modified one of the Alpine's brackets by drilling some holes to fit where the inverter once did. This kept the two amplifiers close and cozy, ensuring that cable runs would be kept as short as possible. Next, I did some damage to the wire harnesses coming out of the Bose amplifier. One of the attachments to this post is a wiring diagram that tells us exactly what cables to cut. The X1 connector (top, 8 wires) carries the output for the front doors and the subwoofer. Cut all of those but keep the battery and ground. The X2 connector (middle, bunch of wires) carries the output for everything else. My truck didn't have any center channel speakers, so I cut everything. The X3 connector (bottom, 4 wires) carries the audio data from the factory radio to the Bose amplifier. In previous years it contained some sound canceling wiring, but that's not a thing for at least my truck. Ideally, we'd be able to use the raw unadulterated and unamplified signal sent over the bus, but entire companies exist to decode and sell expensive solutions for this. A DSP will have to do. I now have two connectors with cut wiring. There's a connector side, which basically takes the Bose output and routs to the input for the Alpine unit, and a harness side, which the Alpine unit outputs back into to reuse stock speaker wiring. This is why I wanted to keep cable lengths short. Nothing is less fun than crimping or soldering 12 individual wires, taking time to verify that you aren't crossing signals, more than two times. It wasn't even fun one time. Of note, the stock subwoofer wiring goes into the Alpine from Bose, but the harness side I taped off and fastened to the wall. We won't be using the stock subwoofer and removing it seems to be a colossal PITA and doesn't recover any useful space from under the center console. After getting the input/output connectors for the Alpine built, I went about applying some CLD to approximately 30% of the rear wall. I saw some other builds applying some CLD to the little vents and decided that I had nothing to lose, but that got annoying quick. I then finalized my wiring paths and used some adhesive clips to keep things tidy. A lesson learned for this step would be to pay attention to where foam is on the seatback. If you move the inverter, you may want to trim some foam near its new home. Once everything seemed to be ready, I began inserting connectors back where they belonged, wiring up the amplifier for power and ground, and getting the subwoofer cabling rear. I also made some space for the Alpine control unit running along the driver's side conduit, under the drivers seat, and to the middle console. It's just hanging out until I decide where I want to permanently mount it. Photo of the mostly finished setup. I connected power to verify operation and began reinstalling the rear setback. No nasty surprises or fires here, I still get sound and the Alpine unit connects to my phone over Bluetooth and the little control pad displays some basic information. Stage 3 I purchased a Fox Acoustics GM-CC-112-V-19-P-STORE subwoofer enclosure for under the rear seats. The driver side contains a large storage cubby while the passenger side is a 1.8 cuft vented 12" subwoofer box tuned to 33hz. I thought this product to be a good compromise between sound quality (low tuned vented, deep-ish subwoofer mount depth at 7.5" and interior storage space. I've moved the jack and tools, along with a first aid kit and small emergency bag in the storage compartment with plenty of room to space. I've made a small modification to the enclosure by adding a pair of terminals to the box to allow for a two-channel wiring solution for each of the sub voice coils. The Alpine amplifier doesn't allow a bridged sub output, so I need to run two sets of signal to the woofer to maximize available output. Once the SQL 12 comes in, I may replace the NVX unit. The NVX sub has a pretty beefy surround with 23mm xmax but I've seen no evidence of contact with the floor. So far so good. I set up the Alpine Optim8 using both my phone and a computer. The instructions were pretty basic and I'd argue slightly misleading. You will absolutely need a computer to set things up. The phone application will only perform the auto EQ tuning feature. The computer application lets you do everything else you'd expect from a DSP. There's lots of functionality that I didn't end up using, but the gist of my setup was to set the inputs and outputs and adjust crossovers to match the aftermarket speakers. I tested a few songs and noticed an immediate and positive change in sound quality for the better. I may keep tweaking down the line, but I'll probably hold off on anything large until the subwoofer comes in. Again, the sound quality with no subwoofers present (6" Bose sub was disconnected earlier) is already leaps and bounds better than what the truck came with. TODO: Upload newer photos of the measurements and auto-EQ lines. The End? If anybody has any questions, feel free to ask! Amplifier wiring.pdf

- 13 replies
-
- 2
-

-
- sound system
- bose
- (and 4 more)
-
 Title pretty much says it all. In temps lower than about -4 or -5° C (≈ 25° F) I get no sound out of my speakers. System is entirely stock except an aftermarket stereo deck (bought the module to keep steering wheel controls etc.) head unit lights up and my phone can Bluetooth to it but no sound except for a clicking noise from the speakers. From what I’ve seen it’s likely a dead amp, seems pretty common. Is there any information available about the factory bose amp or is there an amp available to buy that is equivalent to the factory Bose that I can replace it with? Not looking to add a big sound system in the truck any time soon.
 -
2015 Double Cab with factory Bose center console subwoofer that needs some improvement. I’ve been researching our options and wanted some opinions. -JL Stealthbox center console. Is it enough? -JL Stealthbox under the rear seat. Worth the cost? -Kicker system. Easy install but wondering if it will be enough. -Box built with 2x10s. Any recommendations on boxes? Thanks!
-
Here's a PDF showing how to remove that rear seat for you guys that need access to the Bose amp on the back wall.I hope this helps some people out. Technical Bulletin - 2019 Chevy Silverado Rear Seat Removal.pdf Technical Bulletin - 2019 Chevy Silverado Rear Seat Removal.pdf
-
I bought a 2016 Sierra SLT with the Bose 8 speaker system 5 weeks ago, and the front right speaker already sounds awful. I haven't turned the bass much up at all, but it sounds blown. Even when i turned the bass to negative numbers it still cracks. Would a dealer replace this for free? Can anyone give me some advice on his to fix this. Thanks for the help
-
 I recently installed two audio control amplifiers (D.4-800 and LC-800) coupled with infinity kappa CSX 90 and CSX 60 component system for the highs and (2) P3 15” subs for the lows. I’m having trouble getting a frequency ranges from 15 kHz to 35 kHz from the factory radio to the amp. We double checked the wiring coming in from all the inputs from the Bose system and everything checks out. I am very disappointed with the way my new system sounds. Do any of you guys know what’s the fix on this? Long story short my tweeters sound like ******.