

kevinfranklin
-
Posts
89 -
Joined
-
Last visited
kevinfranklin's Achievements
")
Enthusiast (3/11)
23
Reputation
-
Rear U-bolt torque spec?
kevinfranklin replied to Stronger800's topic in 2014-2018 Silverado 1500 & Sierra 1500
I agree....... we'd appreciate links to quality aftermarket U-bolts from anyone whose done the research. thanks!! -
So did you put anything (PD glossifier, clearcoat) over the Plasti Dip after you were done with the color? I finally got to working on my emblems and didn't add anything as a final coat. Now it seems like if I rub the wrong cloth over them, they might get fuzz stuck in the dip, but they're still just a few days old, so maybe they'll continue to harden?
-
Gas Pedal Flex Solution
kevinfranklin replied to FL335i's topic in 2014-2018 Silverado 1500 & Sierra 1500
Looks like you took the whole assy out, so was that difficult? And I think what you're saying is you removed screws (2 of them?), and added in a washer in-line, between the 2 black sections.....is that right? -
So what's been your experience with the Plasti Dip on the front tie? Does it clean off ok, or have nicks/cuts in it from road debris that will require a re-apply? Same question for the side trim, although I bet that lasts a lot better, due to it's location.........
-
Actually could have used 4, and super tiny fingers as well, but oh well. ;)
-
Man, I wish mine was as accessible as yours appears to be! I used this same screw in this same location, but on my 2017, I have MUCH less "access" to get the nut on the screw. So I had to simultaneously: 1) hold the valve in just the right open position so I could turn the screw 2) hold the nut in the perfect orientation with some needle nose pliers 3) turn the screw until it caught the nut.
-
2014+ Truck Bed / Tonneau Covers
kevinfranklin replied to Green 1364's topic in Modifications & Accessories
I recently installed my Lomax, and I'm very pleased so far! Summary: Customer service: 1 of the rails had a slight scratch in it, I called them, and they sent me 2 ENTIRE rail assemblies! Install: very easy. I'm used to having to tweak a cover's rails, etc to get them to work properly initially, but this one latched perfectly the first time. Look: very low profile, super slick looking. The powder-coated (?) aluminum panels might scratch, but no issues so far. Folding: unlatch works easily, and panels fold easily too. Latching the fully folded group to the front works ok, but could be improved a bit. I do wish I could "hinge" the folded group of panels up vertically like the BakFlip, but that would prob change their design too drastically. Weight: I have a full 6.5' bed, so when I remove the Lomax it's a bit heavy/awkward to handle alone, but I don't fully remove it often so no big issue. Leaks: no leaks yet, but only a couple average rain storms so far. Cost: affordable, all things considered. $715 delivered (TruckAlterations.com) -
Rode with my factory Rancho's for 8,000 miles. This is my first truck, and was rather surprised at 3 things: how much I could feel on the road (small bumps, ridges, pennies, etc) , how hard they hit over speed bumps and the like, and also at the amount of "float" I'd feel at speed over bumps on the highway. So I upgraded to Bilstein 5100's for $320(left stock rake, though) , and am happy with the results. I don't drive offroad much, but they handle all terrain that I encounter much better. Bumps, holes, ridges, etc. Smoother, more "grounded," and feels safer. I'd do it again in a heartbeat.
-
So in the Nav screen, after you've made some adjustments and the screen is in the "edit" mode (see pic), is there a way to quickly get it back to the normal Nav look, without all the extra crap around it? It takes too long to reset. Yes, I"m impatient. ;)
-
Gas Pedal Flex Solution
kevinfranklin replied to FL335i's topic in 2014-2018 Silverado 1500 & Sierra 1500
Well, you hadn't sent him the link to those shims yet, silly. Although they do say they "Split 4x as easily as wood shims" so maybe some folks want something with a perfect fit that they have 100% confidence in. -
All 4 do go down on my '17........not sure when that started. Maybe it's configurable, but I've never looked.
-
Fellow member THOMCAT listed this one in the original thread and I use it constantly now. I don't drive aggressively, and like to coast a lot, drive "ahead" and try to avoid braking when possible, etc. so I'm overly conscious of any shift vibrations/hesitations/rough shifts/etc. This tip REALLY helps me feel better about my tranny and how long it feels like it will last. Although I have yet to research the difference between 1st and 2nd stage braking (is it speed related?) ........ and I'd LOVE to figure out how to make this a switchable feature so I didn't have to do it each time I start up. "Holding in the trailer button on the end of the stalk turns off the first stage grade braking for the full key start cycle , shifts smoother and coasts longer. Second stage grade braking in Z71s is unaffected."
-
And if you tap it while they're going down, they stop in place.
-
2014-2018 Silverado/Sierra High Mileage
kevinfranklin replied to CoralReef's topic in 2014-2018 Silverado 1500 & Sierra 1500
I'm betting he just filled up at a station on a hill, reset Trip B, and then rolled downhill to the house. ;) -
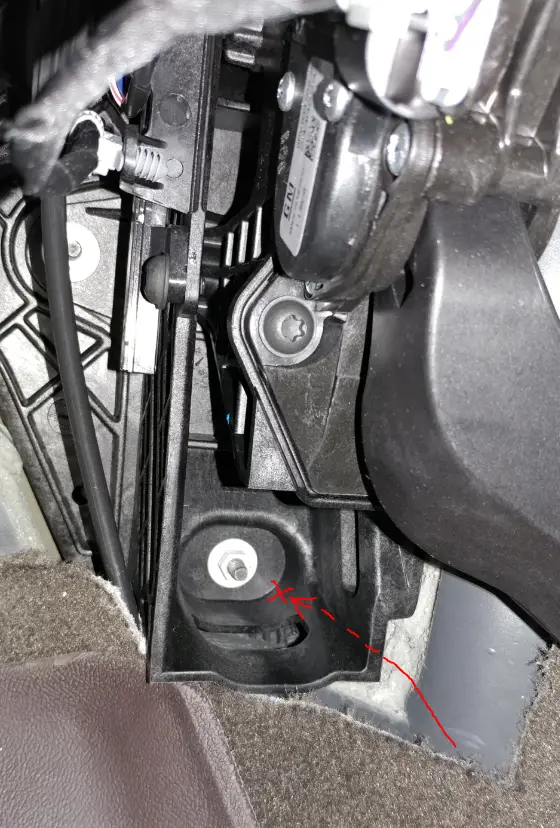
Gas Pedal Flex Solution
kevinfranklin replied to FL335i's topic in 2014-2018 Silverado 1500 & Sierra 1500
Here's where I put my stack of washers wrapped in duct tape.....back behind the red "X" which is the lower right corner of that whole plastic assembly:


-
Forum Statistics
250.4k
Total Topics2.7m
Total Posts -
Member Statistics
342,824
Total Members8,960
Most Online
-
Who's Online 0 Members, 0 Anonymous, 428 Guests (See full list)
- There are no registered users currently online