

Alec Kerchner
-
Posts
22 -
Joined
-
Last visited
Alec Kerchner's Achievements
")
Enthusiast (2/11)
15
Reputation
-

Gauge cluster swap 2015 Silverado
Alec Kerchner replied to Eric74469's topic in Modifications & Accessories
Same price as coding the Denali cluster? I assume the programming is basically the same since it plugs in and functions, just mileage doesn't work? -
A buddy and I are going to do cam swaps together this winter We both are looking for a choppy cam. Not looking for big hp gains, torque would be nice. I tow sometimes. Honestly, we are doing it for the sounds. Stock engine/trans. We both have cat back exhausts. Any suggestions on a cam and has anyone had good luck with a remote tuner? Chicago is 2 hours away from us to find a tuner. Thanks!
-
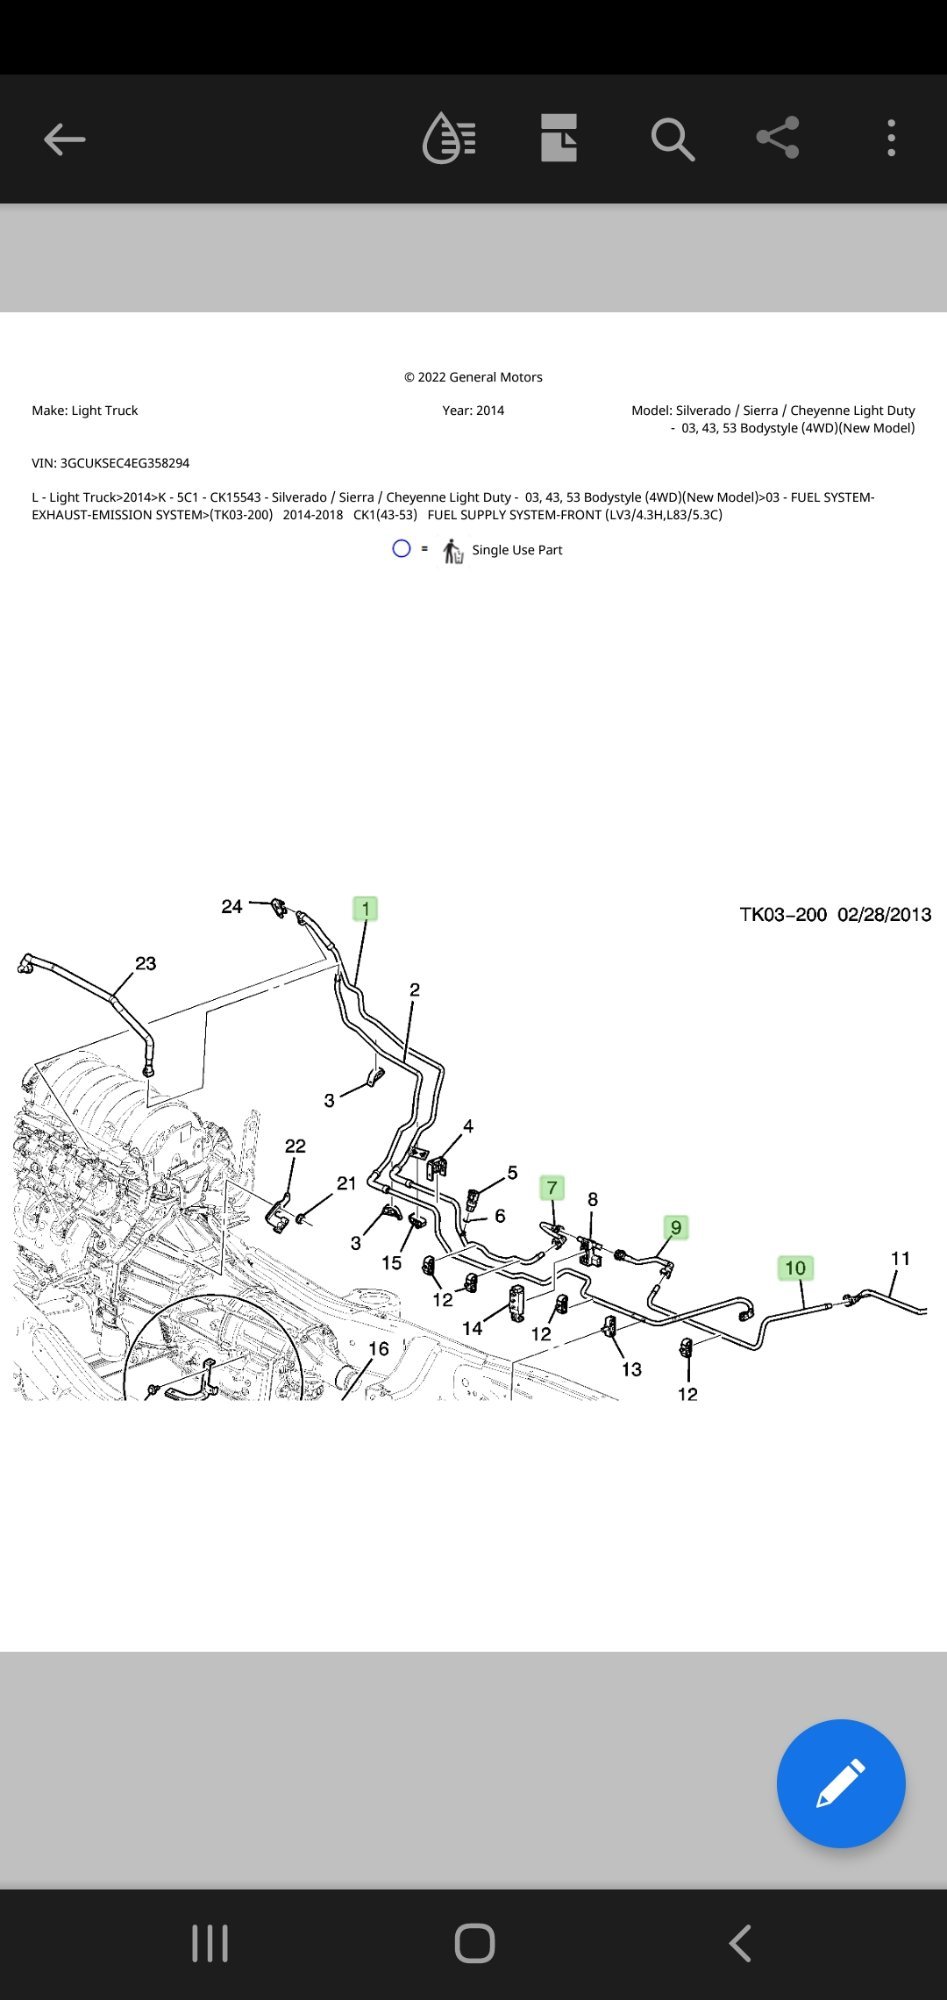
Well, after reading the fine print in my extended service plan for my truck, it says no after market, alternate fuel conversions. Now considering mine was done with a GM sensor and GM's own software (stock ecu edited with HP tuners), but it had after market compression fittings, I was worried (I think my HPFP) is leaking. So I decided to put an oem feed line in so there was no contest to the validity of the oemness. As far as parts, I have a 15' ccsb. All I needed was 4 lines and a new sensor that hadn't had compression fittings on it. The lines consist of a steel line at the tank, a short plastic line, then the sensor, another short plastic line, then a long steel line with a short rubber section in the middle. Removing mine wasn't too bad. It already had a cut in it from where the sensor was, so the back half came out fine. The front half on the other hand, I spent about 2.5 to 3 hours total on this and over an hour was figuring out how to get the front half of the line out. First, the abs module. It's held on by 3 bolts from the outside of the frame Completely remove the bottom bolt and leave the top two in by the last thread. Unplug the fuel sensor plug (its close to the abs unit on the fuel line) and undo as many clips on the line as you can. Then under the hood on the left side valve cover, you can see a rubber line towards the back, that's the fuel feed. Gently pry off the safety clip and use a fuel line disconnect tool to remove the line. (I disconnected the tank end first to drain so I didn't get fuel on the engine) Next, this is the part that took me an hour to figure out. First, drop the front end of the front drove shaft, it's only 4 11MM bolts and move it as far right as you can. Now, there is a bracket bolted to the trans by a single 13MM nut. I used 2 12" extensions and a deep socket to get to it, by running along the top side of the trans. It's up high and hard to see. The bracket had a rubber or wax coming on it and it should be the only thing holding the lines together and in place at this point. The battle is not won by simply unbolting it however. Some genius decided that it needed to be metal and folded over itself. After 30 minutes of studying this, I wedged my dremel up there with a cutting disk and carefully cut it until I was able to pry it open with a screw driver. Now the lines are free and should be finessed out. I have no tips on this, this isn't the proper way to do this. After the line is out, it was time to put the new line in. The new line is shorter than what came out but a huge pain to put in. I'm concerned for the condition of the rubber hose on mine, but what's done is done. (Twisted and kinked) I also have no tip for putting it back in. The advice I have is that the left cab bolts should probably be removed and the right loosened so the cab can be lifted a few inches on the left side. The will possibly make removing and reinstalling the lines easier. Overall, do I recommend doing this, not unless necessary like mine was, or if you aren't comfortable with the compression fittings. I first used dorman high pressure steel fittings and they leaked regardless of what I did. Then I went with standard brass plumbing fittings and had no issue but had lost confidence at this point. I feel better knowing that it's done as it should have been from the factory, minus the one bracket I cut off. To order the parts I literally copied the vin off a 2014 truck in the parking lot at the dealership and provided it to the parts guy. I told him what I wanted and he sent me the attached screen shot to confirm. Nothing else was needed. I forgot and am not editing this in, there is a bracket for the sensor and the holes are in the frame for it. I didn't get it, but I probably will. For my 2015 5.3 denali, crew cab, short bed, I used this: VIN: 3GCUKSEC4EG358294 Year: 2014 Make: Light Truck Model: Silverado / Sierra / Cheyenne Light Duty - 03, 43, 53 Bodystyle (4WD)(New Model) © 2022 General Motors

- 1 reply
-
- 2
-

-
LTFT -23. CEL set for B1 rich. Places to start?
Alec Kerchner replied to Alec Kerchner's topic in Troubleshooting & Recalls
Good thought. I'll give this a shot. Do you think -10 on the other bank is too high? -
Hi all, Started the truck up tonight and it immediately set a MIL for B1 rich. I run a converted L83 for E85. That however has been fine for 3 months. Its about 10% heavier on bank 1 than bank 2. Is it possible for an injector to be leaking?
-
Yeah, the grunt off the line and throttle response is like driving a different vehicle. It's amazing how different it is just by switching fuels.
-
Interesting you see / feel no real difference. About a week ago I was chatting up a guy in a 2500 while getting e85 and he agreed that his bone stock truck feels like a completely different vehicle when he runs e85!
-
If anyone else is considering this, cold starts now have a VERY extended cranking time. I'm looking into it. I'll update if I figure it out. Otherwise all is good. I made the adjustments from the tune shared above and that shaved another tenth in the quarter mile. The truck just feels nicer to drive.
-
How to add subs to Bose system with Nav
Alec Kerchner replied to cubangt's topic in Modifications & Accessories
I have 2 12" alpine baseline subs. Cheap and get the job done. Also no, sorry. I was half asleep when I wrote that out. I used the speaker outputs on the Bose amp, for high level inputs on my amp. This is the only picture of how I back probed the plug. This was also the wrong plug I think. I tapped the rears at first and then realized the stock amp filters all of the bass out of the rears, so then I tapped the fronts.
-
Transmission Thermostat Delete Pros vs. Cons
Alec Kerchner replied to Eddie 70's topic in Engines & Drivetrain
Nope! Ive added it to my list for the weekend. I appreciate it! I hardly take any trips longer than 10 minutes. I foresee all the benefits. -
How to add subs to Bose system with Nav
Alec Kerchner replied to cubangt's topic in Modifications & Accessories
I added subs to my new truck last week. It was pretty easy. I have a 15 Denali with bose. For the amp remote wire, i tapped the 12V outlet on the back side of the center console. Its on basically all of the same times that the radio is. For audio, I back probed the amp plug for the front speaker outputs. I used the high level inputs on my amp. I do not know what the colors were, or which plug it was. If my memory serves me right, it was the plug on the driver side of the am, with the thickest wires in it. You will have to google the wire colors for the front speakers. DO NOT USE the rear speakers, the bass is filtered out of them. Ask me how i know. The amp is located on the back wall behind the passenger rear seat. You need to remove the passenger side rear seat for easy access. For power, i found it easiest to drill a hole through the firewall. From the engine side, you will see a black tube coming out of the firewall on the passenger side. To the left of that, there is a small square of insulation missing, thats where i drilled. I drilled from the inside though. It really is about that simple. -
Transmission Thermostat Delete Pros vs. Cons
Alec Kerchner replied to Eddie 70's topic in Engines & Drivetrain
Hey Grumpy, I noticed somewhere you mentioned you are in northern IL. Im due west of Rockford. It gets fairly cold as you know and this winter is supposed to be rough. You think I should have no issues flipping the pill on my 15'? Its a 6L80. Unknown what the maint history is at 101k miles. -
I would be very interested in looking those over if you don't mind. I do in fact have the 6l80 trans due to having a Denali with the 5.3. I will post my stock file as well as the file that i made the changes to run Ethanol. I appreciating you helping me with this! Alec Sierra stock tune no ccm no changes.hpt Alec Sierra stock tune + E85.hpt
-
I did. I purchased HP tuners. All I did for the time being was enable the sensor, the corresponding MIL codes and filled in the alcohol afr table. I didn't want to do anything outside of OEM parameters. This was purely to show what the power gains on the stock GM tune is with ethanol. "I can easily just post a few tunes I've made here." What do you mean by this?
-
No idea yet. Haven't thought about it. +20whp on the stock tune will do it for a while. I will probably mess around with it for a little while. I need to see what tuners in Chicago are good with Gen V trucks.


-
Forum Statistics
250.4k
Total Topics2.7m
Total Posts -
Member Statistics
342,865
Total Members8,960
Most Online
-
Who's Online 8 Members, 1 Anonymous, 786 Guests (See full list)