

Luke Ouellet
-
Posts
22 -
Joined
-
Last visited
Content Type
Profiles
Forums
Gallery
Events
Articles
RPO
Store
Blogs
Everything posted by Luke Ouellet
-
 Yeah the truck has been through 4 builds already so the frame work was there for a few of the pieces. Actually love the box - it was that or an MTI Acoustics Stage 2 Box. Came down to lead time on the build I was doing at the time and would have ended up with the same subwoofers no matter what. I've come to prefer sealed vs. ported as well and the fiberglass construction is beyond sturdy. I also like that the JL box sits behind the front lip of the seats, every picture of the MTI boxes I see has the box project out past the seats and I'm not a big fan of that. The box has 2, 12" JL Audio 12 TW3-D8's wired at 2 ohms rated for 400W RMS each. Sub amp is giving them 880W. Previous build was giving them 600W and with a proper tune now, it is night and day. They play flat down to about 27-28hz, which I'll happily take for a sealed box with 12s. I am certainly tuned more for sound quality but they boogie when they want to.
 -
Front Door Speakers - Full Range?
Luke Ouellet replied to iceytys's topic in Modifications, Wheels & Tires
Yup - the front speaker is a full range signal with some slight bass roll off at really high volumes. If you replace the dash corner speaker with a tweeter, I would recommend an inline crossover or capacitor. The dash corners are fed with frequencies too low for a tweeter. If you replace the dash corner with a wideband (like Audiofrog's GS25, it is plug and play and handles 200hz all the way to 20,000hz, safely. -
Thanks! And it's a dramatic difference from any OEM system I have ever heard. Range rover, Benz - the key is in the DSP, it's an insanely powerful audio tool - esp. the Helix. I had actually done the main speaker wire harness and power from my previous build but knocked everything else out in 2 weekday night and 2 very long weekend days. Tuning has been on going though. The Stealthbox I had gotten lucky - Crutchfield never has them in stock and when I was chatting with an agent, they had just gotten one in stock that day - I immediately pulled the trigger, felt like fate.
-
I started initially using the AutoEQ feature in the Helix Suite with a UMIK-1 and honestly got some decent results. A little boomy in the 500 - 2k hz area but honestly for a 5 min tune, it was very passable. Parameters for AutoEQ were: All crossovers were LR 24db/octave Subs were 20hz HP and 80hz LP GB60s were 80hz HP and 1800hz LP GB15s were 1800hz HP only GS62 in rear were 80hz HP only I played a bit with it but eventually got a remote tune. I hooked up with Shannon Price this Saturday to knock out a a basic remote tune of the system. He was very competitively priced and figured it would at least be a small crash course in witnessing how he tunes, measures, adjusts, etc. as I have never seen the process done live. He spent a couple hours with me and got me pretty much 90% there and I tweaked the rest of the way to finalize the center of the stage, integrate my rears and global EQ. In full disclosure, I ran out of time to save my final measurements properly (new REW user) after I integrated my rear speakers and did some final global eq adjusting. The small hole you see @ 50-60 hz is filled and I took a touch off of the hump at 80-100hz to create a much more linear rise from 200 hz up to ~35 hz. I have rears crossed at 155 hz, 24 and 5000, 24 - this helped keeping them from distracting from my front stage at all, just a compliment. Overall, this was a drastic step up from the AutoEQ but still think the AutoEQ has a ton of value vs time invested tuning. I had Shannon measure my the autoEQ in red and it is shown here against his final tune (before my rears were added and my Global EQ adjustments) and you can see the big improvement. I had suspected my 200 - 1000hz was off after realizing things sounded a little boomy, esp with lower male vocals, lower end guitar/piano notes and that certainly seemed consistent with the measurements we saw. We started on the left side - GB60s crossed at 80 hz, 24db and 1800 hz, 24db. This shows left mid, left tweet and both measured together. Had a little hole @ 800hz that we boosted gently to ease the curse but mostly disappeared once we got the whole front stage tied together. Right side of the front stage. Had a nasty hole at 200 hz that again blended mostly away after we got the whole front stage together. Left Front Stage, Right Front Stage and Overall Front Stage. Ended up quite balanced. From there, we added the subs. Ended up inverting the polarity of my subs and crossing them at 64hz, 24 db to deal with some issues we were having at the 80-150 hz area. I have to say the the blending of my bass to midbass and location of where bass is coming from is superior with this tune. Feels like the bass rises universally from the floor of the vehicle. Overall, the system just gets better with time and break in. I will continue to tweak some really minor things and hopefully can make some time to hook up with Nick for an in person tune later this spring. I think that will be another big step forward but right now, with the tools at my disposal, I am stoked. The ability to hear a bass drum getting hit by the pedal AND feeling it in your chest is hard to explain to the average listener. Or hearing the breath and tongue clicks between words, the strings of an upright bass vibrating off the fingerboard in Lake Street Dive recordings just makes me want to sit and listen to everything again. I also now notice a distinct difference between well mixed music and poor recordings, it's amazing how much more detail you pick up on. I am currently playing around with adding the bass augmentation because I find at lower volumes (when I have passengers), the low end is lacking without a major adjustment to the my sub gain on my Conductor. I will probably experiment with differential real fill and the stage expander as well to see what it does. Lastly, this is what my Helix EQ looks like. Now to begin designing and dreaming about 3 way front stage combinations that fit in these pods: https://www.instagram.com/p/CBtiKFfp...e-fb3421979177
-
And finally my favorite shots of the final build: Knocked this out in about 2 nights of prep work and 2 full weekend days of hands on work. From here - we tuned
-
The Conductor and its mount - this one piece drove a ton a major decisions in my system - swapping to digital input with my vehicle (no NavTV currently offered) meant an alternate control for master volume and I wanted to retain subwoofer gain control up front as well. The Director is nearly impossible to fit without major cosmetic modifications and I didn't care for the look or mounting options of the URC.3 - so the Conductor was my go to piece. I worked through several mounting locations and settled on making a mount in my center console cup holder. Again, another easy piece to remove and place a small plug to cover the small hole I drilled when I trade the vehicle. This is from concept drawing, paper mock up to final implementation: Now how we got there. I worked with Delander from DIYMA to take my CAD design and have him make some pieces from polycarbonate that I would then assemble and finish. The design: Then cut with his CNC: Then I glued, sanded, testfit, sanded some more and then finally painted (primed with Krylon then used 4 coats of SEM Trim Black: And the money shot, almost looks OEM:
-
Then came wiring and tidying up the amp rack. Mounted the amps on some small rubber washers and through bolted them. Trying to isolate them from as much vibration as I can as they are mounted on my sub enclosure: From there, I wired up the amp rack (to the extent I could outside of the truck) and added a couple layers of 1/4" CCF to the bottom of the rack to conceal the nuts and provide some additional vibration isolation: Then finally I dropped the amp rack in and wired it all up. Sat for a good half hour after I finished this phase and just enjoyed the view, stoked how well it came out for an amateur install: Clean and tidy, easily accessible for service.
-
The amp rack was probably my most pre-planned aspect of the build. Designed the rack in CAD to give myself some additional shelf space behind the V8 for my distribution blocks (wanted clean fuse access) and this was my final layout: Sourced some 1/4" ABS and got the shape cut out and corners rounded. I ultimately ended up scuffing the surface and putting 2 coats of SEM Trim Black paint as I didn't want the gloss black look. It also helped keep static way down and no more fingerprints I then mocked up the V8 (covered in packing tape to protect during the install/fab process) and made some final layout adjustments for the holes needed for the connections to the V8: From here - I began to pre-drill all of the holes I was going to need for power and speaker wiring. Loaded up my drill press and went to town and then mocked up with the distro blocks mounted Got my new P One amp the next day and then added that the amp rack and confirmed layout. Picked up a couple 90 deg Audioquest RCA adapters that gained me some critical clearances on the input side of the P One. Then finally, dropped the rack in for a quick test fit, can't lie, this part got me so excited that I ended up working most of the night on the truck:
-
From here, I moved on to my input signal. I have two items here: My LLJ harness for analog and my Topping D10S for digital. Here is the LLJ Loopback Harness and where it plugs in under the glove compartment. Has 2 twisted pairs of wires providing high level speaker inputs to my Helix V8 for the factory BT (phone calls and navigation), chimes and FM/AM. Then it also have 6 twisted pairs of speaker outputs - 2 twisted pair each to utilize the OEM wiring of front and rear door speakers and 2 additional pair for the tweeters to bypass the OEM crossovers going to the dash corner locations. It also has a 12V feed and ground for something like a LOC or DSP - I just never used the ground as it caused ground loop noise when I tried it out on my old set up. Digital Signal: It was probably to aspect of my built that was going to the most design on the fly but very happy with the outcome. Decided I was going to mount the Topping inside my center console after trying out a few locations and was hoping to retain some access to the device visually and wiring wise but still keep it stealth. Started by drilling holes in the bottom of the console and the console liner. Put some rubber grommets to protect wires: Nice and clean penetration with grommets: Used some VHB, Dual Lock Velco to mount the Topping: Mounted and really like the concealed wiring but easy to get to. Audioquest Pearl Optical and USB A-B cables to a Apple CCK Adapter. Easy to open the console check the sampling rate.
-
Subwoofer: I had installed the JL Stealthbox as part of my previous builds (aka why you are seeing the JL amp and LCQ-1) but wanted to show a few pics of the fitment and unit itself: Two 12TW3-D8's wired @ 2 ohms and the amp shelf/pocket. Installed under rear seat (Again - from my old install): Seats down:
-
Then added Soundskins CCF rings to all 4 door speakers: A before and after of the doors: From here, I jumped to my GB15s. Started by getting some 47 uf, 100V caps installed on a small harness to each tweeter: Then got the acrylic mounts butyl taped front and back then got the tweeters mounted in the brackets and added some CCF foam rings: Then dropped the tweeters in the dash and wired them up:
-
From here, I moved on to getting my speakers mounted in the doors. I worked with Delander to create the custom ABS mounts for the GB60s and GS62s and some acrylic rings for GB15s. The fitment was great, only needed some minor trimming on the GB15 mounts. Here are the mount design and after fabrication (before they were shipped to me): Started with getting the GB60s drilled and tapped on to the mounts before I fit the mount to the door: Didn't take photos of the GS62 prep but same thing. Then I move on to prepping my GB60 wiring. I used the harnesses I got from Crutchfield from my old builds that allow me to plug and play into the OEM harness without splicing: Then finally through bolted the mounts with stainless hardware and lock washers/nuts, CCF taped the opening and mounted the speakers:
-
Then I moved on to treating the inner shell of the doors with the SoundSkins Pro SSK Door Kit. The paper was a pain to peel but the doors are literally air tight at this point and I am very please with the fit and finish: All 4 doors treated: Nice and clean, air tight opening at the OEM speaker locations: Then I moved on to trimming and cleaning up my inner door plastic panels. I had previously applied some CCF to help with rattles but this time I added from leftover CLD I had to the local surround at each speaker location, trimmed the plastic extrusion to prevent conflicts with my CCF rings and finally tessa taped all my body clips: Panels with CCF and clips tessa taped: I can honestly say, I've yet to hear a rattle in my doors. I can barely hear my tires are highway speeds now, can't imagine what it would be like if I fully treated the doors and rear wall of the truck.
-
Oh it will be at least 3.5 to 4 years before I trade this one most likely. We tend to cycle our vehicles at 75k or 110k miles. Seems to be our best trade in break points.
-
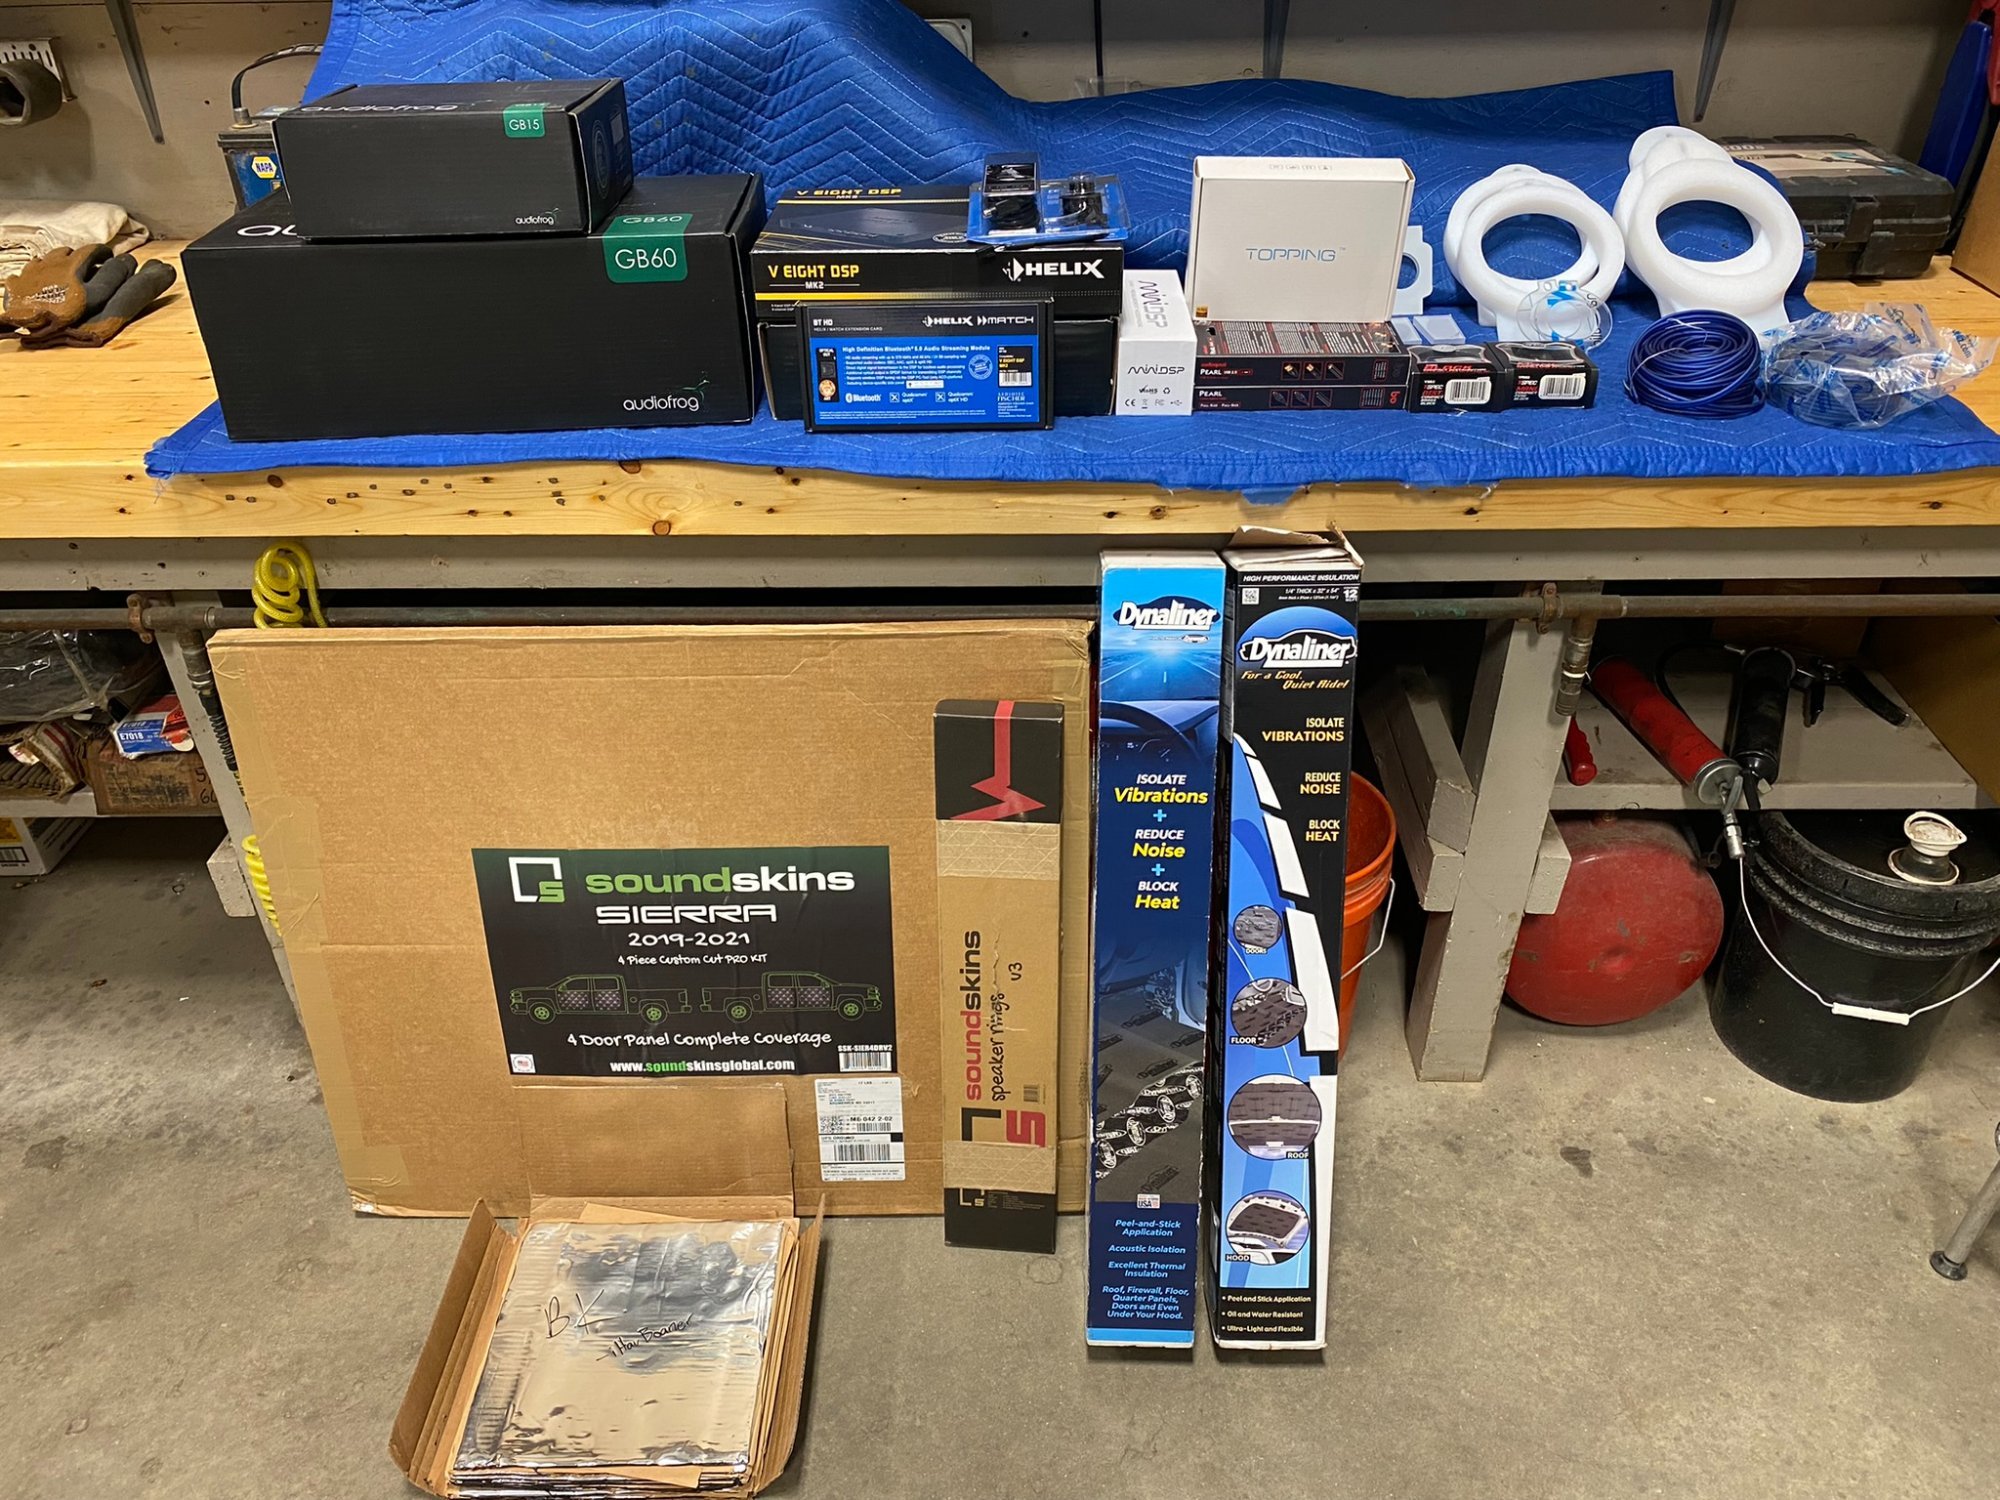
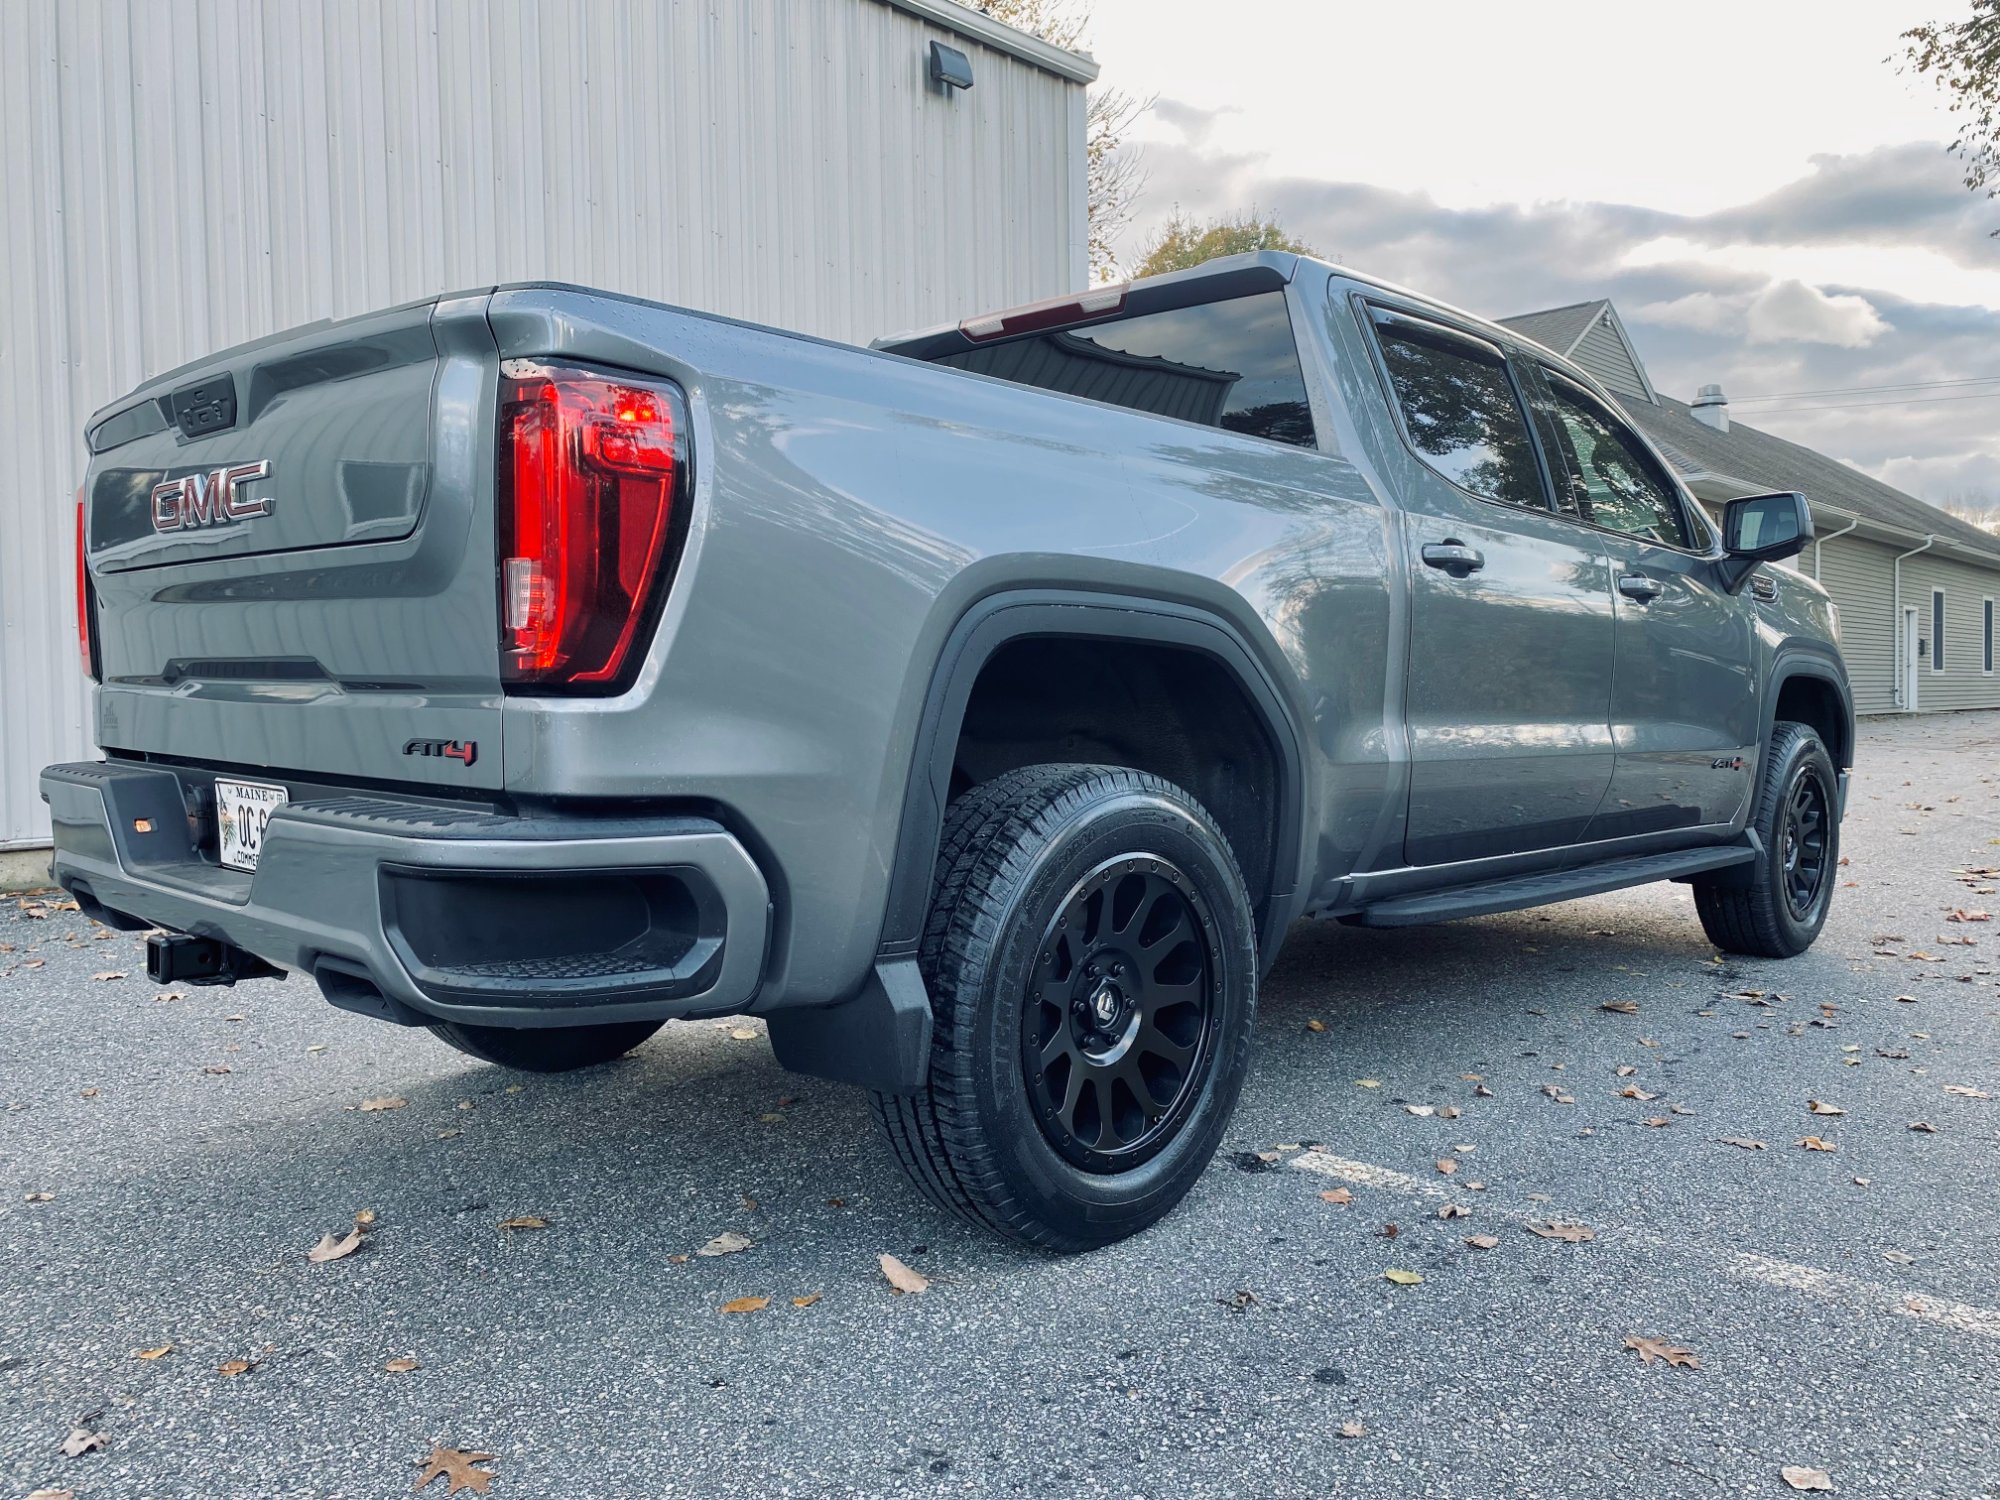
Hello all - this is going to be an abbreviated post from my upload to DIYMA. https://www.diymobileaudio.com/threads/2021-gmc-sierra-helix-audiofrog-gb-jl-resonix-the-revolving-door.444799/ Going to be a long read but hopefully enjoyable to follow along with my rapid descension into the rabbit hole of car audio. Finally had made arrangements to find a new 2021 6.2L AT4 in Satin Steel Metallic that had a confirmed delivery date to our local GMC dealer. This is a company truck for our family construction business. As most people know, inventory is literally nill nowadays and getting any sort of options on your vehicles (esp. GM trucks) cause major issues with delivery times. We found this truck with production spot but was coming with no options added but the basic AT4 trim is still decent enough. Love the truck and have had 3 of the previous Sierra body types. The 10 speed is fantastic and finally the interior are getting refreshed. Before I jump into the audio side of this post, I wanted to briefly show what other mods have been done to the truck: Exterior: 20x9 Fuel Vector Wheels 275/60/R20 Michelin LTX Defender Tires (Drive 99% on road and the stock Duratracs are noisy af/also have Nokian winter tires) Magnum Headache Rack OEM Off Road Running Boards Illuminated Black Front GMC Emblem Black Rear GMC Emblame Black CarbonPro AT4 Emblem Black OEM Exhaust Tips Truxedo Lo Pro Tonneau Cover Bed Mat Interior: ProClip Phone Mount OEM All Weather Mats Mechanical: S&B Cold Air Intake Pulsar LT Programmer J&L Oil Separator On to the audio side of my journey: I knew I was going to make some level of audio upgrades because the truck was not coming with Bose system and regardless, the Bose system is a sad system in itself. So I began to research. Hadn't upgraded car audio in anything except high school, had an Infiniti QX4 with Alpine HU, Kicker 700.5, Some Kicker Speakers and CompVR10 Sub. So I started by setting a budget - initially wasn't planning on a sub, just speakers and an amp only and put $1500 as my goal. Long term, boy was I naive on my wants vs price of components. I am not going to post the other 3 previous audio builds that I did in this truck before I got the system I am posting here. Definitely check out the link above if you want to peak into the progression of the overall build. In short - I certainly underestimated how much time and effort I would sink into this because I find audio and how perceive music fascinating and a piece of advice to my past self. Save for what you want, buy once, install once - I learned a lot in practice but could have saved myself a lot of install hours and returning/selling items had I spent another few weeks researching and talking with experienced installers/DIY'ers. Ok, on to the build. My objectives were: As stealth as possible (company vehicle) Retain ability to return to OEM fit/finish upon trade as well Audiophile sound quality Accurate, slightly warm but powerful speakers and subwoofers Ease of use/straight forward integration with factory head unit Reduce/eliminate cabin noise and rattles Parts list with description and reasoning for purchase: Speakers Front Stage Doors - Audiofrog GB60 - 6" Mid/Woofer A popular, high end mid/woofer driver that is truly spectacular. It has the exact sound signature I was looking for, slightly warm but packs amazing punch and accuracy with literally no distortion at any level I play. They are expensive (relative to most 6 - 6 3/4" drivers) but in my opinion, worth every penny Dash Corners - Audiofrog GB15 - 1.5" Tweeter The "best" tweeter to pair with the GB60 in a 2 way set up. Have mine crossed down to 1800 hz and the detail is insane. I hear new things every time I listen to a song. I will eventually sell these to move into a 3 way set up later this year but they are killer paired with the GB60. Rear Stage Audiofrog GS62 - 6" Coaxial Audiofrog's most popular coaxial and works perfect as the rear fill for the truck. Well made and easy to tune. Rear speakers are always the lesser focus of most builds. Subwoofers JL Audio Stealthbox with two JL Audio 12" 12TW3-D8 Subwoofers, wired to 2 ohms It was between this and a custom box from MTI Acoustics in Texas. I settled on this because of the pocket it provides for the amps, it's sealed fiberglass (extremely well built) and can be installed or removed in under 20 min without any factory modifications. It also ended up cheaper and much faster to ship than the MTI set up. I think I ultimately would have been happy with either. Now that I have them properly tuned and powered with my current Helix P One mono amp (giving them about 900W), they are excellent shallow subs. They play flat down to around 28-29 hz, which I am very happy with considered they are sealed and very thin 12s. I tune towards sound quality with some good low end punch but when I push my sub gain up on my console audio controller knob (Conductor) they will flex the windows and mirrors on my doors. Amps and Controller Helix V8 DSP Amp with HEC HD Bluetooth Card 75W x 8 @ 4 ohms or 120W x 8 @ 2 ohms 8 channel amp, 10 channel DSP I only use 6 of 8 channels plus the 2 RCA outs now but will eventually use all 8 speaker channels when I go to a 3 way front stage. Probably the decision I hesitated with the most until talking with Nick from Vanguard Automotive Design in NY. He has been an amazing resource and builds some INSANE set ups. The online community has a perception that midbass or midrange/woofers need to be overpowered to get the output folks need to listen loud. While at the competitor level this can certainly be true, I don't think it is nearly as important at the common car audiophile. Most folks run their GB60s at 150 watts+, I run mine at 75 watts with the V8 and they get louder than my ears can handle and I listen to music very, very loud in general. Understanding power to SPL ratios helped me settle my brain a lot. Amp features - there is literally no noise in the system, it's so clean and quiet that I think something is wrong at times. It's also a TINY foot print for an 8 channel amp which was important for me to fit all of my amps under my rear seat. Build quality is S Tier. Helix DSP software - it's the gold standard in car audio tuning for a reason. Literally can customize anything, in the right hands, a DSP alone can transform the entire audio system in ANY vehicle. Helix again, is the class leader here. The fact I get the DSP and 8 channel amp in one concise unit makes this my favorite piece of hardware in the system. HEC HD BT Card - This lets me stream Bluetooth directly to the amp (I don't not but maybe when Apple support the HD BT streaming codec), will let me tune/connect wirelessly and adds an optical output. Mostly bought this for the wireless connectivity. Helix P One Mono Amp 1 x 500W @ 4 ohms, 1 x 880W @ 2 ohms, 1 x 1500W @ 1 ohm My subs are wired @ 2 ohms, rated for 400W, each I scored a great deal from a community member on DIYMA otherwise wasn't actually looking at this amp because of the price tag. I was originally looking at the Helix M One X or the Mosconi Pro 1/10 because of their size. This amp will allow me a ton of flexibility in future builds compared the M One X. When I compare this to 600W I was previously getting from my JL XD1000/5 amp, it is night and day. Output, cleanliness and build quality are much, much better. Also fits extremely well in my under seat location Helix Conductor A central, programmable knob that is the center piece of my console and dash area now. Controls my master volume, subwoofer gain (0.5 db increments), rear fill volume and several different audio presets It's a sexy little piece of engineering Input Signal Digital (Music) (in order of sequence) iPhone 11 Pro Max to Apple CCK3 Camera Kit (powered from a USB-C to Lightning cable plugged into my center console) to Audioquest Pearl USB A-B Cable to Topping D10S DAC (Digital Audio Converter) to Audioquest Pearl Optical plugged into Helix V8 Amp This is what I use to play music directly from phone while completely bypassing the head unit and avoiding any un-needed digital to analog and analog to digital conversions of the signal. It has made a nice difference, especially on Master versions of tracks on Tidal. The Topping D10S is simple and just works. Analog (OEM Bluetooth Sound, Navigation, Phone Calls) LLJ Customs out of Arizona who specializes in custom wiring harnesses. They make a full plug and play wiring harness that intercept the 4 high level speaker outputs under the glove box and provides a long harness to mount your amps anywhere in your vehicle. I got the Loopback option which also includes an additional set of speaker wires that use the OEM speaker wiring without splicing, it is a massive time saver. I also had them added an extra set of speaker wires for my tweeters as I was going to go active. Overall a great investment for someone who wants plug and play DIY, just take 5-6 weeks to get. The Helix software auto swaps from Digital to Analog when I get a call and back again seamlessly when the call ends. OEM Controls/Carplay If you keep your phone connected to the truck via BT AND use the Apple CCK3 Kit that lets you select which audio output you want, you can have a digital signal out AND retain all OEM controls except master volume. I use the Conductor for the master volume now which actually I prefer over the HU or steering wheel. Carplay - if you have wireless Carplay, same thing. You can retain it via BT but the current iOS software recently screwed up the audio output function and swaps the audio out to Bluetooth every time you swap songs. It is a known issue that supposedly Waze messed up. Sound Deadening Outer Door Shell Resonix CLD - Don't anything else to deaden your doors, AMAZING difference in mid bass from my doors. Thick as hell and sticks strongly. Performance vs value - it's the best. About 75% coverage on outer shell, beyond this becomes diminishing returns Dynamat Dynaliner CCF 1/4" - Added about 50% coverage of the outer shell with some 1/4" closed cell foam I had left over from my earlier builds. Inner Door Shell Soundskins Pro SSK Kits - I bought these as an all-in-one timeaver CLD + CCF deadening solution to seal the inner door shell. The paper is a pain in the ass to peel off during application but they are well made and my doors are literally air tight now. Inner Shell of Plastic Door Panel Resonix @ Speaker Pockets Dynamat Dynaliner 1/4" - About 50% coverage to help with rattles Tessa taped all of body clips Soundskins Rings @ all speakers Custom Work Custom ABS speaker mounts - a really nice rigid solution mount to the doors and speakers with Custom center console Conductor mount - made by me and honestly my favorite finish piece of the build. Will be posting the entire build process shortly...hope you folks enjoy!

-
LLJ Harness here on a 2021 AT4 Non-bose and have my dash corners fed with new speaker wire from my amp. No chimes or alerts here anymore, I personally don't mind but I am confident that those sounds were only wired to the dash corners so we have both by-passed them. I'll actually check this when I make my upgrade to the GB60/GB15 and plug the old stock dash speaker back in and put my blinkers on and see. I'll let you know in a couple of week.s
-
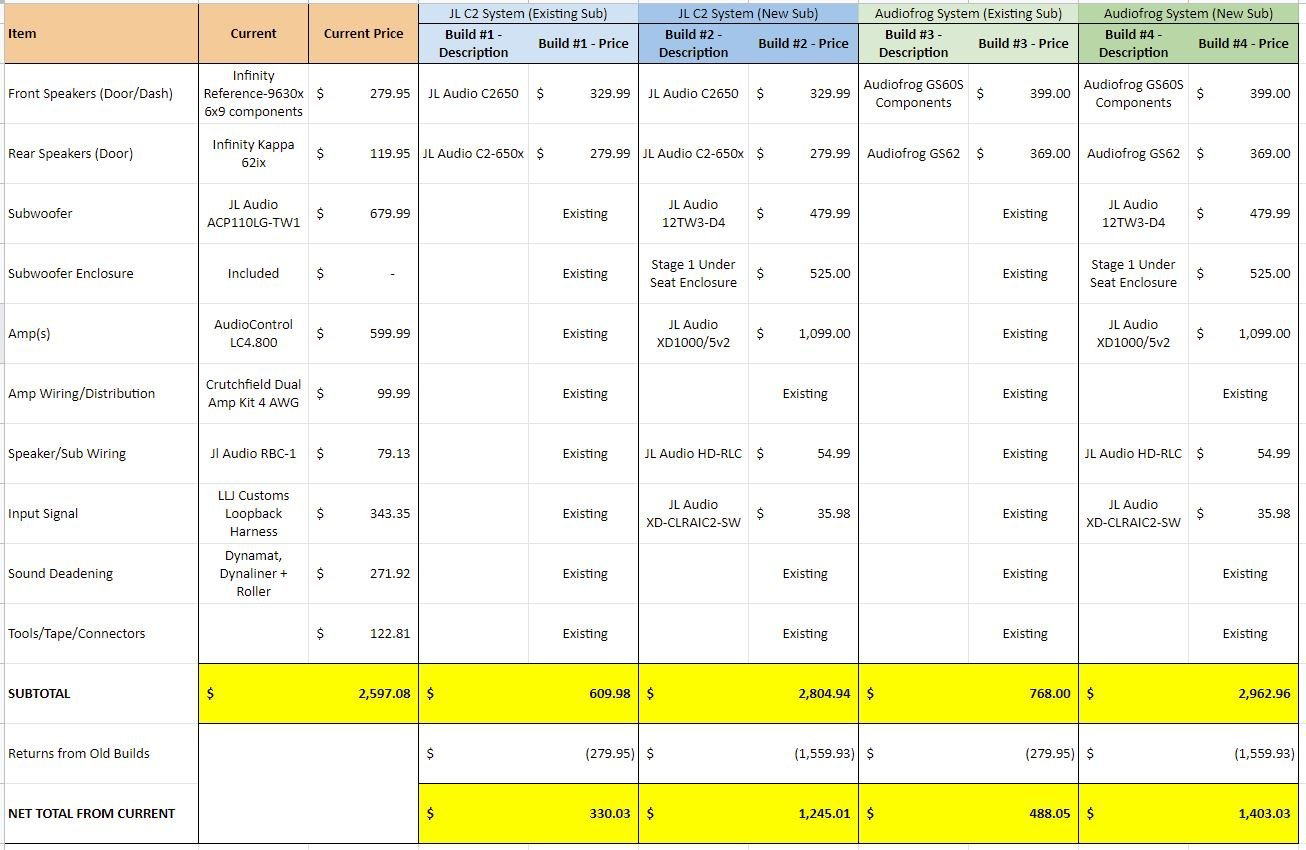
2021 Sierra AT4 6.2L Looking to get some opinions on my upcoming upgrades to my build and to get some help with value and speaker selection. Just not quite happy with my current system and talked to a few folks about DSP value in a 4 channel, passive system - I personally don't think it's worth the complexity but I am still open minded to discussion. Not an expert by any means. First real serious build as an adult. Going with an MTI Sealed Stage 1 sub enclosure with a cubby for the amp and crossovers mounting - if I swap subs. 1 sub with cubby cause I am trying to not tear apart my company truck too much more haha. Already went from the 8" JL Microsub to the 10" version which does much better but still missing those deep lows and feeling like it's always pushing itself to its limits (without having a better way of stating that haha). Trying to decide whether I head into the JL C2 or Audiofrog GS Series as they both seem to be significant clarity upgrades to my Infinity's. My "returns" assume I am getting money back for amp, front speakers and sub (depending on the build). Rear speakers are discontinued and I doubt I can return them to Cutchfield
-
2019 Silverado Speaker Level Audio Tap
Luke Ouellet replied to grimmysnr's topic in Modifications, Wheels & Tires
This is my recent convo with AudioControl. Still waiting on my LLJ Harness to finish my install but hope this helps as the LC4.800 I have has an LC7i "built in" Message to AC: Hi there, Been diving into videos, threads and loads of reviews for putting together my humble build for my 2021 GMC Sierra 1500 Crew Cab AT4, non-Bose. I was hoping to get some help on summing, Accubass and hopefully an opinion on crossover freq. My set up is as follows: Audio Control LC4.800 Amp Infinity Reference REF-9630cx, 6x9 components, front door/dash tweeter Infinity Kappa 62ix, 6 1/2s coaxial, rear door JL Audio ACP108LG-W3v3, powered 8 inch subwoofer LLJ Customs Loopback Harness Boatload of Dynamat My questions are: 1 - Would you recommend summing the inputs or keeping them separate? Does turning summing on prevent the ability to use balance left/right/front/back? AC: Thank you for contacting AudioControl. The one thing worth knowing in this setup is that summing would remove your ability to fade between front and rear, but maintain your ability to balance from left to right. 2 - Accubass - Would you recommend using Accubass for both channels? Or one of them? Or none, since I am using a sub? AC: My recommendation is to start with your front signal in the Front input, and rear signal in the Rear input, with no summing and with AccuBass turned off. By default, the Line Output you use to send signal to the sub amp is listening to the Front input signal, and you can adjust AccuBass for this output even when the switches are set to "disable." Test this out and see if the signal sounds the way you hope it would, and that the sub is playing all the low frequencies. If it sounds good -- perfect, you're done! If it seems like something is missing, try swapping the front and rear inputs on the amp and see if that resolves the problem. If it's still not sounding right, turn the Front/Rear Bus Sum on, and that should get things sounding good. 3 - I am planning to set my 6x9s at 60 hz (high pass), my 6 1/2s at 70 hz (high pass) and my sub 80 hz (low pass) for crossovers. Am I too all over the place or is this something I should tune by ear? Do these numbers look ok? AC: With regard to the crossovers, systems are conventionally set up with the door Highpass set to match the sub Lowpass. For example, if your door is going to play 70 Hz and up, the subwoofer should play 70Hz and below. That being said, if it doesn't sound right to your ear, you can certainly set the crossovers the way you suggested. In fact, your idea for the crossover is very similar to how I have it set up in my car. I think little bit of overlap on the low end really improves the listening experience. -
Show Us Your 2019 & Up T1 Pictures !
Luke Ouellet replied to Sierra Dan's topic in 2019-2026 Silverado 1500 & Sierra 1500
2021 Satin Steel Metallic AT4, 6.2L 20x9 +19 offset Fuel Vector Wheels 275/60R20 Michelin Defender LTX M/S CarbonPro Black Emblems (have black illuminated emblem and black rear emblem now) Black Factory Exhaust Tips OEM High Clearance Off Road Running Boards S&B CAI, Pulsar LT, 1300W Infiniti/JL Audio Sound System Waiting for my headache rack and Borla Black Chrome Touring Exhaust to come in Love the street friendly but still aggressive look that the wheels/tires create.
-
Installing aftermarket audio questions
Luke Ouellet replied to Big Ragu's topic in Modifications, Wheels & Tires
I was quite literally you a few weeks ago. Bought a 2021 AT4 that the dealer had premade and knew it was coming with a bone stock non-Bose 8" system. I knew I was going to pursue an audio upgrade. CT Chevy is spot on - LLJ Customs has been amazing and I don't even have my harness shipped yet (just ordered a couple weeks ago). I have asked them dozens of questions and gotten a ton of detailed responses. Get yourself their "Loopback Elite Harness" - lets you plug and play under the glove compartment, feed your inputs to your LC7i then out to your 4 channel and mono. Only need to run your power and harness to your amp mounting location, super super approachable. Only thing you need to determine is the clip colors going into your radio module under your glove compartment - check their website out for this. https://lljcustoms.com/collections/chevy-gmc-cadillac/EHSGM I also recommend adding the component option to the harness which lets you keep your crossovers with your amps instead of in the doors. I am running a LC4.800 (aka a LC7i with a 4 channel amp as one piece), then a JL Audio 8" micro-powered sub and Infiniti Reference 6x9 Components in the front door/dash and Infiniti Kappa 6 1/2's in the rear doors. The LLJ Customs team basically walked me through the entire install via some questions. Check out the video below to explain the harnesses. Their channel also has an install video for an amp into 2019 Trail Boss that helped me a ton. -
Hey there - just installed my S&B last night and did my Pulsar last week knowing I was going eventually get my S&B. I routed the Pulsar wire under the cross brace and used some VHB locking velco on my Pulsar and its quite rugged and clean. Use a couple zip ties to keep things clear from coolant lines and you are set. The bracket that comes with the pulsar can still be placed on the stud bolt BEFORE you put the S&B air box in your truck. Then use the flange nut to secure the airbox and bracket together. This should make sense when you go to install them. Hope this helps!


-
Forum Statistics
250.5k
Total Topics2.7m
Total Posts -
Member Statistics
342,870
Total Members8,960
Most Online
-
Who's Online 8 Members, 1 Anonymous, 544 Guests (See full list)