


corwest
-
Posts
351 -
Joined
-
Last visited
-
Days Won
2
Recent Profile Visitors
5,845 profile views



corwest's Achievements

Enthusiast (5/11)
129
Reputation
-
Selling my swap cluster for 2015s was used in a 2015 Silverado 2500 gas for a swap. I have both colors of gauges I'll include, they are a simple swap. I modified the Green/blue gauges by soldering the correct color leds on the board if i remember correctly noy.pisitive but they all work when removed. LCD display will display red graphics and that part cannot be changed. Make sure to get programmed before you plug in so you don't brick the cluster. I'll ship UPS and will accept Paypal. Asking 299 shipped. Thanks,,

-

Denali Cluster Swap (Hybrid Cluster)
corwest replied to corwest's topic in Modifications & Accessories
So you were able to get a 2017 Denali cluster with the blue graphics in display with a 2014? Interesting. Ill bet all that cost a pretty penny though. -
Denali Cluster Swap (Hybrid Cluster)
corwest replied to corwest's topic in Modifications & Accessories
Yeah the servos are a little harder. If you can find a bricked cluster with them for cheap they will still work too. -
Denali Cluster Swap (Hybrid Cluster)
corwest replied to corwest's topic in Modifications & Accessories
Yeah you can swap overlays back and forth. As long as you have a diesel since the tach only goes to 5k on the diesels and 6k on the gas. If you use a diesel overlay on a gas you might have some indicator lamps in the wrong spots too. -
Denali Cluster Swap (Hybrid Cluster)
corwest replied to corwest's topic in Modifications & Accessories
You can find just the boards and overlays from the 16+ blue clusters. (I found some on eBay) That's all you can use anyway. You would get your current one programment that Chris confirmed would work then just swap out the physical guage boards and overlays. Definitely cheaper than getting red radio and HVAC. You would still have the red digital theme though as you can see in my pictures. -
Yes this is the expensive but "easy" route to get the guages blue. The other way is a bit more involved.... But hey, the whole thing is pretty expensive when it's done.
-
No that is not the case. You still need a 2015 cluster for a 2015. You can however take the servo boards from a blue cluster and put them in your 2015 cluster to give you blue physical guages. I have a pretty extensive thread on this in the 2500hd section. There is a link a page back.
-
Denali Cluster Swap (Hybrid Cluster)
corwest replied to corwest's topic in Modifications & Accessories
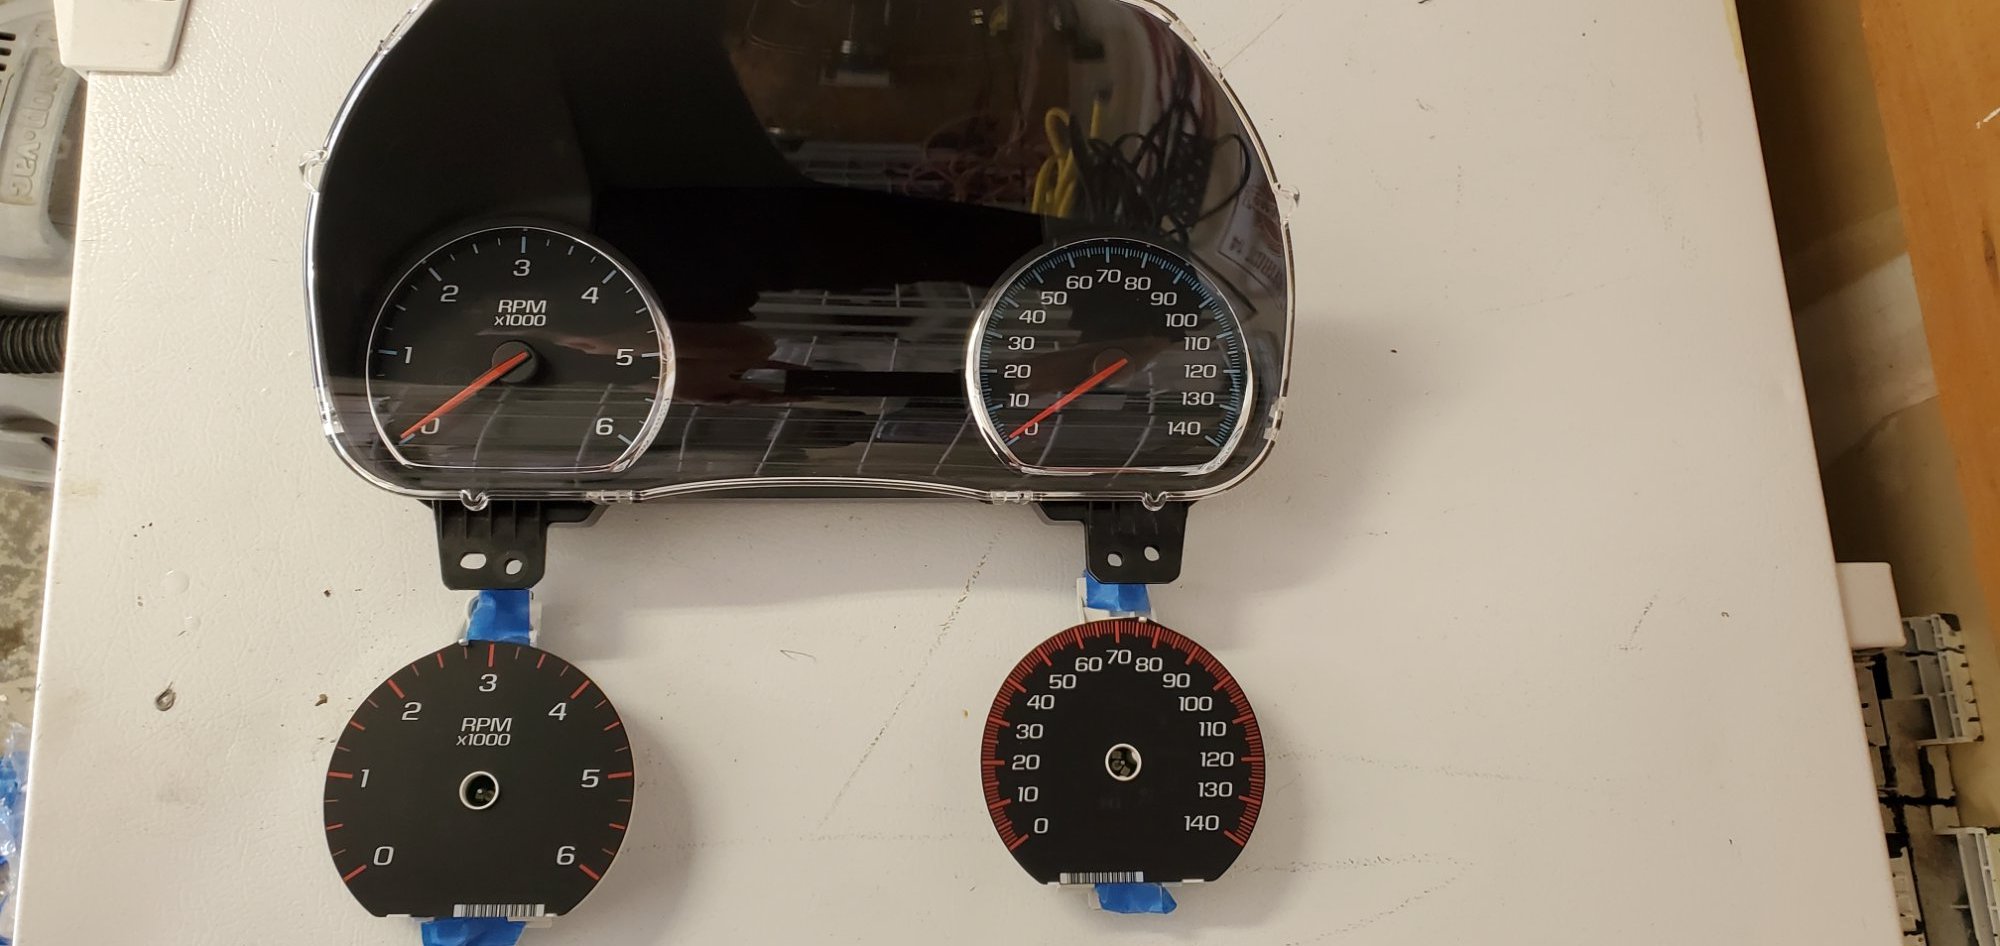
Update to this project. I can confirm that the servo boards from at least a 2017 cluster will swap over to the 2015's. So those of you with more money than time can simply swap the boards and faces from a 2016 with blue or 2017+ cluster. That makes this about a 30 minute job and much easier. and for what its worth, the screens are also interchangeable as well. No that you gain anything from swapping them. -
Update to this project. I can confirm that the servo boards from at least a 2017 cluster will swap over to the 2015's. So those of you with more money than time can simply swap the boards and faces from a 2016 with blue or 2017+ cluster. That makes this about a 30 minute job and much easier. and for what its worth, the screens are also interchangeable as well. No that you gain anything from swapping them.
-
That's half of it. The problem was that the Denali cluster has red LEDs backlighting the red faces so both had to be swapped.
-
Denali Cluster Swap (Hybrid Cluster)
corwest replied to corwest's topic in Modifications & Accessories
Thanks for the replies. I am hoping that someday someone (Chris White) can figure a way to copy the graphic assests from a 2017+ cluster and put them on the earlier ones. Don't know if that's possible due to other changes in the cluster hardware though but one can dream. -
The faces do have an adhesive that keep them on the white difuser but you can pull them off pretty easy. It seems to be more of a double sided tape than a glue
-
Here you go, made a "how to" on what I went through to accomplish this setup.
-
Denali Cluster Swap (Hybrid Cluster)
corwest replied to corwest's topic in Modifications & Accessories
Hey thanks for the reply, I'm sure you can understand given your contributions here, that this forum only gets better when people share their crazy projects so others can use and improve upon our information we can provide. I figured this is probably a one of a kind mod that hasn't been done before so might as well share my experiences. By the way i'm still loving that center console courtesy of your harness haha. Love your work. -
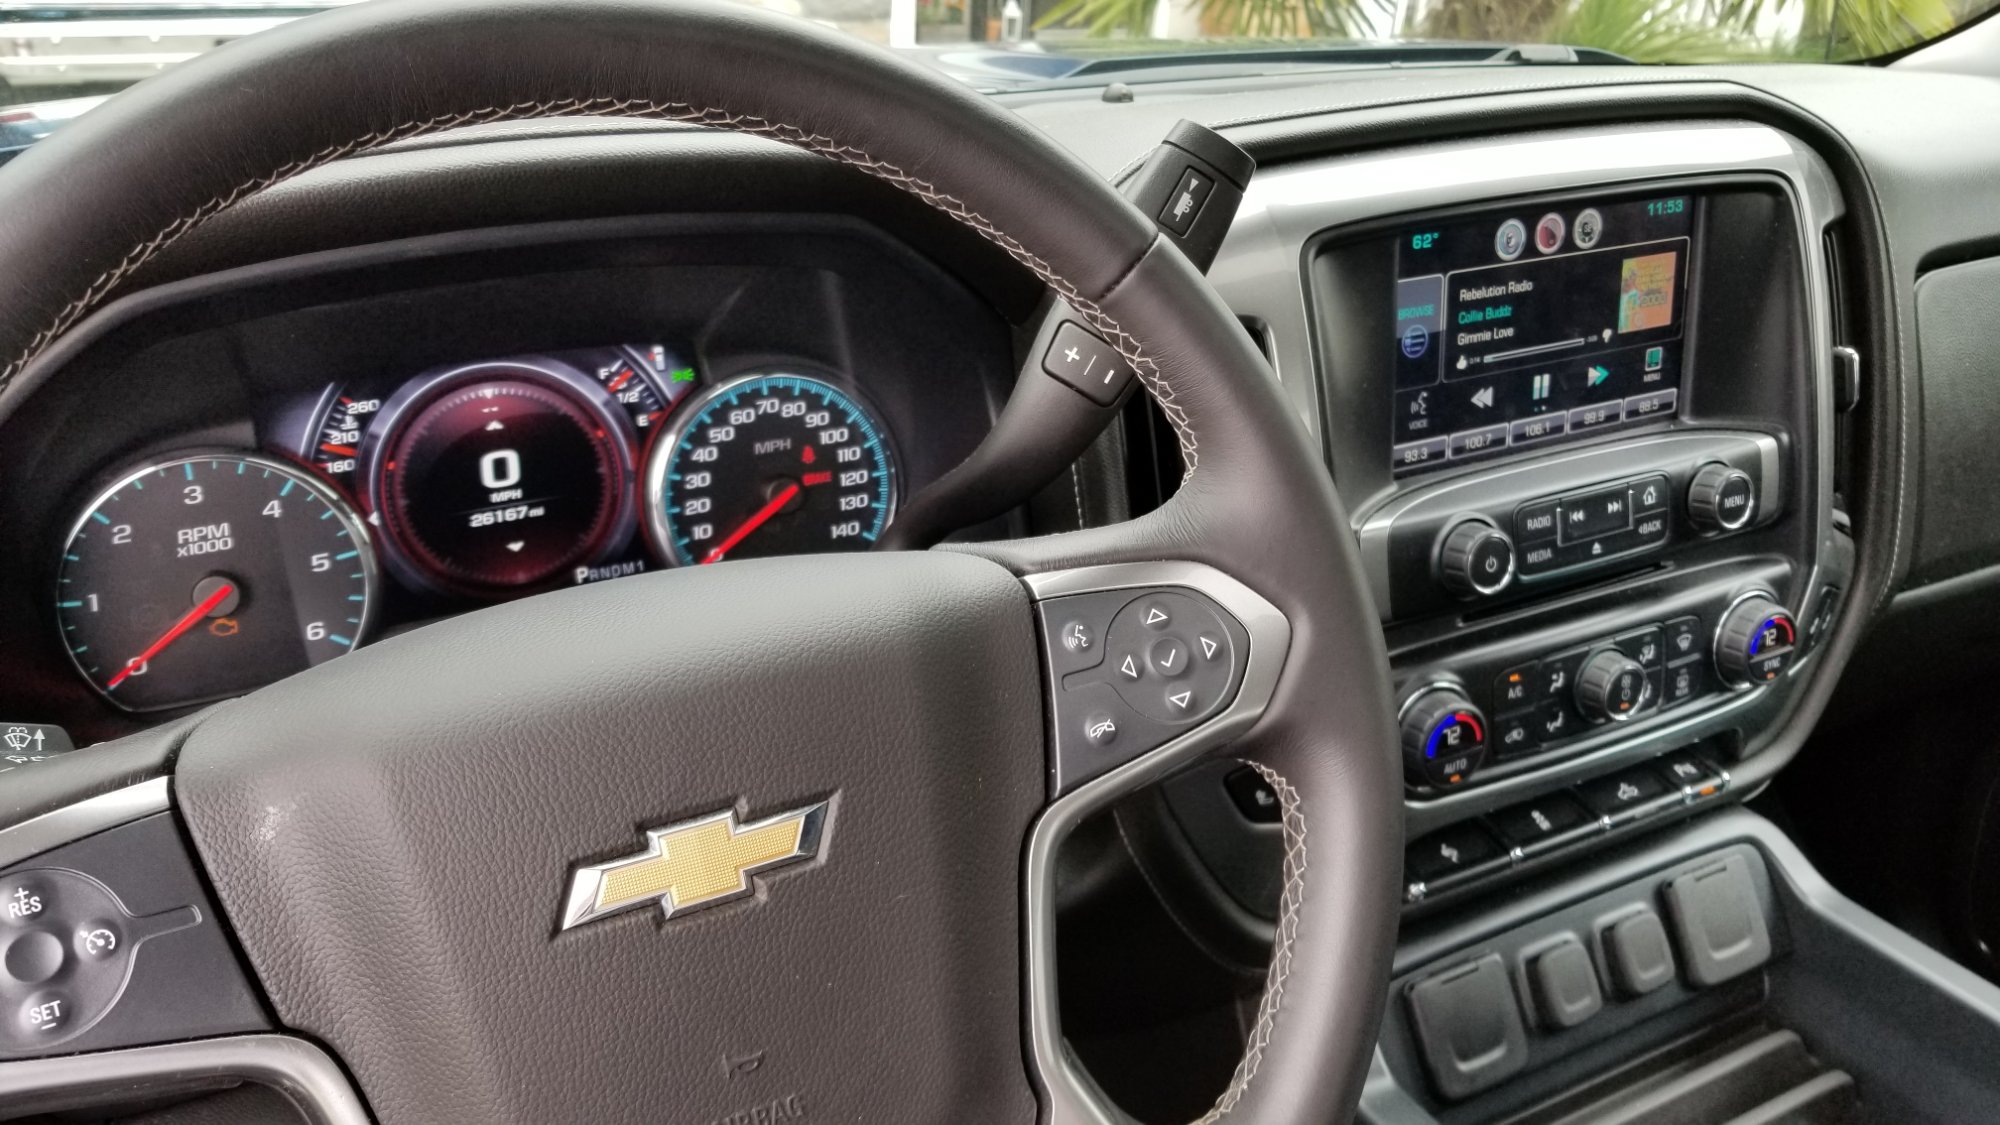
At the request of another member, I'm going to detail the route I took to get the Denali Cluster into my 2015 2500 LTZ and match the physical gauges to the chevy blue color This takes some soldering skill so do not attempt it if you have never touched a soldering iron. A little backstory to anyone reading who isn't familiar, you can put the Sierra Denali gauge cluster with the 7" center screen into your same model year non Denali truck, (even Chevy). There are stipulations to this that I wont go into so please read this thread for more info. Also, Please don't start blasting emails to Chris White (White Automotive & Media Services) asking for details without the requested info from him. I see a lot of people who don't read prior to sending requests and I for one don't want to see this service dropped because they get tried of it. After getting the correct cluster from a Denali and sending it off to be programmed by Mr. White, I received it back and put it in. Great upgrade, everything works as it should and they look awesome. The one thing I did not like about this whole process specifically for the 2015 model year was that there was no cluster made with any of the chevy blue theme in it like the late 16,17, 18. So in my Silverado I was stuck with the cluster from a GMC that didn't look right with the red. Now going forward (as of now) there is still no way possible to get the graphics on the center screen to have the blue, only the red in 2015's. However, depending on what theme you choose in the menu they are pretty subtle and don't use a lot of red in them. I can deal with that. There is a way to at least change over the physical gauges to the blue. Which I will outline here. Basically what we will be doing is changing the gauge faces and the LED's behind them providing the backlighting. You need to source the gauge faces from another cluster somehow. I found just the faces for sale on ebay. They do have to be from the Denali cluster as the locations for the warning lights are different than non Denali clusters. Also watch for Diesel vs. Gas since the tach is different too as well as KPH primary vs MPH. The backlight LED's became the problem for me. I could not for the life of me find the blue or cyan or turquoise or whatever color they are anywhere for sale. Without knowing the color wavelength i was shooting in the dark and struck out every time I ordered what I thought were them. So i went another route. Chances were that most of the chevy clusters use the same components across the board. I was going to source them from my old cluster but nope, they use all white LEDs and use the color of the tick marks to change the light output. So wandering through ebay one day I came across a 2014 chevy Cruze cluster for sale for $13 and $4 shipped. I did a quick google search for the cluster and saw images of what appeared to be the same chevy blue color used in the Silverado's. So i took a shot ant ordered it not expecting much. Turns out they are a perfect match! they are the same PLCC-4 Leds used in the Denali cluster and their output is the chevy blue that i was looking for. plus for $17 its worth it. Here is the cluster in question. I have seen many for sale at the same price as well. Taking it apart there are exactly 8 of the cyan colored LEDs that you will need for the swap. So don't ruin any or you will need more... I 'm not going into soldering techniques either here so if you aren't confident, practice on some of the other ones on the Cruze board since its garbage anyway. Just remember not to pull on the LED before its free from the board or you will rip the solder pad right off the board and ruin that LED mount point. This cannot be undone so be careful. Now that you have a stack of LEDs, its time to go after the ones on the Denali cluster. Take the front plastic lens and chrome rings off in one piece. its easier. There are 4 screws holding it together in the back. Take those out first. Again, I'm not getting into the details of disassembling the cluster since it comes apart the same way as the Cruze one you just did. Take off the needles and remove the gauge face and warning light divider assembly in one piece. It will look like this. You will notice that you will be left with the servo boards in the cluster along with the screen . flip up the clamp on the ribbon cable holding the boards in and remove them to work. Here they are . Notice the block of 8 LEDs on the bottom. These are responsible for the white numbers and blue or red tick marks. We want to remove all the "Ticks" LEDs. before you remove them take not and mark the orientation of the LED on the board. the LED has a corner cut out on it and that indicates how it is mounted to the board. For whatever reason they are different on each board so mark them accordingly and pay attention or the led wont light up when replaced. Note that the solder pads on the servo boards are very fragile. DO NOT pull up on the led unless there is re-flow on the pads or you will tear them off and the board will be done. Once they are all off then go ahead and solder back on the blue LEDs from the other board. Make sure that no two pads contact each other when soldering back on or the LED wont work. They must stay isolated from one another since its a 1 cathode 3 anode style LED. Once that is done and you make sure everything works then go ahead and put the boards back in, put the new overlays back on and put her all back together. Now sit back and take it all in that you are now 1 of a handful of people that have this setup on their gauges. Before: After: Now This is the route i took. I currently have another 2017 Denali cluster enroute to me to see if the servo boards can simply be swapped to alleviate the soldering aspect all together. I will update this when I find that out. Talking to Chris he says there were hardware changes in the different years so I don't know if they will swap out. UPDATE: Update to this project. I can confirm that the servo boards from at least a 2017 cluster will swap over to the 2015's. So those of you with more money than time can simply swap the boards and faces from a 2016 with blue or 2017+ cluster. That makes this about a 30 minute job and much easier since the soldering portion is gone. and for what its worth, the screens are also interchangeable as well. No that you gain anything from swapping them.





-
Forum Statistics
250.6k
Total Topics2.7m
Total Posts -
Member Statistics
343,006
Total Members8,960
Most Online
-
Who's Online 10 Members, 1 Anonymous, 1,219 Guests (See full list)