

FirstAscent
-
Posts
599 -
Joined
-
Last visited
-
Days Won
1
Content Type
Profiles
Forums
Gallery
Events
Articles
RPO
Store
Blogs
Everything posted by FirstAscent
-

My custom Onboard Air install
FirstAscent replied to FirstAscent's topic in Modifications & Accessories
I have two Tee’s in my setup, I Tee off the compressor itself- one line goes to my non regulated quick connect fitting (think standard air line for filling tires etc) and the other line goes to my air bags. The line that goes to my airbags also has a Tee, and one line goes to the left air bag and the other the right air bag. I don’t need it want individual control of my left and right side air bags, setting them at the same psi works great for my needs, and most everyone else too. The ARB Linx is the wireless setup and is kick a$$, I love it. It’s pretty spendy but I love the functionality, control, and expansion capabilities. It’s a separate purchase, I also had to purchase the airbag solenoid separately, the Linx system is very modular. The base Linx setup is the wireless controller and an Input/Output module (main hub) where all the wires go back to. My airbags are the Airlift Loadlifter 5000 Ultimate Plus, I like what the company is doing with their product and their internal jounce bumper. Although with my setup, I could’ve installed anything, the air compressor doesn’t care what it’s filling up haha. If I were to do it all over again, I’d do it the exact same way. I actually have this quick sketch I drew up on my iPad when I was drafting my air lines so I didn’t forget any karts to order. This kinda gives you a visual on how I routed my lines and where my Tee’s are. I hope this helps, and happy to answer any other questions! -
My custom Onboard Air install
FirstAscent replied to FirstAscent's topic in Modifications & Accessories
For me I don’t need a tank. I’d only consider one if I was running pneumatic tools where I needed to maintain a specific pressure. So far I’ve only used the compressor for some basic tasks: Adding air to tires Inflatable SUP’s I also have it tied into my airbags so it gets used daily to adjust them on the fly It’s handled everything like a champ -
WTB: Two (2) Trailer TPMS sensors
FirstAscent replied to FirstAscent's topic in Classifieds (Buy/Sell/Trade)
Thanks but a couple days too late, I already bought some, but thanks so much for posting up! -
Bump, still available!
-
WTB: Two (2) Trailer TPMS sensors
FirstAscent replied to FirstAscent's topic in Classifieds (Buy/Sell/Trade)
thanks! I just purchased a set of 4 for $80 shipped on eBay. Probably as good as I'm going to find without waiting too long haha. I guess it can't hurt having 2 spares either. I wanted to pay $50 for two, so $80 for 4 is a pretty good deal in that regard. -
hardwire devices near rear view mirror?
FirstAscent replied to FirstAscent's topic in Modifications & Accessories
good thinking. I didn't even think to go above the headliner directly to the back seat. Obvious now that you mention it haha. I have a sunroof so would make fishing a little more difficult I bet to go straight back. However, now that I got that friggin A pillar off the rest of the wiring is easy since I have my-pull cord left in place. I need a small part that won't arrive until Monday to finish my wiring but once it arrives it'll take 5 minutes then I'm done. -
hardwire devices near rear view mirror?
FirstAscent replied to FirstAscent's topic in Modifications & Accessories
Never mind, got it. Went with the pull harder method. The silver clip stayed attached to the vehicle though. -
hardwire devices near rear view mirror?
FirstAscent replied to FirstAscent's topic in Modifications & Accessories
@rmsmis Any tips on removing the A Pillar covers? They seem to be different than previous years. I removed the two 10mm bolts. It looks like there is a clip up top where I’d need to pull to the side (pull towards passenger side) to release? But something isn’t releasing, not sure where. There’s just the two bolts right? Should I be pulling down, to the side? Or something else? -
hardwire devices near rear view mirror?
FirstAscent replied to FirstAscent's topic in Modifications & Accessories
Thanks! This sounds pretty easy! For the center lights on the headliner... I see the two small L shaped covers (didn’t remove anything yet.), but does it just fall down after screws are removed or are there clips as well I’ll need to pull out from? I’m excited, this might be easier than I thought haha! I already have a fuse box I added under the rear seat from when I did my air compressor install, this works great because I already have a pull wire that runs from the fuse box to the driver side floor area. So I just need to get the wire fished through from the rear view camera to the passenger side fuse box area and then I can easily get to my fuse box from there. My whole fuse box is tied to ACC power through a solenoid so no worries about any parasitic drains too. Thank you! Here’s my fuse box, I’ve got lots of space for more accessories -
hardwire devices near rear view mirror?
FirstAscent replied to FirstAscent's topic in Modifications & Accessories
Thanks! Doesn’t sound too bad, I’ll give it a look! -
I'm looking for two (2) Trailer TPMS sensors. I have 4 already but I need 6, triple axle. Let me know if you have two you want to part with, thanks!
-
Has anyone ran any wires to the rear view mirror area? Dash Cam, GPS, radar detector, etc. Looks like a lot of people will tap into the rear view mirror power but I'm wondering how hard it would be to run my own power to that area. I haven't took anything apart yet to find a path, asking first to see if anyone has tried this? I want to power a dash cam and an RV specific GPS that I'll be using only some of the time. I'd rather not have all of this tapped into the rear view mirror power though. Obviously it's possible, but I also don't want to tear the whole roof apart to find a wire path
-
duramax battery specs?
FirstAscent replied to FirstAscent's topic in 2020-2026 Silverado HD & Sierra HD
Perfect thank you! Exactly what I was looking for -
Any alignment pro's? I want more Caster!
FirstAscent replied to FirstAscent's topic in Troubleshooting, Warranty & Recalls
I never responded but thought I did, sorry. But thanks for the additional info and the vid links. I have another appt I just set for the 28th, so we’ll see what happens. Part of me also thinks that these trucks are different from previous gen and from what I’ve read the whole Chevy shake issues of the past gens are a non issue. So I feel like them not wanting to make a change because they don’t want to “make it unsafe” while still well within spec is just silly. for sure, completely agree on that. Even bone stock it was a lighter steering than my 2019 1500. But now it’s even worse. I can’t remember the post but I recall reading in here a few members who installed steering dampers they were pleased with. I might look into that as well but I want to get the alignment better first instead of trying to use a damper as a bandaid -
I have a 2020 Silverado 3500 duramax, so with the dual batteries. I'm trying to find out what the stock specs are on them without removing any brackets/covers etc. I know there are multiple replacement options, but I'm just curious as to what they come with from the factory. I called the dealer and all they could tell me was that it was (for both main and auxiliary): Group 48 size 730 CCA Anyone know what the Ah (Amp Hour) rating is on them from the factory?
-
Any alignment pro's? I want more Caster!
FirstAscent replied to FirstAscent's topic in Troubleshooting, Warranty & Recalls
Yes, definitely full of crap. haha jk, no I really appreciate all your info. I know what I know and what I don't know, I only have a general understanding of what each setting is but when you get into troubleshooting and how much of a difference 0.1 or 1.0 degree makes I have no clue Interesting note about wanting 1/4 degree more caster and camber on Driver side, yet mine is that way on the passenger side. I can ask them about that and their reasoning. The lift, wider tire, and lower offset wheel I know all affects it and can make things more twitchy. Do you feel that adding caster could potentially help that though? Thanks again for your input! -
Any alignment pro's? I want more Caster!
FirstAscent replied to FirstAscent's topic in Troubleshooting, Warranty & Recalls
Very true, and I know it has more of an effect with larger/wider tires. But I had no issues with these same tires on my 2019 Silverado 1500 with a 6" lift. And I drove it across 3 states and back, so many different types of roads, and always experienced the same issues. I'm not saying there is absolutely no chance it could be tires, just very unlikely in this situation, I believe. Adding Caster can fix these exact types of issues, so adding in Caster when I still have +1.5 degrees to play with seems like an easy "trial" -
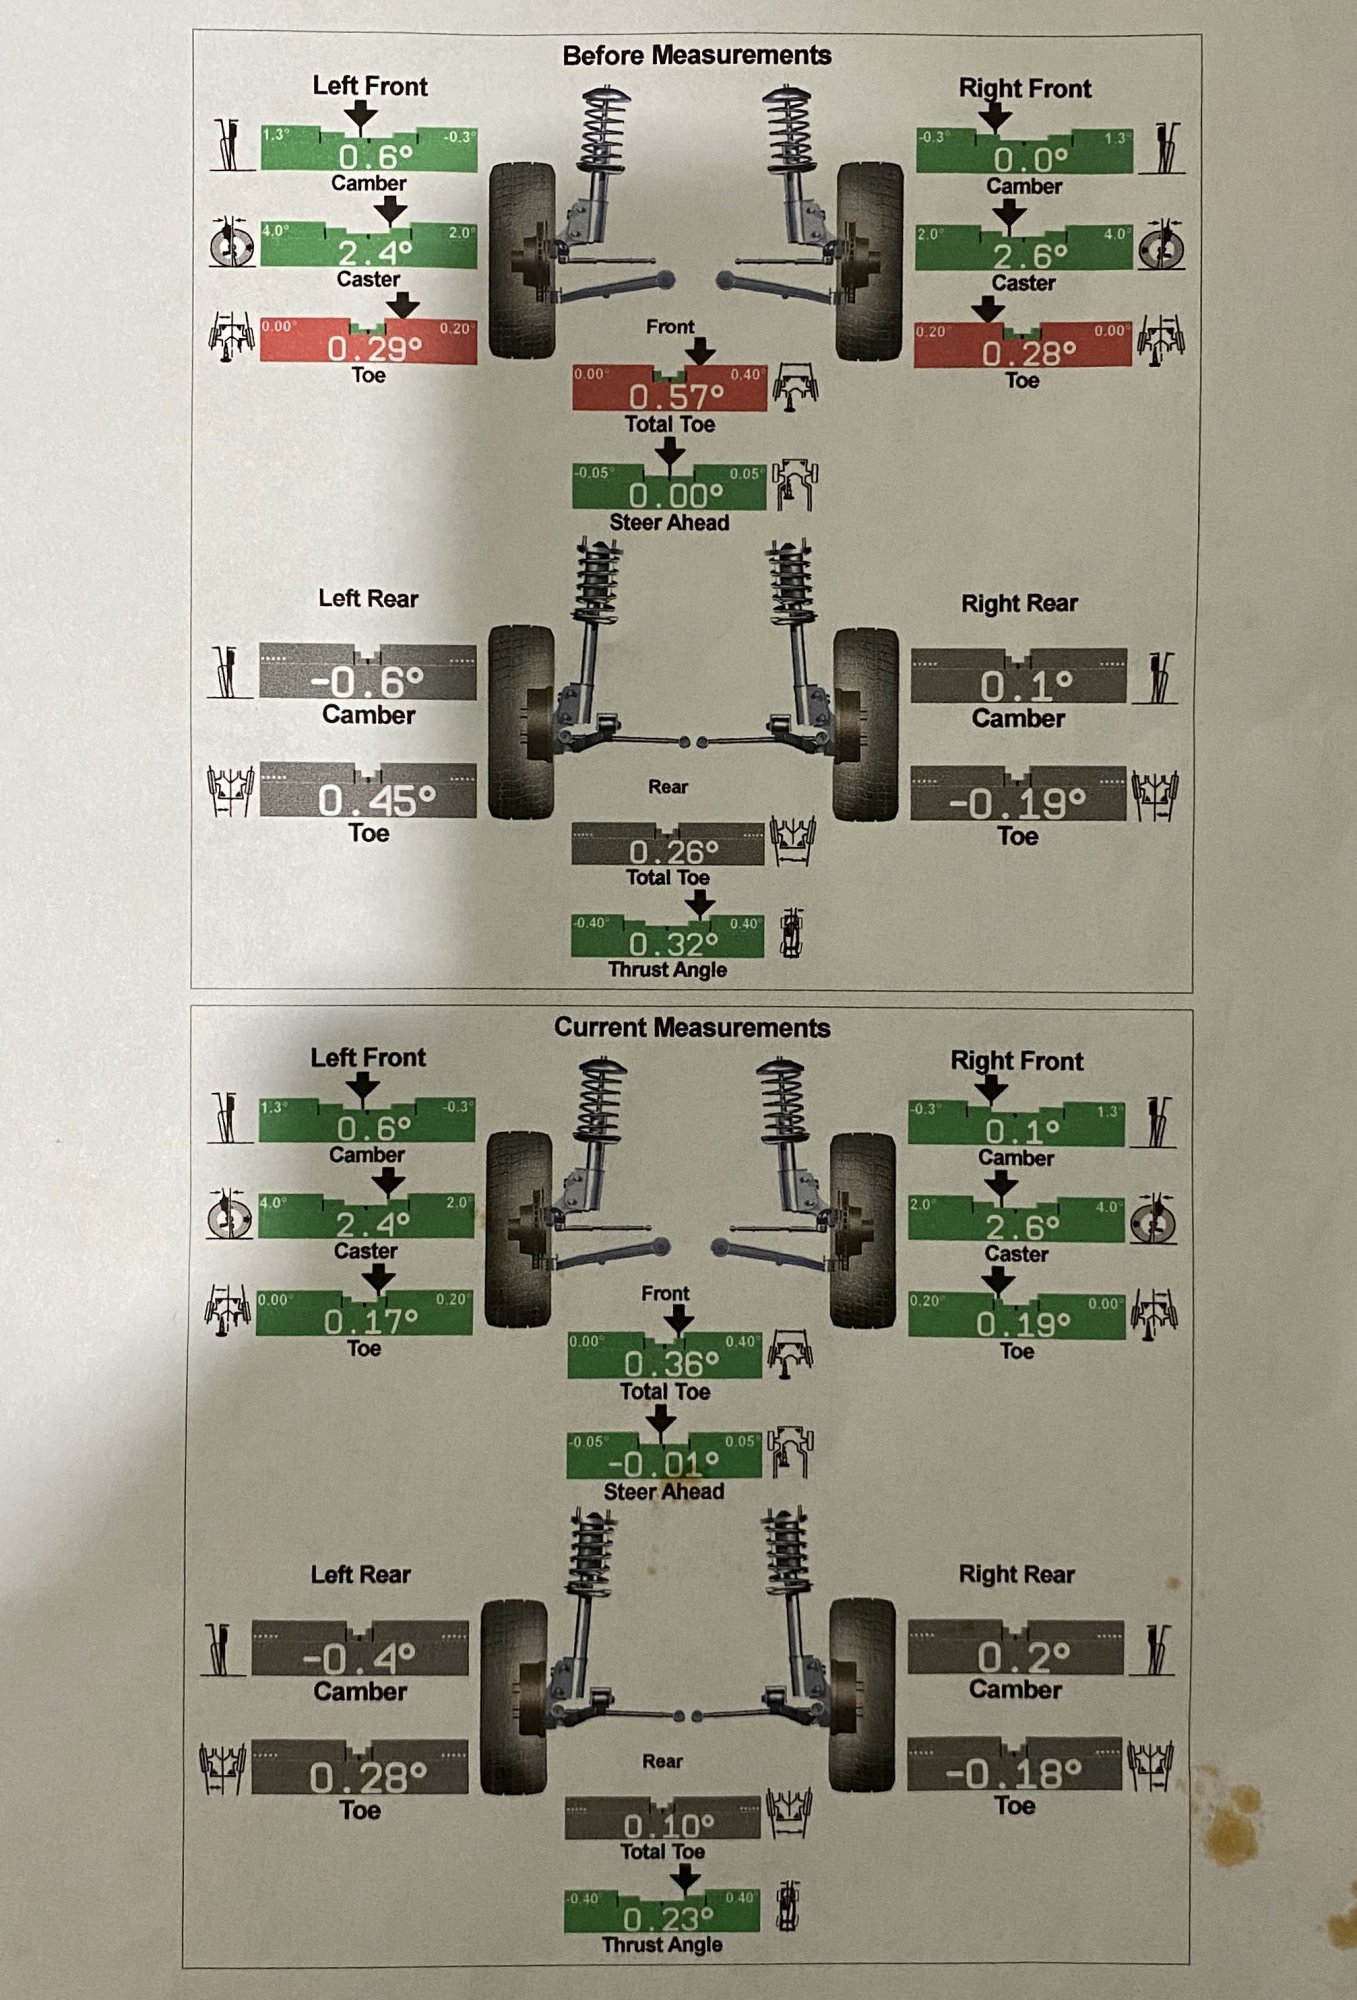
Hey everyone, I've been frustrated with my alignment for a couple months now, I feel like it is VERY sensitive and reacts to everything in the road, wanders a lot, tracks to every line in the road. I don't like it! At first I thought I'd give it time, maybe it was just an adjustment I wasn't used to, then I did a road trip from OR to UT and back and got to really get some time in the seat and focus on how it reacted. It's even more of a concern that I'm experiencing this without hauling anything, and I have a fifth wheel on the way so want to get this dialed in before then. I didn't mention any of my feelings on it to my girlfriend and she drove it and she told me "it feels wiggly". Not really the feeling you should get on an $80k truck No it isn't fully stock, I have a leveling kit with 22" wheels and 325/50R22 Nitto Ridge Grapplers. BUT, I've had these same size tires on my old 2019 Silverado 1500, I had 37x13.5 mud tires on my last Tundra, and they both drove straight and stable. I know tires etc can affect things, but I know it can be fixed with a good alignment. Now I know I'm not an alignment tech, but do have a general understanding on what each setting does, and everything points to potentially being solved with increased Caster. I took it back to the 4x4 shop who originally did my leveling kit and alignment (they did all my other trucks in the past too successfully), and they re-aligned it today for me. I specifically asked for more Caster and explained what I was experiencing. I just got home from picking it up and they didn't change Caster one bit, not even 0.1*. Their reasoning was "these are the best settings for these trucks and they don't want to make it unsafe". What I asked for is STILL in spec, so it shouldn't be "unsafe". Driving home it felt the same as before, but that's not surprising given that all they changed was Toe slightly. Right now the Caster is set at 2.4 / 2.6 (L/R), I thought it was funny when I just checked and from the factory it was set at 3.3 / 3.2! So me asking for more shouldn't be an issue. (acceptable range is +2 to +4 degrees). Soooo, am I crazy for wanting more Caster? I know they will re-adjust it for free but it's still frustrating. I don't want to waste their time/money either. I'm going to give it a couple/few days and at least get 50 hwy miles in to make sure, but my short 5 mile drive home it didn't feel any different. So I'll now be taking it back again making sure they friggin add Caster! What do you guys think? Full alignment sheet attached.

-
What did you pay for your 2020 truck
FirstAscent replied to Ronnell Roegner's topic in 6.6L Duramax Diesel (L5P)
Roughly 80 sticker and I think 70k out the door, no sales tax since I’m in Oregon. Could’ve gotten an extra 2k off if I weren’t so picky on options. 3500 High Country -
Upfitter switches
FirstAscent replied to Truckchauffeur's topic in 2020-2026 Silverado HD & Sierra HD
Yes you can install in a duramax no problem. I did in mine. Btw, the factory doesn’t really install much for you, you still have to do 98% by yourself (or pay a shop). All the factory does is install the knee bolster with the switches in there (not wired) so it only saves a little time. -
[edit] oops wrong forum, below info is incorrect. I follow the 1500 and HD forums haha. Yeah 4” would be pushing it!! I have the 3/2 leveling kit running basically 35x13 on a 22x10 wheel with a minus -18 offset with no rubbing. Minor trimming of course but it’s for sure minor. These trucks fit 35’s pretty well
- 413 replies
-
- 1
-

-
- rough country
- bds
- (and 1 more)
-
My custom Onboard Air install
FirstAscent replied to FirstAscent's topic in Modifications & Accessories
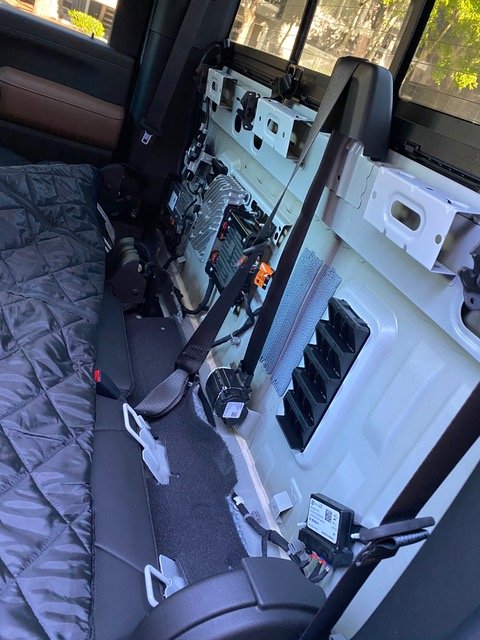
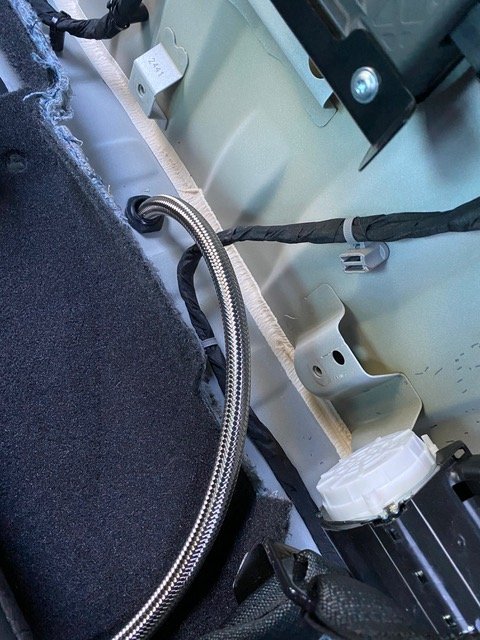
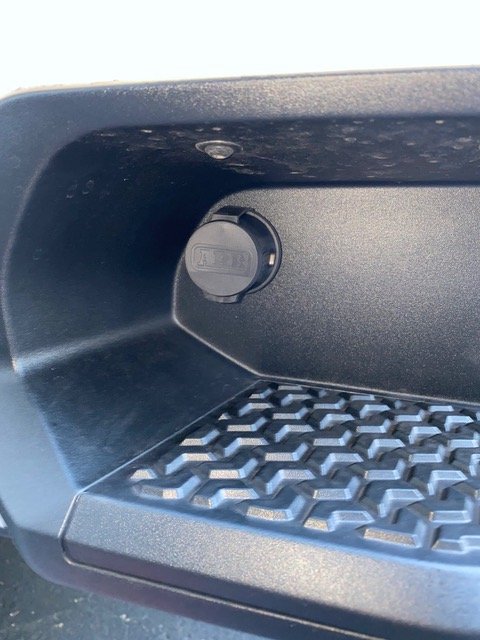
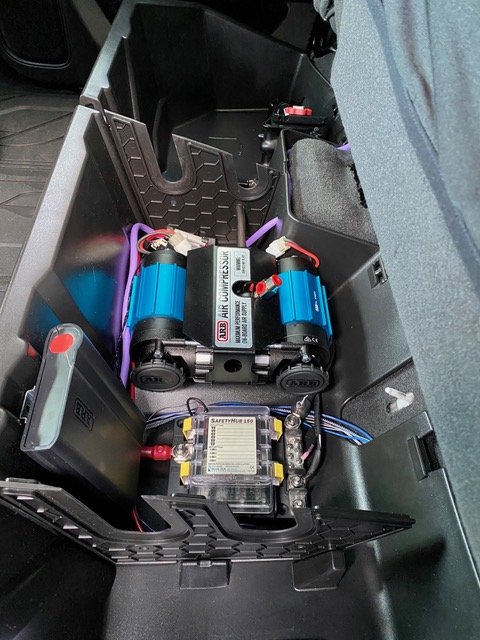
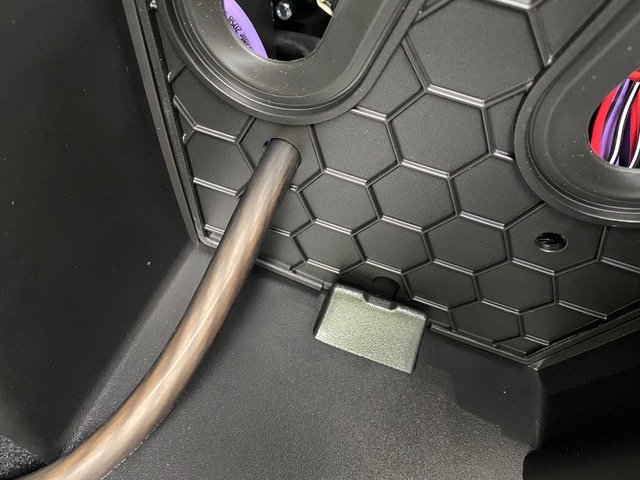
The compressor can be controlled wirelessly from a dedicated display on the ARB Linx the I have mounted near the steering wheel. But just in case anything were to happen, I can also manually activate the compressor with a hard switch The door closes with just enough room to spare! This is my air solenoids that control my air bags. Again, this is wirelessly controlled from the dedicated display to any PSI I want Backseat removed prepping for running two air lines from the compressor to the exterior 1 air line the splits into two for the rear air bags 1 air line that will run to the rear foot step in the rear bumper for standard compressor use with a quick connect female fitting I didn't get a photo of it but there are now two air lines running through the floor just like this one. The air line from the solenoid goes to my airbags The airline with the blue/red fitting goes to the rear bumper BTW, this fusebox is the SafetyHub 150, it supports both ATC and Midi fuses! I needed both and this does it all, it's super solid and well built too! This is a female quick connect fitting for connecting any male quick connect fittings to for filling up tires, toys, whatever. This is what the dedicated display from the ARB Linx looks like. Notice all the ARB wiring in the background, I got rid of all of this and made my own harness that only included what I needed and the exact lengths! From this screen I can turn the compressor on or set my PSI for my air bags and create different settings as well (unloaded, towing trailers, hauling various loads etc) If anyone has any questions, let me know. I had a lot of fun with this project!
-
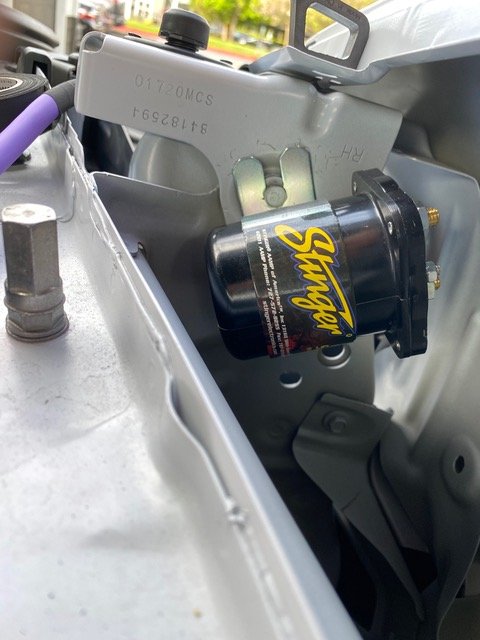
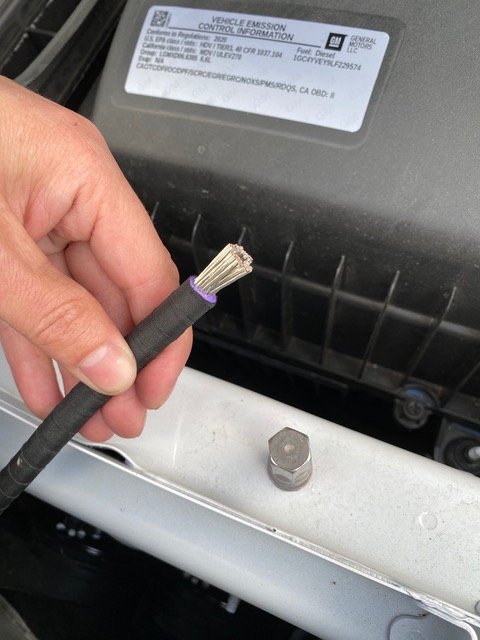
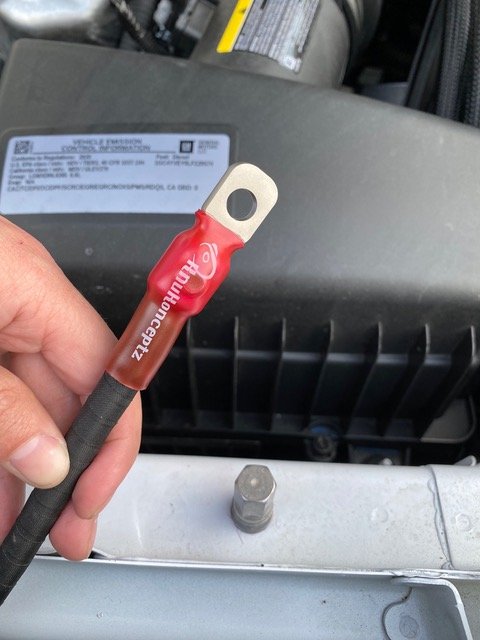
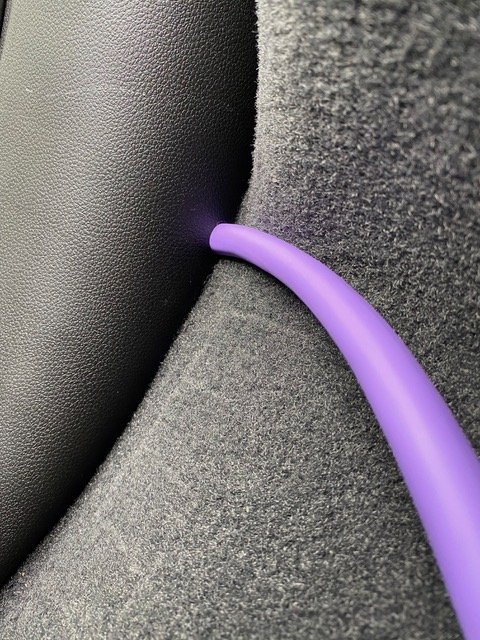
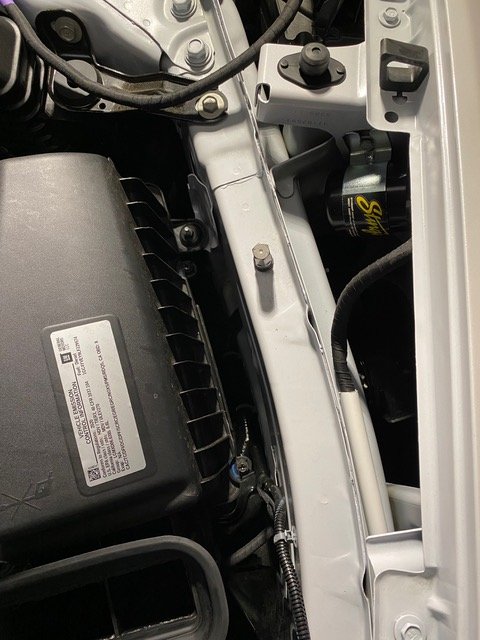
Hey everyone, I wanted to share my version of a custom onboard air compressor install with full custom wiring harnesses too!. There's of course many ways to do this so maybe this will help some of you if you're considering something similar. I first want to specifically thank @Limelight and @mkeddie as I've taken some of my ideas from them. I used a similar mounting location as @Limelight, and @mkeddie had a great upfitter post that gave me the perfect solution for running an air line from inside the cab to the bed of the truck in a clean fashion. So, thank you guys! I've always wanted onboard air for various reasons, but now I "needed" a solution because I just installed airbags for the first time but I didn't want a compressor that was only dedicated to the air bags, I wanted to be able to use it for whatever I want whether filling up truck tires, or mountain bike tires, or float tubes, or whatever! I opted for the ARB Twin Compressor (Part # CKMTA12) because it will give me good output and let's be honest, it looks pretty cool too! I spent quite a bit of time determining the best location, for me, to mount it. I considered just about everywhere including under the body/bed, in the engine bay, in the truck bed and finally settled on mounting it in the larger factory GM rear underseat storage. Now to decide on the wiring and general function/control that I want since it will all play together differently depending on how I wire things. I also wanted room for change and/or additions in the future so I knew I wanted a fuse box. I knew I wanted the to use a solenoid that would enable the new fuse box entirely with Accessory (ACC) power instead of having individual relays for anything connected to the fuse box. Going this route also means I need a solenoid that can handle larger loads. I found a Stinger SGP32 200amp solenoid, and the just about PERFECT place to mount it. These two bolts are almost perfectly spaced to mount the solenoid, this in is in the engine bay kind of on the inside of the front passenger fender. The tabs on the Stinger solenoid were already cut out for mounting bolts in them but I had to slightly cut them out a little deeper so that the spacing would fit the existing bolts shown above. The factory body panel bolts have permanent washers, but there was just enough play in them to slide the mounting tabs in between the bolt head and washer, PERFECT. You can see the body panel is somewhat indented at the mounting point as well, to fill that space to the bolt can be tightened down properly I just added a couple washers beneath it. Here it is wired up, 4 wires total. 1 wire to the ground lug you can see in this photo The smaller black wrapped wire is my ACC power wire to enable it that runs across the engine bay to the driver side and through a rubber nipple in the firewall to the BCM The large red power wire is fused to the secondary battery (I have dual batteries) Then there is one more wire that runs through the firewall and back to the rear seat where my fuse box is. btw: I hand wrapped these wires with tape for wire harnesses, took forever! haha This larger black wire connected to the MEGA 125A fuse (with green text) is coming from the solenoid. This spot is meant for the factory snow plow power, but I won't ever have a snow plow, so perfect use of good space! This is me prepping the power wire before connecting it to the solenoid This is the other end of the positive wire from the solenoid that went through the firewall, along the door sills, and then I cut a little bit out for the wire to come out of the rear passenger door seal to under the rear seat. Clean routing of the power wire from the solenoid to the battery Here you can see it start to come together. The purple wire is the power wire from the solenoid to my fuse box Remember this entire fuse box will be enabled by ACC power. On the top right of the fuse box you can see the main ground wire, it is grounded to the body near the factory jack. The black box on the left mounted vertically is an ARB Linx, I'm using this for control of my compressor, air bags, and future I/O expansion. This is that ground wire, I had to slightly drill out the whole that was already existing to fit the 1/0 AWG wire Here is how I'm going to connect it to the factory threaded stud that secures the jack I got the Dremel out to take the black paint off the surface of where the ground point would be.
-
Sad! The first one always hurts the worst, glad it’s behind you now. Sorta, it’s not fixed yet
-
Where are you coming from, inside the engine bay or from the bed area? If inside the engine bay there are two decent locations with existing rubber grommets/nipples in the firewall. One in the driver side and one in the passenger side. There are good photos on this referring to the upfitter switch install.


-
Forum Statistics
250.4k
Total Topics2.7m
Total Posts -
Member Statistics
342,749
Total Members8,960
Most Online
-
Who's Online 2 Members, 1 Anonymous, 1,655 Guests (See full list)