

SinisterZ71
-
Posts
40 -
Joined
-
Last visited
Content Type
Profiles
Forums
Gallery
Events
Articles
RPO
Store
Blogs
Everything posted by SinisterZ71
-

HID Headlight Bulbs / HID Projector Retrofit
SinisterZ71 replied to MotoMedic's topic in Modifications & Accessories
I've installed 2 sets of the LasFit D5S LED's (one set in my '18 and one set in my dad's '17) and they work great. 5/5 would recommend.- 3,363 replies
-
- 2
-

-
- hid
- headlights
- (and 1 more)
-
GM p/n 84689444 / AC Delco GT378. Comes with a clip that installs in the gas door hinge hole so you don't lose the dust cover (filler cap).

-
Does anyone make a 35w replacement D5S that works with the factory BCM and automatic headlight mode?
-
Has anyone tried the HYLUX D5S 35w HIDs? Various websites that have them for sale note that they should be turned off when cranking the engine...Why?
-
I don't care for the XB look.
-
I've done some research and it seems as though a popular option is the Morimoto 35w D5S; but it is stated that these don't work with "automatic mode". I definitely don't want to lose my automatic-on headlight function. I've also found a ton of LED D5S replacements, but I haven't had good luck with many of the aftermarket LED bulbs I've bought in the past - as most don't promote a good beam pattern in a factory housing (due to LED chip placement not being on the same plane as the factory bulb filament). Lumen rating also tends to be grossly overstated on most of these LED replacement products. I am curious if anyone here has tried any of the LED replacements for our factory HID D5S bulbs and what their experience was with those products.
-
As the title says, what's a better (than factory) replacement HID bulb for T4F option 2018 Silverado? Would consider LED if they aren't junk. Not interested in breaking the bank with an entire housing swap. I like the appearance of my factory headlight housings...
-
ACDelco TDS / SPS2 won't recognize "generic" VINs, I need an authentic VIN in order to obtain a stock tune file.
-
I'm working on a 2003 K2500 Sierra 6.0 5-speed MT that is getting a 8.1L swap. I have a GM MDI and AC Delco TDS subscription, so all I need is a VIN to obtain a suitable stock tune. I realize the '03 8.1L applications got the M12 6-speed manual, but I can make a 6-speed MT tune work with the NV4500 5-speed that we will be using. I can use a Silverado VIN as well.
-
A friend's 2014 Silverado K1500 L83 (with 82k miles on it) would experience an intermittent no-start / no fuel pump run when opening the driver's door issue. Would start if the fuel pump relay in the under-hood fuse and relay center was wiggled. Replaced the under-hood fuse and relay center with a new GM part and that fixed the issue. We wanted to know what was wrong with the original fuse and relay center, so we took it apart. Attached are pictures of what we found. I've got a 2018 Silverado K1500 with 50k miles and I'm thinking about taking my fuse and relay center apart to see how bad it is. I'm wondering if I should coat both sides of the circuit board with some of that red battery terminal corrosion protectant spray...
-
Reassembly procedure... A. Stand the inner axle shaft up on your bench with the hub end down. Lubricate the area of the axle shaft where the seal and bearing ride with petroleum jelly or trans assembly goo. Inside the axle extension housing, lubricate the roller bearing and new seal with petroleum jelly or transmission assembly goo and slide the extension housing down over the axle shaft. B. Reinstall the tanged washer into the housing then install the snap ring (make sure the snap ring properly installs into the groove on the shaft. (NOTE: GM recommends replacing this snap ring but I reused mine because nothing was wrong with it). C. Insert the axle engagement collar into the axle engagement fork with the plunger end of the shaft pointing down (to go inside the extension housing) and hollow area of the collar facing up (towards differential). Install these parts back onto the extension housing over the exposed axle shaft. D. Coat one side of the thrust / end play washer mentioned in step 14 above with petroleum jelly or transmission assembly goo and place it onto the pilot shaft that's part of the axle shaft (the jelly/goo should hold it to the shaft so it doesn't fall off when you are trying to reassemble it). E. Smear some petroleum jelly or transmission assembly goo onto one end of the spring from step 14 above and install that end of the spring over the axle engagement fork shaft. F. Clean the gasket mating surface with brake cleaner and install the new extension housing to differential housing gasket - making sure to align the dowel pin holes properly. G. Clean the gasket mating surface of the differential with brake cleaner. H. When reinstalling the axle extension housing onto the differential, the spring on the axle engagement fork shaft must insert into the raised hole boss inside the differential housing which is forward (towards the front of the truck) of the main shaft in the differential. Rotate the axle during installation to ensure nothing binds and make sure the gasket and extension housing engage the dowel pins correctly as you are putting it together. The extension housing should go pretty much all the way on by hand, although the alignment dowel pins may provide some resistance requiring some pressure to get the extension housing to fully seat against the differential. I. Apply some blue threadlocker to the threads of the 5 axle extension housing to differential bolts, install the bolts and hand tighten all - observing that the housing is going onto the differential evenly. If not, remove the extension housing and make sure the thrust/end play washer hasn't fallen off the axle shaft pilot or the spring isn't binding and is going inside the raised boss / hole in the differential housing. Torque the axle extension housing to differential bolts to 41 ft/lbs. J. Jack up the differential so you can install the washer nuts that fasten it to the frame mount. Torque these nuts to 75 ft/lbs. Take care to not put any pressure on the plastic electrical plugs protruding from the electric power steering motor. K. Reconnect all three electric power steering motor harness connectors and the single harness connector for the axle disconnect motor/solenoid. Make sure you reinstall the harness holders into the provided bosses on the electric power steering motor housing. If you broke these off during disassembly, it would be a good idea to zip-tie the wiring harness to the electric power steering motor housing so it doesn't rub on anything. L. Reinstall the CV axle onto the inner axle hub. Apply some red threadlocker to the six CV axle to inner axle flange bolts and install them all hand tight (do not torque them down at this time). M. Reinstall the lower control arm into the frame. The longer of the two bolts goes in the rear, and both bolts install from the rear. The conical end of the washers for these bolts faces the frame on the side the nut installs onto. Apply some red threadlocker to the exposed threads of these bolts and install the nuts onto the bolts by a few turns - DO NOT TIGHTEN these nuts at this time. N. Coat the threads of the bolts that connect the shock to the control arm with blue threadlocker and install them. Torque these bolts to 37 ft/lbs. O. Coat the threads of the sway bar to frame bracket bolts with blue threadlocker. Reinstall the sway bar to frame brackets and torque the bolts to 37 ft/lbs. P. Reinstall the sway bar end link and torque its nut to 17 ft/lbs. Q. Torque the CV axle to inner axle hub bolts to 58 ft/lbs using the star torque pattern. R. Lower the vehicle completely and jounce the front suspension a few times so it settles into normal ride height. Torque the front lower control arm to frame nuts to 129 ft/lbs. (NOTE: It is important for the lower control arm nuts/bolts to be loose until the suspension is settled into normal ride height before torquing - otherwise the control arm bushings could be over-twisted if you torqued these with the suspension unloaded). S. Refill the front differential with 75w90 full synthetic gear lube. Torque the fill plug to 24 ft/lbs. T. Reinstall the skid plate brackets onto the engine cradle and then reinstall the skid plate. At this point you can either raise the vehicle to get all 4 tires off the ground and test to make sure 4WD works or you can operate the vehicle on grass/dirt/gravel to verify proper 4WD operation. If for some reason it doesn't seem like the front wheels are getting power sent to them in 4WD mode, discontinue driving and disassemble the front axle extension housing and inspect the axle thrust/end play washer and spring to make sure they are installed correctly.
- 1 reply
-
- 1
-
-
I wanted to start this thread and share what I've learned about replacing the front passenger's side inner axle seal on a 2017 Silverado K1500 (this is the seal behind the axle flange the passenger's side CV axle bolts to on the front differential). The GM service manual states you have to pull the electric power steering assist motor off of the steering rack in order to perform this service which would then require you to reset the power steering belt tension using a special tool that I'm sure very few have (it uses a microphone to listen for a specific frequency the belt generates when tension is set correctly). You do NOT need to remove the electric power steering assist motor from the rack in order to get the passenger's side extension housing off of the front differential. Here's the procedure I came up with to do this job... 1. Raise the front of the vehicle and support with jack stands on the frame or by using a 2-post lift. If the vehicle is on a 4-post, drive-on lift; it will be necessary to raise the right front tire off the lift (put a jack stand on the frame, not the control arm). 2. Remove the skid plate and skid plate mounting brackets that attach to bottom of the engine cradle. 3. Remove the top nut from the passenger's side sway bar end link (in order to disconnect the sway bar from the control arm). 4. Remove the sway bar to frame brackets (2 bolts on each side) so the sway bar is free from being mounted to the frame. This is necessary to give clearance to remove the passenger's side lower control arm bolt facing the rear of the vehicle. 5. Remove the two shock mounting bolts on the front passenger's side lower control arm. 6. Remove the front passenger's side lower control arm to frame mounting nuts and bolts. There are small conical washers under the nuts for these bolts and the conical side of the washers need to face the frame (not the nut) upon re-installation, so don't lose them. 7. Swing the lower control arm down from the frame (it can stay attached to the steering knuckle via the ball joint). With the control arm disconnected from the frame, this will allow enough room to unbolt the passenger's side CV axle from the differential extension housing axle flange and swing it down out of the way. Consequently, this same procedure can be used to remove/replace the CV axle without needing to separate ball joints form the steering knuckle. 8. Unbolt the passenger's side CV axle from the differential extension housing axle flange and swing it down out of the way. 9. Disconnect the 3 electrical connectors from the electric power steering assist motor and carefully remove their loom fasteners from the body of the steering motor so you can move these harness pigtals out of the way. NOTE: there is a bare ground wire attaching one of these connector pigtails to the steering rack via a torx screw. I did not need to remove this to give myself enough room to work, but doing so will make it easier. 10. Disconnect the single harness connector to the front axle disconnect motor/solenoid and route it out of the way (I stuffed it between the engine's oil pan and cradle). 11. Use a jack to support the weight of the front differential. Remove the two nuts holding the passenger's side front differential extension housing to the frame bracket. Be very careful when removing the nut above the electrical power steering electrical plug so you do not damage this plug. 12. Remove the 5 bolts holding the passenger's side axle extension housing to the differential case. It will be necessary to lower the jack supporting the front differential (so the extension housing will tilt down) so you can get to the top 2 bolts on the extension housing. 13. Place a drip pan under the front differential to passenger's side axle extension housing flange. Use a hammer to tap the front passenger's side axle extension housing towards the passenger side of the vehicle to separate the extension housing from the main differential housing. (There is a gasket between these parts.) 14. Once separated, a spring and washer may fall out - set these aside (the spring goes on the axle engagement fork shaft and the washer goes on the end of the axle shaft upon re-installation). 15. You should now be able to rotate and remove the passenger's side axle extension housing from the truck. The axle engagement fork and collar may fall out of the axle extension housing so be ready to catch them if they do. 16. Place the extension housing on a clean bench with the CV axle mounting flange down. Remove the axle engagement fork and collar if you haven't done so yet - this will expose a snap ring holding the axle in the housing. 17. You'll need a pair of snap ring pliers and a couple of small screwdrivers (and perhaps even a curved pick) in order to get the snap ring off. It will be difficult. Once the snap ring is removed, you can remove a tanged washer from under it in the housing and then pull the housing up off of the axle shaft. 18. With the axle shaft removed from the extension housing, you can now change out the end seal. There is a small bearing down in the housing under this seal so take care not to damage it when removing the old seal. I recommend applying Loctite High Strength Bearing Mount For Relaxed Fits on the exterior of the new seal prior to installing it into the housing. The new seal I got from GM was not a tight fit, so I felt the loctite was necessary to properly secure the seal in place. I will post reassembly instructions and torque specs later when I get more time to complete this thread.
- 1 reply
-
- 2
-
-
As the title says: Has anyone been successful in adding the factory trailer brake system to their K2XX platform truck that wasn't equipped with it from the factory? I have a 2018 Silverado Z71 that did NOT come with the factory trailer brake controller/system and I would like to add it. I've read that in addition to installing the needed parts (trailer brake control module, dash control panel, etc), the IPC needs to be reprogrammed to work with it...??? Does anyone have any info on this?
-
I switched to 5w30 and the catch can still accumulates about the same amount of oil as it did when I was using 0w20.
-
No
-
Had a 2014 Sierra with an L83 in the shop the other day with this exact same problem (P0172 & P0175 fuel trim rich bank 1 & 2). Identifix says the cause is a leaking high pressure fuel pump. The high pressure fuel pump can leak fuel which is then sucked up by the PCV system and ingested by the engine (causing it to run rich, especially at idle). The test they give is to unplug and cap off the crankcase breather tubes that connect to the air box, and then unplug and cap off the PCV tube at the intake. If doing this causes the fuel trims to return to normal (near 0%), then the issue is most likely a leaking high pressure fuel pump. This particular 2014 Sierra had 160,000 miles on it so it is quite possible the seals in the high pressure fuel pump have gone bad.
-
I'm using something similar to this: https://ebay.us/m5Vp5D
-
.93 lambda equates to about 13.7:1 AFR which is still a bit lean for an N/A engine at WOT for my liking (I would prefer no leaner than 13.0:1 AFR), but not as terrible as 1.00 lambda (14.7:1) would be.
-
True, but I wasn't looking at my fuel trims at WOT. I was watching my narrow band B1S1 and B2S1 o2 sensor readings - and both were above 900mv during the WOT pulls (which would generally indicate richer than 12:1 AFR).
-
It only takes a few minutes to remove the catch can and return it to stock.
-
I will try that.
-
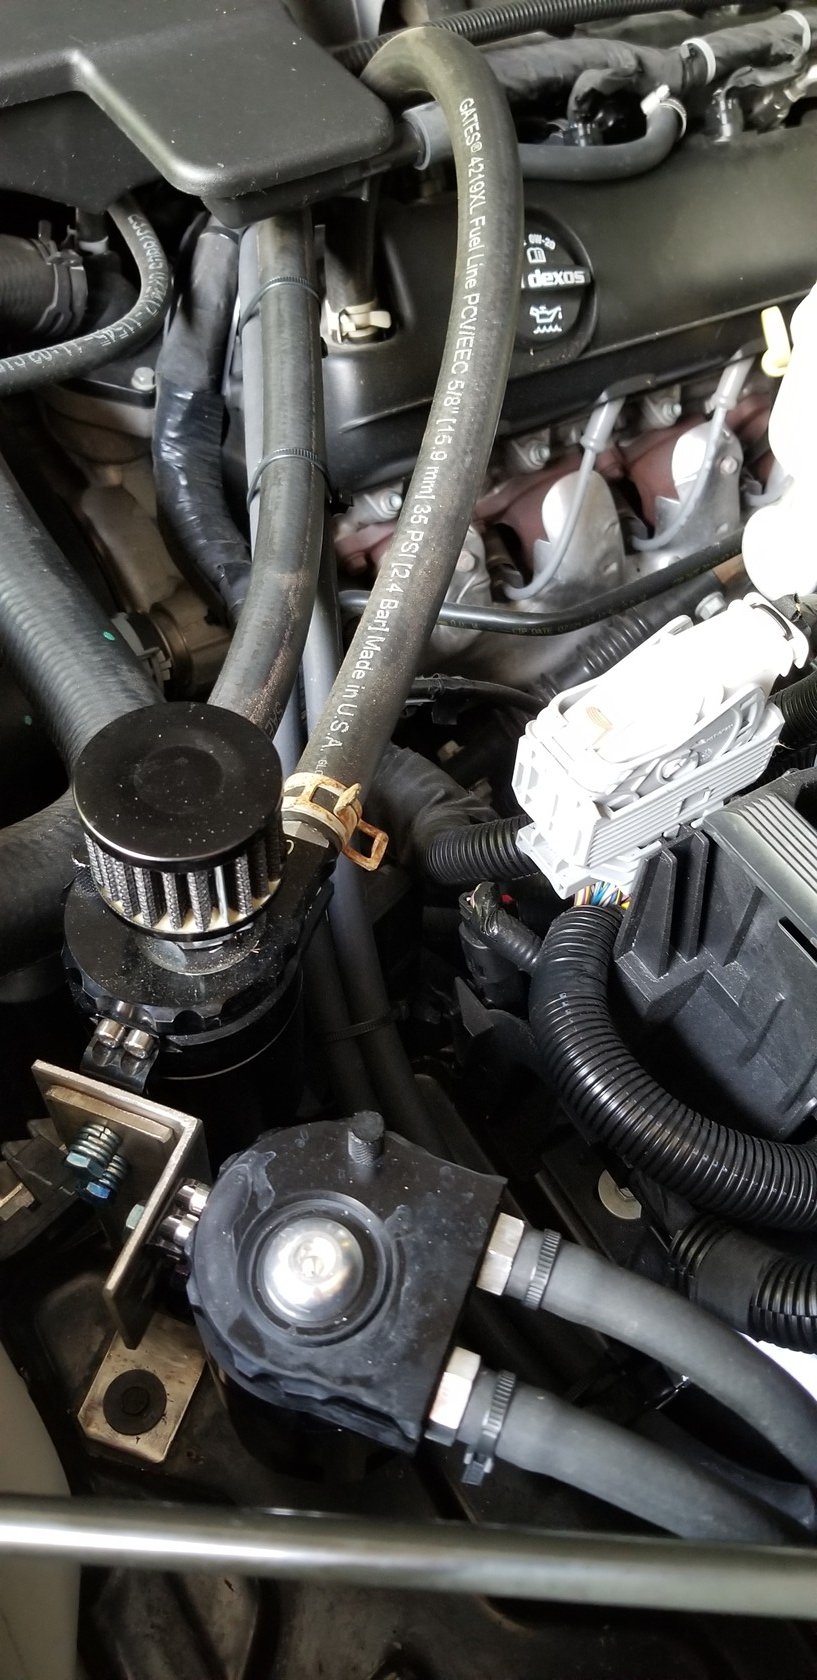
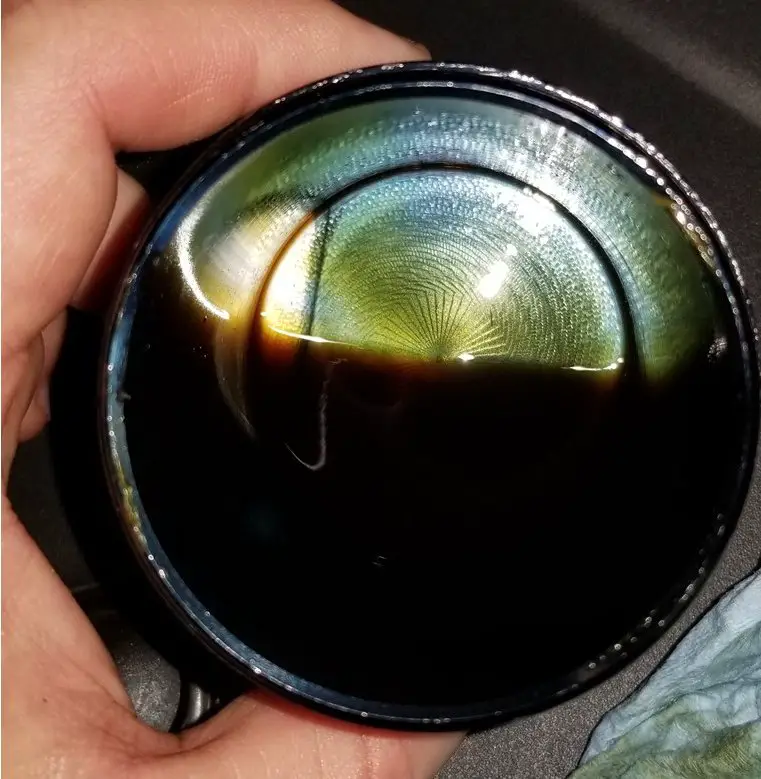
I've read quite a few articles on the pros and cons of oil catch cans. Some say you need them on DI (direct injected) engines (to help keep the intake valves from getting carbon buildup), others say you don't. So I did a little experiment on my 2018 Silverado L83 to see what would happen. I mounted 2 separate catch cans - one connected directly to both crankcase breather lines that come off of the valve covers with an open element breather filter on the catch can itself (plugged ports on air box the factory crankcase breather lines attached to). The other catch can is in-line of the PCV vacuum line. I drove the truck for 500 miles, mixed city/highway. The results were: Crankcase breather catch can was bone dry - not even a haze of oil film on the inside of the can. PCV catch can was a different story: There's probably 2 tablespoons of oil in there after 500 miles. I'm running Mobil1 0w20 full synthetic, engine has about 25,000 miles on it. Based on these test results, I think I can remove the crankcase breather catch can but I'm definitely keeping the PCV catch can.
-
I recorded a log yesterday. Flex fuel sensor was reporting 72.5% ethanol in fuel content, ambient (outside) air temp was 91 deg F. WOT narrow band o2 voltage was 868mv on B1S1 and 880mv on B2S1 (plenty rich). STFT on both banks was 0% at WOT and LTFT on B1 was -7.8% while LTFT on B2 was -9.4%. So it wasn't running lean at WOT in my case. If anything, the tune could stand to have a little fuel pulled out to correct for the negative fuel trim numbers.
-
Bought my 2018 Z71 with ~17k miles on it and noticed a clunking noise coming from the rear end when hitting bumps and turning corners. Turns out ALL of my leaf spring to rear axle U-bolt nuts were LOOSE. Torqued to factory specs and the clunk is gone.
-
I might have some time to do some datalogging on my truck later today, if I do, I'll get back to you with my findings. Please let us know what you come up with on your suspected fuel line kink issue.


-
Forum Statistics
250.4k
Total Topics2.7m
Total Posts -
Member Statistics
342,826
Total Members8,960
Most Online
-
Who's Online 8 Members, 0 Anonymous, 991 Guests (See full list)