

mrjulian416
-
Posts
180 -
Joined
-
Last visited
Content Type
Profiles
Forums
Gallery
Events
Articles
RPO
Store
Blogs
Everything posted by mrjulian416
-
What brand and weight are you using?
-
Rear Window Leak and GM warranty warning
mrjulian416 replied to bowtie2007's topic in Troubleshooting, Warranty & Recalls
Out of warranty you're best bet is to either seal it yourself or take it to any automotive glass shop (not the dealer). -
Rear Window Leak and GM warranty warning
mrjulian416 replied to bowtie2007's topic in Troubleshooting, Warranty & Recalls
Could be one of the spoiler mounting bolts leaking. It's all just a $hitty design all around. -
You would never notice the difference between the 86 and the 'normal' 87.
-
Maintenance Mode for Brake Pad Replacement?
mrjulian416 replied to SuperDuper's topic in Troubleshooting, Warranty & Recalls
Same issue on my '21. I replaced all four corners with powerstop pads just to make the noise stop. Extremely easy. You will need a 2 way code reader to be able to reset the wear indicator in the DIC. The method in the owners manual does not work. -
Had the dealer perform the recall last Friday. I have the multi-pro tailgate. They replaced only the lower/main gate switch. It is a whopping $4.46 part on gmpartsdirect Switch
-
I have the PML standard capacity pan sitting on my workbench. Plan on swapping it in when I get some free time in next couple of weeks. $375 for a transmission drain plug will be worth every penny.
-
One thing to consider... You basically won't be able to see the fancy spark plug wires without a step ladder.
-
You have to remove the hub nut to remove the rotor? Is that a 3500 DRW thing? 2500 rotor removal
-
Not sure if they can get it to you any faster, but Launch has it "in stock" on their website Launch CANFD adapter
-
See but not change?
-
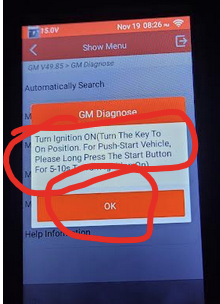
To recap, I bought the "GM specific" reader in the link I posted above. Before I connected it to the truck, I powered it on with the USB cable, connected to wifi and did the initial software update and downloaded the GM specific software that was included with the purchase. Connect it to the OBDII port. I then turned the ignition on, truck off (mine is an SLT with push button start. Push and hold the start button without pressing the brake pedal until things 'turn on'). Then to get to the tire pressure warning adjustment: 1. Diagnostics 2. GM 3. Ok 4. Automatically search, and 5. Yes 6. If not already 'on', follow the Ignition on, engine off instruction. Otherwise hit OK. 7. Common functions 8. The reader will begin to scan the various modules of the truck. You'll get a series of questions about what modules are installed. If you get it wrong you won't break anything. You are not writing any info at this point. If I didn't know the right answer I just picked the first option. Here is what I used: 0301, MYD, 0501, SRW, not equipped, U1D, UHS, not equipped, IOT, 0627, AUN, UD5, 10. Scroll down to select tire type reset 11. Select tire type/pressure selection 12. You'll then get two screens with a short story about passenger car tires and light trick tires. Just hit ok twice 13. Touch the current tire pressure target number (413 in my case). It will ask you to enter a new value in kPa for the front. Touch the blank spot for the 'Expect Value' to enter the new value. Follow the prompts to save/write the new value. Just a heads up, if you enter the same value as what is currently showing, you will get an "out of range error". 14. Continue to update the rear. Follow the prompts to save/write the new value. Make any/all changes at your own risk. You are responsible for your actions and any changes made using the reader. This story was based on my experience only. Your experience may vary. etc etc etc.

-
I'll connect tonight and try to get pics of the steps involved in what I did.
-
@revrnd The target tire pressure setting is accessed through the body control module options. Without connecting and walking through it myself, I can't recall the exact the menu selections needed, but it was not buried too deep in there, and once into the BCM, the choices were pretty intuitive. Next time I get a chance, I'll try to remember to hook up and document the steps. You'll find a screen where you can enter an expected pressure in kPa for both front and rear tires. Just to be clear, units matter. Don't enter a value there assuming psi or you'll effectively remove the low pressure warning (50psi = 345kPa, if you enter '50' you've set the low pressure warning to be ~7psi). No idea about the chassis module version...
-
Mud Monkey Any news on the parts cannon solution?
-
Rear Window Leak and GM warranty warning
mrjulian416 replied to bowtie2007's topic in Troubleshooting, Warranty & Recalls
My 2021 developed the leak at around 40k miles. I ended up sealing it on my own using butyl rope on the fasteners and some 3m 08367 black urethane seam sealer in the channel, following the DIY thread on here. The job wasn't as bad I expected it to be, taking my time with dropping the rear half of the headliner and releasing the clips on the spoiler... didn't break anything. Took my time cleaning the channel with soapy water, denatured alcohol, compressed air. Two months and 2k miles later (and plenty of rain) so far so good. I guess if it starts leaking again I'll go with a fixed window. Hard to believe they haven't solved this problem. -
I am happy to report that the Launch reader in my link just above was able to reset the brake pad wear indicator. It also has the capability to change the TPMS target pressure and adjust the tire size if needed. Of course it is a full code reader, able to access all modules/codes, perform ABS bleed, etc. etc.
-
Ahh, thank you. These Launch readers.. I swear they have 900+ different models. Here's another one I found, portrait instead of landscape... $129 (with 'coupon') instead of $189 https://www.amazon.com/dp/B09XV8VR35?ref=ppx_yo2ov_dt_b_fed_asin_title
-
Bowtie, can you share which specific model you bought? There are a ton of Launch readers on Amazon, but I don't see any X431 in that price range. The link gemarsh provided above seems to be broken.
-
Here what I found:
-
Mudmonkey, did the new starter solve the issue?
-
Made an appointment for the recall on mine. They had it all of 20 mins to confirm it needed the recall, but they had to order the part (seriously... the dealer took my appointment for a known recall, but only used the visit to "confirm the condition"). That was two weeks ago. Checked with the service writer earlier this week and she said the parts are no longer available as they recalled all the "new" recall parts. Good thing I have never actually had the tailgate randomly open... yet.
-
Well that's not good news. I need to check if Powerstop has released pads for these trucks yet.
-
That's a good indication. I'd like to hear if anyone with 15-20k+ on a set of the "latest" is still squeak-free.
-
The noise from my '21 didn't start until ~15k. Too late for the TSB if I recall. Before I spend the $$ for the latest/greatest, I want to make sure they actually fixed the issue... because it's awful.


-
Forum Statistics
250.4k
Total Topics2.7m
Total Posts -
Member Statistics
342,754
Total Members8,960
Most Online
-
Who's Online 1 Member, 0 Anonymous, 466 Guests (See full list)