
Rob191288
-
Posts
82 -
Joined
-
Last visited
-
Days Won
1
Rob191288's Achievements
")
Enthusiast (3/11)
31
Reputation
-

Post Pics of Your 2014+
Rob191288 replied to jomuehlbauer's topic in 2014-2018 Silverado 1500 & Sierra 1500
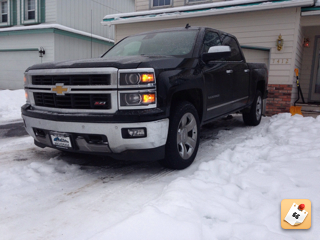
The day I had it leveled Sent from my iPhone using Tapatalk -
What have you done to your K2 today?
Rob191288 replied to block8head's topic in Modifications & Accessories
How did you do the amber lights in the grill. I like it! Sent from my iPhone using Tapatalk -
What have you done to your K2 today?
Rob191288 replied to block8head's topic in Modifications & Accessories
Z-71 badge I had custom made from Roger Neace at emblempros.com. He saves every design he makes so if you want one shoot him a email. It has 3M double tape on the rear. His email is [email protected]. As for the stitching it was done with a cloth marker I bought from Michael's, you can do it in any color. You just go over the original stitching with the marker let it dry for a min then take a wet rag and wipe off the excess on the leather. Have had it for about 6 months now and still looks like I just did it. I know some guys who did it to their camaros and it lasted years before they had to do a touch up. Sent from my iPhone using Tapatalk -
What have you done to your K2 today?
Rob191288 replied to block8head's topic in Modifications & Accessories
Do you have the sellers name? Sent from my iPhone using Tapatalk -
What have you done to your K2 today?
Rob191288 replied to block8head's topic in Modifications & Accessories
The light output looks good in the picture, how's it look in person? Sent from my iPhone using Tapatalk -
What have you done to your K2 today?
Rob191288 replied to block8head's topic in Modifications & Accessories
Thanks man. Gave me an idea! Sent from my iPhone using Tapatalk -
What have you done to your K2 today?
Rob191288 replied to block8head's topic in Modifications & Accessories
Is that the high intensity flush mount led? Sent from my iPhone using Tapatalk -
What have you done to your K2 today?
Rob191288 replied to block8head's topic in Modifications & Accessories
I got the idea off when I owned a camaro some of the guys on the camaro forum did it. They said it lasted a while. I know one guy had his on for 2 years and it wasn't as bright as it was new but he just went over it again and looked the same as day 1. I never got the chance to try it on the camaro since I had cloth seats, didn't wanna risk it. But leather it's easy. Just go over the stitch 2-3 times, let it sit for a min or two then wipe with a damp rag to get the excess of the leather. Took me about 2 hours to do the whole truck. Sent from my iPhone using Tapatalk -
What have you done to your K2 today?
Rob191288 replied to block8head's topic in Modifications & Accessories
Yup fabric pen picked it up from micheals. Easy and cheap mod! Sent from my iPhone using Tapatalk -
What have you done to your K2 today?
Rob191288 replied to block8head's topic in Modifications & Accessories
Made the white stitching red. And love it. Sent from my iPhone using Tapatalk -
What have you done to your K2 today?
Rob191288 replied to block8head's topic in Modifications & Accessories
Chuck did your bed rug come with the Chevy emblem in it? Sent from my iPhone using Tapatalk -
Yea it's got the stock 20's on it still. Will prob upgrade once I get the money for it. Sent from my iPhone using Tapatalk
-
RC 2.5 in level installed today. Put the rear at 40inches and the front at 39.5inches Sent from my iPhone using Tapatalk
-
Recommended Mods/Upgrades for new Silverado?
Rob191288 replied to TTU19's topic in Modifications & Accessories
These are the LED bulbs I used for my truck, fit perfectly. http://store.ijdmtoy.com/5202-H16-LED-Driving-Fog-Light-Bulbs-p/led_fog_5202_sku_4e.htm As far as the plasti dip its basically just spray paint but once it dries it will peel right of. Its strong and reliable. Can be pressure washed and don't have to worry about it coming off. But if you mess it up or just wanna take it off it will peel right up. Keep in mind though the longer it sits the harder it is to get off. I just masked off the emblems with painters tape and some plastic and painted, put 4 coats of red and 2 coats of glossifier. -
Recommended Mods/Upgrades for new Silverado?
Rob191288 replied to TTU19's topic in Modifications & Accessories
Here is some ideas for you. Plasti dipped bowties, HIDs and LED lights for more light output Footwell lights Custom billet Z71 logo on the dash And OEM bedlights are everything I've added. Not that expensive of mods. Also adding a bedtred pro liner, AVS big deflector, and rough country 2.5 level this upcoming week. Sent from my iPhone using Tapatalk

-
Forum Statistics
250.5k
Total Topics2.7m
Total Posts -
Member Statistics
342,893
Total Members8,960
Most Online
-
Who's Online 11 Members, 1 Anonymous, 738 Guests (See full list)