

rxnotec
-
Posts
175 -
Joined
-
Last visited
Content Type
Profiles
Forums
Gallery
Events
Articles
RPO
Store
Blogs
Everything posted by rxnotec
-

Engine bay got you down...Clean it up with a new cover.
rxnotec replied to rxnotec's topic in Modifications & Accessories
TADAhttp://www.ebay.com/itm/90-91-92-93-94-95-96-97-98-99-00-New-GM-15634865-GMC-Wheel-Center-Cap-Emblem-/351138655758?pt=Motors_Car_Truck_Parts_Accessories&hash=item51c17eae0e&vxp=mtr This would work but may be straight flat. I debated on flattening the middle to eliminate the dome issue on mine but that will come at a later day. GMC Center Emblem possible solution: GM Part 15634865 this is not a GMC engine cover emblem but should work as one for you GMC guys and gals. This is from the older hub center covers but appears to be just shy of 3.5" so could be just like the Chevy one I did on mine. -
Engine bay got you down...Clean it up with a new cover.
rxnotec replied to rxnotec's topic in Modifications & Accessories
As far as we can tell they are the only ones unless you convert the intake manifold to a LT1 intake manifold. (I believe the LT1 manifold only works on the 6.2 though, not the 5.3. I could be wrong here) -
Engine bay got you down...Clean it up with a new cover.
rxnotec replied to rxnotec's topic in Modifications & Accessories
No it should be already there. There are a couple posts sticking up towards the front end part of the intake manifold it just snaps down on to and two pockets on the intake manifold cover in the back. I did not need any additional hardware other than changing the badge out from Caddilac to a chevrolet badge which are from the Cruze engine covers. -
Engine bay got you down...Clean it up with a new cover.
rxnotec replied to rxnotec's topic in Modifications & Accessories
Those prices are right on. About $70 if you have an account. Emblem I used was a bit pricey but worth it. The K&N I like. Sounds much better or rather how it should. Different in price for airraid not worth it. That's my opinion though. To each their own.- 279 replies
-
- 1
-

-
- engine cover
- cover
- (and 1 more)
-
Engine bay got you down...Clean it up with a new cover.
rxnotec replied to rxnotec's topic in Modifications & Accessories
Thanks Texas. -
What have you done to your K2 today?
rxnotec replied to block8head's topic in Modifications & Accessories
Added the drivers side assist handle today. As well as finished my engine cover. -
Engine bay got you down...Clean it up with a new cover.
rxnotec replied to rxnotec's topic in Modifications & Accessories
Done and done on this one. New emblem on and looking better than the homemade one I had on there.
- 279 replies
-
- 5
-
-
- engine cover
- cover
- (and 1 more)
-
Engine bay got you down...Clean it up with a new cover.
rxnotec replied to rxnotec's topic in Modifications & Accessories
Off to pic up the new emblems for the engine cover. Updated photo to come today. http://www.gmoutletparts.com/oe-gm/92068693 Above is the emblem but have to paint out the center of the bow tie first. Fits perfectly in the cover I have. -
Engine bay got you down...Clean it up with a new cover.
rxnotec replied to rxnotec's topic in Modifications & Accessories
Do it and post some pics of it. -
What have you done to your K2 today?
rxnotec replied to block8head's topic in Modifications & Accessories
Did some more black out of badges. Steering Wheel Key Fob
-
What have you done to your K2 today?
rxnotec replied to block8head's topic in Modifications & Accessories
Which one? Why? -
Engine bay got you down...Clean it up with a new cover.
rxnotec replied to rxnotec's topic in Modifications & Accessories
May have found the exact Chevrolet replacement to the Caddy emblem. Stay Tuned! -
What have you done to your K2 today?
rxnotec replied to block8head's topic in Modifications & Accessories
http://www.gm-trucks.com/forums/topic/164105-engine-bay-got-you-downclean-it-up-with-a-new-cover/ Started a new thread on what I did yesterday. -
Engine bay got you down...Clean it up with a new cover.
rxnotec replied to rxnotec's topic in Modifications & Accessories
Part number added to original post. If I could afford the supercharger right now I would be without covers too. Keep in mind peeps that the part comes with a caddy emblem on it. Takes some removal and cleaning to get it off. I'll update later when I figure out a better solution. My brother and I are always looking. -
Engine bay got you down...Clean it up with a new cover.
rxnotec replied to rxnotec's topic in Modifications & Accessories
But yours came with a cover. 14 silverados didn't come with one. The 6.2 covers from caddilac fit the 5.3 and the 6.2 in the 14 silverados. Just have to peel the badge. If anyone wants the pn let me know but it will come with a caddy emblem. -
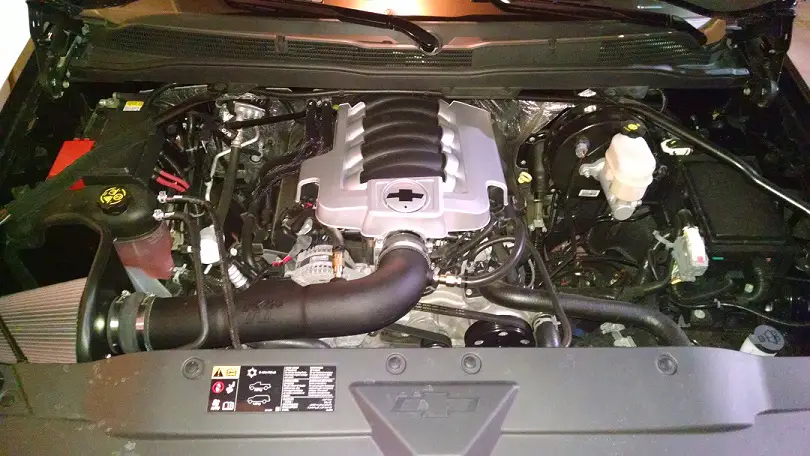
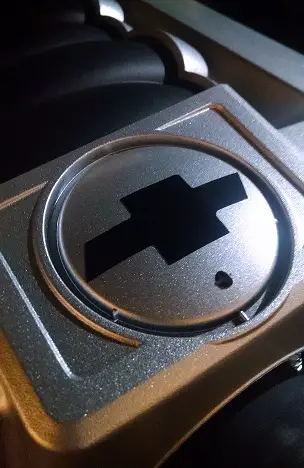
Still working on an emblem plan to do in the middle circle over the throttle body but it looks a bit nicer in the engine bay for now. This is on my 2014 Silverado LTZ Z71 with a 5.3L Here is the logo that I made to hold me over for now. 3.5" is the diameter of the emblem that was there before. Any suggestions let me know. Gm part number: 12643295
- 279 replies
-
- 5
-
-
- engine cover
- cover
- (and 1 more)
-
What have you done to your K2 today?
rxnotec replied to block8head's topic in Modifications & Accessories
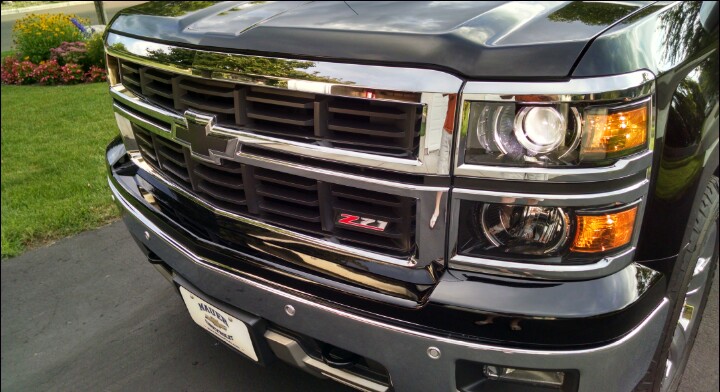
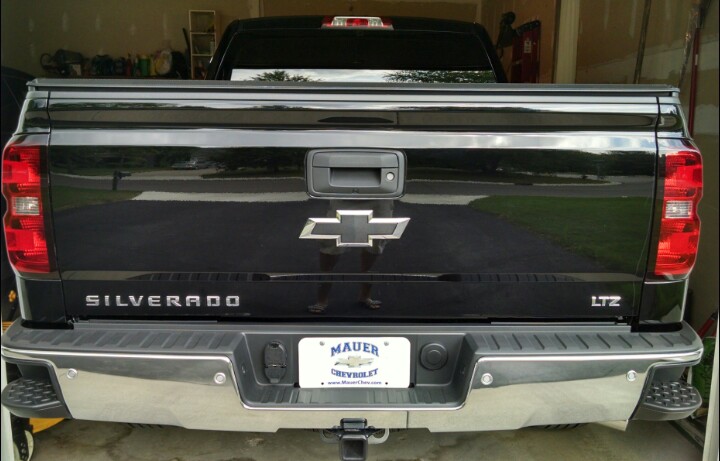
Blacked out the bowties.
-
What have you done to your K2 today?
rxnotec replied to block8head's topic in Modifications & Accessories
I have only less than a day on it. I am still having fun with it. I'll do less hard driving next gas tank. The sound is awesome though. -
What have you done to your K2 today?
rxnotec replied to block8head's topic in Modifications & Accessories
Finished the KN Intake last night. Stupid cheapo plastic npt fittings I replaced with some nicer brass ones. Much better. Sounds a lot healthier now.
-
HID Headlight Bulbs / HID Projector Retrofit
rxnotec replied to MotoMedic's topic in Modifications & Accessories
The heat is everywhere in the engine bay. The radiator is the least of your worries on that since where I mounted my parts is on top of the air shroud in front of the fan and radiator so any heat is primarily being pulled away from that spot. I totally understand though your reasoning. If it ain't broke don't fix it right? -
HID Headlight Bulbs / HID Projector Retrofit
rxnotec replied to MotoMedic's topic in Modifications & Accessories
I personally know 5 cops here with hid retrofits. As long as you keep them clean and white in color you will probably not get bothered. -
HID Headlight Bulbs / HID Projector Retrofit
rxnotec replied to MotoMedic's topic in Modifications & Accessories
I like doing my installs where everything goes back with no extra pieces leftover and keeping everything as stealthy as possible. -
HID Headlight Bulbs / HID Projector Retrofit
rxnotec replied to MotoMedic's topic in Modifications & Accessories
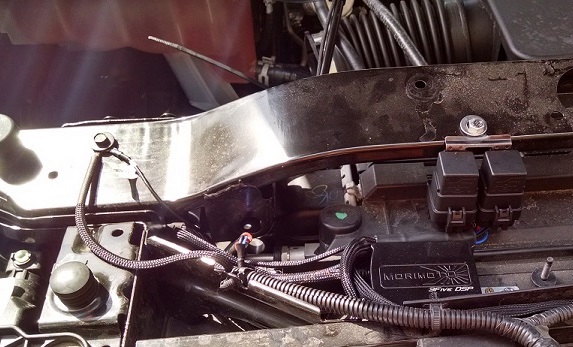
And what do you see in PIC 4 after install is complete? That was off in Pic 1 during install because you have to remove it to take the airbox out to get access to the low beam.Grounds were attached for testing and then the brace was re-attached with the grounds under it. -
HID Headlight Bulbs / HID Projector Retrofit
rxnotec replied to MotoMedic's topic in Modifications & Accessories
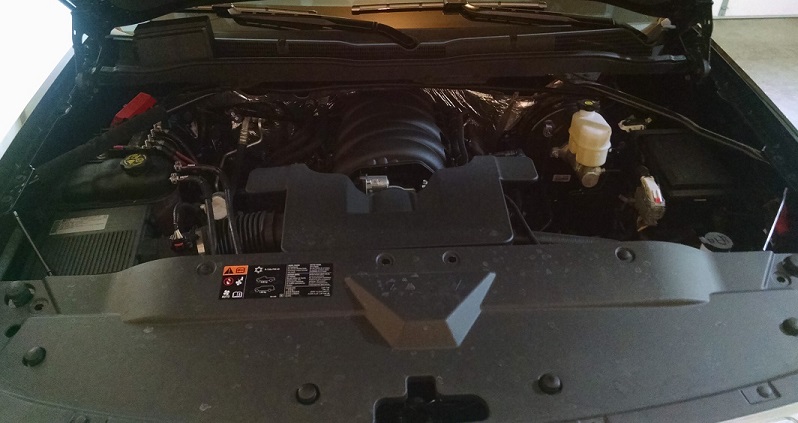
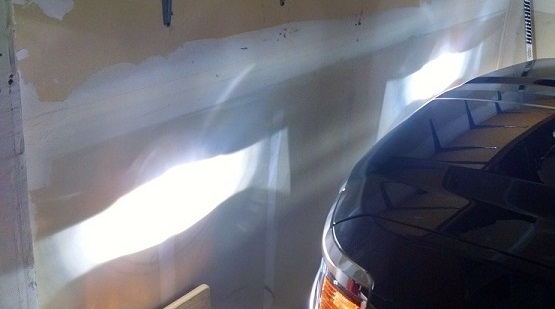
For 2014 Silverado LTZ Z71 Lights from The Retrofit Source http://www.theretrofitsource.com/ Here are my install pics using the MOPAR Low Beam Harness with built in Capacitor and 5000k H11 Bulbs from TRS. http://www.theretrofitsource.com/components/harnesses/morimoto-mopar-xenon-relay-wire-harness-48653.html Had flicker issues right away but then discovered the capacitor was wired in to the wrong side so just re-pinned it and it was all good to go. Re-pinned the OEM plug connection so it can remain inside the protective cup as well. Received some good assistance from TRS rep Carlos in trying to figure out what that flicker issue was. Big thumbs up to TRS for a great kit and great customer service. TIP: Use a 7/8" Auger bit or hole saw. The grommet is tight to get in but fits perfect. Contrary to what people have said about using a 1" bit. The 7/8" removes the need to add butyl to it. This is my 5th HID install with no issues in this method. Passenger Side: Mounted and protected by the plastic front core support cover. There is an existing hole I used to bolt the relays down to. Vertical as recommended by TRS. Driver side. Again mounted in a heavily protected area from the elements. 7/8" auger bit and grommet fits snug and perfectly clean. Nothing to see here that HID is present from the front. You can only see the couple wires coming out the cup from behind the light but not seen from the front. Don't have a night shot yet but I will add one as soon as I can. They are a great clean white on the road. Any questions on Silverado LTZ and above installs hit me up.
- 3,363 replies
-
- 1
-
-
- hid
- headlights
- (and 1 more)
-
HID Headlight Bulbs / HID Projector Retrofit
rxnotec replied to MotoMedic's topic in Modifications & Accessories
I ran the Mopar Elite system from TRS as well with single input and capacitor all built right in with H11 5000k bulbs. I will take some photos of it as I have found a nice clean looking way to do the install that I think all will like. All my components are hidden under the front cover and my relays are mounted vertical properly. The room is there for it. Only can see one wire that comes out to lead to the battery but I have that traveling under the front mini brace from fender to core support. I just used http://www.theretrofitsource.com/components/harnesses/morimoto-mopar-xenon-relay-wire-harness-48653.html#.U-4QR_ldV8E as my harness.


-
Forum Statistics
250.4k
Total Topics2.7m
Total Posts -
Member Statistics
342,751
Total Members8,960
Most Online
-
Who's Online 8 Members, 1 Anonymous, 1,821 Guests (See full list)