

.JPG.6537b7f00fa66f30aa51f5040da0fd95.JPG)
Grumpy Bear
-
Posts
12,861 -
Joined
-
Last visited
-
Days Won
465
Content Type
Profiles
Forums
Gallery
Events
Articles
RPO
Store
Blogs
Everything posted by Grumpy Bear
-
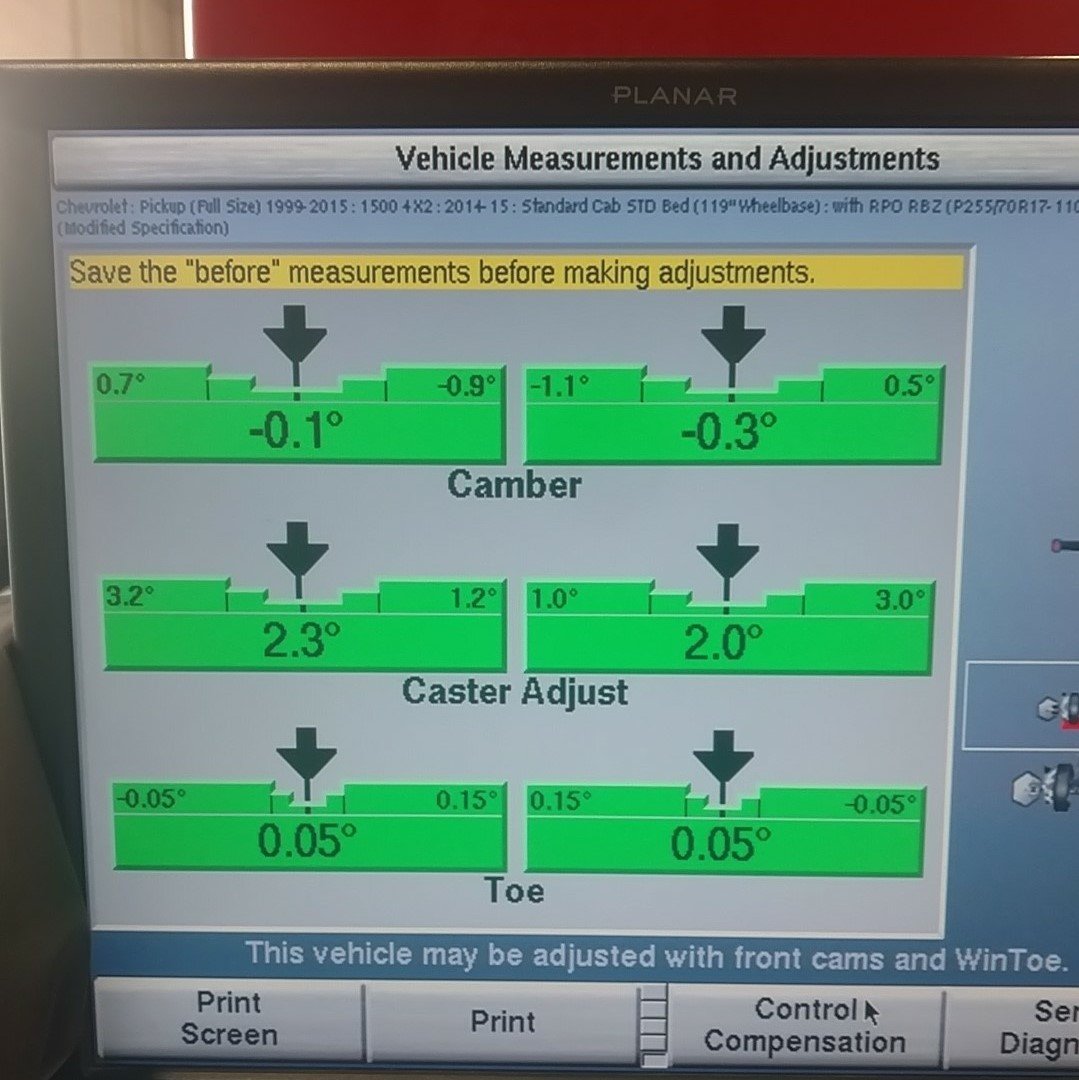
We put Pepper on the rack before we started to assure we were still on the marks I set earlier and we were. (That alignment is posted several pages back).Then the suspension got her face lift. The readout on the left the result. It moved it quite a bit. The photo John took after the alignment when the printer went wheels up at the worse time possible. Deegan's is a first rate shop. As you can see the camber is actually inside the GM spec and in perfect proportion. But there was not enough in the factory camber eccentrics to reach the negative camber numbers I prefer.

-
Another thousand miles logged. She’s fully settled and still 37 inches and change. Had it on the rack looking for the squeak/rattle and found it. Front leaf eye bushings are in the slip/stick mode. Not enough grease or perhaps not the right grease and washed out, so out they come again to get cleaned, inspected and repacked. That means a gas tank drop again. Collecting information on shock travel still. Rear shocks are sitting at 4-1/4” of 8-3/4” of stroke and using 2-1/4” in compression. Bump is set at 2-3/4” and N2 pressure is 200 psi. Ditto on the N2 up front. Front droop (rebound) is 2” and bump stop limited. Looks to be about 2” and change up front as well in compression. Hard to get a direct measurement inside the coil. In essence then we are using about 4” of nearly 9” in available travel. Bottom line, it is firmer than the stroke needs to be for the roads and speeds I travel. That said, I don’t have enough information to start making wholesale changes in that direction. Still need a few numbers from King. Maybe some equipment/tools as well. Measurements of bump stop stiffness and some questions answered about the N2 preload. Ideally I would like to see at least two more inches of travel employed. That means some limits would have to be removed or moved. Deaver delivered. I have a spring that puts the shock at mid-travel and gave the drop I was looking to get. The ride quality in in the right zip code now and not just on the right planet. Ben has been at the SEMA show and unavailable. Email stack up and I’m not a huge priority all things considered. Time and patients will crack this nut. Different subject. Cold temperatures and high winds are wreaking havoc on fuel mileage. I talked about preheat last winter and that needs a revisit.
-
Today we finally got the re-torque on the suspension done. Now at 48,000 miles having logged 1,000 on the King setup (Installed at 47,000 miles) I am pleased to report that the “hard” is now “firm” and very comfortable. Not even overly firm. We installed some zip ties to measure wheel motion and find limits of travel for the future tuning phase. Cylinder Deactivation Commanded (On/Off) TXD: 07E0221133 RXF: 046225110633 RXD: 3001 MTH: 000100010000 NAME: CDC Thank you Linear Logic for retrieving this code from my ECM. Would you be surprised to learn the AFM is triggered by the TPS? The system is armed by satisfying a list of conditions. Some temperatures and time limits. A few others. And/Or gates we refer to them as in process control systems. But once satisfied you get more or less ‘on’ time by moving the TPS trigger point. BTW, that point is 30% with a 2% dead band. 29% shuts off cylinders and 31% turns them back on. Literally if you had a Live Tune you would change this set point like moving a timing value. Just punch in a different value. That tells me that OBD-II plug in modules costing $180 or more are a device that moves this set point in a temporary fashion. Like holding your finger on a momentary contact switch. Wow! Thing is with a programmer you get a bunch more capability for a few dollars more.
-
No I did not wade through 107 pages but.....the first 20 didn't answer anything you asked so...... Removing the blocks buys you a hair over 1.25". As a matter of happy-stance your factory shocks just under 2" above mid stroke. Your not 'blowing through' any valve sensitive area. It's a nine inch stroke shock. Removing the block puts it closer to the mid point. That is a good thing. IF fact its a great thing. The bump stop which was 3.75 inches off is now 2.5" off. Even at 3.75" it will prevent the shock from ever bottoming out. With the truck sitting still wrap a wire tie around the shock shaft and driven it a few days. Normal routes, normal speeds. Measure the distance between the knot of the tie. (widest part) and the shock bottom. That's you compression range. If it's under you bump measurement all is good. If it's not it isn't the end of the world. Those bumpers are in play and are part of the progressive spring rate. They take about 5X more force to move the second half inch than they do the first half inch. If you cut the tip off you loose the progression and it hits much harder. (IF you really handy and it really bothers you, you can modify the mount to get some distance like they do on some flip kits). When towing then either bag the thing or use a Reese style hitch and get it back to level. You don't need shock extensions for this mod. If you want a bit better ride almost any factory length shock is better than the $5 a piece name or no name junk that's on it. Even Monroe or Gabriel is a step up but don't expect magic. BTW that crock about don't reuse because it's a rolled thread? (U-Bolts) Well...yes...it's a crock. The reason anyone would not reuse such a fastener is if it were over torqued and stretched beyond it's elastic limit or overloaded to the same end. What engineering school did that guy go to? Use a 1 to 1.2" stack of washers under the nuts if you don't have enough thread. Military J form threads are rolled threads.
-
$4543.09 That's this suspension projects current cost. Parts, shipping, taxes and installation. Given the result I'm good with that. I added a few X-Gauges today. When I added the oil pressure ECM diagnostic output it floored me. I now know the meaning of 'dummy gauges'. Warmed up idle by the dash reads 38-40 psig. By the ECM it reads 19-22 psig. At a 55 mph cruse the dash gauge read 38-40 the ECM read 23-27 . Tip in just hard enough to turn off the AFM the dash reads 42-45 the ECM reads 30-32. Pin her ears back the dash gauge reads 80 PSI PLUS PLUS pegged to the wall. ECM reads 48-50 psig. Not for the faint of heart. Only got a look at two tanks of E-10 fuel both read 8-9% alcohol. Engine Oil Pressure TXD: 07E0222345(01) RXF: 046205230645 RXD: 3008 MTH: 001400320000 NAM: User Defined Engine Fuel Alcohol Composition TXD: 07E0220052(01) RXF: 046205000652 RXD: 3008 MTH: 006401000000 NAM: User Defined
-
OMG!! Well the initial work is done and I have it back. Picked the truck up last night and by this evening have logged my requisite 500 miles. Back Monday for re-torques and moans. So…every scrap of harshness is gone. Railroad tracks. Bridge expansion joints. Awful pockmarked Illinois roads and I went out of my way to drive the worst in my area then headed into Iowa to visit dad and ride some roads I grew up on that I’ve been avoiding since the first time I ran them in this truck. No need to dodge them anymore. Don’t kid yourself, 1960 Cadillac it is not. More like a modern higher trim level pony car. Firm. Very firm. Almost hard but not harsh. Always in control and very responsive. There’s a double set of esses not far from here that are marked 40 mph and that number has been generous until now. 55 mph was a breeze. Can I do it faster? Who cares but I don’t have to slow anymore. There is only a front sway bar on the WT1 and I’m not sure I’m going to need one. The turn in is on cue and precise. Holds the line as pointed. Very confident feeling. Makes the tires feel like I just traded in my LT’s for Gumballs. Okay, not quite but very inspiring. So all four corners were different heights. 500 miles settled everything in nicely and now that it has, it is dead level standing 37.25” +/- .0625” at the tops of the arches. That’s not a lift and not a lower. It’s a level done from both ends. Level enough that on level pavement an angle gauge on the bed sill is about as dead zero as it gets. I can literally move it either side of zero with two pounds of air from either ends tires. Down over two in the rear and a bit over an inch up in front. I stopped at four dealerships today and found about a half dozen of my model that measured roughly 36” up front and 40” out back. Moans (for Deegan’s): Headlights were aimed but still a bit high. A mild groan/rattle from the suspension at low speeds at turn in. (At highway speeds it is dead silent). Loose sway bar link maybe? Steering wheel is about 4 degrees left. Moans (for Filthy Motor Sports) A bit softer would be good. N2 pressure? Stack? Viscosity? I’m only using about 1-1/2” of compression my zip ties say. Well away from the bump stops. It’s more of tuning request than a moan I guess. Things that made me smile: Everything settled in perfectly. I have a working day/night mirror now. Before it ran out of adjustment before I could see a full picture that didn’t include half the bed cover. Less dash glare reflecting from rear glass at night. I get an extra gallon of gas in her and the gas gauge is actually pretty accurate at three quarter and half now. That puts me squarely over 500 miles of range even if I’m not getting peak mileage. The rear axle that was out of square by .2 degrees from factory which is now dead square has drastically increased coast down distances. Like over 600 additional feet drastic. I can let off the gas at 55 mph and still be over 45 mph if I lift a half mile from the sign. That’s nuts. That is Buick like. My Buick anyway. Any questions?
-
And we have two new issues to deal with. First is camber adjustment. Extended camber bolts are ordered and arrived late yesterday. Too late to finish up last tonight. I actually kind of saw this coming mixing and matching parts like this. This second one is just common sense but I didn’t foresee the fall out. When you lower your truck with the spring by taking out arch or shackles you close the distance between the axle and frame mounted bump stop. So you gain rebound range and loose compression range. The truck now sits as it would with about 1000 pounds in the bed. And there’s the part you don’t think about. Load puts energy into the springs. Sitting static at that same height it’s under no such load. That changes the amount of force the bump stop sees when first contacted. The bumper ‘acts’ as a softer secondary spring. Bump stops, urethane ones, are highly progressive. Each half inch or so it’s compressed takes about 5X more force…until it won’t compress anymore or the load is balanced to the load of deformation. So while the shorter distance limits up compression travel the bumper, receiving more energy defects further, more rapidly and abruptly. So could you shorten it? Many do. It’s even in the instructions for some cheap tuner kits. But doing so runs two risks. First the part you are cutting off is the soft end (normally) so while it takes more travel to reach it it’s very harsh once it hits. That can totally upset the balance. So let’s say the mount allows you to shorten the big end. Yep you get to keep the progressive nature of the bumper but now you run the risk of bottoming the shock or in the case of piggy backs, crashing the reservoir into the axle housing. It’s case specific and in this case applicable. Thank goodness and the unforeseen only part of this lower was by the arch reduction method. The other part was in a lower spring rate which allow the truck to settle lower before spring force equals truck weight. Leaving the bumper then uncut puts rate back in once the bumper is in play and being highly progressive it will prevent the reservoir crashing the bump stop pad. Look King did not intend on the OEM shocks to be installed in lowered trucks so this is all on me and I will get if fretted out. The delay in receiving the camber kits put my truck off the lift and at the back of the days list. These boys need to make money and that doesn’t happen if I’m tying up the lifts for days on end. Patients…….
-
Installation of parts is done. Now we tweak. Pinion angle, wheel alignment and bump stops. I took some photos and measurements and sent to Ben for review. He will tell me what's what. It did not produce a perfect 2" drop. A very solid 1.5" was realized which gave a very pleasing 1" forward rake. It will settle some over then next few thousand miles so this is great. I can always shim it taller. Just not shorter. I think it made a huge visual impact. Lost that 'ducks eating in the pond' butt to the sky stance. I have over an inch more front travel and half that gain in rear travel. All four corners are perfectly centered in their respective travel. It doesn't get better than that to tune from.
-
.thumb.JPG.2c573de60d3a3a4407c7d92298db46dd.JPG)
Sugar Bears 2015 GMC Terrain SLE-2 2.4 AWD
Grumpy Bear replied to Grumpy Bear's topic in Member Build Threads
45,000 mile oil change. Balance and rotate. Check up. All good. Longer term average fuel efficiency seems to be 25-26 mpg. -
I edited two previous post on this install concerning the knuckles and wheel bearings. I’m not going into the who or how but the information ball got dropped hard. It doesn’t matter why. It matters that all is good and the worst of it was some lost time and a bit of frustration. Most of it mine. We reused the OEM bearings and spindles and the install was for the most part butter and bread. There were no disassembly issues, period. Fact is the bearings fell out once unbolted. There is a small interference issue with the reservoir hoses which is nothing more than a matter of some fine adjustments of brackets. Let’s move on to the back. Passenger side went in pretty straight forward. The reservoir may need some tweaking to clear the bump stop pad at full compression but that is still unknown and yet on the list of “watch out for that’ things. Like the front hoses and like the lower ball joint stud vs tape weights and a few other minor things that could be a problem if not caught. That’s the thing with projects like this. Owner wants what he wants. Wrench needs what he needs. Three vendors across the country customizing parts for a truck not in their hands nor in sight and blind to each-others work WILL produce some issues of impingement. It’s why we have a punch list and why there will be a moan list.
-
Deaver spring, Sulastic shackles and King shock in place. Now for the tough one. That's allot of leaves.
-
Both fronts done. Rear in progress. Have to lower the gas tank to do the drivers side spring.
-
Finished charting the oil temperature data collected on all three thermostats. This was part of a broader study that included various oils as well and even some alternate viscosities. It also included a range of ambient temperatures from 70 to 100 F. So for sake of clarity and disclosure 207 F data is with Quaker State Ultimate Durability 5W20. The 180 F data with the Mobil 1 5W20 and finally the 170 F thermostat with Red Line 5W20. I chose the data points collected from the 75 F ambient data for this chart. Honesty ambient temperatures had little effect on the outputs excepting a more rapid warm up. I hazard a guess this is due to the generous radiator size and the in tank oil cooler. The effects of those brands on temperature holding the thermostat a constant was published in an earlier post with the 180 F thermostat. I only had one data set using 5W30 and never published it. It was ridiculous and I quit collecting data before the entire speed range had been run. Each cooler thermostat is matched with the next cooler running oil thus ranging a worse to best scenario. Lastly the data from 40 to 70 mph is actual data logged and the last two points, 75 & 80 mph, are the trend lines projected positions. That trend line was a 3 point polynomial best fit curve with an R = .9999-1.0. Read that nearly perfect fit. The object of this exercise was to find a thermostat and oil combination that allowed me to obtain an operational oil temperature that fell between 180 F and 210 F for the speeds and loads I run under the ambient conditions that prevail in my area. Notes: The overall reduction in oil temperatures reflected the reduction in water temperature less than perfectly but directionally allowed a bit more than a 30 F oil temperature reduction when in concert with the cooler running Red Line oil. The two combine allowed for a reduction in viscosity grade of one SAE unit. That is I can run 5W20 instead of 5W30 and maintain the same operational absolute viscosity cSt. The goal was to find a combination that would significantly increase engine life while taking nothing from economy of operation. Half that goal has already been realized in a net gain in fuel economy of roughly 5%. The later time will reveal but as this is not my first barn dance, unless I total the truck or die, it’s pretty much in the bag.
-
Marv88 2016 Silverado LS Regular Cab 5.3L
Grumpy Bear replied to Marv88's topic in Member Build Threads
I've seen nothing but the 'skins' local and began thinking the clad was just a dream. -
I can't get enough of tastefully lowered RCSB's. On my list of follows. It's purrrdy.
-
Marv88 2016 Silverado LS Regular Cab 5.3L
Grumpy Bear replied to Marv88's topic in Member Build Threads
Those wheels. Is the chrome/stainless actual plating or a wheel skin / wheel cover? Love this project BTW. -
Monday, June 26th 2017. That was the day of first contact with Filthy Motorsports about this suspension makeover. Yea, over four months ago. Seventeen long weeks to the day. Not much of this was straight off the self like it could be pulled as an item from stock. The basics however were and it became a blend of ‘one off’ truly custom manufactured and some ‘cherry picked’ production items. Unless your name is Arlen Ness, Chip Foose or Jay Leno this is the way it goes. A project like this for the masses is an exercise in patients, commitment and humility. You learn who you aren’t pretty quick. Get over it and get on with it. Get your wallet ready for some serious abuse. The biggest problem has been ME. Ya just don’t know what you don’t know and won’t know it until your tripping over it. They spend as much time waiting on you as you do waiting on them. As careful as I was I still missed critical items that cost me hundreds of extra dollars. Then again I insisted on certain aspects of the project that cost a good deal of time and money to engineer and manufacture and then install now to prevent spending huge sums latter. For instance I could have accepted the ‘canned’ version and had a truck that sat with the factory rake but two inches taller in all four corners. Doing so would have saved me about grand in cash and six weeks of time. It’s what most do and so that’s what they build the shelf parts to do. Oh and I still don’t know if my expectations will be met do I? :-)
-
So far it’s been one thing after another. We have no idea what sort of protective oil is used by Bell on these raw knuckle castings but it took days of multiple solvent baths to get is all soaked out of the metals pores well enough to get paint to stick but done it is and they look good. I miss real old time caustic tanks. The step bars were in the way and had to be removed to sit the lift proper (balance) and being tied to the cab mounts the original installer in his infinite wisdom evidently didn’t believe in anti-seize. Four new mounts. So I’m hands off and just looking around. Doing so I find a half dozen more body plugs missing or half a**ed installed. Mostly in the cabs lower section. Prime resting areas for cab corner and running board rot. Not drain holes but filling holes higher up. I’m also finding more places the undercoating tech missed by a mile. Really, does anyone actually care about the work they do or does negligence and apathy actually have a working wage? Coming up on the 50K trans/diff service I note there isn’t a drain plug on the pan. Pure genius. Nor the diff cover for that matter an no low point plug in the casting either. The 8.625 gets all the best GM has to offer. It’s important. There will be no ‘power flush’. But not all bad news. What exactly is the problem supposed to be in removing the bolts from the rear hangers? Remove the lower bolt first and let down the spring and hanger together then separate them. Why beat the box to death? I’m embarrassed that I took the consensuses opine instead of crawling under and looking. I look like the village idiot. More good news. All premeasurements done gave a few happy surprises. And I’m going to say first most of the doom and gloom that formed my expectations I got on truck forums. Okay then. The initial alignment is pretty much dead middle spec and as a happy-stance all adjusters are nearly dead center. All four corners are equal ride height to their respective positions. The only thing a bit amiss is a 0.15 degree out of square rear axle to the trucks centerline. We fix this. We have room to play and the replacement parts have even more designed in adjustments. I also own a die grinder. LOL. My head wrench has some killer carbide blades that made short work of the partially hardened ball joint studs. A much cleaner and squarer cut than cut off wheels and allot less heat. You win some, you lose some. It’s the nature of projects.
-
-
Got yourself a major project there. I feel for you, really. Nothing ever goes as smoothly as you hope it will. Did you mean caster where I highlighted camber in the quote? Caster, as you know, keeps the trucks wheels wanting to go forward. It doesn't take more than a degree and a half or so to do that job. Five things happen when camber gets at the top of the spec. Actually over 2.5 or so. 1.) In corners at speed the truck doesn't want to change direction. It understeers and makes the steering effort higher than it needs to be. Trucks being nose heavy don't need any more help plowing in the corners when your turbo is on the hunt. 2.) Anytime you're not pointed straight down the road, which is allot, caster is laying the tire on the edge that is in the direction of steer. You can picture this easier if you think in terms of extremes such as 45 degrees of positive castor. If you can't turn your wheels to full lock and look. If that still doesn't seal the deal think about the " parking lot speed" difference in front tire geometry between a choppers laid out forks and a trails bike nearly straight up and down forks. 3.) It hammers the bees wax out of the shocks. Again think in terms of extremes. Like 90 degrees positive caster and hitting a 4" bump on 2" of sidewall. That gets translated to you. Feels nasty. The tire is no longer going 'over' the bump it's 'running into' the bump. I took over a degree out and it made a real difference in ride I could feel. I should take out more. 4.) When at the spec top any load in the box puts the caster out of spec. 5.) It stresses every connection in the suspension more and just wears parts out faster than it needs to. Your right, you camber is indeed in spec. I was just saying for a street ride your tire wear would improve if it were closer to middle spec. If you don't mind, it don't matter.
-
1SLOW1500 Yikes!! That is a huge cross camber. Do you find it odd that lowering the front, which takes positive caster out, put your caster adjustment at maximum positive caster? Something is wrong there. Do you have another alignment shop in you area with a good reputation? When I see toe numbers that are not a dead match I see a mechanic pitching horseshoes and happy with close enough. Are you? I'm just say'n. They are you tires and it's your family's safety. On the camber. Yes that is in factory spec. It's also more than a half degree which can be hard on tires. You mentioned you already are using extended camber bolts. Have a conversation with Ben and Filthy Motorsports. No reason you can't have much better than you have. UCA's maybe? Now I'm tossing horseshoes. LOL
-
Jason called. All instructions read and punch list reviewed last night. Started break down today. Preassembly has started. Pressing bushings into spring eyes. Painting knuckles. Touch up of shipping damage. Lots of before measurements to take as well. Targeting Thursday completion. Going to drop in tomorrow AM for a look see. Maybe photos if there is anything to see.
-
2014+ Gas Mileage (MPG) Topic
Grumpy Bear replied to BringTheRain403's topic in Engines & Drivetrain
47,000 mile life time hand calculated average = 26.7 mpg. -
I get a call from the shop early yesterday telling me my space has not been vacated by the previous holder. A one day delay and actually that’s a good thing. It’s been raining here for a week and yesterday was the first day dry enough to do some clean up and the interior needed it bad. Wife says the truck smells like an old goat. That would be puppy gas I’m sure. I gave the interior a top to bottom clean and disinfect. Shampoo the seats and Meguiars the plastic and rubber. Clean and sent the cabin air filter and clean the window film. It’s four AM and time to catch a nap. Drop of is 7 AM. My guts are churning in anticipation. I've been waiting all summer and these last few hours are the worse.
-
October Friday the 13th is the day I've been assigned stall space. Punch list is done. Stopped in to see what a grand in springs looks like as factory replacements are about $125 each. This is some set of springs. 11 full leaves with one half leaf. Reversed and double wound eyes. Heavy critters. Shippers nicked them up silly. Some paint work to do. Having lived with the Jet Performance 170 F thermostat for awhile now I'm pleased as punch. Suits my driving style and requirements both. Gathered data for my files on water and oil temps vs speed in a simulated 4.10:1 gear (manual 5) over the range of 40 to 70 mph. Gasket stayed on. Doing this test is how the first one shed it's skin.

.JPG.f38165719c1167abf97350f67a87b91c.JPG)

-
Forum Statistics
250.6k
Total Topics2.7m
Total Posts -
Member Statistics
342,996
Total Members8,960
Most Online
-
Who's Online 7 Members, 1 Anonymous, 462 Guests (See full list)