

webshopper
-
Posts
13 -
Joined
-
Last visited
webshopper's Achievements
")
Enthusiast (2/11)
5
Reputation
-
Windshield Wiper Blades
webshopper replied to davidio840's topic in 2014-2018 Silverado 1500 & Sierra 1500
Here's one out of the box for ya. Take a clean old bed linen sheet (white is preferable) and makes a small rag. Spray some lacquer thinner onto the sheet rag. Run the lightly soaked cloth along the square edge of the wiper blade. You'll see a coating of black (rubber) removed from the blade onto the rag. This works best if you remove the wiper blade and work under a nice bright shop light or outside in the sun. Lacquer thinner evaporates very quickly so work fast. Do not scrub. Run the whole length of the blade nor more than twice. Wear a nitrile glove or something. Giggle if you will but I'm still running my 2015 OEM's on my 2500HD in Maine with all the salt, sand, and other road crap. Want to see the results of your work? Take a very strong lens (old camcorder or camera) and look at the wiper cleaning edge before and after. It makes a nice crisp edge. It typically is very small chunks of pitch (pine trees in Maine) the collect on the cleaning edges of the rubber that make the streaks. The rubber needs to be in good condition for this to work. If it's cracked, separated, folded over, etc. you need new blades. All the best... -
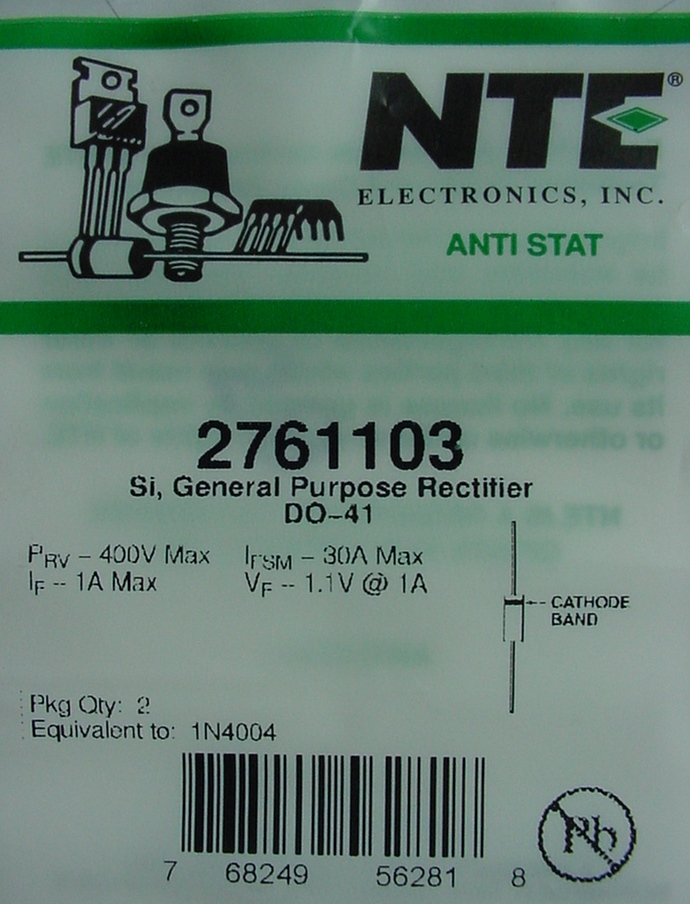
RE: Topic 162734-Foglights On With High Beams I’m new to the forum this week, so please excuse any oddities from not knowing how to post. Just purchased a Chevrolet Silverado 2015 2500HD LT and completed the “Foglights On With High Beams” modification successfully. I did study the GM 2015 and 2016 Upfitters Guides extensively. The 2015 Guide is 898 pages; the 2016 Guide is 1,617 pages so now there is a lot more information. The BODY BUILDER MANUAL FOR 2016 CHEVROLET SILVERADO/GMC SIERRA ELECTRICAL SECTION is available at: https://www.gmupfitter.com/files/media/photo/664/Sierra_Silverado_Electrical_Body_Builders_Manual_Service_Manual_2016_en_US.pdf. If you can't navigate to that, Google "GM 2016 Upfitter Guide" or key in "https://www.gmupfitter.com/pdflists/view/36". Choose the "Full Size Trucks/SUVs" folder. For my application, pages 872 and 873 of the 2016 Guide apply. For those not inclined or wish not to study diagrams, match colors on wires, and read the fine print, I offer these tips: Perform your work in a dark ambient light and use flashlights. It’s easier on your eyes. The X5 plug (brown color) inserted in the K9 Body Control Module (BCM) can be a bit difficult to remove but do not use tools; keep the locking tab pressed firmly and use your fingers to rock the plug. The harness is tight but don't be tempted to cut the black fabric protection layer. The connections you'll be making are ground so no heat is generated on the leads. I sharpened the leads of the diode to produce a needle-like effect. This seemed to aid in insertion of diode leads into the proper plug holes. The diode must be oriented properly with the cathode (striped end) placed in hole #18 (Brown/Violet stripe) Headlamp High Beam Relay Control. The anode (non-stripe end) is placed in hole #10 (Brown solid) Fog Lamp Relay Control. The leads of the diode, when inserted properly, go into the plug ¾ of lead available on a standard 2¼" length diode. I did not use any heat shrink or insulating tube. If you do, it may disallow smooth bends in the leads that remain external to the holes. The vehicle battery was not disconnected. Like any job, good tools help. I used a small needle-nose plier with a 45° nose bend. I did go to Radio Shack® for the $1.49 package of two diodes show in the photo. I like the NTE® brand. It does help to have the X5 plug (brown color) disconnected so that you can hold it while applying pressure to the diode lead while inserting. The leads bend extremely easily so take little bites with you needle-nose pliers. Don’t fight it or the lead will bend. If it doesn’t go, try another corner of the hole. To save on diodes, practice with a similar diameter wire. The color of the #10 wire did change from Brown/White to solid Brown somewhere along the production line. The above reflects only my personal experience and does not imply your particular situation will be the same. I hope these hints help. I'm not much of a forum writer so please excuse the simplicity and the rambling list. A special thanks to all that designed, contributed, and assisted in the 25 pages of this thread. Read the entire thread for special nuggets that might apply to your project. All the best from Maine.


-
Forum Statistics
250.4k
Total Topics2.7m
Total Posts -
Member Statistics
342,826
Total Members8,960
Most Online
-
Who's Online 4 Members, 0 Anonymous, 669 Guests (See full list)