

Aaaaaaaayush
-
Posts
72 -
Joined
-
Last visited
-
Days Won
1
Content Type
Profiles
Forums
Gallery
Events
Articles
RPO
Store
Blogs
Everything posted by Aaaaaaaayush
-
 Might find it in this: https://www.gmupfitter.com/files/media/photo/99/2006_LD_CKFullSizeElectrical.pdf https://pinoutguide.com/Car-Stereo-GMC-Opel-Chevrolet/GM_2003-2006_UB0_UB1_UC6__pinout.shtml Pin Number wire color UQ3/UQ5 UQ7 1 ORN Radio Class 2 Serial Data 3 PPL N/A Rear Seat Audio Enable Signal (UQ7 w/o Y91) 4 RED N/A FM Composite Signal (UQ7 w/ Y91) 8 TAN Left Front Speaker Output (+) (UQ3/UQ5) Left Front Low Level Audio Signal (+) (UQ7) 9 GRY or DK GRN Left Front Speaker Output (-) (UQ3/UQ5) Left Front Low Level Audio Signal (-) (UQ7) 10 LT BLU or BLK Right Rear Speaker Output (-) (UQ3/UQ5) Right Rear Low Level Audio Signal (-) (UQ7) 11 DK BLU Right Rear Speaker Output (+) (UQ3/UQ5) Right Rear Low Level Audio Signal (+) (UQ7) 12 BLK/WHT Ground B1 ORN Battery Positive Voltage B3 PNK or DK GRN Radio On Signal (UQ7 w/o Y91) or Antenna Enable Signal (UQ7 w/ Y91) B4 BRN/WHT Instrument Panel Lamps Dimming Control (w Y91) B5 BLK Ground (w/ Y91) B6 GRY/BLK Radio Mute (UQ7 w/o Y91) B8 BRN Left Rear Speaker Output (+) (UQ3/UQ5) Left Rear Low Level Audio Signal (+) (UQ7) B9 YEL or DK GRN/ WHT Left Rear Speaker Output (-) (UQ3/UQ5) Left Rear Low Level Audio Signal (-) (UQ7) B10 DK GRN or ORN/BLK Right Front Speaker Output (+) (UQ3/UQ5) Right Front Low Level Audio Signal (-) (UQ7) B11 LT GRN Right Front Speaker Output (-) (UQ3/UQ5) Right Front Low Level Audio Signal (+) (UQ7)
 -
What exactly are you getting voltage drop across?
-
I Found that other coax cable capped off under the bed yesterday while plugging in my new tailgate harness. I have a feeling its a video input for some reason. I'm gonna try switching the coax connectors to see what that other input is for or if it will even show up on the infotainment center.
-
Yes that's totally normal, its the shift lock that makes the click sound. only when shifting out of park, it shouldn't be making any other clicks after you're out of park.
-
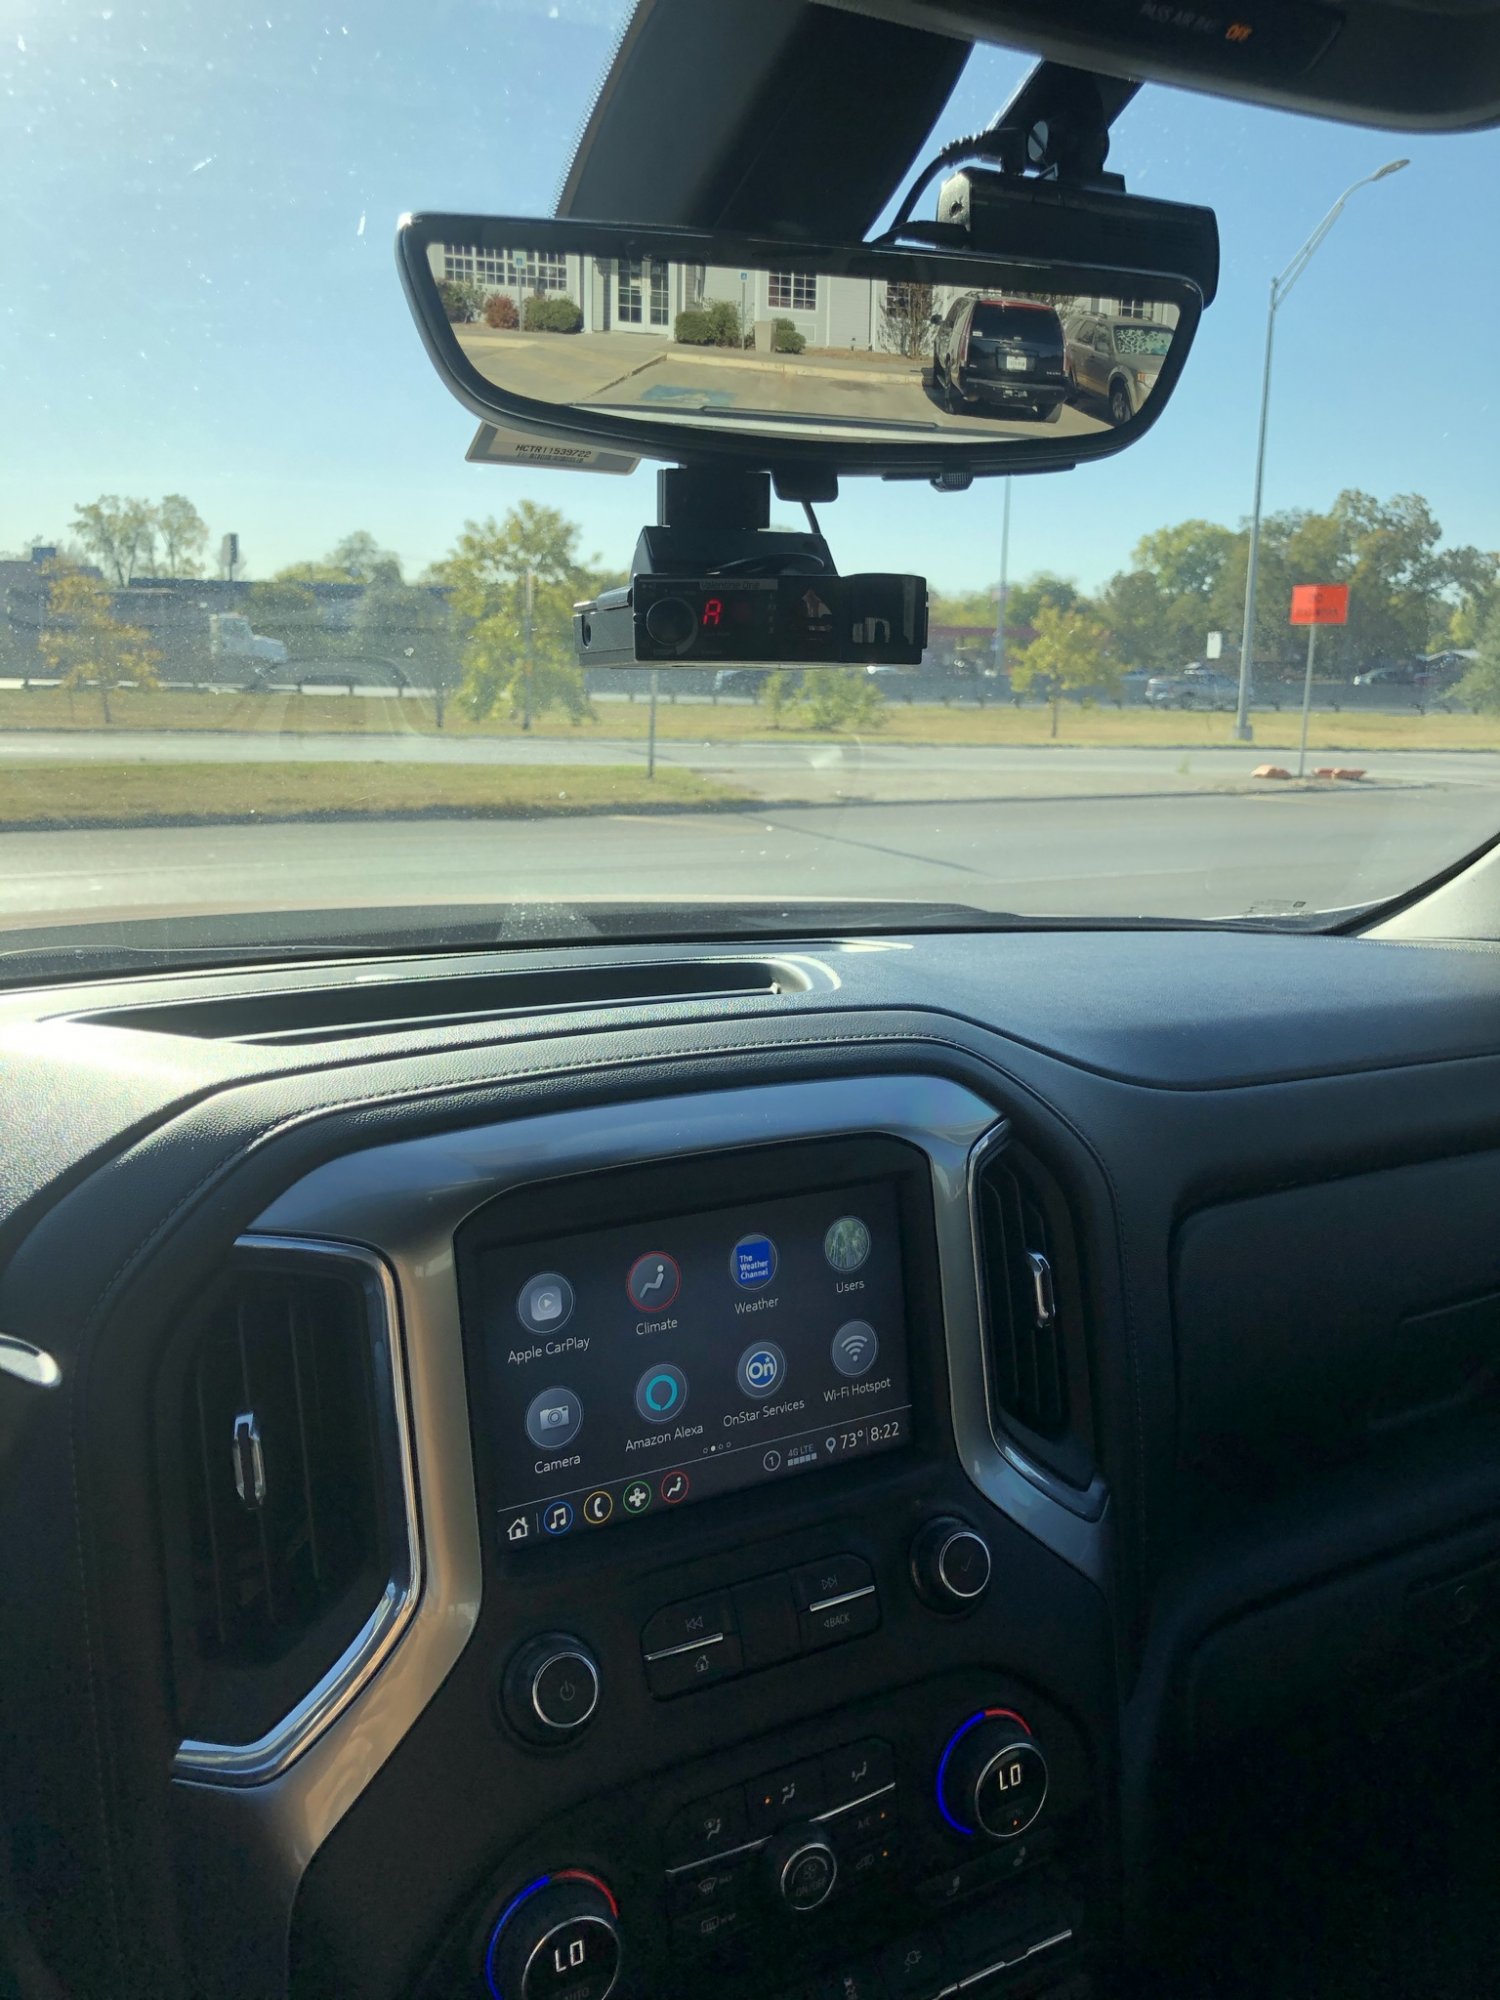
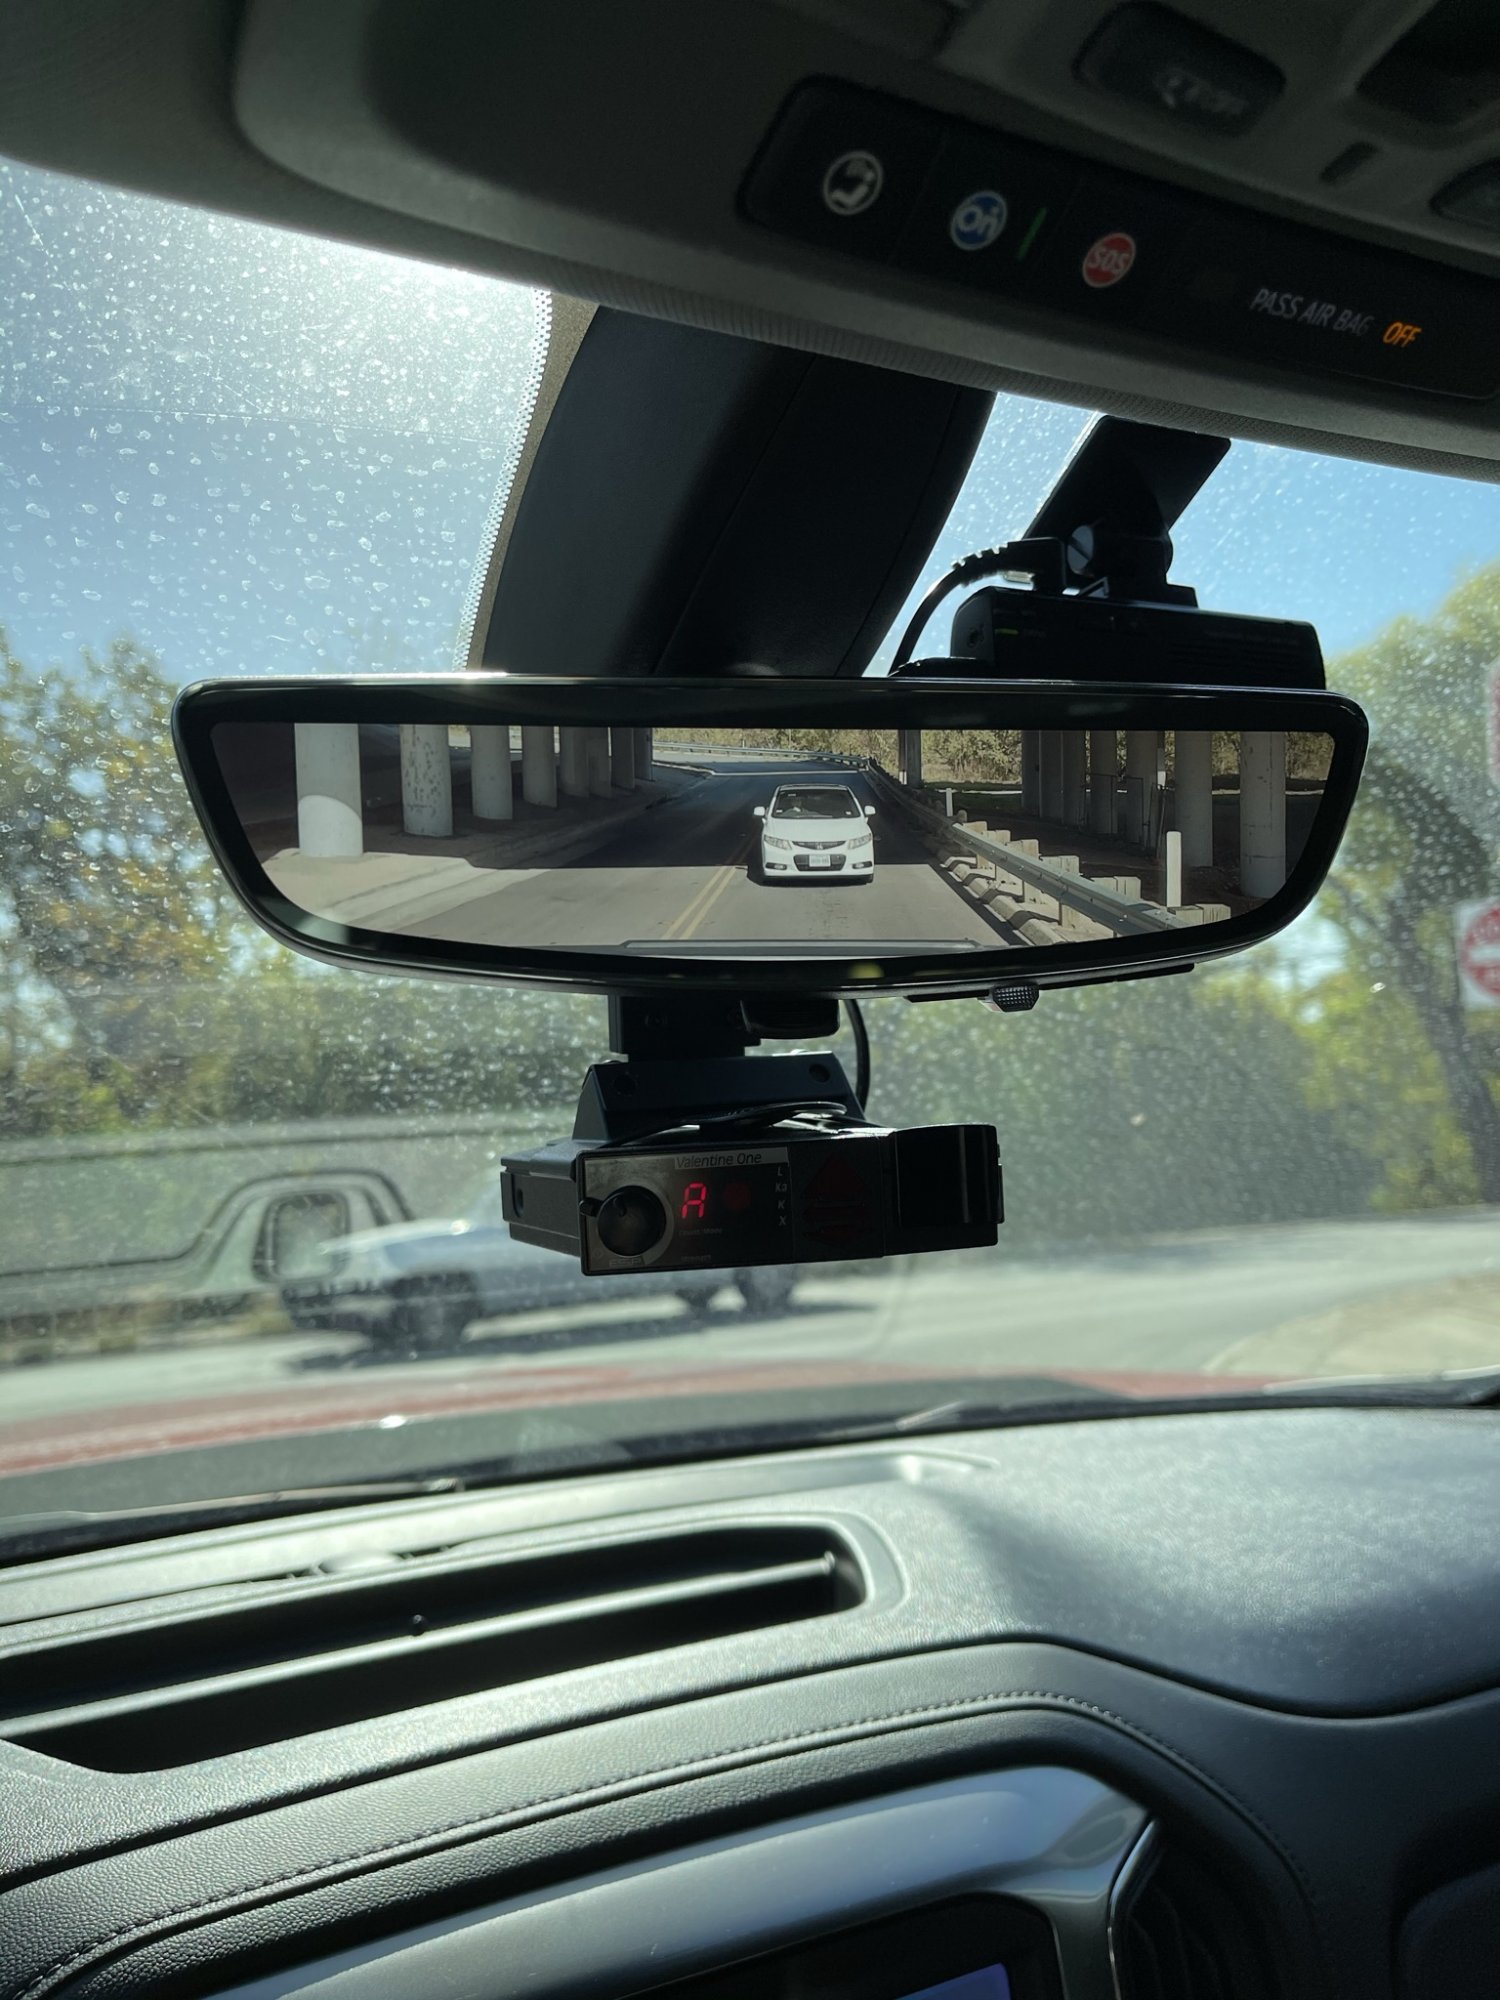
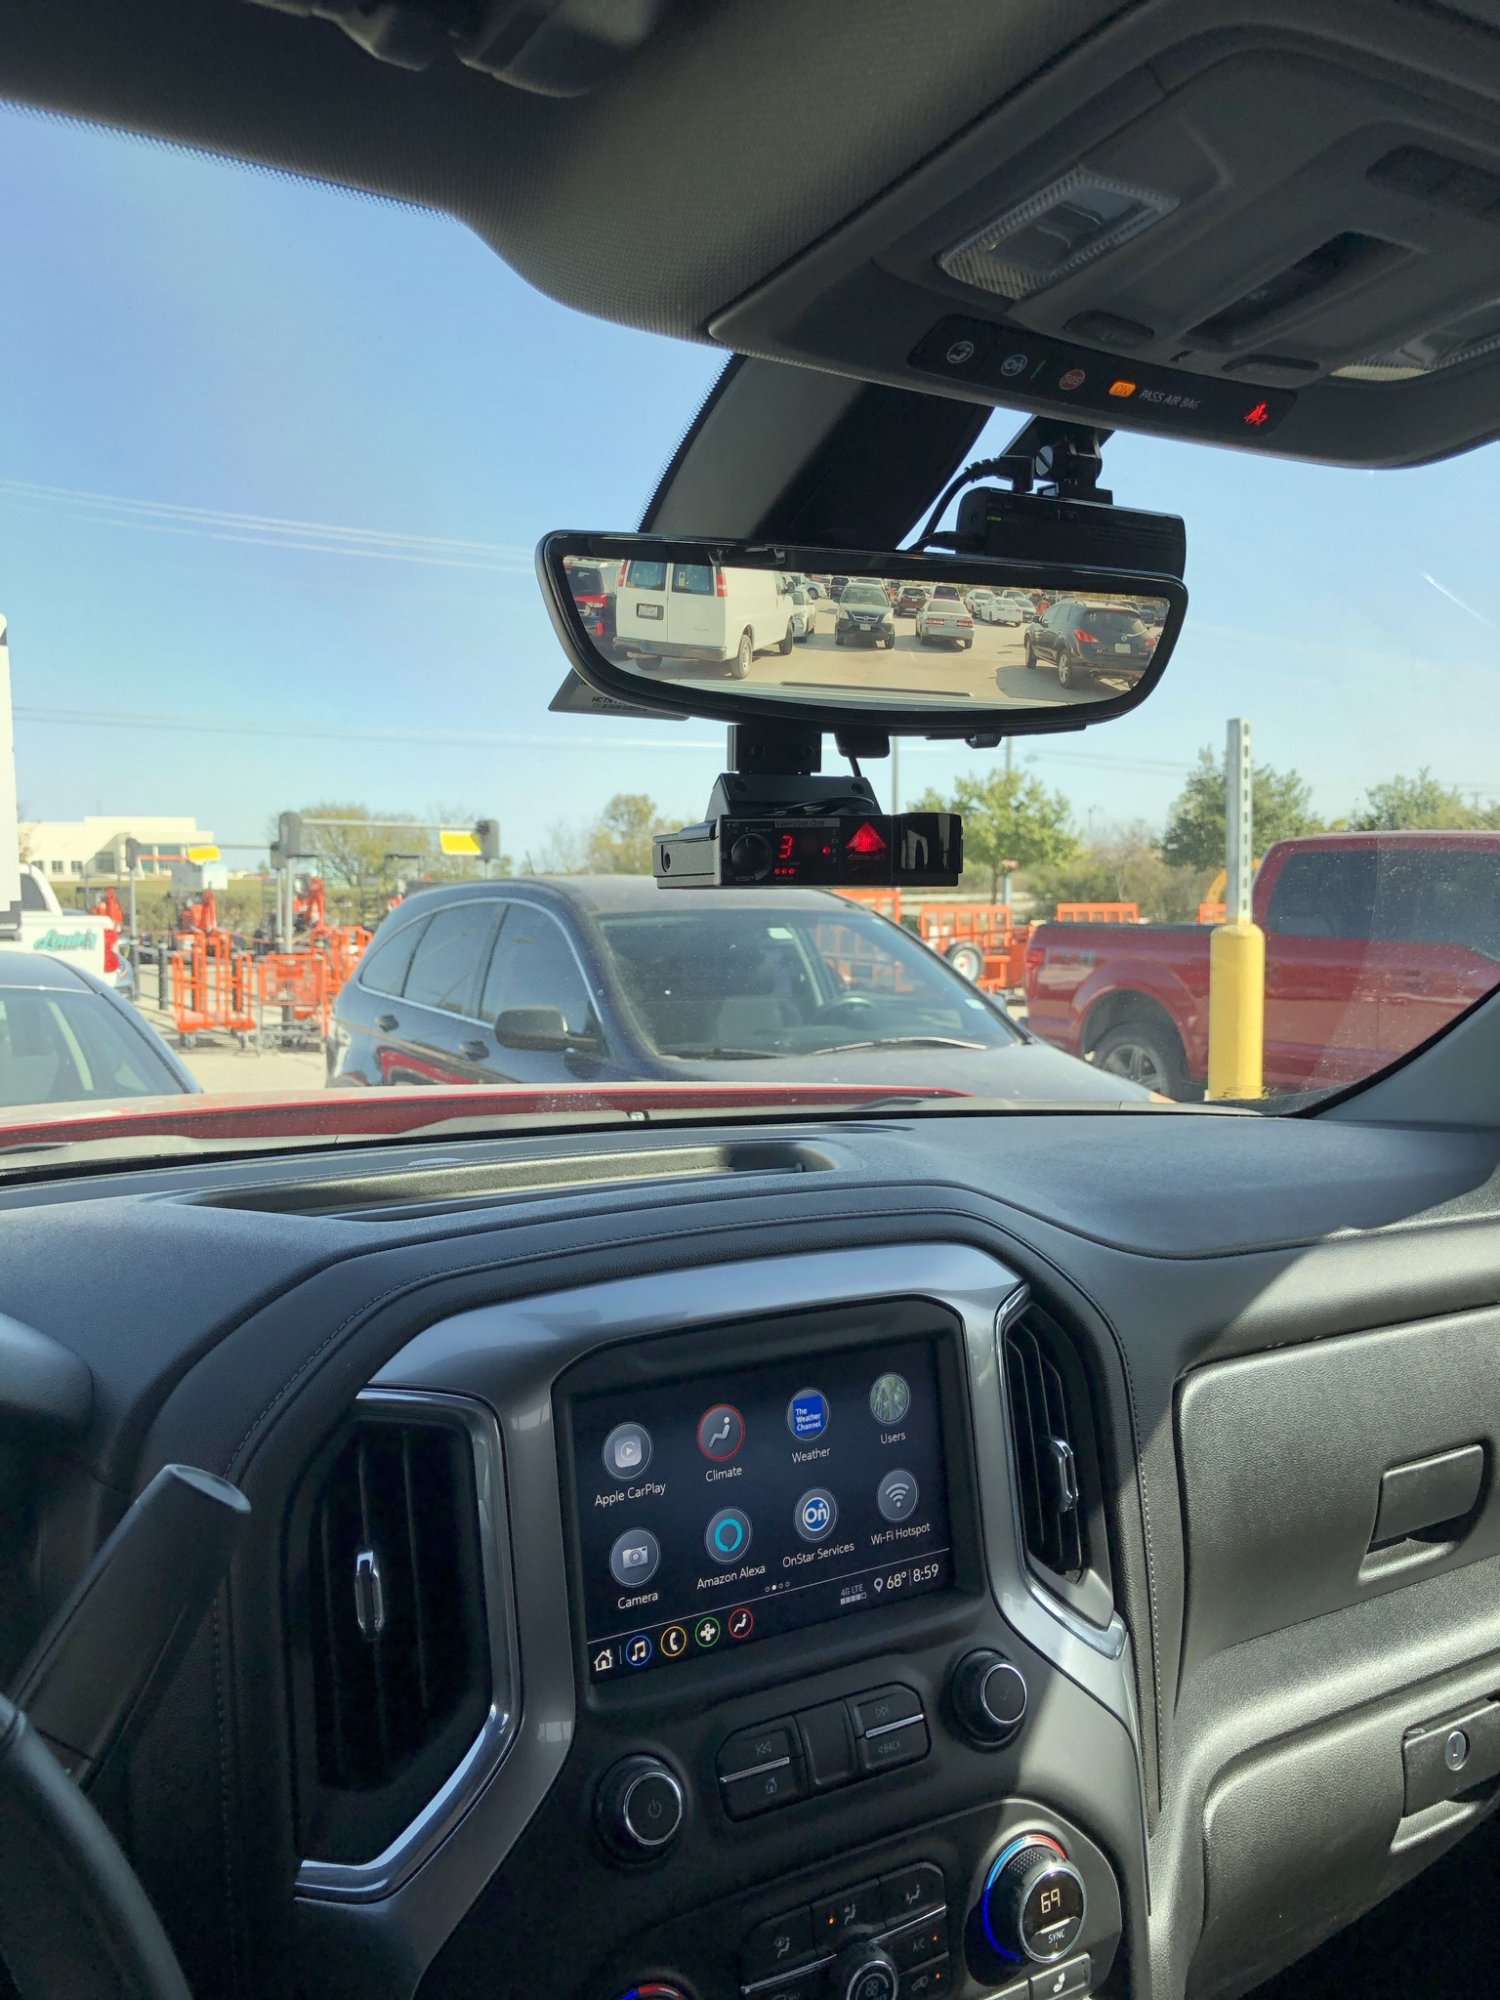
The bed view camera is only for bedview and that camera is connected to the VPM(Video Processing Module) directly. The Rearview camera Mirror is independent from the BCM(Body Control Module) and independent from the VPM. The mirror itself does all the processing, so yes the headliner will have to be pulled down and the CHMSL( Center High Mount Stop Lamp) will need to be replaced for the one with both cameras. The first thing you should check to see is if your headliner harness has the rearview mirror plug. In my case I did not have an auto dimming mirror so the plug was glued up inside the headliner just not used. The same plug provides power for the auto dimming mirror and the rearview camera mirror. I've done this mod but I don't have the bedview camera.
-
They make waterproof ones but I don’t think it will be that much of an issue inside the tailgate.
-
Just any relay will do you can get one from autozone for a few bucks or I got a pack of 5 from Amazon so I can use the other relays for other projects, just make sure the coil side is 12v. this is exactly what I got https://www.amazon.com/dp/B00RWV470O/ref=cm_sw_r_cp_apip_QQkakJcmsjjSg
-
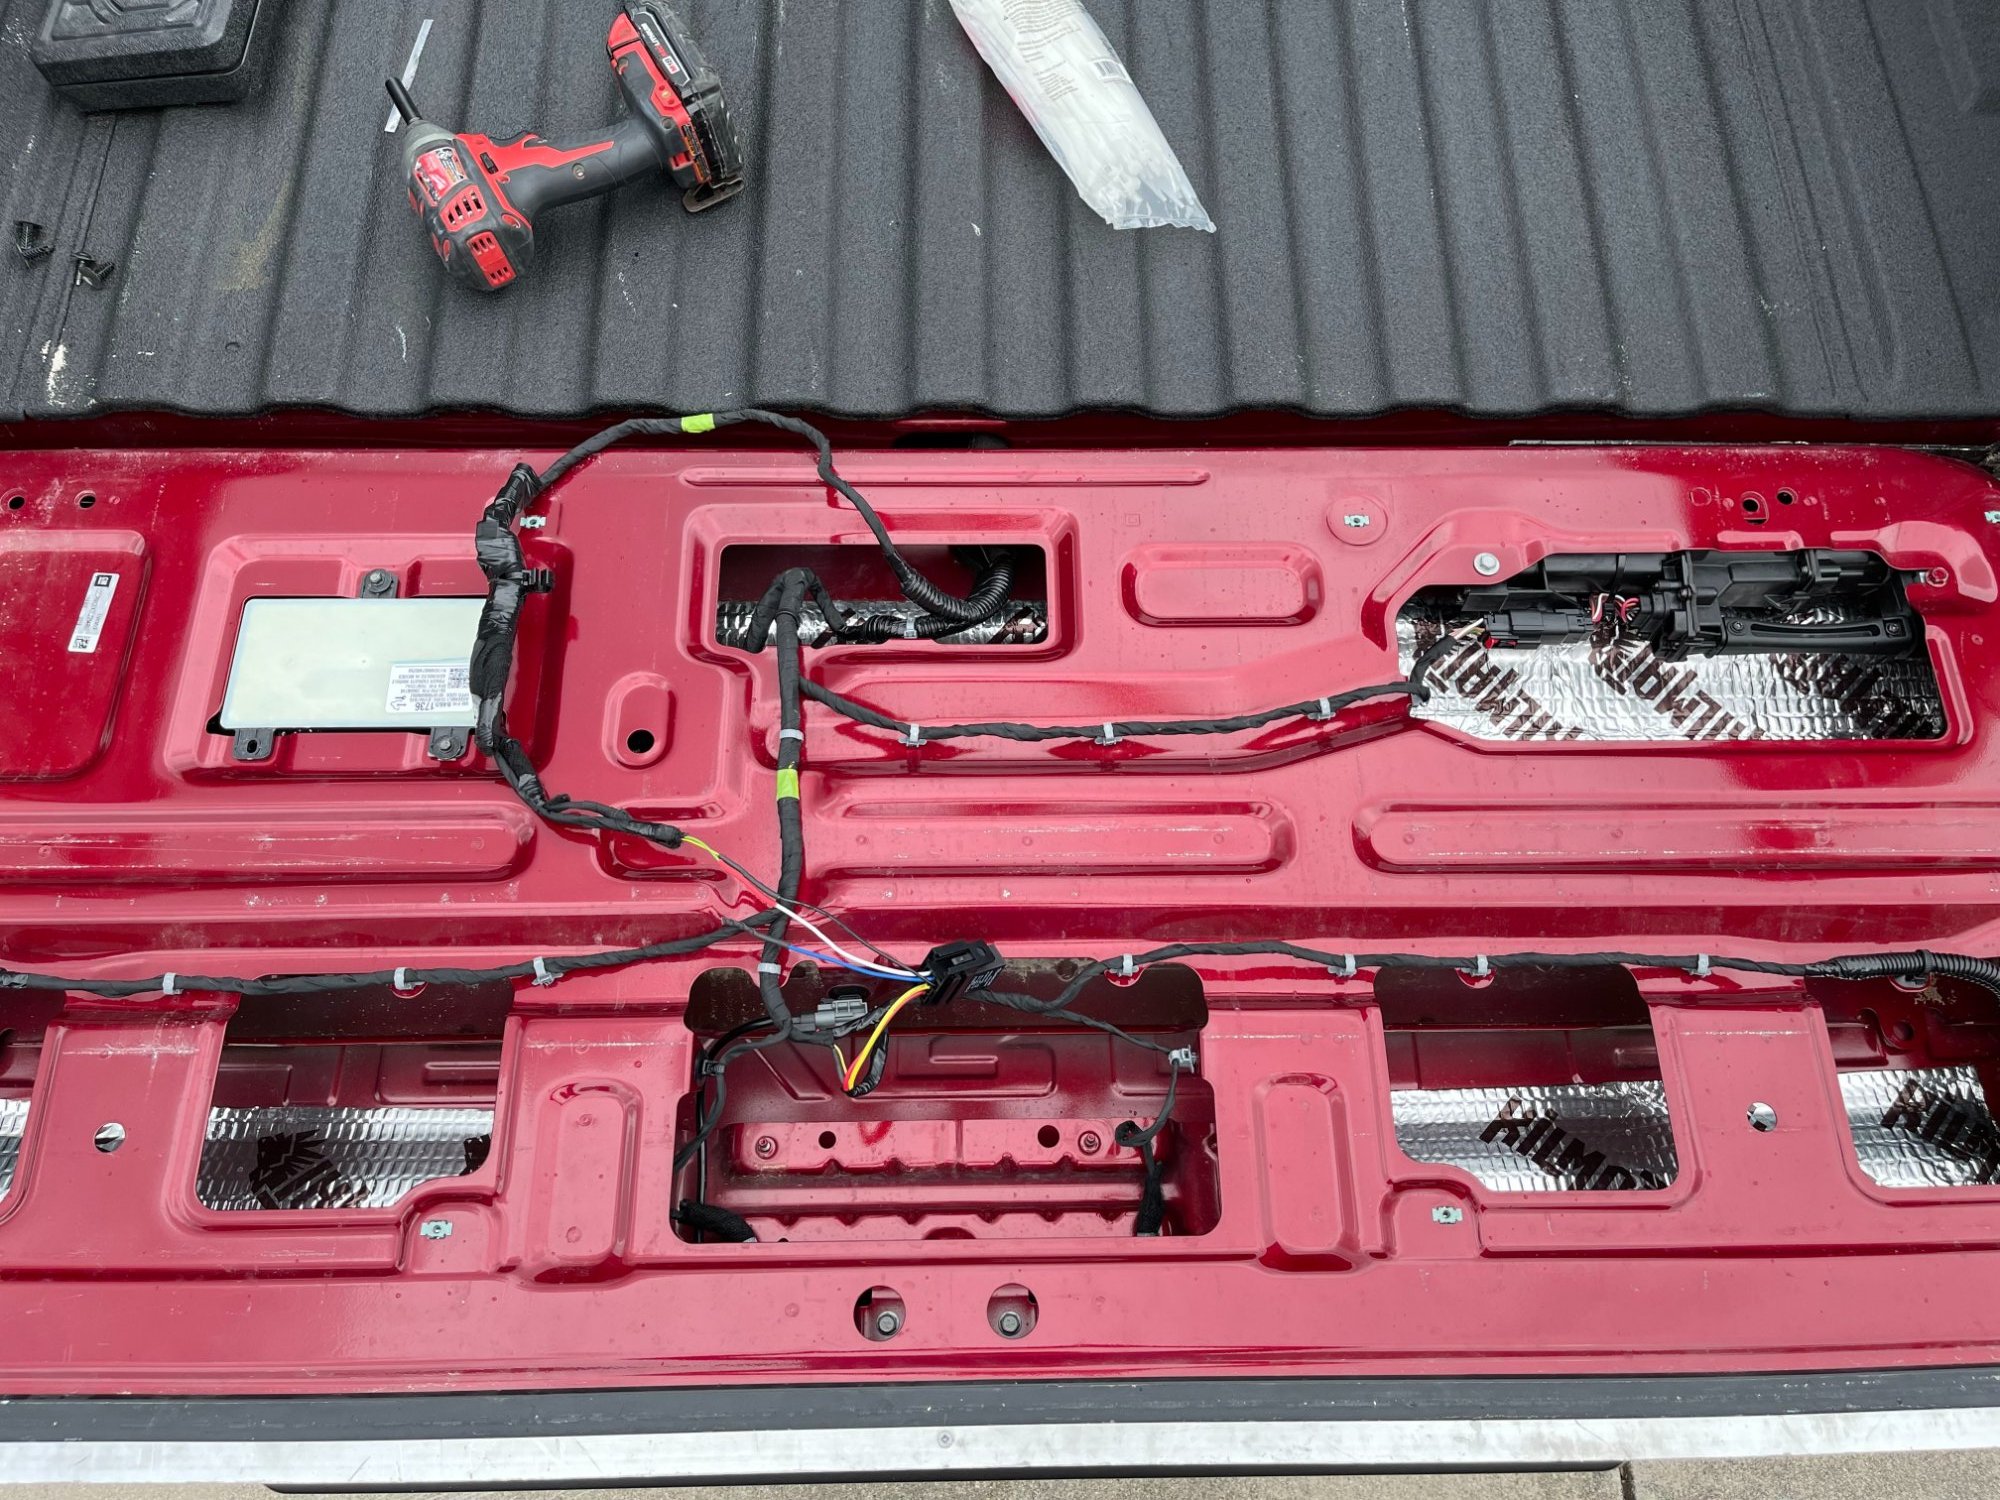
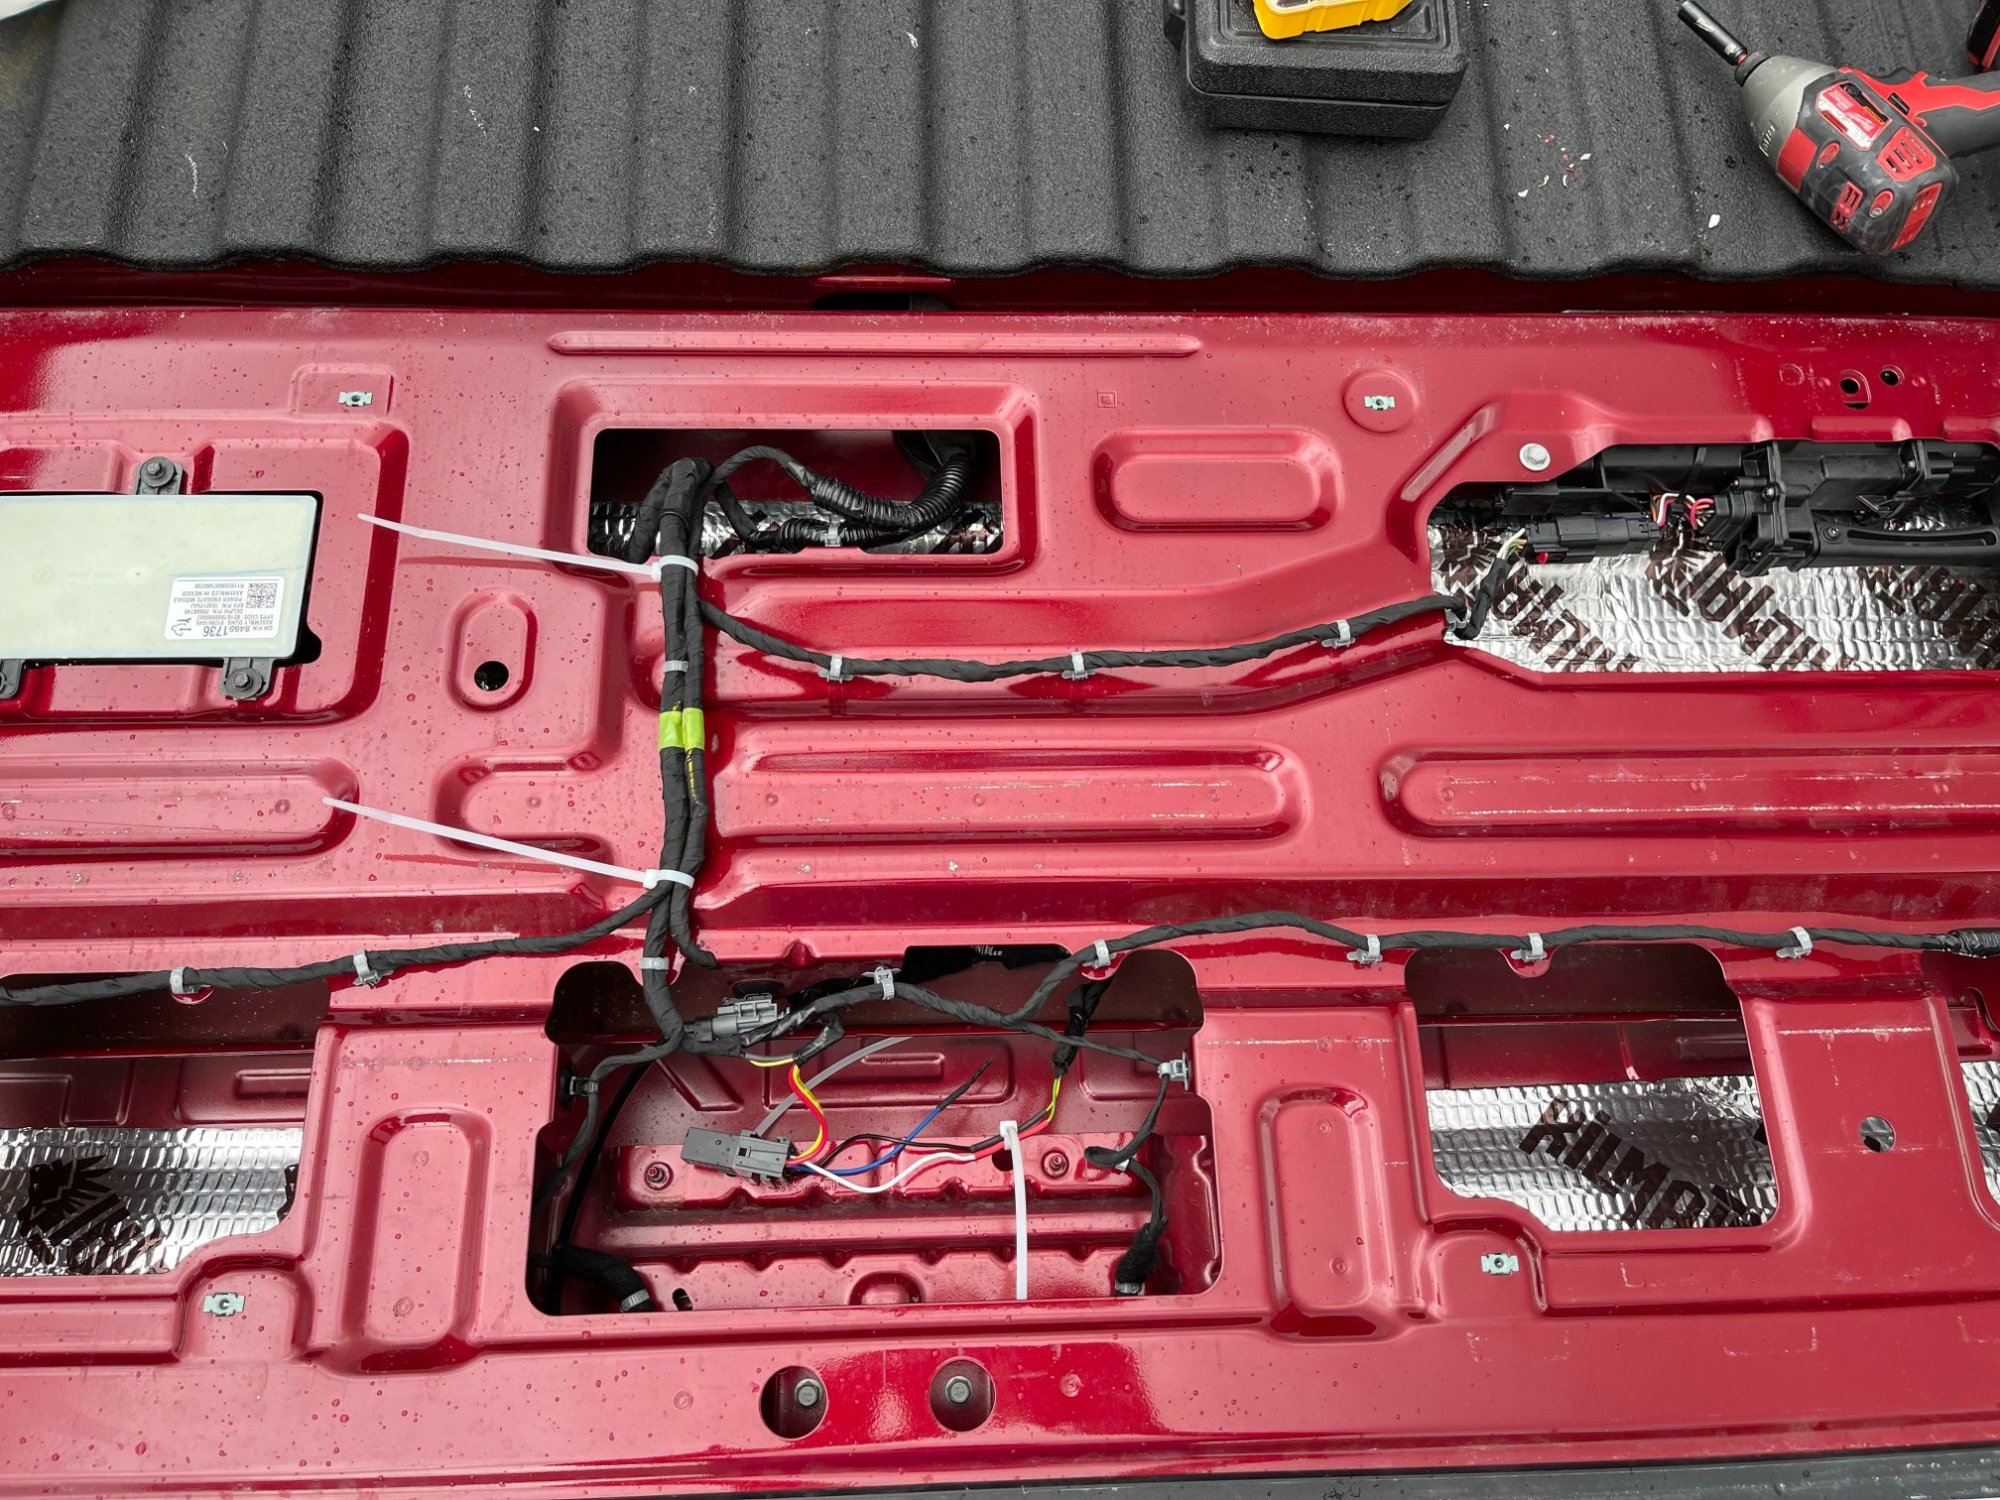
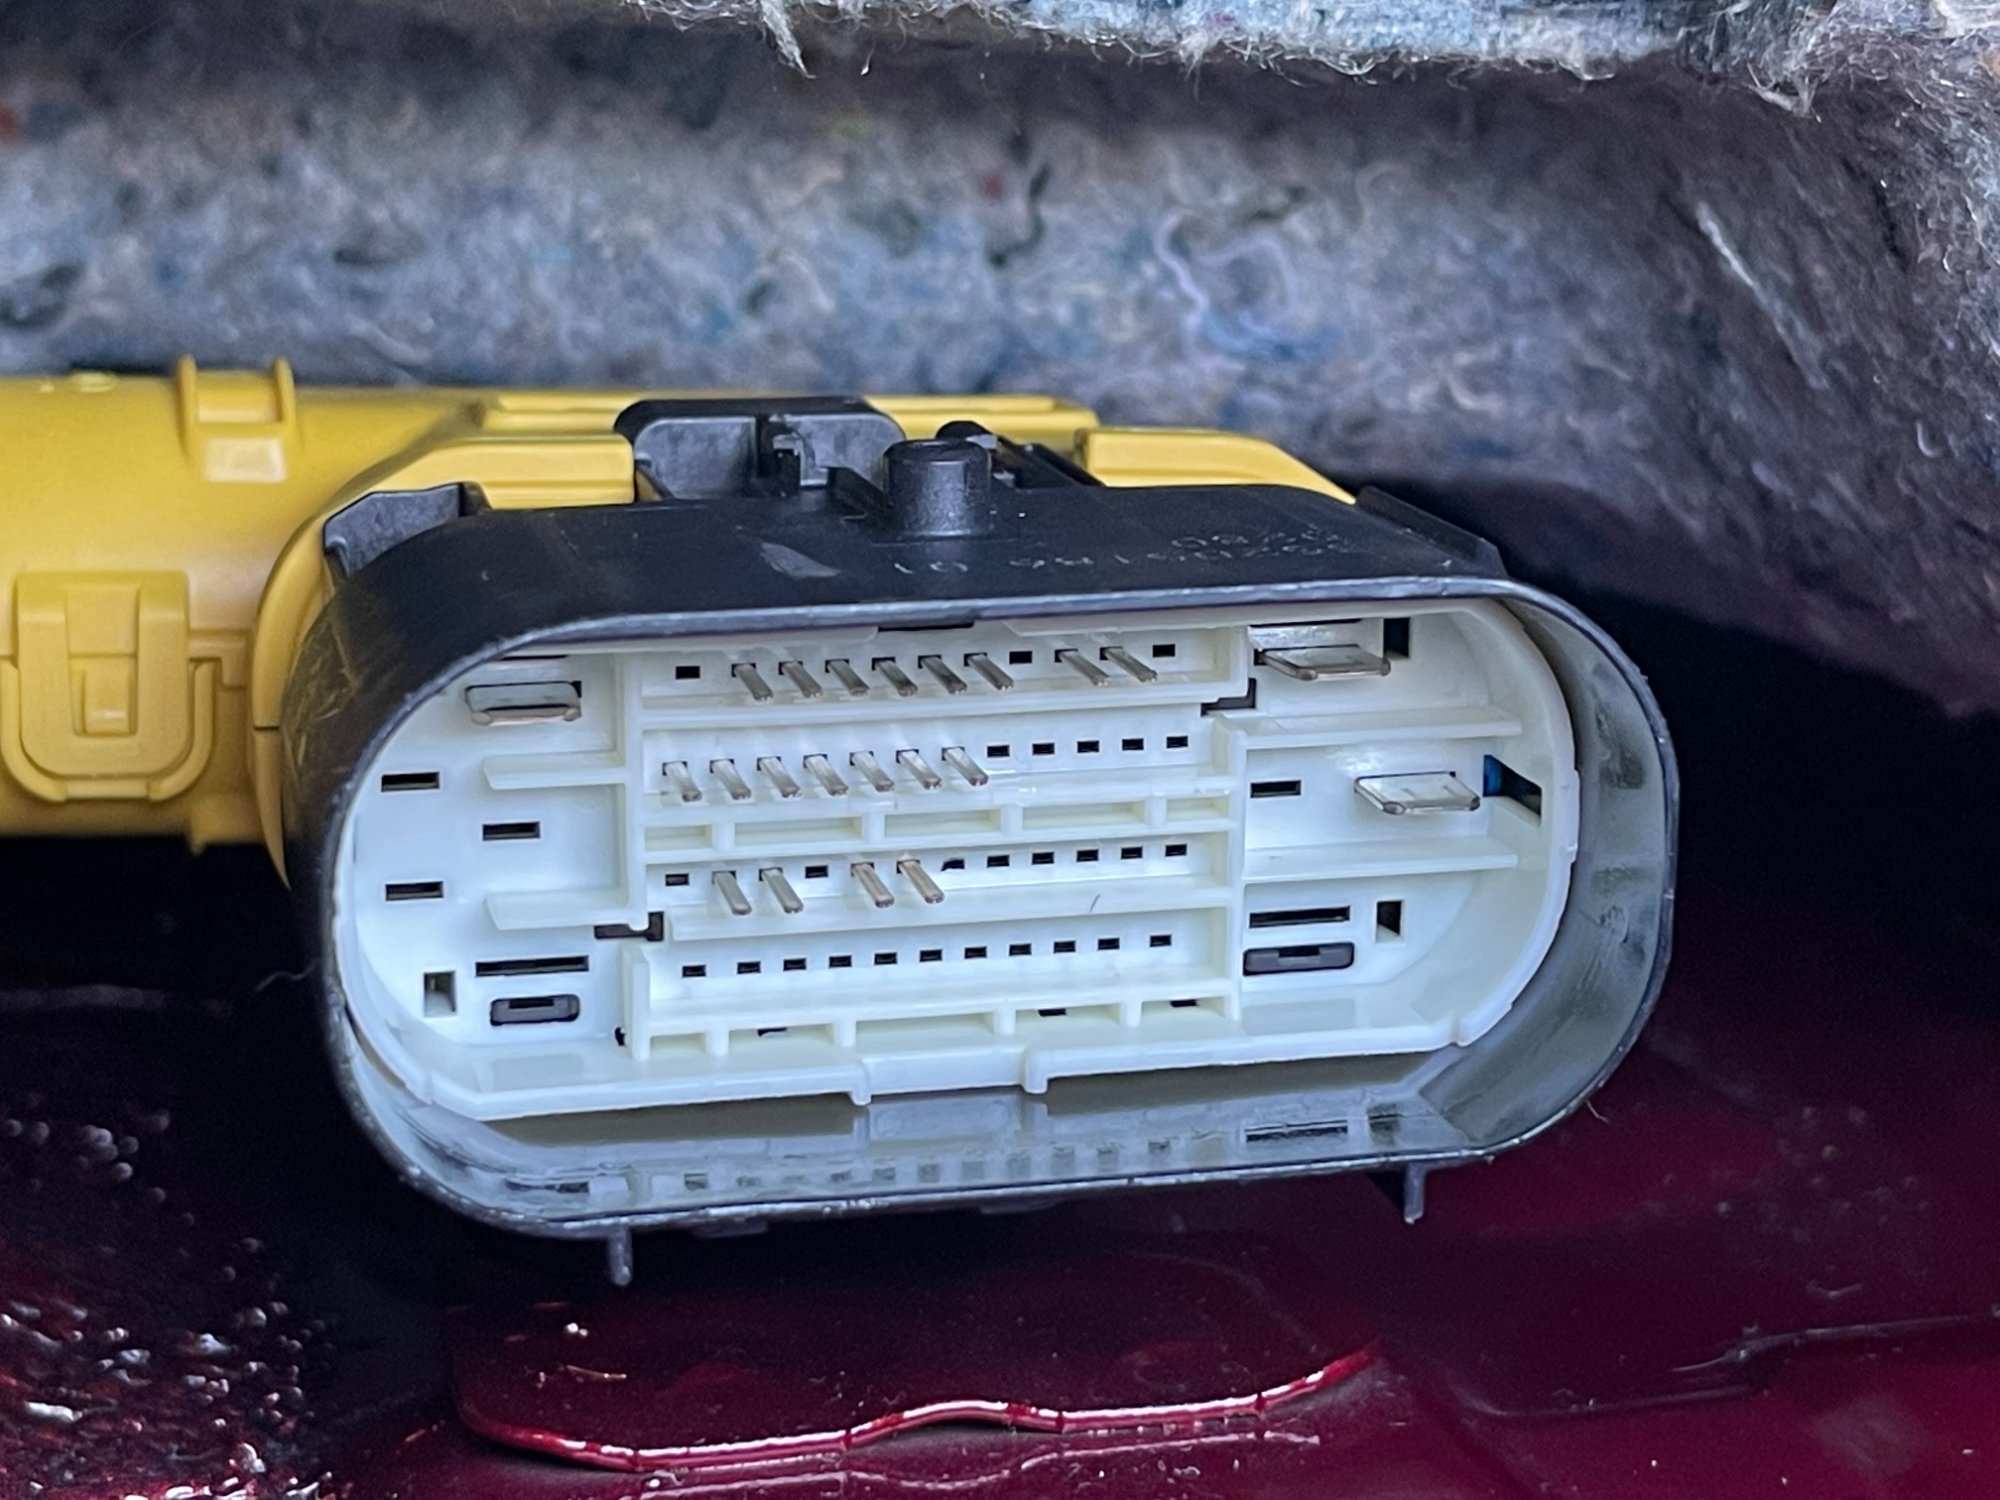
I too have followed what Rally6.2RST has done and have gotten the QT6 Tailgate working almost like factory, the only difference is the key fob just requires a double tap to bring it up and/or down rather than the press and hold like factory to bring it back up. I also did not use P/N: 84652297 for the tailgate module, I instead used P/N: 84651736. I originally ordered the 84652297 but did not think it would require programming (it does). I then found this tailgate module (84651736) that looked the same and had the same number of pins and the same placement of pins. I ordered this used part not knowing if it was gonna work or not. I received the part this morning and it worked. I did use Rally6.2RST's method of the tailgate control signal for the key fob by using the old harness pins (as seen in the pictures below) However instead of using the old actuator as a sort of diy solenoid switch I just used a regular relay and soldered the wires directly to the new harness. I didn't want to completely tear apart both harnesses and redo them into one, but I also didn't want to just solder two wires and let them be exposed throughout, so I taped and zip tied both harnesses together all the way through and only used the two pins I would need for the old actuator/ new relay signal. and kept the other wires tucked incase of future mods I have those wires already running through the old harness.

-
Adding safety options ie lane assist types
Aaaaaaaayush replied to GS-21AT4's topic in Modifications, Wheels & Tires
I did and I cross referenced the pins to the GM electrical body builder guide and it seems to have all of the pins there. I'm also wondering if I could just change the seat harness to the memory seat harness, I have power drivers seat and all leather already so I don't want to buy the whole seat... The PN for the seat harness: 84513012 (With power, Without ventilated, With memory, Without haptic alert) If I could just switch out that harness and add the memory module and buttons and such it would be way cheaper and easier.
-
Adding safety options ie lane assist types
Aaaaaaaayush replied to GS-21AT4's topic in Modifications, Wheels & Tires
The Lane assist Camera 84586312 The Headliner harness 84711898 not sure if that's the right harness, there are only two listed, one with vanity mirror and one without -
Adding safety options ie lane assist types
Aaaaaaaayush replied to GS-21AT4's topic in Modifications, Wheels & Tires
Where exactly would I check? there are two connectors going to the motors and two connectors going to the adjustment switches other than that the airbag connector... -
Yeah I don't have a VPM, I do have the IOS radio, the WAMS radio is expensive! but I have a feeling it wouldn't be needed.
-
I too only have the reverse camera but today I was looking at my radio module and I saw that there were a group of 4 coax connectors two used (I think for the antenna and shark fin antenna) but also another pair of coax connectors separate from the other group both of these had cables connected, I unplugged each while the camera was displayed, one coax was in fact the reverse camera but the other coax had no affect on anything, yet it was still plugged in. could this other coax be for front view? was the cable ran with another harness just not used?
-
Adding Rear camera Above Bed
Aaaaaaaayush replied to Boda1985's topic in Modifications, Wheels & Tires
That is definitely not for the rearview mirror, My truck has that connector clipped up as well but it is connected to something under the plastic trim around the mirror bracket, it might be for a security sensor or something, I'm not sure but it was already connected and used. The rearview mirror connector should be more square than flat rectangular and it should be glued to the inside of the headliner. The easiest way to be sure its there is to remove the overhead console (lights, garage buttons, sunroof buttons) there are two T-screws up there under two small pieces of trim, after removing them the console should pop out and you should be able to see if the connector is there! I believe part 9 is that sensor under the trim I'm not too sure what its for though. -
Waking up this thread for anyone who has still has their CPlay2Air and/or Carlinkit (They are the exact same) and still have not gotten it working. When I went to update the dongle, the highest version it was giving me was 2020.10.28 but I figured out you can manually flash the firmware using a usb flash drive. I AM NOT RESPONSIBLE FOR ANY MESS UPS YALL CREATE, Flashing firmware like this could Brick the dongle and make it completely useless! Here are the steps to Flash a higher version of the firmware 1.) format a flashdrive of any size (USB A) to FAT32 2.) Download the firmware from https://github.com/ludwig-v/wireless-carplay-dongle-reverse-engineering onto the now formatted flashdrive, I Used the Custom 2020.12.10 and it works perfectly for my truck (Make sure to rename the file to U2W_Update) 3.)Connect the CPlay2air/Carlinkit to a USB wall adapter, wait for the solid red light 4.)put the flashdrive into the usb port on the dongle (red and blue light should start flashing back and fourth) 5.) GIVE IT 5 MIN to finish flashing 6.) Solid red light should appear when finished 7.) when finished, unplug the dongle from wall adapter then remove flashdrive from dongle and plug into Silverado!! should work great! If red light doesnt appear you may have bricked the device and now it is garbage. (still try it out) here is a thread I read that might answer any more questions you have (page 187): https://forums.macrumors.com/threads/carplay-adapter-to-convert-to-wireless-carplay.2193978/page-187?post=29208724#post-29208724
-
Backup Camera Angle
Aaaaaaaayush replied to odarevliS's topic in Troubleshooting, Warranty & Recalls
That is definitely not a software issue! It seems like the camera might have shifted in the tailgate button module. Ill take my tailgate apart tomorrow and see if there is any camera adjustment of any kind. (My camera is perfectly centered, but that seems rude of the service department to dismiss it as a software issue.) -
Adding Rear camera Above Bed
Aaaaaaaayush replied to Boda1985's topic in Modifications, Wheels & Tires
Good luck, I assume its all the same(same body style). When you order it they will ask for your VIN and when they realize these parts aren't for your truck they will ask you if it was an intentional mod or if it was an accident. They will still send it to you, I just said it was intentional mod. -
Adding Rear camera Above Bed
Aaaaaaaayush replied to Boda1985's topic in Modifications, Wheels & Tires
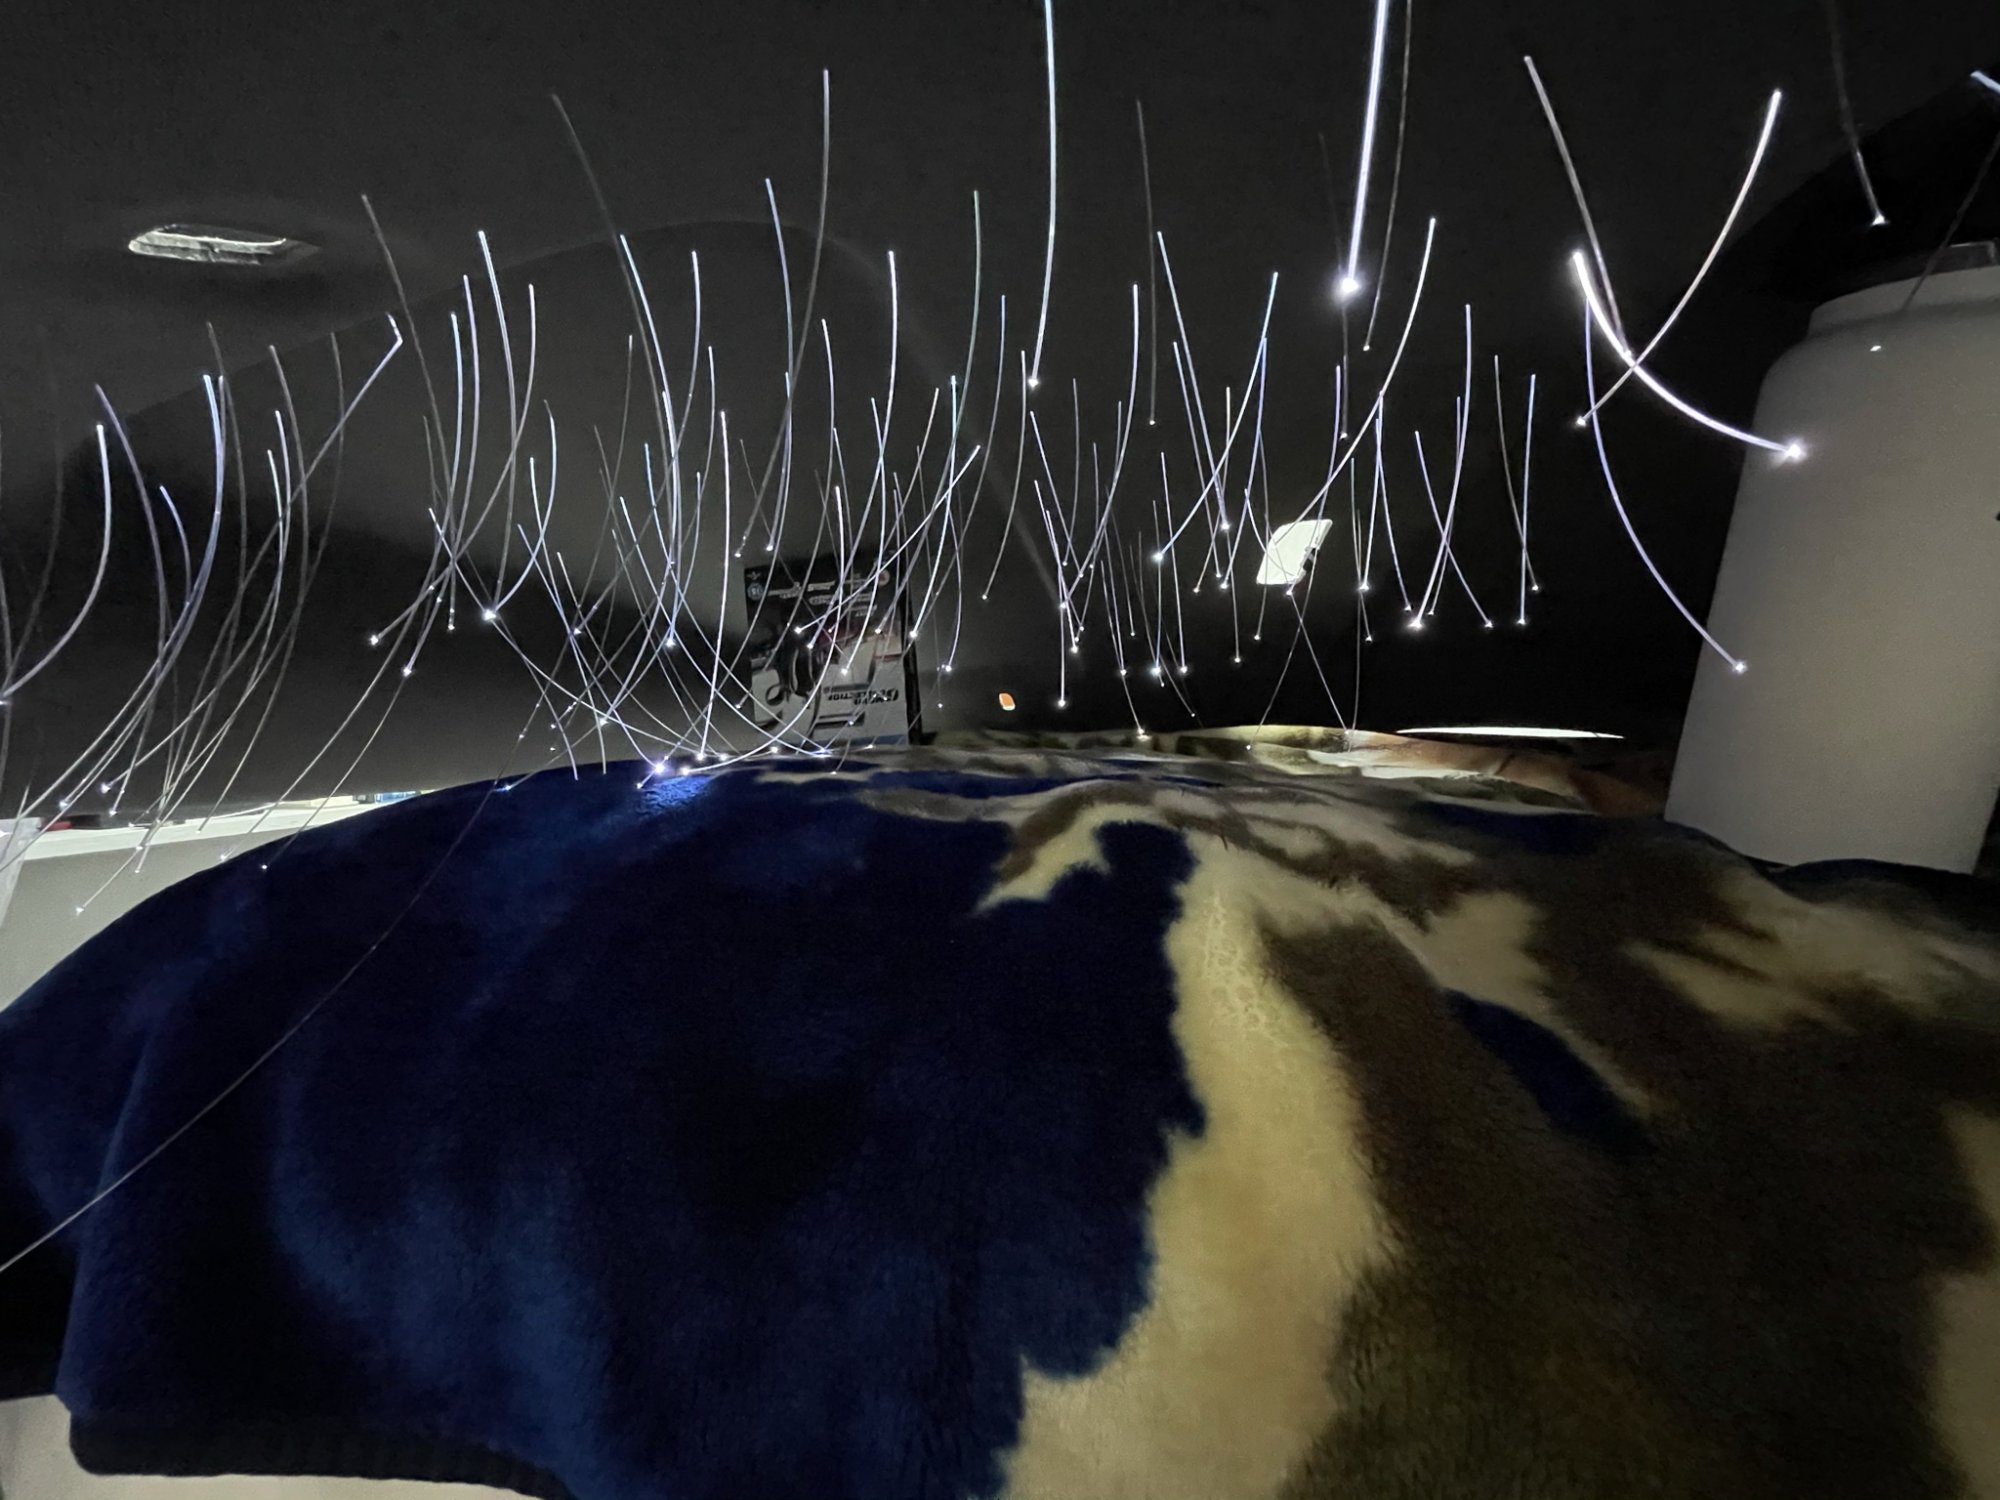
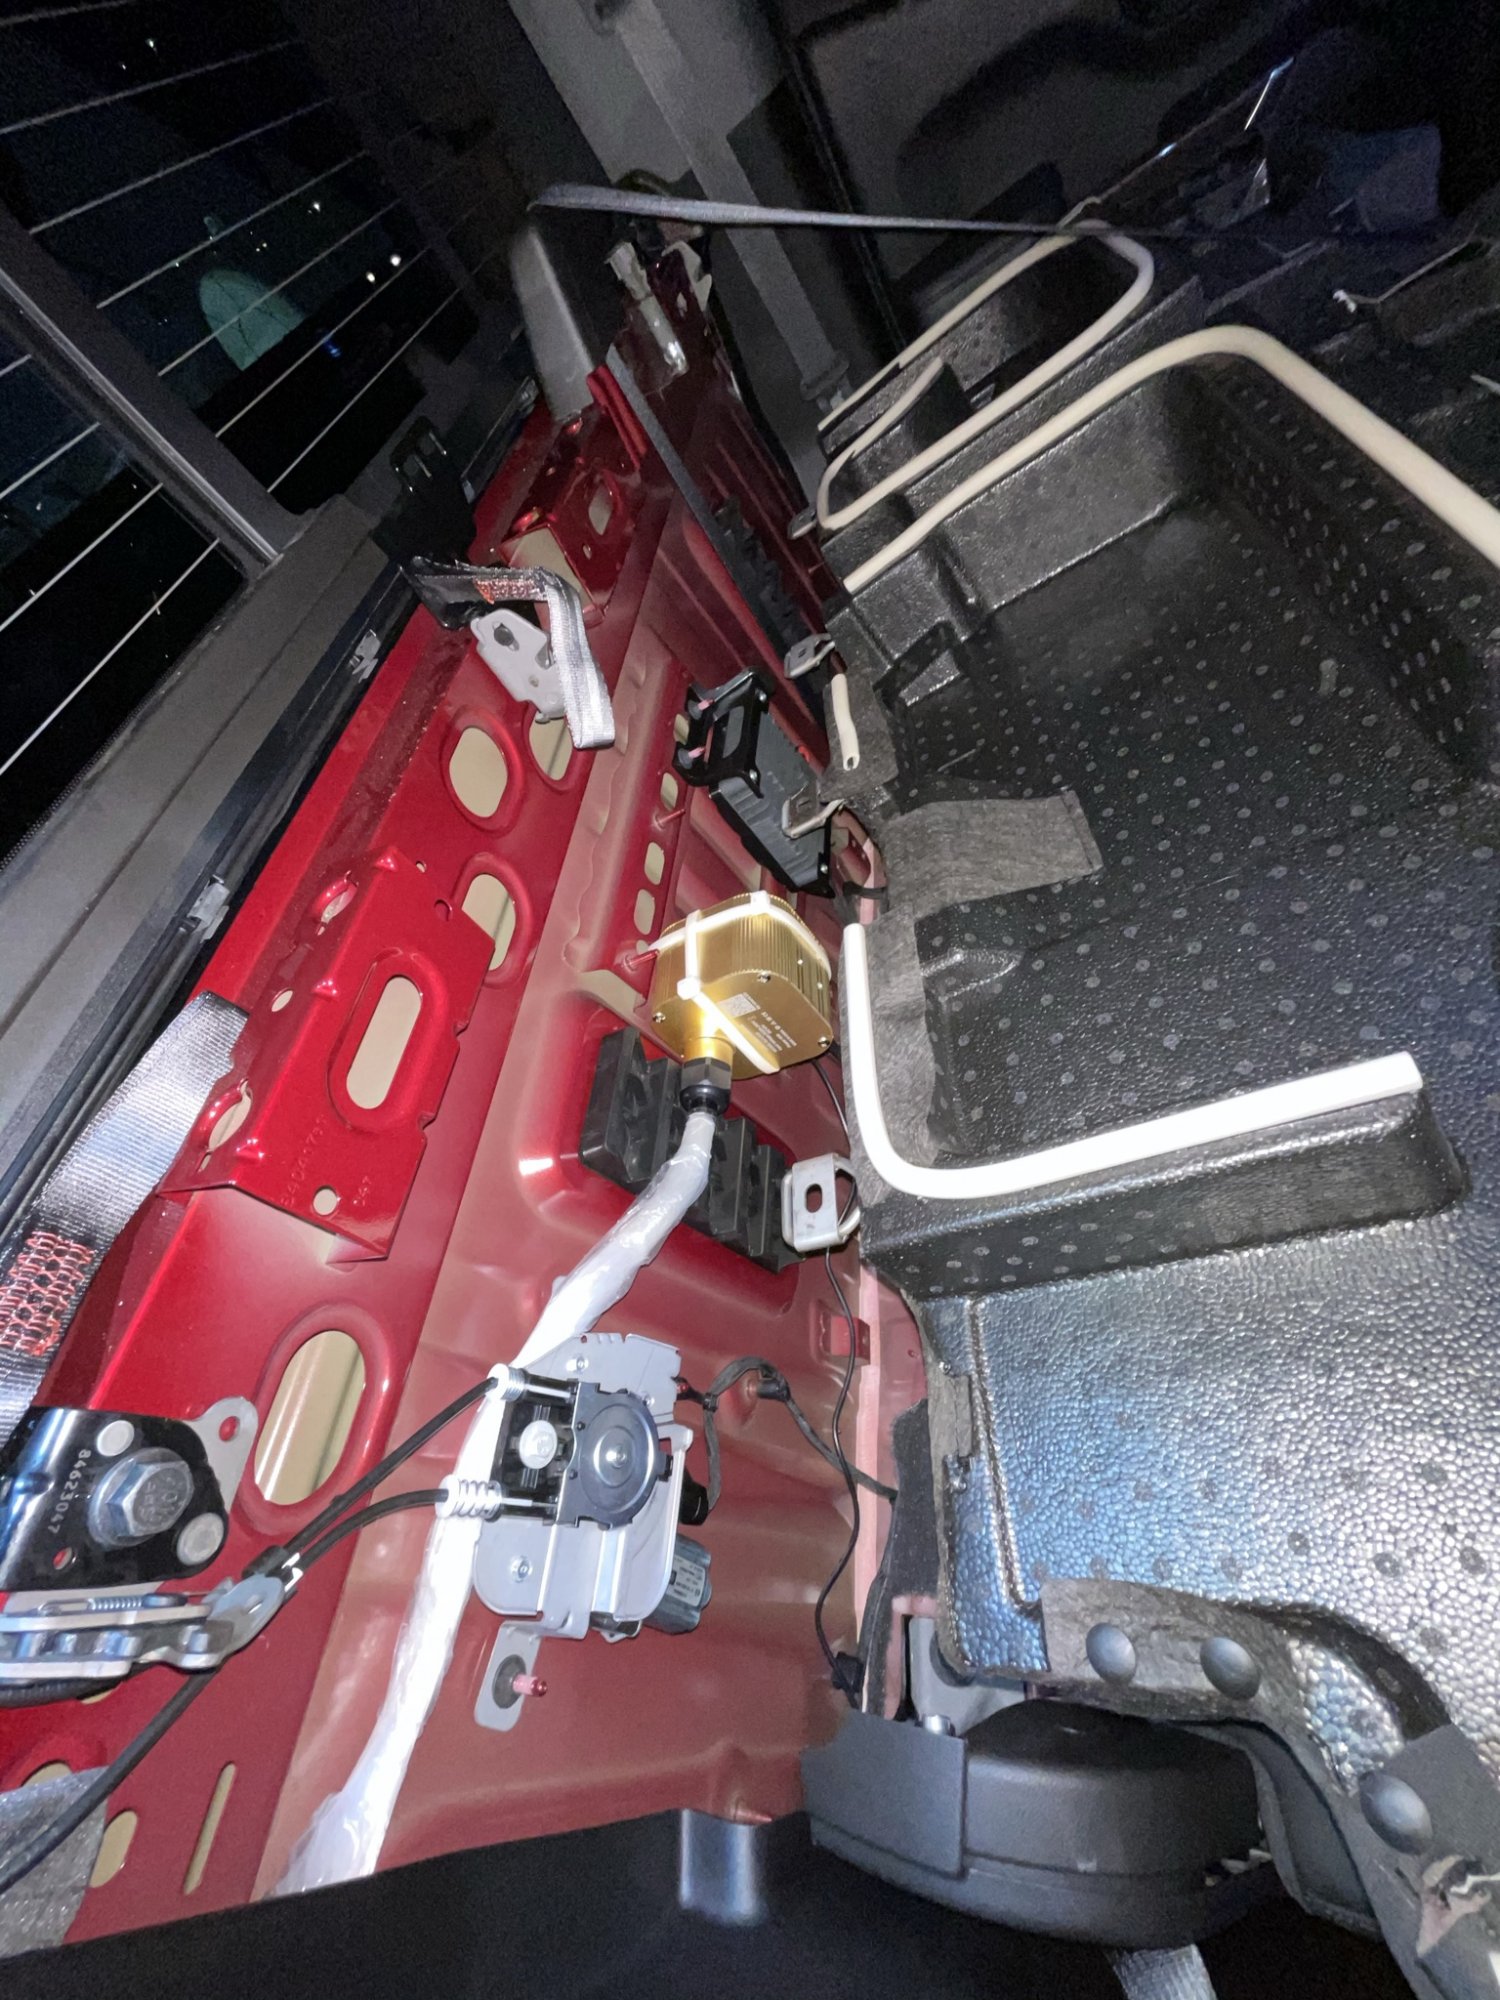
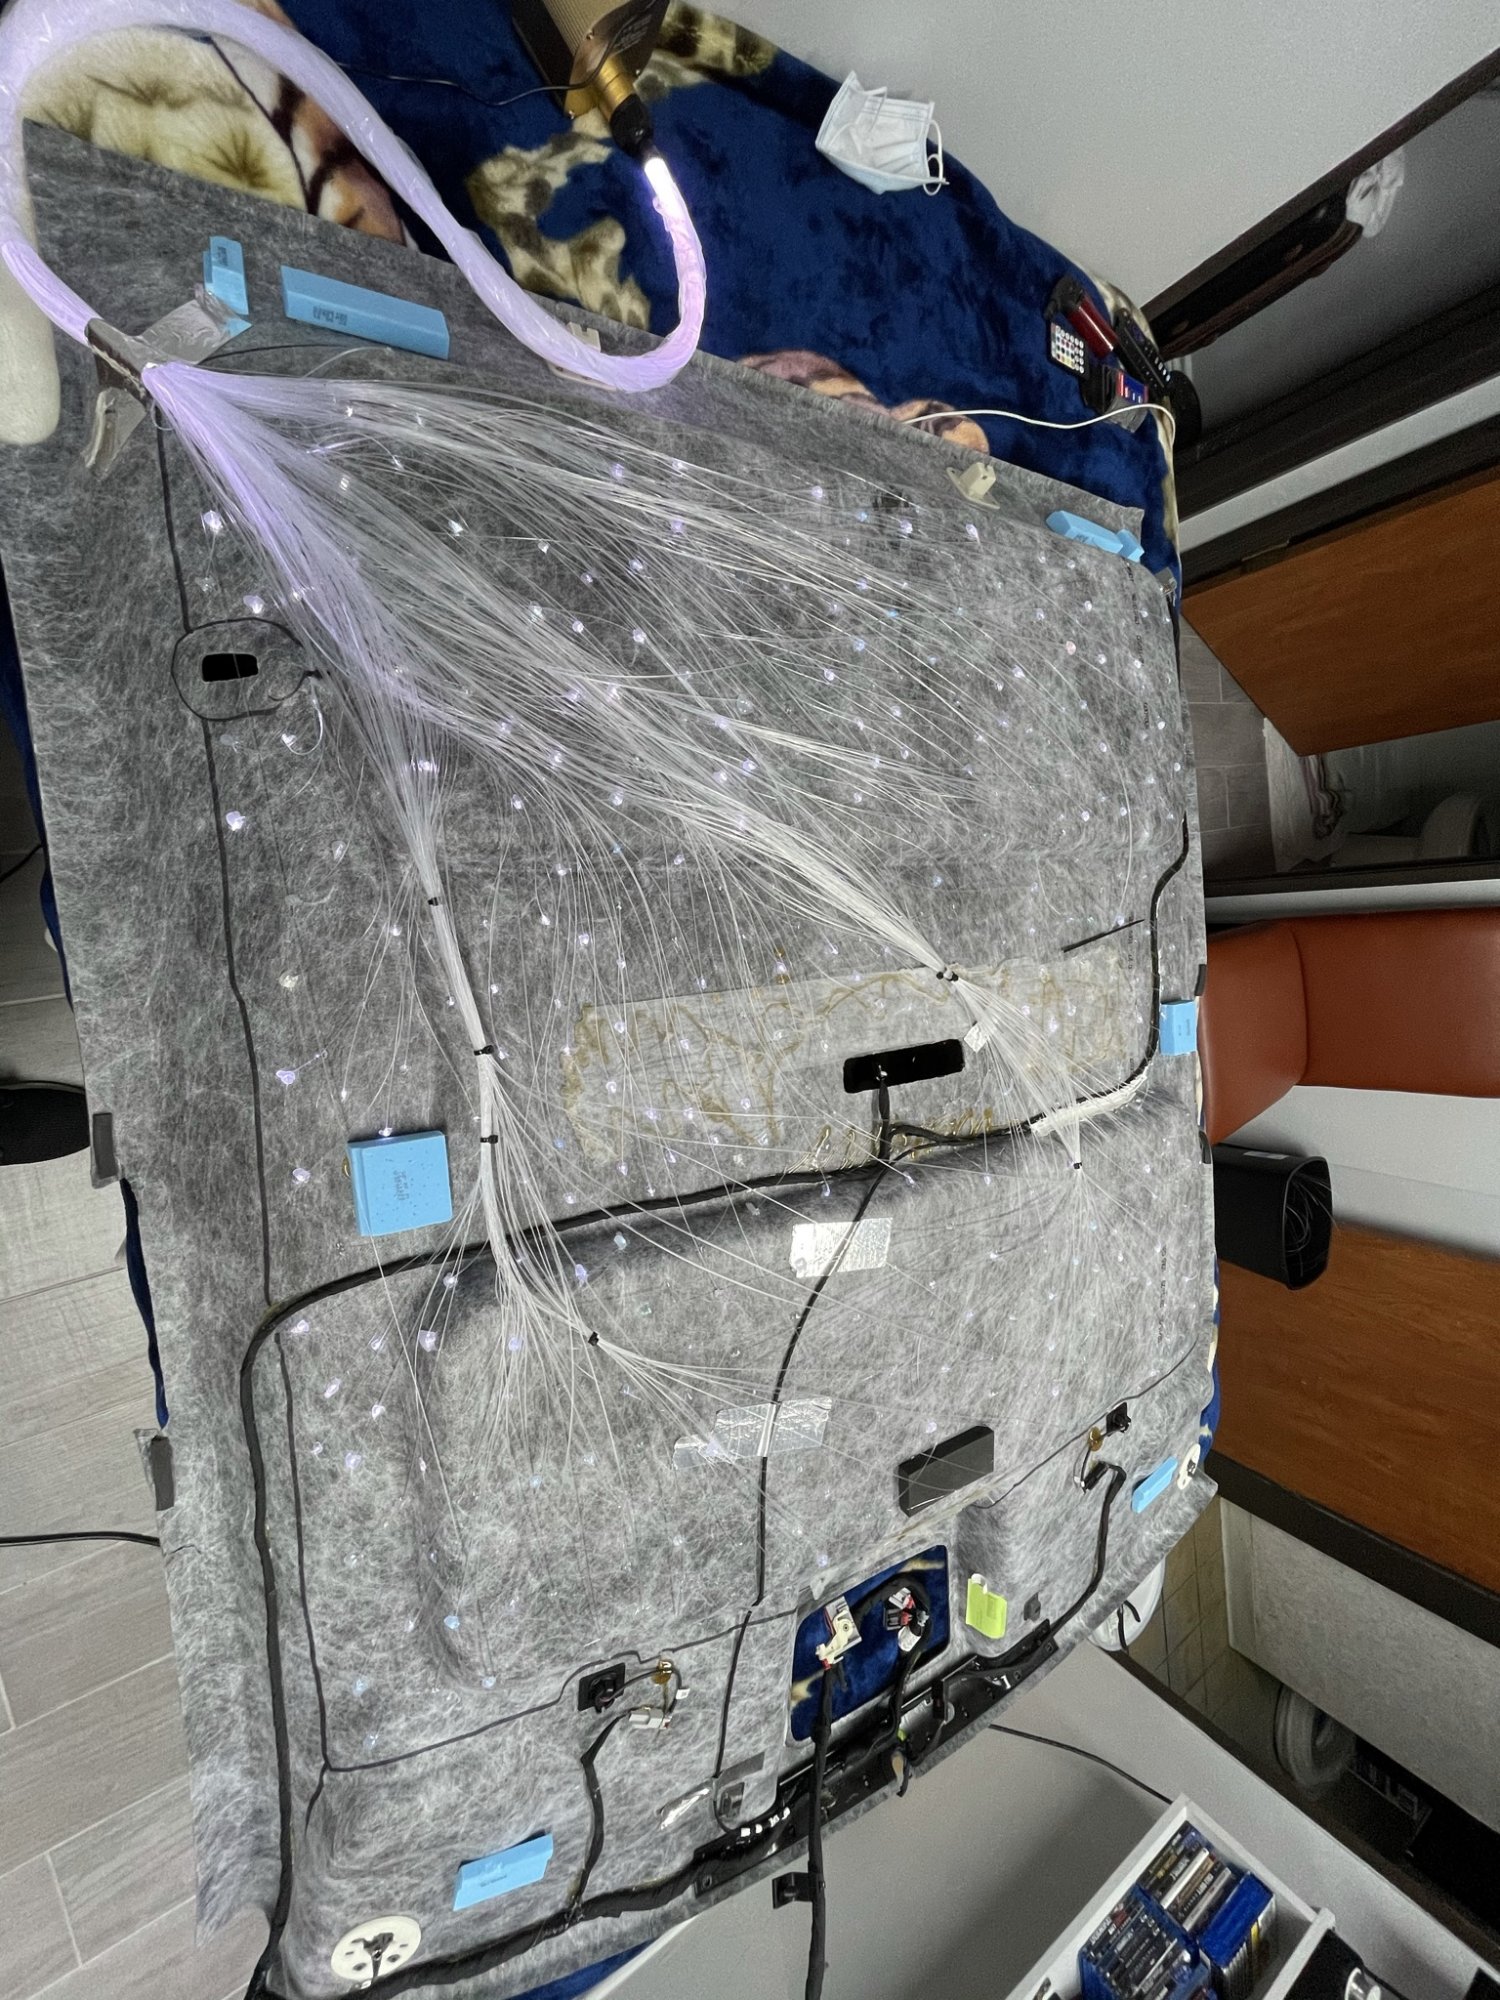
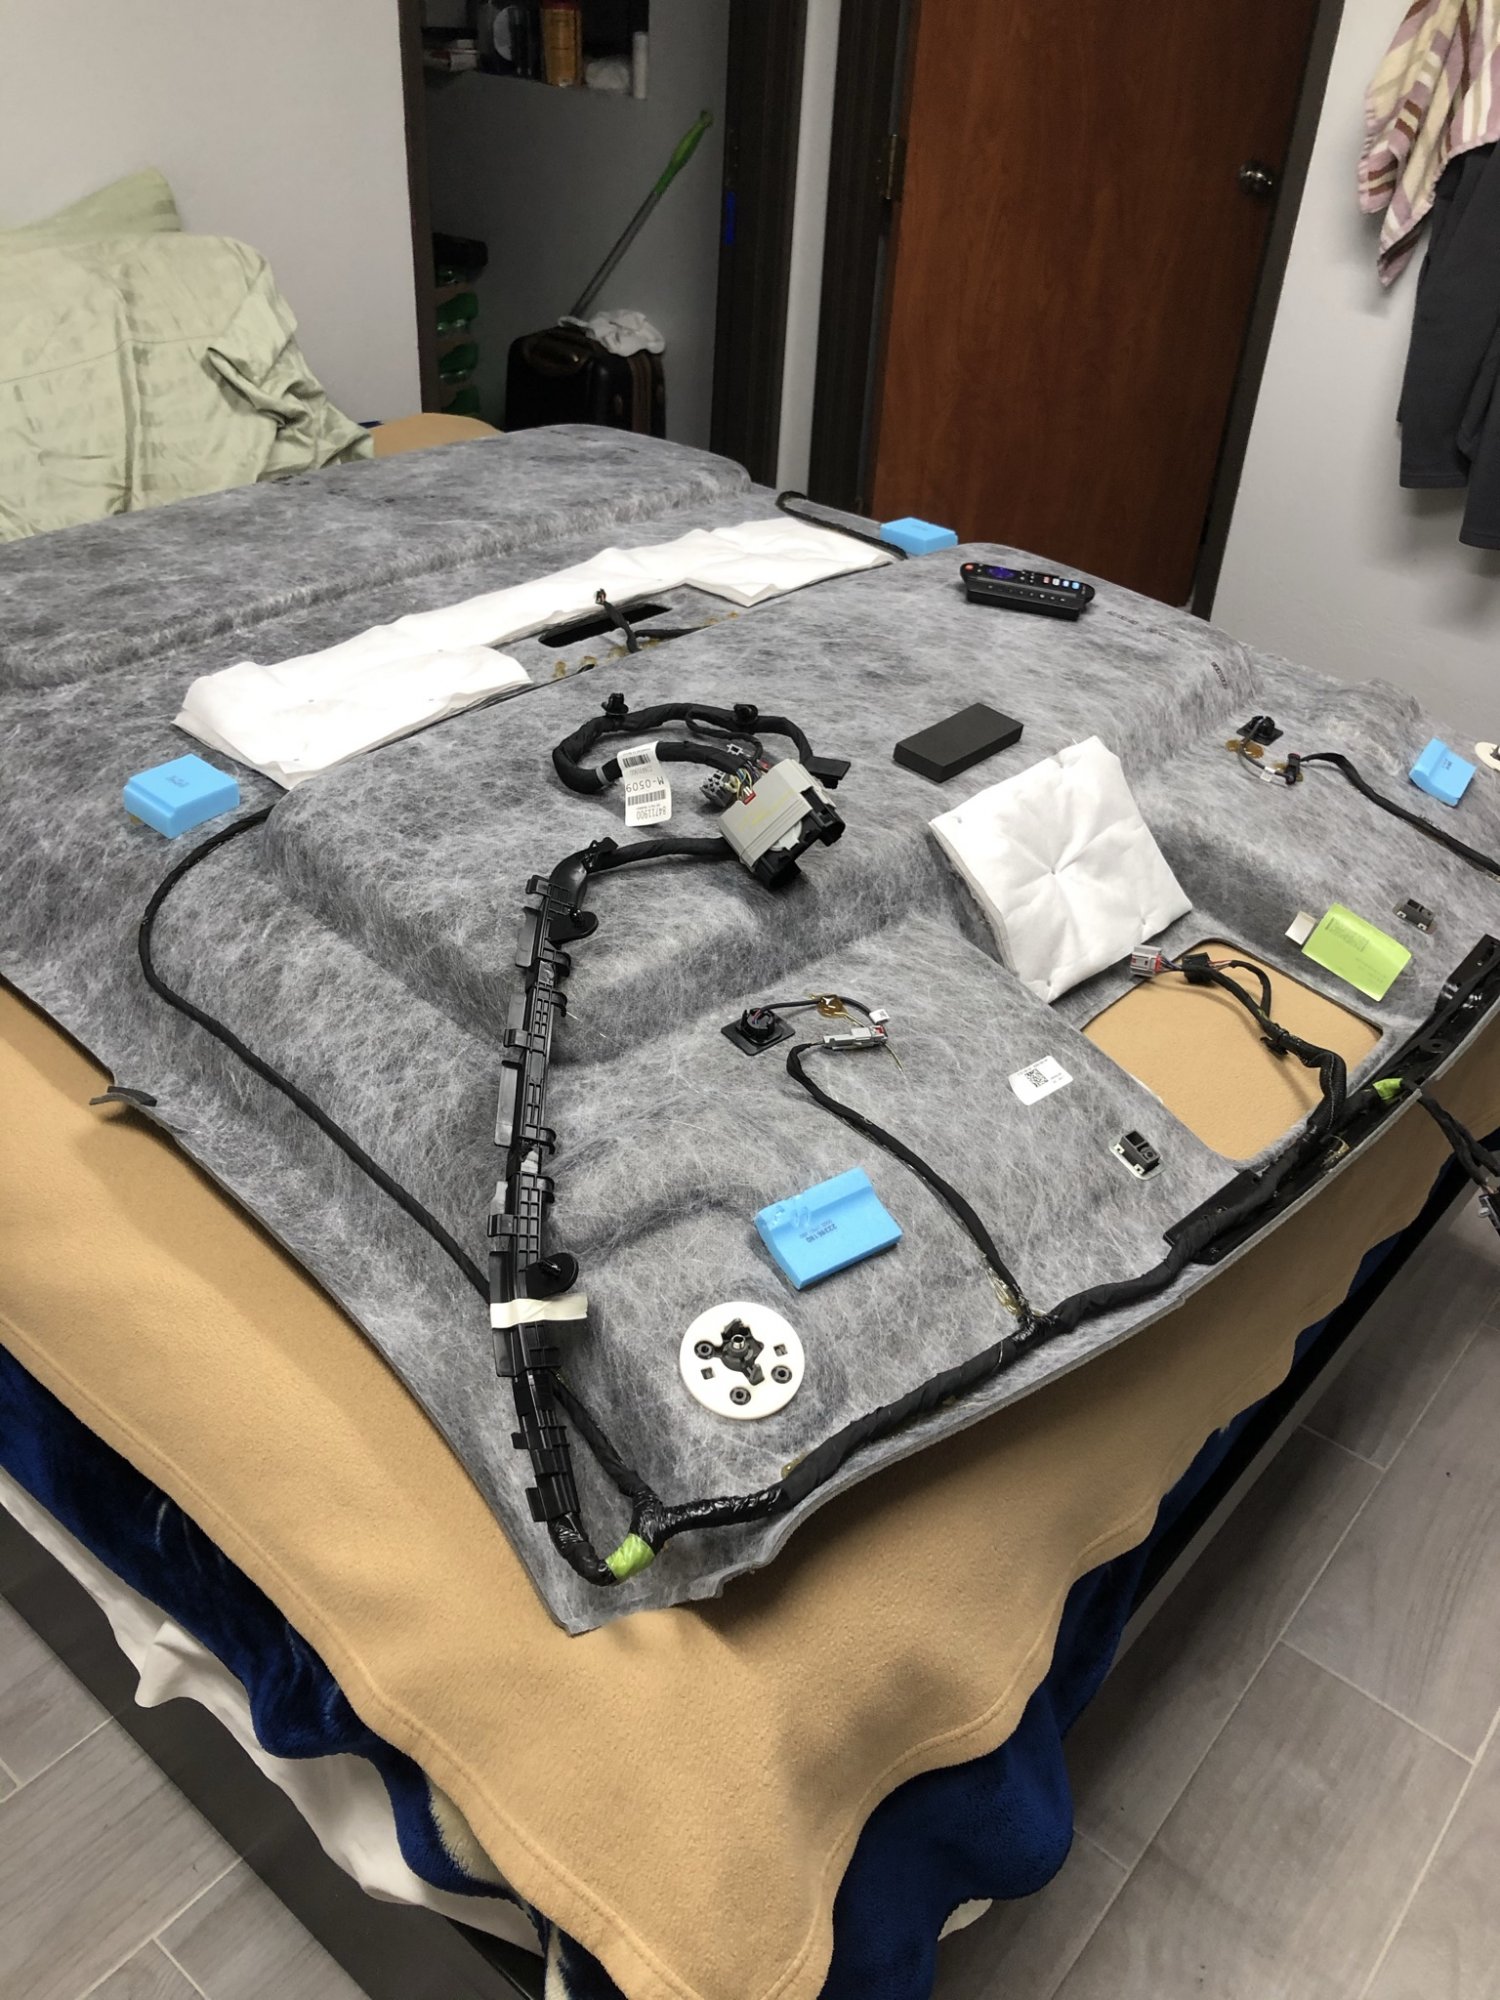
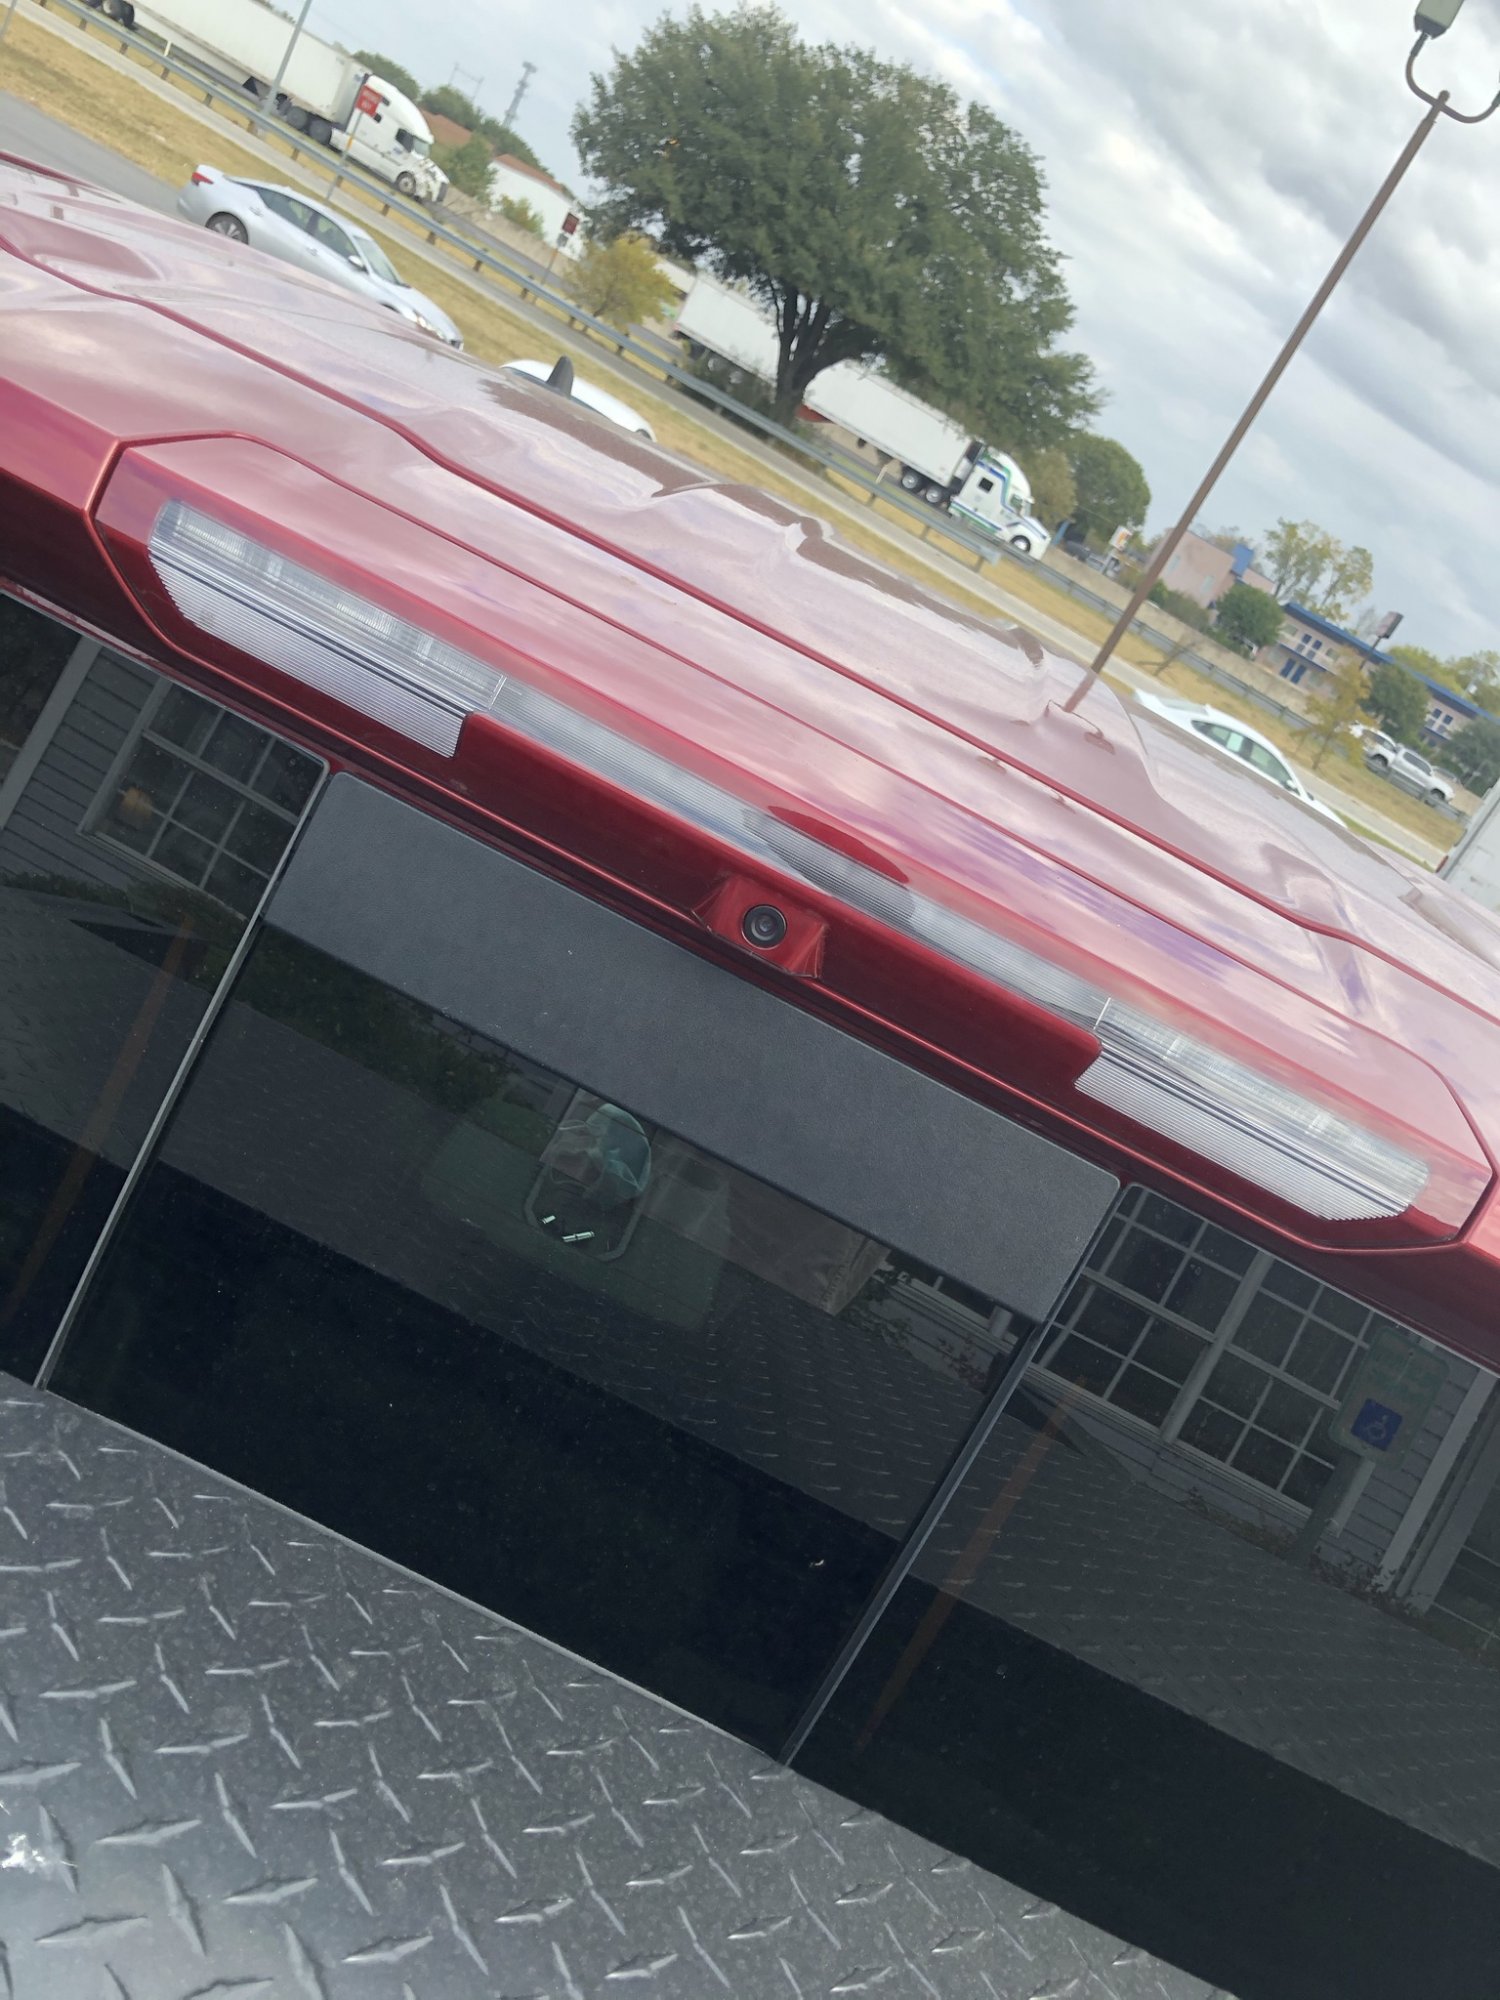
It was all plug and play, the mirror does all of the video processing itself, no programing or BCM reflashing or anything like that. Headliner kit was $200 from amazon there are plenty on amazon just look it up, I have a 430 piece kit its like 16watt its pretty bright. here are some pictures of it while I was installing it, obviously I cut all the fibers flush, and I installed the light box behind the rear seat and ran all the fibers up the C-pillar. Ill take some more pictures tonight.
-
Adding Rear camera Above Bed
Aaaaaaaayush replied to Boda1985's topic in Modifications, Wheels & Tires
PN: 84699124 is only the high mount lamp (FOR GMC SIERRA) with no harness, no mirror, etc. I think what Kyle’s AT4 was talking about was the “infotainment.com” upgrade which is all packaged together but costs $1199 My PNs were all for a 2020 Silverado LT Texas Edition, my high mount lamp came with no harness and I would need a new harness that had the coax connector for the video signal. I ordered all of my parts from “TascaParts.com” which is where I found it to be the cheapest, I didn’t want any “take off” parts or used parts so these were all ordered New genuine GM parts. My Subtotal was $771.90 and after shipping and taxes the Total came out to $870.37, I believe this was the cheapest route for me without buying used/take off parts. Subtotal: $771.90 Estimated Shipping to Austin via Standard Shipping: $32.15 Tax: $66.32 Total: $870.37 -
Adding Rear camera Above Bed
Aaaaaaaayush replied to Boda1985's topic in Modifications, Wheels & Tires
Sorry I've been busy recently and haven't been able to update y'all but I did finish in about a day, I did also do a Rolls Royce Starlight headliner so that added to the time it took me to do the mirror (because I didn't have the headliner harness in). It isn't necessary to remove the whole headliner from the truck, however I did because I wanted to do the starlight headliner and sound deaden the roof with Killmat deadener. I didn't have any problems, I was sure to glue the coax cable down to the headliner so it wouldn't rattle with music and also used some outdoor silicone on the bolts for the spoiler and the third brake light to reseal the cab and prevent any leaks. Everything worked perfectly no misalignment or anything like that. There wasn't really anyway to show you how to do it but there is a video somewhere in this forum from Infotainment.com that shows you the install, that kit is $1500 and I don't think its worth it just to have them in one box, just order them separate from gm parts suppliers, its way cheaper. I do have a toolbox that isn't low-profile so this mirror camera system was a great upgrade.
-
Adding Rear camera Above Bed
Aaaaaaaayush replied to Boda1985's topic in Modifications, Wheels & Tires
I ordered all four parts, P/N: 13536995 Mirror P/N: 84487008 High Mount Lamp P/N: 84335461 Cable P/N: 84599550 Harness Just Shipped this morning, I should get it on Friday and installed on Friday or Saturday. I'll Post again with any problems or tricks I come across and pictures. -
T1 Dome Light Tap Wires
Aaaaaaaayush replied to Smoothbassman's topic in Modifications, Wheels & Tires
Did the diode and 1000uf capacitor work for the relay chatter?


.JPG.9e1c372072b821647990cc29c5e45897.JPG)


.png.ad23297c600b67bba54959aec91485a8.png)
.png.a83f0eafc145f74d151b5bba012bfb61.png)
.png.fca4bc90e2ec1096756b4546fdf6a80b.png)

-
Forum Statistics
250.4k
Total Topics2.7m
Total Posts -
Member Statistics
342,749
Total Members8,960
Most Online
-
Who's Online 6 Members, 0 Anonymous, 1,672 Guests (See full list)