Search the Community
Showing results for tags 'alternator'.
Found 8 results
-
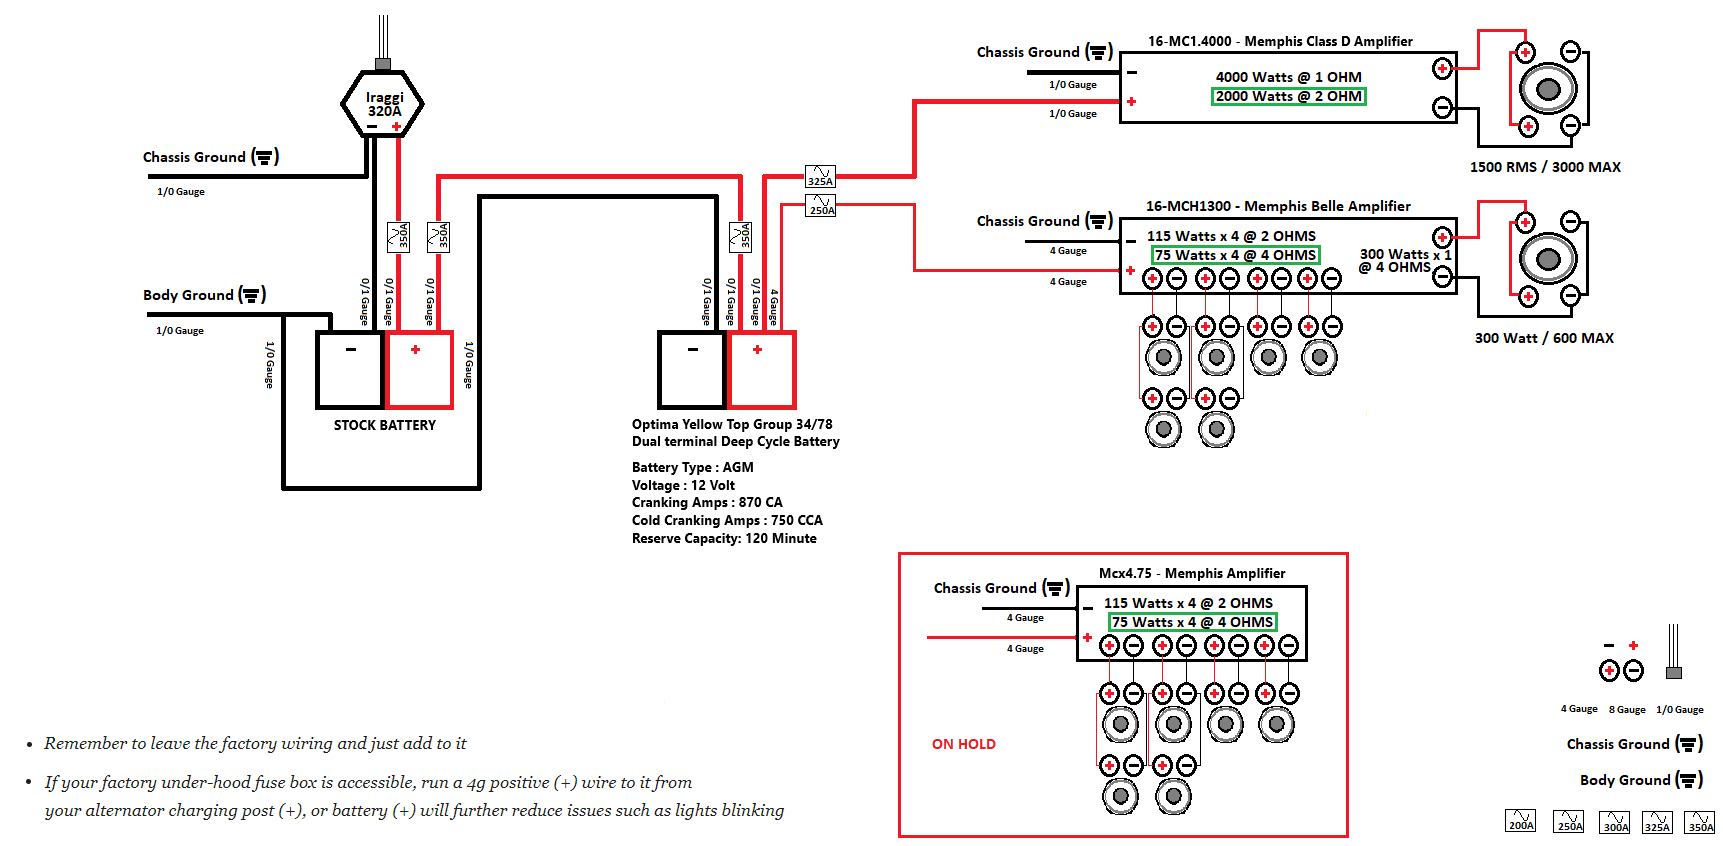
I've read threads on here, read other threads (from other sites), spoke with people etc. MY MAIN GOAL OF THIS POST IS TO SEE IF ANYONE HAS ANY COMMENTS OR SUGGESTIONS ON MY WIRE DIAGRAM BEFORE I PULL MY TRUCK APART. THANK YOU My goal is to add the following: 1. High Output Alternator (320A Iraggi) 2. Add Second Battery (Optima Yellow Group Size D34-78) 3. Upgrade All Charging wires to 1/0 Gauge (GP car Audio Power Wire w/Big 3 kit) From what I gather, The route that i'm going to take is as follows: 1. Install the Alternator 2. Run 1/0 Gauge Ground from (-) of Alternator to Frame (Leave factory wire connected) and to (-) of Factory Battery 3. Run 1/0 Gauge Power from (+) of Alternator to (+) of Factory Battery (fused @ 320A) 4. Run 1/0 Gauge Power from (-) of Factory Battery to (-) of Second Battery and to Body Ground 5. Run 1/0 Gauge Power from (+) of Factory Battery (fused @ 320A) to (+) of Second Battery (fused @ 320A) 6. From there all Power needed for AUX Equipment (Amps, Rock Lights, Inverters, etc) will Run from the (+) of the Second Battery (Fused appropriately) I did a lot of research into this and the only things that had any second thoughts on were if I should run a relay or not and if i should run the 1/0 gauge wire through the current sensor. (not sure if it would even fit). I decided not to do either. The first of which I chose not to do, mainly for the fact that the relay has a voltage drop of its own (minor), but also, it's removal has been the fix for many people in car audio to reduce lights from flickering. The amount of battery capacity that I have won't have issues with me needing to isolate my batteries. The second of which I chose not to do, was only because I read a lot of posts (mainly in car audio forums) that didn't do this and had no issues. I feel that the current wire that is running through the sensor must suffice. I'm still a bit on the fence on this one. But, I could only find maybe 1 or 2 instances where people did this modification and it was for much smaller rated systems. Neither seemed to have any problems. I just tend to follow the majority of examples that don't have issues. I'm attaching my general wire layout. If anyone sees something or could have a rational discussion, please do. I'm all ears.

-
2018 Silverado 2500 LT 1,300 miles truck during the day shows volts at 12.5. I can turn on ac full blast, radio and defroster and colts stay at 12.5 all day. When driving volts stay at 12.5 when I’m rolling and foot of gas mpg gauge goes up to 99mpg then will charge at 14volts as soon as I hit the gas bolts drop to 12.5. And night when headlights turn on truck will charge at 14 volts. First two times truck was taken to dealer they said nothing is wrong now the third time they tell me that’s not normal and change alternator and never fixed the problem still in the shop. Anyone have same issues or volts stay around 13.2-14.5 volts all day and night
-
 Replaced battery and alternator after the truck died after a 5 hour drive a month back. i had to replace the battery and alternator since the truck was holding 10.5 volts on the old batt/alt and i was 5 hours away working in another town so i had no choice to replace both to make the 5 hour drive home. now the truck does this weird thing were it will only start charging once you hit a certain rpm range. ive cleaned the grounds under the driver side on the frame rail. The one under the rad support to battery . Replaced the broken hood to body ground. Checked the body to block ground strap and now the truck will ONLY start charging once the RPMS hit 4-7k and then the truck runs completely like normal and holds voltage at any rpm. untill the truck is turned off and you have to repeat the process of having to rev/drive the truck up to 4-7k rpms and voltage jumps to 10v to 14.5v. i don't mind doing this when its warm lol since its a quick fix but its not ideal and the problem is winter is coming and regular -20c to -30c temps soon so i don't want to be hitting those rpms to keep the battery alive when the truck is still warming up. ive read that 2005 models have some kind of module on the ground. just wondering if anyone has experienced this weird symptom .any ideas would be helpful, thanks guys. 2005 gmc sierra 1500 4x4
 -
After recently swapping out my alternator, my truck lights are slightly dimming repeatedly. It's especially noticeable when I turn on the dome lights. Is it a grounding issue? The alternator doesn't physically touch the metallic base at all, but seems to be grounded only via the two bolts that hold it up and in it's right place. Should I take it off and sand any metal that connects from the bolts to the alternator?
-
 I was having electrical issues on my 2005 GMC Sierra 1500, which is at 197,000 miles. The issues were things like pulsing lights (interior and exterior and low voltage fluctuation (14.0v to 11.8v) so I replaced the alternator with a premium 160amp remanufactured one from CarQuest. Now my voltage seems high, sitting at 14.9v-15.2v during idle. The pulsing went away, but now it pulses when I rev the engine. I will leave it at about 1500 RPMs and it will steadily pulse until I release the gas. Is this an issue with the alternator or something else?
 -
I'm not sure how far ill get with this but here goes. I have a 2018 GMC Sierra 1500 5.3L C engine code non flex. Its got 20k on it when i bought it had a crappy napa battery in it but the adaptive charging system worked fine with the napa battery it would be a 14.4 volts on start up and then drop down to 12 as it should and the back up to 14 per the conditions listed in the service info well i replaced the 94r napa battery with a 94r oriellys agm battery and the voltage would inky stay at 14.4 not drop down to 12 when electrical loads are low so i hooked up the scan tool at my shop and see that according to the BCM the battery was at 67%charged (all other data was normal and in the right conditions for the charging sytem to drop down to 12 volts) but the state of charge has to be at least 80% so i tried charging the battery and state of charge on the scan tool never changed so i attributed it to the fact that i put an agm battery in the truck and the BCM didnt like this so i went and exchanged it for a non agm 94r battery and intalled it well after driving it for a bit the charging system still did not drop down to 12 volts despite low electrical load. Ill hook the scan tool back up tomorrow and see what the BCM thinks the state of charge is but has anyone else encountered this? Thanks.
-
 Dear All, I've changed the original belt driven radiator cooling fan in my GMC Sierra 2004 to an electrical driven type and want to know what is the best alternator to install to overcome the amp loss without adding/modifying alt. bracket/holder or wiring connections please? Regards,
-
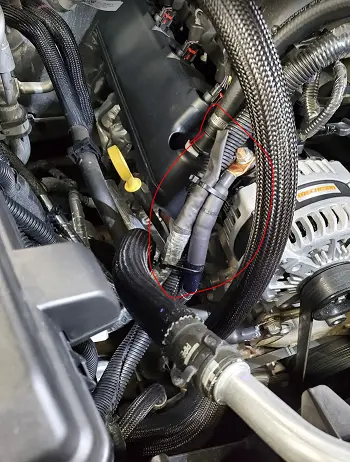
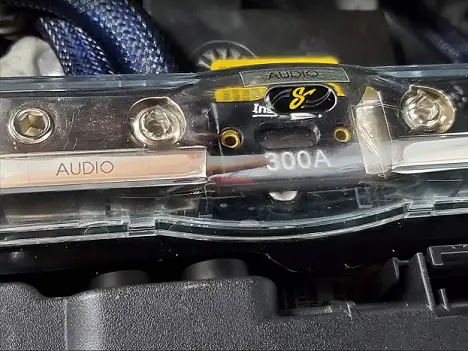
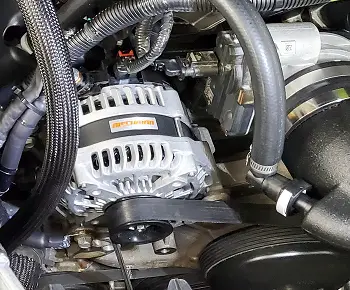
 I am currently in the process of writing up a full audio system build document that includes a lot of details. The build document will include a lot of detailed explanations of the gear being installed and include setting up a MiniDSP with Dirac. It's taking me some time to put all the information together, so I figured I would share the alternator section of the document in this post. You can add an upgraded alternator to these trucks, but there is are a few catches that I explain further into the installation process. Alternator Installation Hardware: (1) Mechman High Output 250 Amp Alternator https://www.mechman.com/high-output-alternator-250-amp-silverado-tahoe-suburban-escalade-sierra/ Mechman currently does not show this alternator fits the 2019+ Silverado/Sierra pickup trucks. This does work, but see additional information further into the guide. (1) Stinger Inline ANL Fuse Holder (For Alternator) https://stingerelectronics.com/collections/distribution-blocks/products/inline-anl-fuse-holder (1) Airaid Junior Air Intake System https://www.airaid.com/201-782-junior-air-intake-system (5) Stinger SHW10B 1/0GA Per Foot (5) Stinger SHW10C 1/0GA Per Foot (1) 1/0GA compact ring terminal Need a small ring terminal to use the factory ground bracket with the sensor installed (2) 1/0GA ring terminal Needed for power and ground connections (1) 300 Amp ANL Fuse (1) Roll of heat tape (1) Roll of 1/2" braided wire sleeve (6) 1" Heat shrink tubing at 3" in length (1) Custom built under hood fuse holder 1/8" x 2" Hillman Aluminum Solid Flat Model #: 11303 from Menards Install Process: My factory 2019 GMC Sierra Denali 1500 6.2L shipped with a 170 amp alternator. My past 2014 GMC Sierra had less alternator amperage and I could notice the power drop with only subwoofers added, so for my new system build I was going even bigger and I did not want any protentional power loss. I wanted higher wattage at both idle and normal driving. Also, since I invested so much time and money into my audio system it's worth the additional cost of adding some extra amperage. My new audio system's total max watts is 2,200. Some people may have a much higher watt audio system and the 250 may not be big enough, but adding the 250 will still give you an additional 80 amps, which is more than the factory. GM offered a 220 amp alternator upgrade kit for these trucks, but it would exceed the factory fuse rating, so my guess is it required some type of OEM wiring harness. This wasn't worth my investigation because I wanted more amperage then 220 amps. At this point, I knew I needed to call Mechman to discuss my alternator upgrade needs. After talking to Mechman they informed me my truck had a stretch belt, which limited my alternator amperage selection to 250 amps. At the moment this is the highest amperage these trucks can go per Mechman (As of 9/11/2020). The reason is the higher amperage alternators require a smaller pulley, so the alternator can spin faster to create more amperage. With a stretch belt, there is no extra play for a smaller pulley because you do not have a belt tensioner. The primary issue I ran into was Mechman did not know if the 250 amp alternator would function in my 2019 GMC Sierra 1500 Denali because of the smart charging system. At this time they had no confirmation that any of the 2019+ GM Silverado/Sierra 1500s would work. Mechman gave me the option to give the installation a try and if it didn't work they would allow me to return the alternator without any issue. I knew if this did not work I would be out all the wiring upgrade, air intake costs, and my time. I choose to take the gamble. The good news is I can confirm the alternator does work in the 2019+ GM Silverado/Sierra 1500s, but I do have a little bad news. For some reason GM decided on these trucks they would make an air intake system that stretches clear across the front side of the motor in a huge plastic box, which is probably for some extra emissions reduction. The main issue is they decided to add the support bracket for this large air intake box to the factory alternator. Mechman's alternators are not purpose-built for this truck generation and they sent me one for the 2014-2018 model year thinking it would match up just fine. The alternator mounting bolts and pulley size is correct, but it is missing this mounting bracket. I eliminated this factory air intake issue by choosing to install an Airaid Junior Air Intake System. This system is the least expensive out of all air intake upgrades and it removes the factory large plastic intake box but leaves the factory filter enclosure. I wasn't concerned about the air filter enclosure. I'm not going to go into my reasons for that. You do get a nice cleanable air filter that fits in the factory enclosure. The factory alternator wiring does not have the correct wire gauge and fuse to support a 250 amp alternator from Mechman. This requires upgrading all the wiring between the alternator and the battery. This includes positive and negative wires. I used Stinger wiring for my audio upgrade, so I decided to use the same wire and fuse block for this alternator upgrade. This wire is Stinger 1/0 gauge wire and Stingers inline ANL fuse holder. The fuse holder is added to protect the wire and you in the event of a crash, so make sure you add a fuse holder. If you are using this wire make sure you use a 300 amp fuse on this alternator because the alternator can exceed 250 amps, which will blow a 250 amp fuse. Also, I would recommend having a spare 300 amp fuse and installation tool in your glove box in case something ever happens and you needed to change out the fuse. These are not fuses you can get at your local hardware stores. WARNING: If you are using a different 1/0 gauge wire, make sure the wire is rated to handle at least 300 amps. WARNING: Do not just upgrade the positive wire and not the negative. You can cause major damage or even a fire. I'm sure at this point you are ready to read about the installation and see some pictures. To start I want to show the factory alternator with the air intake box above, so you can see the mounting bracket that comes off the factory air intake. Here is a side by side comparison of the two alternators. The left is the Mechman alternator and the right is the factory alternator. You can notice the factory air box bracket more clearly in this picture. Your first step in removing the alternator is removing the stretch belt. I tried to look up some easy removal tools for the stretch belt, but I couldn't find any information. I tried buying Lisle Stretch Belt Remover/Installation tool and it did not work. My recommendation is to buy or have some plastic door/trim panel pry tools. I used these to remove the belt. Circle 1 works to remove the belt. I used the factory alternator bolt to remove the belt. The removal can be done above the engine. Circle 2 works to install the belt. Mechman's alternator pulley bolt will not work to install the belt because the bolt spins freely and will not move the belt. You need to use on the pulley bolt where the circle 2 is shown. A large breaker bar will help here. You will need to remove the bottom front lower engine splash shield to reach the bolt and slide on the belt. I got the belt most the way on from the bottom and went above the engine and finished spinning the belt using the same bolt/breaker bar while pushing the belt onto the upper right pulley. If you try doing the entire install from the bottom the belt will not seat correctly. Once you pull the belt you will need to remove the radiator cooling fan that sits in front of the alternator to remove the bottom alternator bolt. The fan is installed with three torx screws. I created a custom fuse block holder out of aluminum to hold both my fuse blocks. I used 2" wide aluminum from Menards, which does allow you to bend without heat. If you choose to do this same mounting location it works great and you can use the mounting pin. You will need to expand/cut the plastic top and base where the 1/0 gauge wires run through. I added two 90-degree bends on the engine side of the aluminum fuse block mounting bracket to level out the bracket and give room for the 1/0 gauge wires to run underneath. The main thing to take into consideration is the negative battery terminal. You have to mount these fuse blocks to still allow the ability to disconnect the negative battery lead during maintenance. I wanted to have these fuse blocks run in parallel, but using 4" wide aluminum would cover up the ground and require the fuse blocks to be removed to connect the ground wire. I ran a 1/0 gauge wire back to my audio system's distribution block and ran another 1/0 gauge wire over to my alternator. Note 1: The factory power wire on the alternator needs to be disconnected and not used. Note 2: The alternator will come with a 1/0 gauge terminal you can use for the wire, so you do not need any terminal for this wire back to the fuse block. You will need a standard gauge battery terminal connector to connect the fuse holder to the factory mounting location. Note 3: I used some braided wire sleeve with heat shrink for look and added heat resistant tape on both my ground and positive wires that are near the engine. I recommend adding at least the heat tape to protect the rubber shielding on your wires from potentially melting. You need to run your own 1/0 gauge negative wire from the alternator and use one of the alternators mounting bolt's to hold the 1/0 ring terminal. The ring terminal that came with the 1/0 gauge wiring kit for my amplifier did not have a large enough hole for the alternator mounting bolt. I use a step bit to increase the hole size to fit snug around the bolt. After you get the negative wire ran from the alternator bolt you need to make sure you remove the factory ground wire and connect the new 1/0 gauge wire directly to the mounting point the factory wire installed. I had a smaller 1/0 gauge ring terminal that worked perfectly. Note: Do not connect the factory ground and alternator ground or it may throw off the smart charging system. You need to have only the new 1/0 gauge ground wire connected to the negative battery lead with the same factory connector that holds the sensor. This picture shows me adding some heat shrink to the factory's positive and negative wires. I choose to leave the factory positive and negative wires under the hood. My goal is to remove this system before I trade the truck in for a newer model year, so if this alternator works with that model year I will be putting the factory alternator back into the truck. Here is a picture of me securing the factory power wire. I secured the ground wire near the firewall and there isn't an easy way to take a picture. Since I choose to add the same fuse blocks for my audio and amplifier I wanted to label both fuse blocks. Below are a few pictures of each fuse block being labeled. I added the label to the cover and the fuse mounting point. I did this just in case the covers got installed incorrectly. Here are the final pictures of the installation of the Mechman alternator and the Airaid Junior.