

EXSlider400
-
Posts
1,158 -
Joined
-
Last visited
Content Type
Profiles
Forums
Gallery
Events
Articles
RPO
Store
Blogs
Everything posted by EXSlider400
-
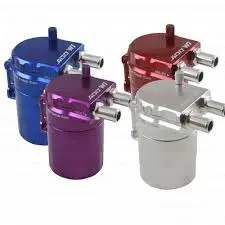
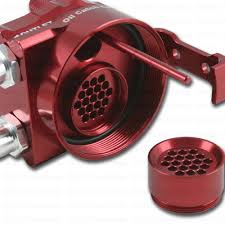
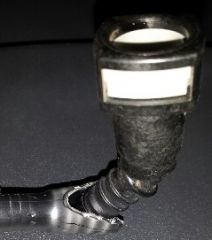
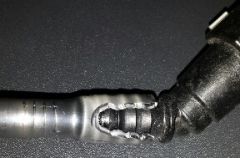
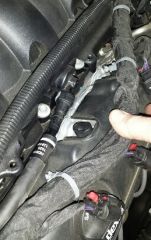
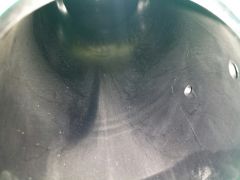
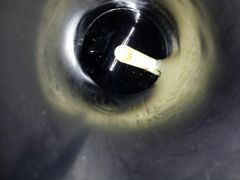
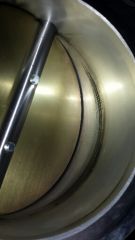
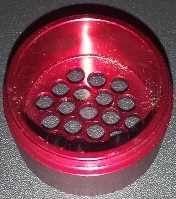
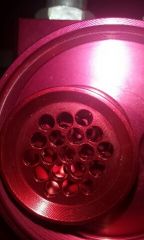
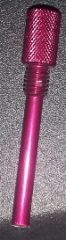
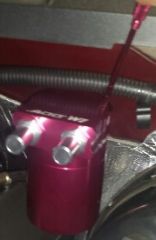
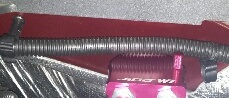
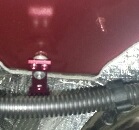
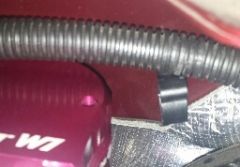
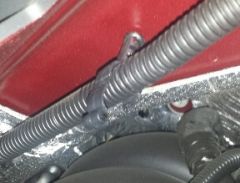
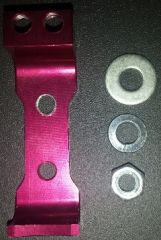
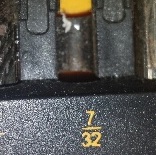
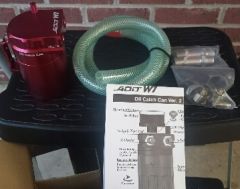
This is a write up on installing an ADD W1 oil catch can on a 2014 5.3 Denali with a few thousand miles. I like the RX can but after some research, the ADD can had good reviews as well. so for $90 I ordered it from ebay (same cost on amazon and new egg), and here is what it did. I am not a pro, just a hobbyist. I did buy 4 feet of Gates 3/8 Fuel Vapor/PVC hose to replace the one in the kit and plan on inserting Scotch Brite Stainless Steel Scouring pad (not fibrous SS wool as this can degrade and cause metal fibers to enter intake) inside the can's filter compartment as shown in the above pic. Here is a youtube video from RX which may help as well: 1) Here are pics of the package, flow diagram, and out of the box: Billet aluminum and sound construction. 2 Size ports. I chose to use the smaller one. 2) I don't have a way to make a custom bracket so I used the grounding bolt. I could have used the inner fender well on drivers side where 2nd battery can go but I may plan on adding a second battery later on. I had to drill out the hole to 7/32 and that was just enough to screw the bracket down with the use of a washer and bolt I had in the shop. I wanted to use the lock washer but their was not enough room. 3) the Can was against the wire harness so I undid the clip, gave a little extra wire, and set the wire on top of 1 of the clips. It helps to remove the clips from the firewall for working room. They just pull off of the bolt like prong. After mouse ting the can is tilted a little down so just gently pull it up to bend it flat/straight. 4) Did not want to, but the dip stick was too long to put in. If you leave it in when installing you won't have to trim it but still can't use it and it will be hanging down when removing the bottom part of the can. Again, if on inner fender, you won't have to trim it. I plan on checking every 1,000 miles until I get a good baseline, but I expect having to drain every oil change. I used a pair of wire cutters. 5) This is the spot you can unscrew and put any filter media. As you can see, it has holes before and after (above and below) the empty spot. I did rinse with some alcohol since I saw aluminum residue/dust from the manufacturer's drilling process. 6) To allow enough room to disconnect the vapor line, I removed the air intake tube (including the 2 hoses on either end of the air housing) and unbolted the throttle body. This was super easy and you should not be worried, just unbolt and remove the bolts 1 at a time. Their is a green o-ring seal so no need to replace any gaskets. In doing so, I cleaned this buildup. I am unsure what the white tube inside the intake does though... 7) To make room to remove the line, I also disconnected the injector connections (just pull up on red tab and squeeze down/pull up on plug). Also pull up on the 2 grey zip tie rings that secure the harness to the intake. You may not have to make room but I did not want to brake anything so I was very precautious. Also, another member broke the nipple on the outlet side and had to replace entire manifold so I was being very careful when squeezing and removing the quick connector. All of them came off easy except for this one. I think it had to do with the line being turned, so if it seems hard, do not use excessive force but try and rotate the line gently as you are squeezing the gray clip. 8) I cut the quick connectors off as shown and will order a replacement hose this week just incase. 9) Applied some water to new hose ends to help them slide on, and attached hose clamps. I will probably buy some black clips for a more OEM look later on but the barbs seemed tight enough to hold with out any additional help anyway. Then zip tied hoses together out of the way of oil filler cap. and....here it is...... Thant's all folks........
-
From the album: W1 Catch Can
a -
From the album: W1 Catch Can
a -

From the album: W1 Catch Can
-
From the album: W1 Catch Can
-
From the album: W1 Catch Can
-
From the album: W1 Catch Can
-
From the album: W1 Catch Can
-
From the album: W1 Catch Can
-
From the album: W1 Catch Can
-

From the album: W1 Catch Can
-
From the album: W1 Catch Can
-
From the album: W1 Catch Can
-
From the album: W1 Catch Can
-

From the album: W1 Catch Can
-
From the album: W1 Catch Can
-
From the album: W1 Catch Can
-
From the album: W1 Catch Can
-
From the album: W1 Catch Can
-
From the album: W1 Catch Can
-

From the album: W1 Catch Can
-
From the album: W1 Catch Can
-
From the album: W1 Catch Can
-

From the album: W1 Catch Can
-
From the album: W1 Catch Can


-
Forum Statistics
250.4k
Total Topics2.7m
Total Posts -
Member Statistics
342,770
Total Members8,960
Most Online
-
Who's Online 12 Members, 1 Anonymous, 2,211 Guests (See full list)