

Smoothbassman
-
Posts
606 -
Joined
-
Last visited
-
Days Won
3
Content Type
Profiles
Forums
Gallery
Events
Articles
RPO
Store
Blogs
Everything posted by Smoothbassman
-
Just got thru installing my floor lighting. Looks great but now I need to tap into the dome light circuit to get them to turn on when I open the doors. Does anyone have a clue on the 2019-2020 Silverado. I need to get this done. This was so simple on the 2014s. Sent from my SM-N960U using Tapatalk
-
Anyone figure this out on the 2019 yet? Looks like they changed a few things for the T1. Sent from my SM-N960U using Tapatalk
-
T1 Switched Power Source
Smoothbassman replied to 2019_Silverado_HC's topic in Modifications, Wheels & Tires
I'm working on it today. I'll find the right wires and report back. I got the 1st part done with wiring this into the accessory power. Sent from my SM-N960U using Tapatalk -
Show Us Your 2019 & Up T1 Pictures !
Smoothbassman replied to Sierra Dan's topic in 2019-2026 Silverado 1500 & Sierra 1500
Tonneau and Bed Rug Done!!! My wheels and tires came in today as well. Can't wait to get those new shoes on the beast!! Mods Complete/In Progress LED Tailgate Bar - Done Quick Charge 3.0 Ports Front and Rear - Done Tinted Windows - Done Bed Mat - Done Backflip Tonneau cover - Done 22 Inch Black Wheels - Arrived Nitto Tires - Mounted on Wheels Floor Accent Lighting - Installation Tomorrow LED Bed Light Expansion - Ordered Rough Country Side Steps - Shipping Sent from my SM-N960U using Tapatalk -
Adding factory brake controller
Smoothbassman replied to turbosporsche's topic in 2019-2026 Silverado 1500 & Sierra 1500
It's possible to get the factory one installed. I got mine done on my 2019 Trail Boss. It was 300 bucks with the parts labor and software included at my dealer. The wiring is already there for LT and up Chevy Trucks. Just needed the controller and the software. 30 minute job at the shop. Sent from my SM-N960U using Tapatalk -
Show Us Your 2019 & Up T1 Pictures !
Smoothbassman replied to Sierra Dan's topic in 2019-2026 Silverado 1500 & Sierra 1500
Nope. I do this once every 4 years with a new truck. It literally takes 10 minutes to take the whole thing apart and have it laid out to work on. 7 8mm screws and a whole lot of body clips to pop loose. Way too many in my opinion. The toughest part is getting that bottom trim piece off. For a piece of plastic that small it had 5 body clips on it. It doesn't need that many to hold it in. I removed the center body clip when I reinstalled it to make it easier to remove later on. -
Show Us Your 2019 & Up T1 Pictures !
Smoothbassman replied to Sierra Dan's topic in 2019-2026 Silverado 1500 & Sierra 1500
I scooped an OPT 7 Floor Accent Lighting Kit. Installing that this weekend once I find the right dome light wire to tap into. OPT 7 Kit https://www.amazon.com/dp/B00OU5LOT2/ref=cm_sw_r_cp_apa_i_mbYDDbC55798Y As for the LED Bed lighting expansion I picked up a roll of LED lights. I'll be tapping into the existing LED light in the back of the truck and running some LEDs under the bed rail of both sides of the truck all the way to the front. That way I can see everything in there when my Tonneau cover is installed. The way they designed this truck over the last generation will require me to drill 2 small holes to fish the wires thru. Since these holes will be under the bed rail, you won't see it when it's done. LED Roll https://www.amazon.com/dp/B01339G2F6/ref=cm_sw_r_cp_apa_i_ydYDDbK5EGMGZ I almost forgot about the last addition. Can anyone name this Autobot?? -
Show Us Your 2019 & Up T1 Pictures !
Smoothbassman replied to Sierra Dan's topic in 2019-2026 Silverado 1500 & Sierra 1500
LT Trail Boss Upgrades Tint Complete Today. Looks so much better !!!! Loving it so much I have already started upgrades. Mods Complete/In Progress LED Tailgate Bar - Done Quick Charge 3.0 Ports Front and Rear - Done Tinted Windows - Done Bed Mat - Ordered Backflip Tonneau cover - Ordered 22 Inch Black Wheels - Ordered Nitto Tires - Ordered Floor Accent Lighting - Ordered LED Bed Light Expansion - Ordered Rough Country Side Steps - Ordered Sent from my SM-N960U using Tapatalk -
Show Us Your 2019 & Up T1 Pictures !
Smoothbassman replied to Sierra Dan's topic in 2019-2026 Silverado 1500 & Sierra 1500
Yep Grabbed a couple of these ports on Amazon for 13 bucks. Pulled the dash apart and tapped into the existing 12V port to give me power to this. Now I have 4 QC 3.0 ports to charge everything at once. Sent from my SM-N960U using Tapatalk -
Show Us Your 2019 & Up T1 Pictures !
Smoothbassman replied to Sierra Dan's topic in 2019-2026 Silverado 1500 & Sierra 1500
New Trail Boss LT here! Loving it so much I have already started upgrades. Mods Complete/In Progress LED Tailgate Bar - Done Quick Charge 3.0 Ports Front and Rear - Done Tinted Windows - Scheduled Bed Mat - Ordered Backflip Tonneau cover - Ordered 22 Inch Black Wheels - Ordered Nitto Tires - Ordered Floor Accent Lighting - Ordered LED Bed Light Expansion - Ordered Rough Country Side Steps - Ordered Hope it all comes together before the 20th. Sent from my SM-N960U using Tapatalk -
Well this morning I figured it out after contorting in position to see behind the dashboard at the bottom. I found 5 clips and 2 screws back there. Those clips are Overkill. I felt like I was about to break that bottom piece before it finally released. You only need 2 clips to hold that piece in. So on reassembly I removed the center clip. After I got those screws out, the panel dropped down with ease. I was able to tie into the 12 V lighter circuit and add a dual Port quick charge USB outlet and voltmeter combo. I added another one in the center console and dropped 2 extra leads for future expansion. Sent from my SM-N960U using Tapatalk
-
Thanks for the info. Going to use this tomorrow to hook up some additional USB Charging Ports. Sent from my SM-N960U using Tapatalk
-
Did you figure out how to get that off? I got stuck in the same spot trying to take my panels apart. Sent from my SM-N960U using Tapatalk
-
Is it possible to add bed plug?
Smoothbassman replied to bite_hard_ceo's topic in Modifications, Wheels & Tires
Yeah. I want this. The only issue is the factory one is 150 Watts. Wish they made it in 400 Watts. Sent from my SM-N960U using Tapatalk -
Switch at Tailgate for Cargo Light
Smoothbassman replied to FlBowhunter's topic in Modifications & Accessories
All the lights come on. That's what happens. I like it that way. Sent from my SM-N950U using Tapatalk -
I did this a long time ago. No more issues. Bootleg but effective. Sent from my SM-N950U using Tapatalk
-
I think it will work if your tire is less than 12" wide and 34" tall on stock wheels. You are right there at that measurement. 275 tires vary in width wide by brand. Check the width of your tire choice and it might fit. I have a 2.5" lift to fit my tires. I have very little clearance on stock wheels running 285s. An aftermarket wheel would allow it to fit with no issues except pulling back the inner fender skirts. Sent from my SM-N950U using Tapatalk
-
I think it will fit if you don't go too wide. These tires are 11.69" wide. If it was 12 wide I know it would rub the upper control arms when at full lock as well as the fenders. These are about 1/2" from rubbing the control arm, and about 1/4" from hitting the inner wheel skirts. You would need a spacer or different offset wheels to make it work on a 60. Sent from my SM-N950U using Tapatalk
-
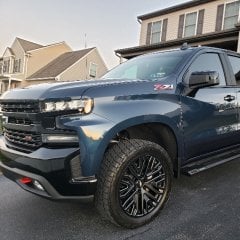
Stuffed some Terra Grappler G2s on my leveled 2.5" High Country. 285/50/22's. No rubbing and a nice smooth ride with more tire on the road. I might have been able to stuff at 285/60/22 Sent from my SM-N950U using Tapatalk
-
You guys giving me ideas!!!
-
How did they fit?
-
I'm planning to do the same tire this year. I love my last set of Nitto tires. I didn't find that size on the Nitto site. They only had 285/45/22 avaiable. When did you buy these maybe they stopped making the 50s
-
Switch at Tailgate for Cargo Light
Smoothbassman replied to FlBowhunter's topic in Modifications & Accessories
Forget the BCM. Go straight to the wires in the back of the truck.


-
Forum Statistics
250.4k
Total Topics2.7m
Total Posts -
Member Statistics
342,759
Total Members8,960
Most Online
-
Who's Online 7 Members, 0 Anonymous, 1,203 Guests (See full list)