

Darth_Vader
-
Posts
567 -
Joined
-
Last visited
-
Days Won
2
Content Type
Profiles
Forums
Gallery
Events
Articles
RPO
Store
Blogs
Everything posted by Darth_Vader
-
I assure you, it is worth the money to upgrade the cluster if you are wanting the steering wheel controls.
-
Keying doesn't matter, just focus on the size and number of pins, get what you can and just cut the keys off to make it fit. Had to do the same thing on the ATC retrofit because I bought one connector type for three different key styles.
-
This has been my finding also, I bought a roll of 100 for my tinkering and have found that they have fit in every connector so far that is using a smaller gauge wire.
-
It (The arm rest) does come with the console assembly. I don't think anyone has reported otherwise. I bought mine from gmpartsdirect.com and it did.
-
Is it possible to upgrade the gauge cluster?
Darth_Vader replied to beard_up's topic in Modifications & Accessories
You have lights that don't work right now? The stereo control lights won't work without tying those into the gauge cluster that supports steering wheel controls but your cruise lights should work. Heck, it has been so long since I have done this I actually can't remember. -
Is it possible to upgrade the gauge cluster?
Darth_Vader replied to beard_up's topic in Modifications & Accessories
Basically the new clock spring will have two extra wires on the column side for the heated wheel, you'll need to tie into ground and power (I used a fuse tap to get the power off the fuse for the heated steering wheel instead of trying to tackle the back of the harness on the fuse box). The steering wheel side will be plug and play. -
Is it possible to upgrade the gauge cluster?
Darth_Vader replied to beard_up's topic in Modifications & Accessories
http://www.gm-trucks.com/forums/topic/192664-wt-trim-with-color-dic-steering-wheel-controls-io5-stereo-retrofit/page-2?do=findComment&comment=1877825 -
Is it possible to upgrade the gauge cluster?
Darth_Vader replied to beard_up's topic in Modifications & Accessories
You need the clock spring with the heated steering wheel circuit in it. -
PM me your email, I'll send you a copy.
-
Is it possible to upgrade the gauge cluster?
Darth_Vader replied to beard_up's topic in Modifications & Accessories
This tied with the steering wheel controls is well worth the upgrade. I assure you. -
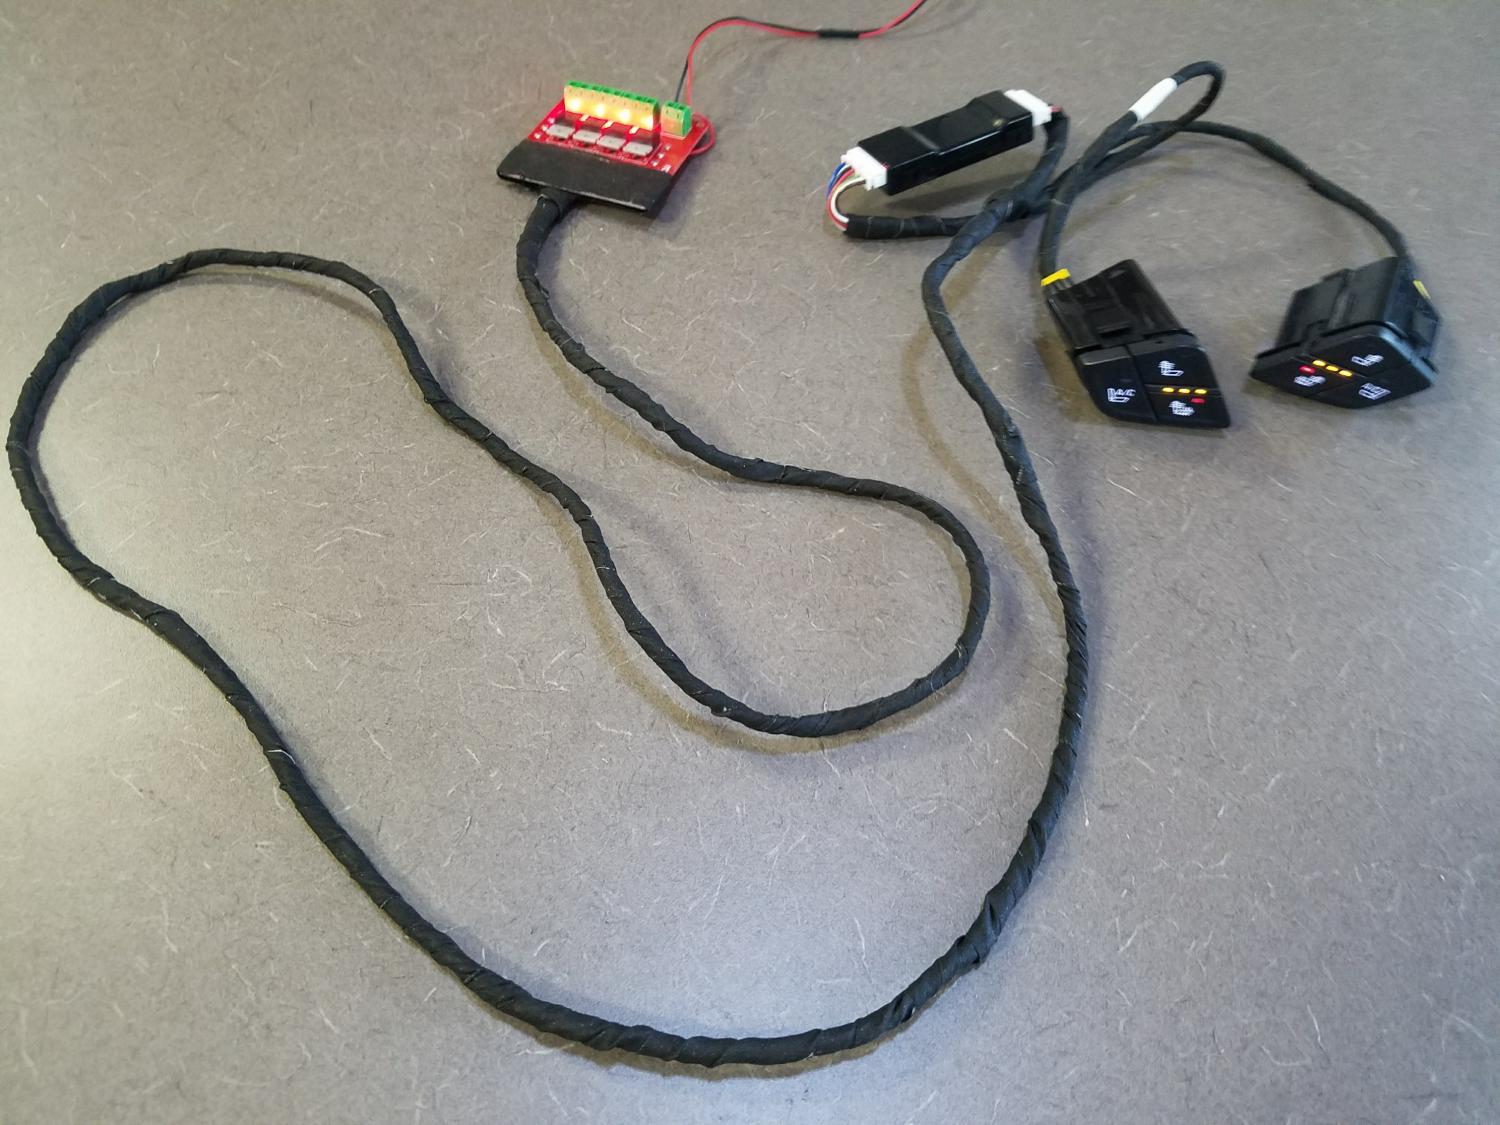
Okay, here is the big update. The seat heating portion is done, everything is tested and confirmed to be working, the harness has been built. I am awaiting an enclosure for the power board, and bugging my wife into letting me get a 3D printer so I can make my own enclosure, on top of that I am waiting on the elements for the passenger seat. I haven't done much on the AC side at all, mainly because I don't have a set of seats to experiment with, feel free to ship me a pair of front seats, black leather, if you want to donate to the cause. Okay, I have been coy up this point of completing the project while trying to decide if this is something I want to monetize for the few people who want this functionality on their non-fancy trucks, like me. But I will be honest, if you can take all of this information I am about to present and do it yourself you deserve to do it without giving me any cash. So to that end here comes all the information of what I have used to accomplish this project. Seat heater elements (In lieu of stock seats with heaters): https://www.amazon.com/gp/product/B001L6HYQK/ref=oh_aui_detailpage_o02_s00?ie=UTF8&psc=1 $28 per seat Dash trim with seat heater or seat heat/AC buttons: Ebay or your favorite GM parts supplier, can provide part numbers if need be $100 or so Switch Connectors: http://www.mouser.com/ProductDetail/Molex/31068-1011/?qs=sGAEpiMZZMs7eK6h2EBtKuk1fUeupRrxcLsO5tRhpWs%3d Less than $1 each Pins (For about everything on this truck with small gauge wire, buy extras) https://www.amazon.com/Automotive-Connectors-RECEPTACLE-CONTACT-pieces/dp/B00LVKB3S6/ref=sr_1_1?s=industrial&ie=UTF8&qid=1489871981&sr=1-1&keywords=928999-5 These can be found for cheaper elsewhere, do some looking, but lets say $10 Power board: https://www.amazon.com/gp/product/B01N5VRZWF/ref=oh_aui_detailpage_o07_s00?ie=UTF8&psc=1 $16 Controller, can't say enough great things about the guys who make this over in Russia. I am working on getting a discount to bring a bulk order over, check out www.cannylogic.com for more information: http://www.ebay.com/itm/Automotive-Visual-Programmable-Logic-Controller-CANNY-7-/162358910401?hash=item25cd585dc1:g:jHAAAOSwVL1WC5Jd $100 And of course various wire, crimpers, etc. Wiring is simple. Use the upfitter manual but basically you are going to have these wires to hook up: Controller: Power (tied in with power and ground for the switches) Ground Lin 1 (Channel 9 to driver switch LIN) Lin 2 (Channel 10 to pass switch LIN) Channel 0 DO to Power board Signal 1 in Channel 1 DO to Power board Signal 2 in Channel 2 DO to Power board Signal 3 in Channel 3 DO to Power board Signal 4 in Power board to seats (both power and ground for elements will land on power board): Channel 1 to Driver Heater Back Channel 2 to Driver Heater Seat Channel 3 to Pass Heater Back Channel 4 to Pass Heater Seat And then you are going to need the program in the picture I have attached. Don't worry, if you ask nice I could be inclined to email it to you. And I might even be convinced to sell a couple of these. The completed harness, controller and power board would run around $250, you would supply your own switches, and seat elements but I would make it in a way where all you would have to do is plug the switches in and tie in the 8 wires from the seat heater elements (Screw terminal, super easy). Thanks for following along with this project the last couple of weeks and I will update you all when I start to tackle the seat AC. Thanks, Kyle

-
Brace yourself. You are about to get an info dump.
-
Nah, we are good to go, the FETS I am using are bigger than the ones GM use so there shouldn't be any issue there. I ran them at full power the other day and they stayed below 120 degrees.
- 2,411 replies
-
- 1
-

-
- power folding mirror
- dl8 to dl3 upgrade
- (and 10 more)
-
Phil, I want to get with you soon on this, I think I can add a controller the size of a quarter or smaller to your harness that would allow fold/unfold on lock/unlock. Let me wrap up this seat thing first and then we will explore some options.
- 2,411 replies
-
- 3
-
-
- power folding mirror
- dl8 to dl3 upgrade
- (and 10 more)
-
Is it possible to upgrade the gauge cluster?
Darth_Vader replied to beard_up's topic in Modifications & Accessories
Haha, if it gets any more complicated I am going to have to start working for GM just so I can get the inside track. -
Hey everyone, part 3 is up and we have heat! Sort of, lol, heat on my kitchen table. But that being said, I have ordered the elements for the passenger seat, if I have time next weekend I plan on tossing them in the truck and heating the stock seats up using the factory switches. At this point and time the control for the driver side heated seats are 100% complete. Once that is beaten I will start turning towards the cooled seats and possibly talking about putting out a heated seats only retrofit kit if there is interest. https://www.youtube.com/watch?v=69FibPjjK_U
-
I was wondering the same thing Phil, but from what I have seen they tend to keep the circuits on the same number. But given that the Denali/LTZ seats have so many extra it could be something crazy like a different wire pair on the connector.
-
Is it possible to upgrade the gauge cluster?
Darth_Vader replied to beard_up's topic in Modifications & Accessories
Global A is an unforgiving bitch. -
I knew I should of just gone straight to the Denali last year. Damn my self control! I am going to add it to the list, but put it towards the bottom, I have some other irons in the fire still.
-
No clue, double check all your connections. Might need to pull the seat and make sure something hasn't happened to where the airbag ties into the seat connector. My guess is it's not seeing the bag for some reason.
-
Damnit, there is a HUD?! I've been trying to keep from spending more money on this kind of stuff!
-
Is it possible to upgrade the gauge cluster?
Darth_Vader replied to beard_up's topic in Modifications & Accessories
No BCM reprogramming required for the cluster swap, just the cluster itself requires programming. -
Subwoofer in a regular cab
Darth_Vader replied to Darth_Vader's topic in Modifications & Accessories
Wouldn't mind seeing a pic of that setup. -
Shouldn't be anything on pins 1 and 2 if you had the monochrome cluster before hand. But you are right on the rest. Basically the wires on the connector in your picture as listed on my original post are split with the harness side going to pins 1 and 2 on the cluster instead of the radio and then the return from the cluster will go directly into the radio where the wires were going. You are just paralleling the cluster with the radio on the MOST bus. Good luck!
-
Subwoofer in a regular cab
Darth_Vader replied to Darth_Vader's topic in Modifications & Accessories
It didn't, not sure the best way to do it with the storage.

-
Forum Statistics
250.4k
Total Topics2.7m
Total Posts -
Member Statistics
342,799
Total Members8,960
Most Online
-
Who's Online 5 Members, 0 Anonymous, 511 Guests (See full list)