


jay webb
-
Posts
144 -
Joined
-
Last visited
jay webb's Achievements

Enthusiast (4/11)
48
Reputation
-
Noise coming from the dash
jay webb replied to Moend's topic in 2019-2026 Silverado 1500 & Sierra 1500
The noise may be caused by the 110 Volt Power Inverter Module not being seated properly in the mounting bracket (if equipped with RPO K14). Condition 2: Rattle, squeak or itch type noise from the center of the dash in the radio area. The instrument panel accessory bezel may be rattling due to insufficient tension of retainers. Press on the bezel while duplicating noise to see if it is eliminated. Condition 3: Rattle or itch type noise from the dash area near the windshield Defroster grill may be rattling due to insufficient retention of retainers. Press on defroster grill ( # 1 in illustration) while duplicating concern to see if it is eliminated. Condition 4: Rattle, tick, knock type noise from the front center floor or center of dash area (Applies to trucks equipped with center console subwoofer speaker) This concern could be caused by the radio subwoofer speaker mounting nuts either being loose or missing. Condition 5: Creak, ticking or popping type noise heard from the left center stack area. (This issue only applies to Full Size Utilities built before November 18, 2016) This concern could be caused by the use of an incorrect screw that secures the instrument panel carrier in place. The screw that may have been used is too long, and it may contact the instrument panel tie bar. In some cases, this noise may only occur after the vehicle has been driven for a period of time. Condition 6: Chirp or squeak noise coming from the lower left side of the center stack area. This concern could be caused by loose retaining nuts on the chassis harness retention bracket that is located below the brake booster. Condition 7: Rattle noise coming from the drivers footwell area. This concern could be caused by the IP junction block cover moving and causing a rattle noise. Recommendation/Instructions Correction 1 (for vehicles equipped with 110 Volt AC Converter - RPO K14): Follow SI to locate the Accessory AC and DC Power Control Module located to the right of the steering column. See #1 in photos below: Inspect the power inverter module for possibly moving slightly against mounting bracket and creating the noise. Remove the K14 power inverter module and apply two sided tape to the module bracket to insulate it from the mount. Two sided tape is available through Kent Automotive, part # P40519 which is a ½”x 50’ roll or it may be obtained locally. Correction 2: Wrap Kent automotive BRS flocking tape part number KT13487 over retainers (#1 in illustration) and reinstall bezel. This will require an application of BRS flocking tape on ten retainers (one strip @ 1” x 10”). Two sheets should repair 16 vehicles. Correction 3: Remove defroster grill. Apply foam tape around connectors located under grill to prevent them from rattling on grill. See # 1 in illustrations. Apply foam tape to all mounting hooks in the front of the defroster grill # 1 and apply a strip of foam tape along the edge of the grill to isolate the grill from the dash #2. Wrap Kent automotive BRS flocking tape part number KT13487 over the metal retaining tabs that secure defroster grill in position #3. Foam tape can be obtained from Kent Automotive, part # KT15103 (40 ft roll) or it may be obtained locally. Correction 4 To correct this issue, inspect the center console subwoofer speaker (2) mounting nuts (1) for being loose or missing. Subwoofer speaker mounting is shown below. Install and tighten the subwoofer speaker mounting nut(s) to 6 Nm (53 lb in). Correction 5: (This issue only applies to Full Size Utilities built before November 18, 2016) The screw shown in the photos below may be too long and the screw tip actually contacts the instrument panel tie bar. This contact is shown as item #4 below. This screw secures the instrument panel carrier to the instrument panel tie bar. Chevrolet/GMC models are shown as item# 1 and a close-up of this fastener can be seen as item #2. Replace this screw with a shorter fastener, GM part number 11547755, which is approximately 24 mm in length. Cadillac models can be seen in item #3 below. Replace this screw with a shorter fastener, GM part number 11547755, which is approximately 24 mm in length as well. Correction 6: The following picture shows the chassis harness retaining bracket and nuts (2) below the brake booster (1). Verify the retaining nuts are tight. Correction 7: To correct this issue use foam tape to insulate the IP junction block cover to prevent movement which is causing the rattle type noise. -
just go to the dealership and speak to the service manager
-
it is an updated part. GM just updated the coverage on this to 10 yrs 150,00 so if you still are with in coverage period just go to the dealer and have it done.
-
Trailboss tire pressure sensor
jay webb replied to rev44's topic in 2019-2026 Silverado 1500 & Sierra 1500
they can be off and not 100% accurate to the display its just an RF signal sent to a receiver. tint, after market wheels, other things can interfere with the signal. as far as the light coming on and you put air in it and it didnt change, well do you know for sure that the sensors positions are learned to the vehicle correctly? meaning when they get rotated is the shop relearning them after? they need to be relearned every time. so you may be putting air in the left rear but the that may not be the left rear according to the vehicle. -
Noise coming from the dash
jay webb replied to Moend's topic in 2019-2026 Silverado 1500 & Sierra 1500
there is a bulletin about noises coming from the dash it can be the inverter or they used the wrong size screws in behind the radio or whatever... just take it to the dealer , its under warranty -
give me your vin i can look up the vehicle build online through my gm global connect login in and have it in seconds
-
the lines attach to the side/back of the compressor , if and when the took it lose to remove the bracket and water pump the line could of got damaged. the tech will get paid for the non come back repair.
-
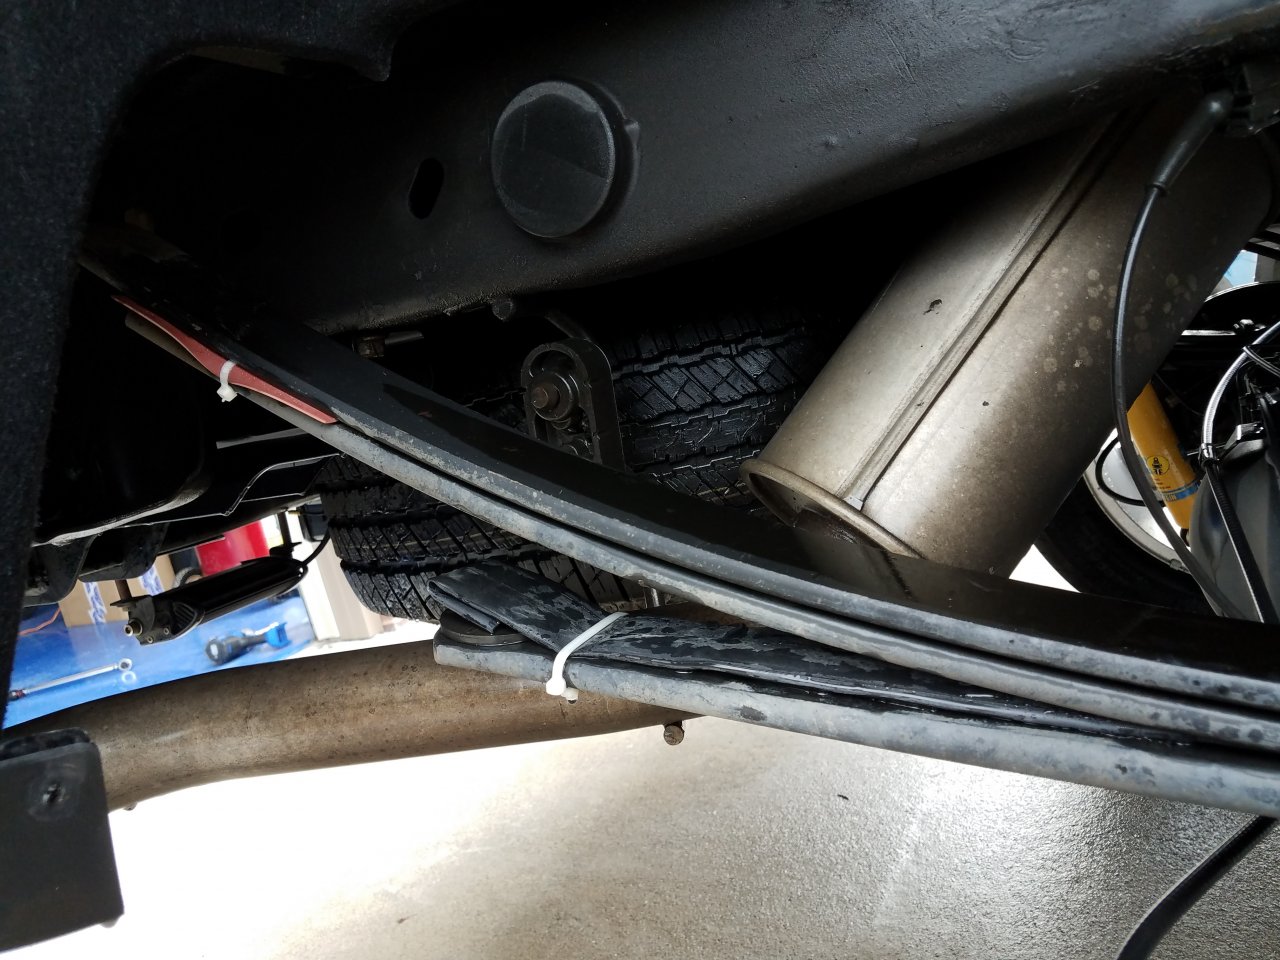 see the round pad on the lowest leaf spring. what i do at the dealership is get 4 of those and install them on the upper springs replacing the square pads and the noise goes away. we had a meeting with some engineers and this is what they came up with to fix the popping noise from the leaf springs.
 -
i also have an 18 sierra and no i dont believe it is, you will get a noticed if you are.
-
ok here is what i do to do them. you need to remove the air intake to the throttle body, remove the belts. heres the kicker on the ac/vacuum pump belts. they are stretch belts , meaning there is no tensor. using a ratchet and a 24mm socket on the crank bolt and a pry bar or similar tool you can remove these belts. turn the engine over with ratchet and use prybar to wedge the belt off. going back the same way but is a bit more difficult. they have to go on in a certain order, vacuum pump, ac then main belt. vacuum pump belt you can hold by hand on the pulley and turn the crank. ac belt i typically put the belt around the compressor and half around the crank and zip tie to crank to hold in place and turn the engine over to pull it on all the way. i find it easier to remove the steering shaft between the part that comes through firewall and down to steering gear. its a 15 mm on the upper part and a 11 mm pinch bolt on the lower part attaching to the gear. this provides alot of room. there is a vacuum line that runs to the pump remove it , position out of the way. there is a wiring harness there too you can gain some slack if you pull it from the clips that hold it in place. then on the pump it self is 4 13 mm bolts , remove them and the gasket. it will drain a good amount of oil. and then install new pump/gasket and finished putting everything back. i do these from underneath the truck on a lift but they can be done from the top. i typically do them in 30 mins. but ive done so many of these and have swivel sockets , electric impact drivers / cordless tools etc.
-
the vacuum pump is located on the driver side of the engine block just above the oil pan at the front of the block, it is driven by a belt on the pulley system. then a vacuum line runs from the top of the pump to the booster. in all the pumps ive replaced and remove that line from the pump to do so i have never seen any oil escaping from there.
-
i have yet to see the pump come apart and sending metal shavings into the oil system. i have replaced about 50 of them.
-
you dont need to replace the serpentine belt, but it does have to be removed and the ac belt and the vacuum pump belt. under the special coverage we replace the vacuum pump belt to.
-
its an updated pump. what internally different im not sure. i dont take them apart. i dont find them difficult to do but.... im an actual tech , i know what tools i need, what to remove , etc. i typically can do them in about 30 mins , 45ish on 4 wheel drives. a lil less clearance due to front diff/axles.
-
Rack and Pinion Mount Bushing
jay webb replied to Carissa's topic in 2014-2018 Silverado 1500 & Sierra 1500
ok the bushings are pressed in, looking at your picture it dont look like the bushing is missing. these trucks/steering gears have 4 bolts that go through to front cross member /frame into bushings of the steering gear. two on the left /driver side and two on the passenger side. the passenger side ones are shorter and are recessed into the cross member cant see them unless you look with a light from the front through the access holes. the driver side are longer and go through the whole frame and into the bushings. that is the driver side so if the upper one is missing i would just get the bolt and put it in to secure it. if you had work done recently maybe the tech didnt reinstall. lift kit? engine/oil pan / front end work. where either the gear had to be removed. if you have 4 wheel drive , the gear has to be lowered to remove transfer case.



-
Forum Statistics
250.5k
Total Topics2.7m
Total Posts -
Member Statistics
342,980
Total Members8,960
Most Online
-
Who's Online 1 Member, 0 Anonymous, 519 Guests (See full list)