

Stug
-
Posts
8 -
Joined
-
Last visited
Stug's Achievements
")
Enthusiast (2/11)
7
Reputation
-

Adding Foglights-Depinning Connector at Block
Stug replied to BronzeSierra's topic in 2019-2026 Silverado 1500 & Sierra 1500
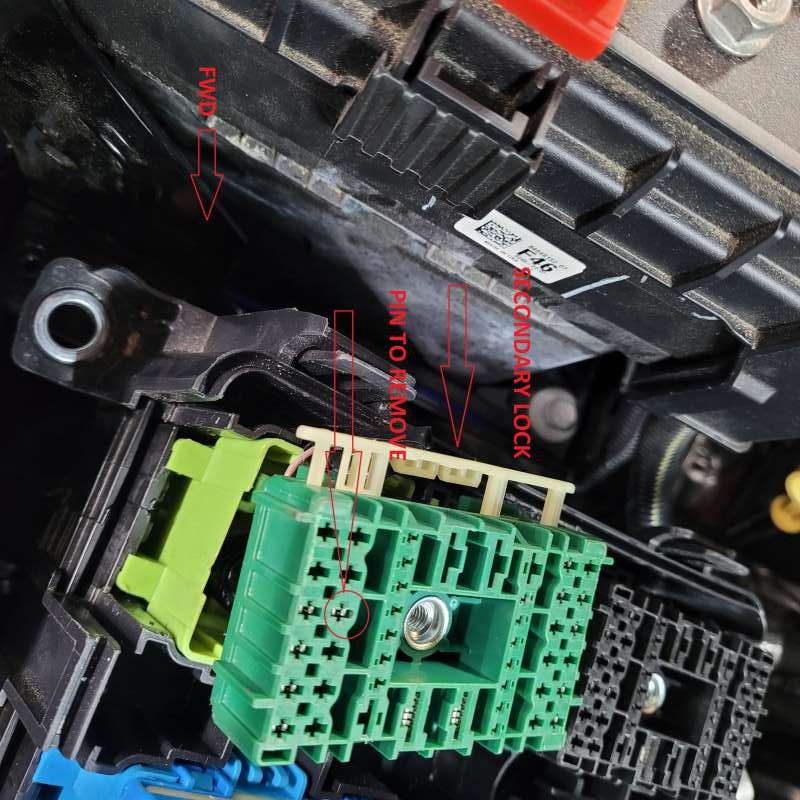
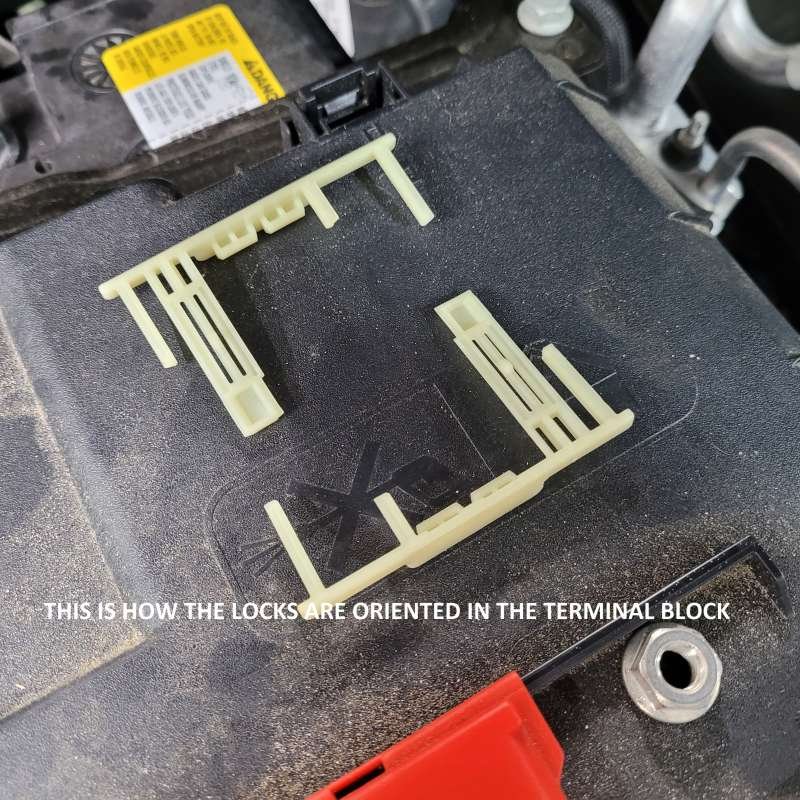
Hi all, Resurrecting an old thread here because I just went thru my install of these fog lights and the step to install the wire into the UEC was a HUGE PIA!!!! Biggest reason was that per the instructions if there's a wire installed at B3 you must remove it and then install the supplied harness wire. Looks easy enough in the instructions but not lol. I also believe that you need to do this if your installing the upfitter package so this may help there as well. So I'm going to post some notes/highlights and pics here for those that want to under take this install themselves. The install instructions are pretty straight forward. When it comes to the step of opening the UEC take your time. The four mounting bolts that hold the UEC to the wire harnesses terminals below are captured so you really wont know if they are completely out until you start pulling the upper portion off. If it feels like there's resistance then back them off more. Basically is whats below those relays and fuses is four blocks so your basically unplugging the top from the bottom. Some of the plugs will un-clip a little so you may have to hold them as you pull up. Once open you'll need to un-clip the green terminal block from its mounting box. Note there is very very little play in the wire harness coming up from the bottom of the box. I was able to stretch it enough to be able to get the wire out and new one in. Now run the lights harness up from below. The wire they are having you install will need to be inserted in the wire-loom running into that terminal box. There's no other way to get it into that box. On the supplied fog light harness tap wire cut the electric tape away from the wire and wire loom as you will need to pull that wire out of the loom so you can have enough slack to get it into the box and up to the connector. How they have it taped up it will not be long enough...trust me I found out the hard way lol. Ok so now you'll see a wire in B3 that must be removed. this is what took me quite some time to figure out and BronzeSierra's post above lead me in the right direction but was still very vague.....that's the main reason for this and with pics. You'll notice on the sides of the green block a plastic cream colored strip. This is the secondary wire lock system. There is one on each side. Gently pry to release with a small flat head screw driver and slide out each side. You'll see they are "sided" so you can't put them back wrong. I still set them down in the orientation they came out. Now using a T pin or terminal removal tool you can release the wire. Be easy pulling on the terminal block as I was nervous that other wires may pull out. Follow the instructions to cover and stow the old wire. I just covered it and left it in that box. Now fish the harness wire up thru the wire loom into the box. I used an orange stick to "open" up a path for the wire to slide. I did cover the terminal with tape so it wouldn't hang on any thing. Once you have it fed into the box snap it in the terminal block. I had to use needle nose pliers to manipulate it as there's so little room to work. Now slide the secondary locks back in. NOTE they should slide easily in. If there's resistance or it feels like its hitting something it is. Pull back out and push the wires up into the block. I had one wire that dropped a little.....it didn't unlock but it dropped down obstructing the path of the secondary lock. Once the secondary is in it'll snap locked. Reassemble everything per the instructions and continue your install. Hope this helps anyone doing this install.
-
Resurrecting a semi old post here but WOW!!!! Great look!!!! I also have a satin steel metallic silverado as well and this is the look I'm looking for. My son is soon lifting his 2020 trail boss higher and getting new wheels/tires so I have a set of trail boss wheels/tires that will become available to me, lol.... One question for those that have installed this kit did you go to the dealer to get the re-calibrations done that they do for the GM lift???? Thanks, J
-
Hi there, Cool organizer. Could you please send me the file. TIA
-
Installed stampede's vigilante deflector. Did a how to write up here in the forum as the install instructions are kinda poor. I just don't like the idea of taping things to my truck It uses 2 clips that are clipped to hood but 3m rubberized "tape" protects it. The "tape" is like the wraps that are used now a days. No adhesive.
-
It's the blend mount from my camaro that I traded in for my truck. It works but really isn't the correct blend mount for the silverado but, right now don't really want to spend another $100 for a new mount when this one works just fine. Love their mounts for the clean install look.
-
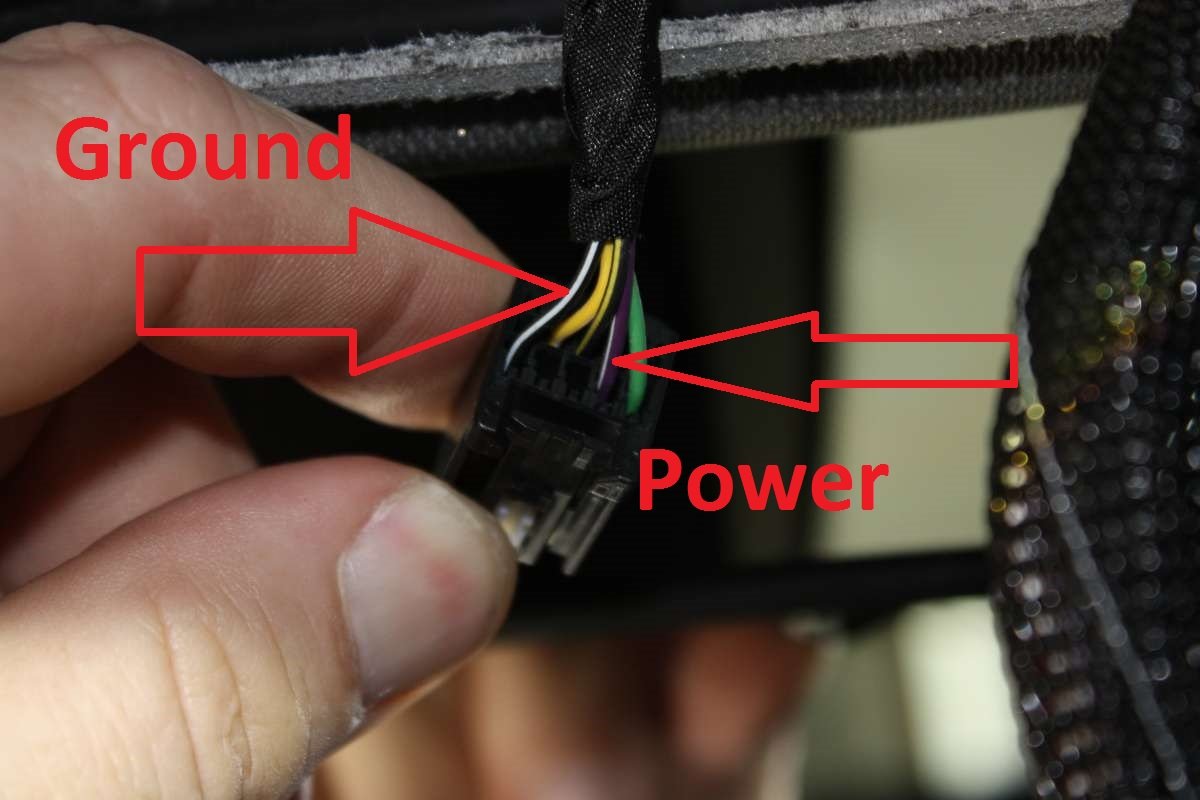
Hi there, I installed a dash cam and tapped off the mirror power wires. I can confirm purple/white 12v switched on and black/white is ground. The mirror power wire is only powered when the ignition is turned on or accessory power. Camera powers off when truck is switched off. I plan to do a how-to write-up for the dash cam install but just haven't gotten to it and still haven't purchased my auto-dim mirror. Pics of some of the install below.
-
What Have You Done With Your T1 Today ?????
Stug replied to Sierra Dan's topic in Modifications, Wheels & Tires
Hi All, Well yesterday installed my Stampede hood deflector, dash cam and shorty antenna. Plan to do a how-to for the dash cam install if anyone is interested. Next up is getting the windows tinted and step bars.


-
Forum Statistics
250.4k
Total Topics2.7m
Total Posts -
Member Statistics
342,836
Total Members8,960
Most Online
-
Who's Online 10 Members, 0 Anonymous, 982 Guests (See full list)