


asilverblazer
-
Posts
4,830 -
Joined
-
Last visited
-
Days Won
10
Content Type
Profiles
Forums
Gallery
Events
Articles
RPO
Store
Blogs
Everything posted by asilverblazer
-
It sounds like the noise goes from bump, bump, bump at low speeds to a rattling noise at higher speeds. Happening at low speeds in first gear and at high speeds in overdrive sounds like it isn't the transmission. When you "hit the gas there was no power" were the noises occurring? I'd pull the rear diff cover and inspect.
-
I assumed you owned a tester. I would rent/borrow/buy one to confirm: 1. How much pressure has bled off? It would have to bleed off basically all of it to cause the symptoms you exhibit. If all the fuel pressure bleeds off, that is a bad check valve and the pump must be replaced anyways. 2. Is "barely starts, then dies" due to low fuel pressure? If the fuel pump builds proper pressure and maintains it, then "barely starts, then dies" isn't caused by the lack of fuel pressure and must be diagnosed separately. (Not likely) 3. Does priming the fuel pump... ...allow the engine to start and run normally? If priming the fuel pump to achieve proper pressure resolves item number 2, or lessens it to a noticeable degree, you've confirmed that the fuel pump has to run long enough to rebuild enough fuel pressure at start up to start and run normally. Depends how long this "sit for a little" is - if that amount of drop is overnight, I don't think that is enough to create the degree of difficulty starting you exhibit. Shorter response... I think its probably the fuel pump 85% certainty,
-
Now it's my turn for no start! Ughhh!
asilverblazer replied to mikeyk101's topic in Troubleshooting & Recalls
GMPP authorizes a certain amount to whom? Does GMPP have a contract with the dealer for a certain amount for the labor? I don't think the deductible amount matters. Dealer labor rate = x. GMPP "authorized" labor rate = y? Your contract with GMPP does not limit, cap or grant any specific labor rate. It guarantees to pay for a "covered repair" by "someone performing the work" for 0$ deductible. Does your contract stipulate "who performs the work"? -
You might be able to eliminate some, a truck not moving wouldn't necessarily generate a code. Clear all the codes (sounds like you have a reader) then scan again, post them all here.
-
Locks toggling and mirrors folding.
asilverblazer replied to Chris Kyle's topic in 2014-2018 Silverado 1500 & Sierra 1500
Door Lock System Controls The power door lock system can be controlled by any of the following: A door lock switch LOCK or UNLOCK activation A key cylinder switch unlock activation A keyless entry transmitter activation Pressing the driver door lock plunger flush with the door panel will lock all doors Seems like one of those is activating the 'lock' command. Have to try to narrow it down. Any codes (B codes specifically)? Typical code readers probably won't pull them. Additional vehicle specifications? -
Fuel Pump? Help!
asilverblazer replied to blackout881's topic in Troubleshooting, Warranty & Recalls
How did you trouble shoot? -
You were going slow... applying throttle? coasting? braking? Jerk? like being rear-ended, suddenly stopping, suddenly accelerating? What was the engine doing? Free revving, idling? Eventually I got going, indicates no forward movement... explain. How was it different other than the speed? The driveshaft will never stop going... if it does it will be very obvious and very bad. What is very loud? One bang, multiple bangs, grinding? When this is happening what else is going on, is the engine revving, does putting the gear selector in neutral or drive change anything? Mileage? Drivetrain? Maintenance? Check engine light? Visible damage underneath?
-
No, this is a premature failure in my opinion, unless the mileage is crazy high or it hasn't been maintained properly. Maintenance item. Odd that the old starter failed at the same time the engine did... DTC P0711 Transmission Fluid Temperature Sensor Performance Presuming that the harness to the temperature sensor was damaged during the engine replacement. I'd inspect the damaged harness and consider making the engine swap mechanic fix that problem. So long as everything is working you should be good to go. Engine failures are exceptionally rare that require a new engine; a valvetrain failure is more common. Operating characteristics and maintenance are what I would first suspect.
-
Sounds like check valve in the fuel pump is no good. Replace the fuel pump. Before doing so I would put a gauge on the test port to more closely monitor the fuel pressure. Install the gauge, let the engine run to confirm the pump does build proper pressure. Shut the engine off and confirm that fuel pressure bleeds off. If pressure bleed off is significant (overnight) cycle the key from off to run this runs the pump prior to starting. Make sure this priming action brings fuel pressure back up to where it should be, then try starting. Edit: If it is the pump use only an OEM pump, unless you like changing them.
-
Now it's my turn for no start! Ughhh!
asilverblazer replied to mikeyk101's topic in Troubleshooting & Recalls
I wouldn't rule out anything yet, battery, cables or starter. I like to use jumper cables from the battery negative to the engine and battery positive to starter terminal to help rule out battery and/or cables. -
Depends on where you want to tap into a wire at. Presumably near the switch? gmupfitter has wiring diagrams...
-
Did I miss where you posted DTC's? What are the current ones?
-
2016 GMC Yukon Denali XL not starting
asilverblazer replied to Rebecca77's topic in Troubleshooting & Recalls
Battery? Check ALL the main battery cables including the one posted by PhilB. You can also confirm/bypass suspect cables by using a set of jumper cables. Engine ground, chassis ground, etc. -
Start looking for damaged wiring on the 5volt Reference Circuit 1 (there are 4 circuits, only number 1 is having an issue), below I pasted the sensors/components that are on that circuit. Also check all grounds for corrosion. Look for any other wiring deficiencies, chaffing, smashed, melted, corroding, etc. DTC P2230 Barometric Pressure (BARO) Sensor Circuit Erratic DTC P0451 Fuel Tank Pressure Sensor Performance DTC P0016 Crankshaft Position - Intake Camshaft Position Not Plausible DTC P0641 5V Reference 1 Circuit Circuit/System Description The engine control module (ECM) has 4 internal 5V reference circuits. Each internal reference circuit provides external 5V reference circuits for more than one sensor. A short to ground or short to voltage on one external 5V reference circuit can affect all the components connected to the same internal 5V reference circuit. Conditions for Setting the DTC The ECM detects a short to voltage or ground on the 5V reference circuits for greater than 0.5 s. Diagnostic Aids The 5V reference 1 circuit provides 5 V to the following sensors: Air conditioning (A/C) refrigerant pressure sensor (If the A/C is working, this portion of the circuit might be undamaged.) Camshaft position sensor (Engine isn't going to run right with this signal all screwed up (P0016)) Engine oil pressure sensor (Why the gauge is going nuts) Fuel pressure sensor Fuel rail pressure sensor Fuel tank pressure sensor (P0451) Multifunction intake air sensor (P2230) Disconnecting one component at a time from the affected 5V reference circuit while observing the scan tool 5V Reference Circuit Status parameter may help locate the fault. The scan tool parameter will change from Malfunction to OK when the source of the fault is disconnected. If all 5V reference components have been disconnected and a fault is still indicated, the fault may exist in the wiring harness.
-
2024 GMC DENALI ULTIMATE HALF TON PICK UP
asilverblazer replied to Hobuck2000's topic in 2020-2026 Silverado HD & Sierra HD
Denali or Denali Ultimate are trim levels available on 1/2, 3/4 and 1 ton trucks. Not exactly, you are comparing two different trim levels AND chassis. Yes. It seems you are looking for a 1/2 ton truck (1500) with the Denali Ultimate trim package. You do not want an HD which is a 3/4 or 1 ton ton truck. -
Chart indicates either wiring fault, instrument cluster or ECM. Instrument cluster and ECM failure is rare. Check the wiring, connectors and pins in the connectors. Also check all the grounds, poor grounding is very common.
-
Diagnostic Aids If the condition is intermittent, move the related harnesses and connectors while monitoring the scan tool MIL control circuit status parameters. Perform this test with the ignition ON and the engine OFF, and with the engine running. The MIL control circuit status parameters change from OK or Not Run to Malfunction if there is a condition with a circuit or a connection. If the ECM detects low voltage on the MIL control circuit during the control circuit driver OFF state, DTCs P0650 and DTC P263A may set simultaneously. Circuit/System Testing Ignition OFF. Disconnect the X1 harness connector at the K20 Engine Control Module. Ignition ON, verify the malfunction indicator lamp does not illuminate. If the malfunction indicator lamp illuminates Test for infinite resistance between the control circuit terminal X1 46 and ground. If less than infinite resistance, repair the short to ground in the circuit. If infinite resistance, replace the P16 Instrument Cluster. If the malfunction indicator lamp does not illuminate Connect a 3 A fused jumper wire between the control circuit terminal X1 46 and ground. Verify the malfunction indicator lamp illuminates. If the malfunction indicator lamp illuminates Replace the K20 Engine Control Module. If the malfunction indicator lamp does not illuminate Test for less than 1 V between the control circuit terminal X1 46 and ground. If 1 V or greater, repair the short to voltage on the circuit. If less than 1 V Ignition OFF. Test for less than 2 Ω in the control circuit end to end. If 2 Ω or greater, repair the open/high resistance in the circuit. If less than 2 Ω. Ignition OFF, disconnect the harness connector at the instrument cluster. Ignition ON, verify a test lamp illuminates between the ignition voltage circuit terminal 8 and ground. If the test lamp does not illuminate and the circuit fuse is open Ignition OFF. Test for infinite resistance between the ignition voltage circuit and ground. If less than infinite resistance, repair the short to ground on the circuit. If the test lamp does not illuminate and the circuit fuse is good Ignition OFF. Test for less than 2 Ω in the ignition voltage circuit end to end. If 2 Ω or greater, repair the open/high resistance in the circuit. If the test lamp illuminates Replace the P16 Instrument Cluster.
-
I would start with the MIL circuit - it isn't going to running all over the truck. Start at the instrument cluster and work backwards. The diagrams can be complex to follow: you'll get a wire colors and connectors, find the connector location (listed separately in the diagrams) to know where to look.
-
I saw the 'report' too and my thoughts are: The 6.6 isn't significantly disadvantaged compared to the current segment power figures lead. Why the need for such a large displacement increase? Despite the large displacement increase power figures didn't seem as comparatively large. The rumored displacement of 8.3L is oddly specific, I wonder if it is for a future GAS engine, investment for GAS engines is already confirmed. They had a level of confidence in their source and the prospects of the engine, but to me it doesn't quite add up.
-
2024 GMC DENALI ULTIMATE HALF TON PICK UP
asilverblazer replied to Hobuck2000's topic in 2020-2026 Silverado HD & Sierra HD
No, it's not true. It is on the same chassis as every other 1/2 ton. -
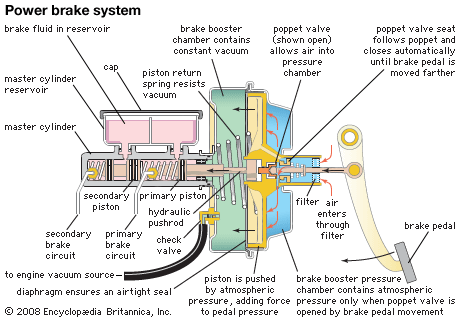
The picture attached isn't accurate to these trucks but what I'm getting at is the "poppet valve" in the image isn't fully closing or is leaking this would apply the brakes until the vacuum (on the vacuum side) bleeds off. I'm not ruling out the master cylinder yet either, the vacuum codes are why I'm more interested in the booster.

- 45 replies
-
- 3
-

-
- brake booster
- vacuum pump
- (and 3 more)
-
The other thread you linked to that had similar symptoms that were "resolved" by washers on the pushrod (summarizing) indicates that something in the booster/master cylinder assembly is at fault. I can't think of a way that the master cylinder would cause a vacuum code. The booster though could (I'm drawing this conclusion based on the booster working off vacuum). Without a more thorough diagram of the booster/master cylinder its hard for me to describe how... but I'm thinking the valve that controls the vacuum's action on the power diaphragm isn't shutting based on the pushrod's position (washers altered the pushrods position in the other thread and fixed this). Meaning that even though you've released the brake pedal, vacuum is still being applied to the power diaphragm resulting in the brakes being applied without pedal action. The vacuum leaking off without the engine running is allowing the power diaphragm in the booster to retract and release the brakes. The master cylinder I don't think would bleed off like that. I'd need to study some diagrams and symptoms more carefully to confirm my hypothesis... You could pop the vacuum line off the booster and cap it. Then drive (carefully, you wouldn't have any power brakes) to see how it changes the brakes action. I'm working from memory here, (see bolded sections above) but it should either result in the problem not appearing at all, or appearing immediately. You might also be able to pull that vacuum line off the booster when the brakes have locked and see if they immediately release (I can't recall the presence of a check valve on it).
- 45 replies
-
- 1
-
-
- brake booster
- vacuum pump
- (and 3 more)
-
Do you get this message? There used to be a topic/TSB about the vacuum pumps failing that you might look in to as well. The trouble code you posted looks more like a sensor issue than anything else. That wouldn't explain it manifesting in a mechanical fashion though... If the brake booster has a leak allowing vacuum to leak in, it could cause the sensor to see a low vacuum condition that shouldn't exist (triggering the code), while at the same time applying brake pressure without pedal input. Shutting off the engine removes the vacuum source and pumping the brakes releases any stored vacuum resetting the conditions. I think maybe the brake booster is the culprit.
-
Forum Statistics
250.5k
Total Topics2.7m
Total Posts -
Member Statistics
342,873
Total Members8,960
Most Online
-
Who's Online 1 Member, 0 Anonymous, 495 Guests (See full list)