

jrob56
-
Posts
697 -
Joined
-
Last visited
Recent Profile Visitors
7,676 profile views


jrob56's Achievements
")
Enthusiast (6/11)
224
Reputation
-

Airbag removal help (steering wheel removal)
jrob56 replied to Fifty's topic in Troubleshooting & Recalls
I know this is old but for those looking for this answer. This video only really works on the keyed models. On the SUVs most of which are keyless you have to poke the holes. No way I could find to get around the column lock on keyless models. -
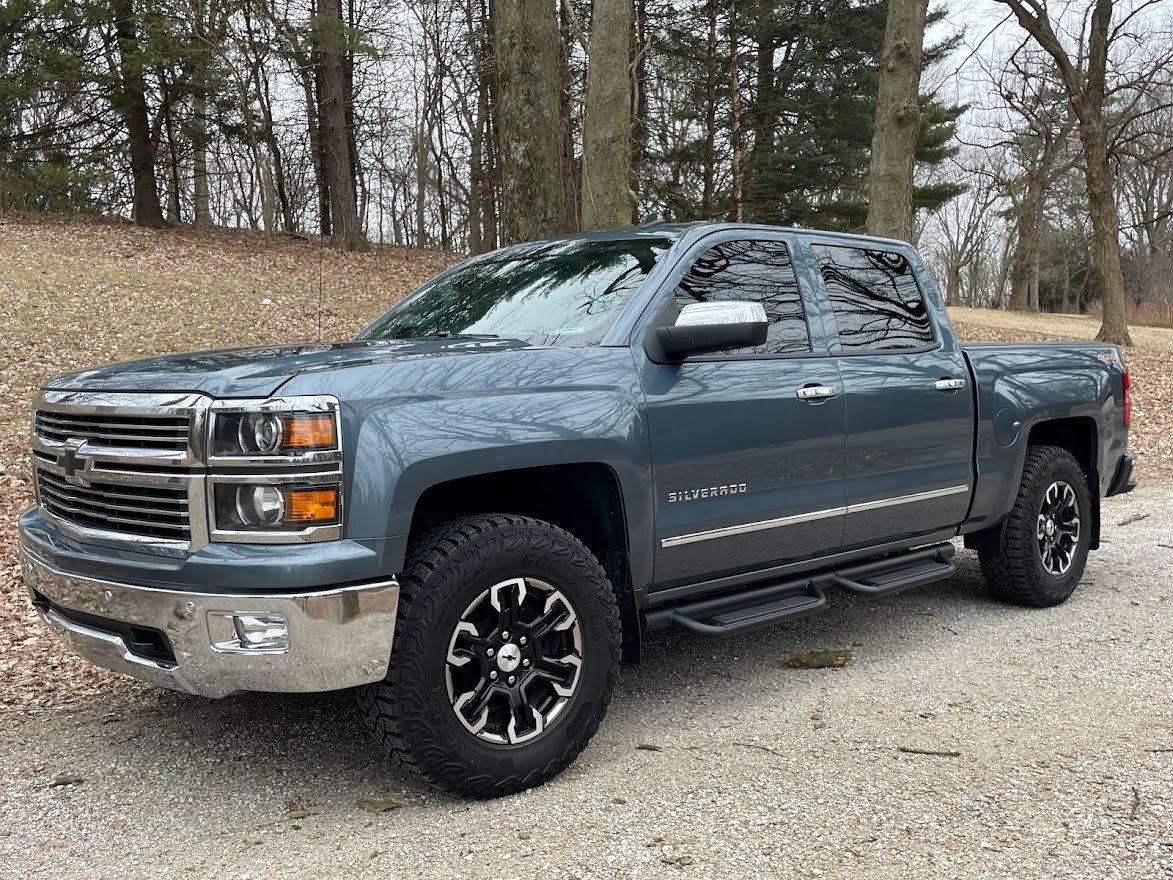
Referenced this thread quite a bit when looking at T1 wheels to add to my K2, so I wanted to add mine here for anyone else looking. Tried the 18inch AT4 and looked pretty good, but didnt love it. Shortly after putting those on I ran across some 2023 Zr2 takeoffs and fell in love with them on Blue Granite. Taller than stock so some rubbing on fender liner at full lock, but Im only on a 1.85 level Bilstein 5100s.

-
jrob56's - 2014 Silverado LTZ Blue Granite 5.3
jrob56 replied to jrob56's topic in Member Build Threads
Haven't updated this build in a long time, but still have the truck! Truck is mostly the same. Added some steps now that I have kids, oem GM steps off one of the special edition K2s. Went through several sets of wheels, Sierra All Terrain, the T1 18 inch AT4, and finally settled on these 2023 Silverado ZR2 18s. Love the look on this color. Everything else has mostly been maintenance or common failures. Its had a condensor, compressor, and last year lost the converter and trans. Rebuilt with billet converter, new thermostat, and tune that will make it live. Drives better than it did new! If you are in the Indiana area, cannot recommend Double R Transmission enough!
-
Hello all, Very familiar with the K2s, had a 2014 Silverado for about 7-8 years now. Recently picked up a 2019 Yukon XL that was my FIL, higher mileage so outside warranty period, but may get a message in to see if GM will cover it under goodwill. Tried to search here, google, youtube, all my normal sources, but cant find any similar issues. The driver side 3rd row seat belt is worn right where it goes down into the plastic panel while relaxed unbuckled. The plastic panel has frayed/worn half way through the belt. Luckily I saw it before I strapped my kid's car seat in on that side. Anyone seen or heard of anything similar? Trying to find an exploded view of that interior panel to see about just removing it and replacing it myself, but of course the belt is on backorder. Thanks, Josh
-
I thought about it but ultimately skipped having it unlocked. I was after carplay almost exclusively. If I towed more I think I might have, but just have a little single axle trailer for yard work I could drag down the road without wheels on it haha.
-
Finally upgraded the radio and HMI in my 2014 Silverado. I had considered doing it for awhile, but when Indiana law changed to require hands free operation it forced me to go ahead and do it. I dont like mounts on my dash and always missed CarPlay in my truck. Chris White and White Automotive Media, if its more than just him, couldn't have been more helpful. I considered buying the modules from them and they helped me weigh the pros and cons. Ultimately, I rolled the dice on ebay after I found a few deals, but didnt change the level of customer service I received there which really says something about the company. Still a risk as I dont have a warranty, but I was fully aware of that when I went that route. They were still extremely helpful throughout and got my modules turned around quick. I couldn't be happier with my transaction end to end and will be considering the Denali cluster in the future! Dont be afraid to give these guys a shout! https://www.whiteautoandmedia.com/product/2014-2015-5-c-k-platform-car-play-upgrade-retrofit-programming/ Also, for anyone on the fence about pulling/swapping the modules, it isnt hard. I grabbed these interior tools on Amazon, and probably didnt need them, but always meant to get a set. I have scratched plastics in other cars using screwdrivers. https://www.amazon.com/gp/product/B01KXN7LE6/ref=ppx_yo_dt_b_asin_image_o00_s01?ie=UTF8&psc=1 Here is video I used as a primer for the swap, its really easy. You dont need to do everything that was in that video depending on what your upgrade was. Mine was just the radio and HMI.
-
Bringing this back up, would be a great option to add a drain plug if this works with the tucks without causing issues.
-
Thanks, thats me sourcing my own parts, right? If Im reading the site correctly, I would need one from each list below? What part number do I need for the USB hub or is the one I have good, like the 8" screen? HMI (Human Machine Interface): North American Spec Non-Navigation (OnStar Nav RPO IO5) 84096815 84156699 84131941 84296480 84048398 84004948 Radio Modules (Includes HD Radio): Premium Audio (BOSE RPO UQA, UQH or UQS) 84062073 13506371 23402903 84293226 The Denali part number page is a lot to decipher, but to match I think it would be one from this list? I could do this later it sounds like though if I wanted the voice commands. 2016 GAS US SPEC - DENALI STYLE LARGE DISPLAY BLUE/GREEN LIGHTING FOR CHEVY (SILVERADO/TAHOE/SUBURBAN ETC)
-
Hey guys, reading through this thread still, lot to digest. Have a 2014 Silverado LTZ with Bose no Navigation. Really want CarPlay. Looks like Id need the HMI upgrade, screen and USB minimum plus programming. Do I need the Denali cluster as well? Anyone know the part numbers I would need to acquire, or a cost if source it all from a vendor?
-
Brake Controller Install locations
jrob56 replied to A_Ninja_Racer's topic in Modifications & Accessories
Looking to add a controller and leaning toward P3. Anyone tried to mount in center console under the removable cup holders vertically? For trucks with captains seats with fixed center console. From what I read vertical is okay. Not sure if wiring long enough though. -
Fixed mine a month or so ago myself, ended up using the ACDelco condenser. I had nothing left in mine, so I rented the Oreilly pump and gauge set. Pulled vacuum, it leaked down so confirmed leak, I charged with dye to confirm the spot. Leaked out in a weak, but dye did its job. Same spot as everyone else on the condenser. Bought the ACDelco part, got the bracket for the lower line just to prevent a leak there although mine showed no signs of issues. Installed both in a few hours, could be done quicker though. One of my cooler lines went right together, driver side I want to say. The passenger side gave me a little trouble but after a little manipulation and trial and error it went together. Rented the Oreilly pump and gauges again. Charged the system, one can with dye just in case of future leaks. Added some ACDelco oil. Been cold a month or so now, with no issues. All in with condenser, oil, and refrigerant Id say around 300. Prior to this the most I had done was add a can with the quick connect simple systems auto parts stores sell. Really not a hard job to do. AC seems intimidating, but if you can wrench a bit its not bad. Could have messed this up 3 times and still come out ahead of paying a dealer 1200 bucks. Adding to this, I added some trans fluid to the condenser at install, instead of after through dip stick. When I checked cold it looked good and after a drive looked good warm.
-
AC Condenser replacement
jrob56 replied to benjdow's topic in 2014-2018 Silverado 1500 & Sierra 1500
After watching video probably take me 1-2 hour with a beer mixed in. I dont know about you, but I dont make 250-500 an hour yet at my day job. -
I saw one post where this was exaggerated, but no confirmed owner doing it that soon. I may go aftermarket though, given the volume of issues with GM condensers. Think many DIY's are going this route.
-
I thought I was lucky, but got a leak in the same spot as everyone else, weld from dryer to condenser. Cross your fingers and deal with it one day unfortunately. 2014 75k miles
-
What gaskets are these? Ill be tackling this soon. Any other hard parts you needed like that. Edit: Should have read, just did the AC ones for peace of mind. Ill probably reuse those.


-
Forum Statistics
250.5k
Total Topics2.7m
Total Posts -
Member Statistics
342,892
Total Members8,960
Most Online
-
Who's Online 2 Members, 0 Anonymous, 617 Guests (See full list)