jay webb
-
Posts
144 -
Joined
-
Last visited
Content Type
Profiles
Forums
Gallery
Events
Articles
RPO
Store
Blogs
Everything posted by jay webb
-
This isn't true. Have you read the last few pages at all? this was true as of few weeks ago when i had this in my bay. but you are correct i just re looked it up there is now a software update
-
this is under investigation by gm engineers they believe its a software anomaly but have not released a fix for this yet. i just had this on a 2019 with like 1500 miles the brake life was saying it was at 30%. nothing is out yet as far as an update for the software.
-
typically brakes on these trucks last 75K ish some get more . you will get less depending on braking habits, towing, extra weight etc as a tech i would recommend doing the brake fluid 45k miles/ every 3 years unless you are doing heavy towing and things of such then recommend to do it sooner just as other fluids due to the over working of the system.
-
Clicking and popping front end left or right turn
jay webb replied to Jd517's topic in 2014-2018 Silverado 1500 & Sierra 1500
gm tech here. there is a bulletin to re torque the lower control arm bolts and cross member bolts. lower control arm bolts are 129 ftlbs and the crossmember bolts are 59ft lbs + 110 degrees. -
14 Sierra 5.3 ltr Stalls, Low Speed, Idle, Turning??
jay webb replied to sourdough44's topic in Troubleshooting & Recalls
just cuz a battery is a year old dont mean it cant be bad. wiggling the cables isnt a voltage drop test. this needs to be preformed. -
ok so there was a nation back order of parts for the engines, head gaskets, etc etc and it has trickled into alot of other models and parts. what the dealer has told you is the truth. i had to wait 3.5 weeks to get a steering gear for a warranty replacement on a truck. the truck sat on the lot til i go one in through parts. alot of dealerships will give you a loaner vehicle if you prefer , but typically they ask you dont go out of state with it or what have you. these are retired at 4000 miles and sold on lot as demos if you chose to get a rental on your own and you request gm to reimburse you for it, just keep all paper work. and fight it with gm.
-
transfer case fluid should be dexron vi. front diff and rear diff are gear oil. transfer case is going to behind the trans right before the shaft.
-
Popping sound while turning left
jay webb replied to GP Phillips's topic in Troubleshooting & Recalls
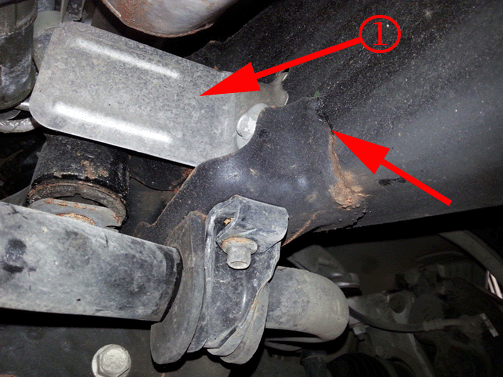
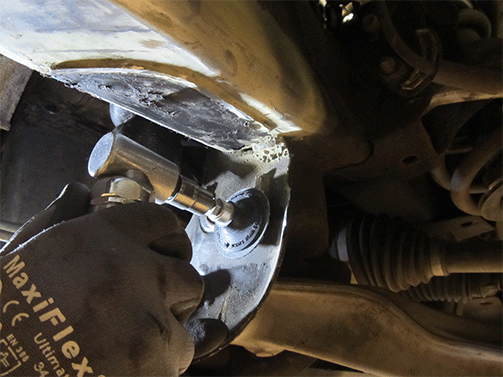
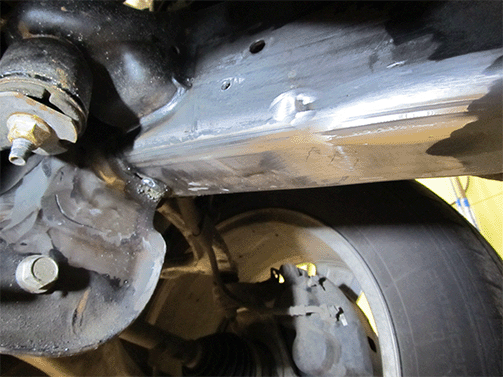
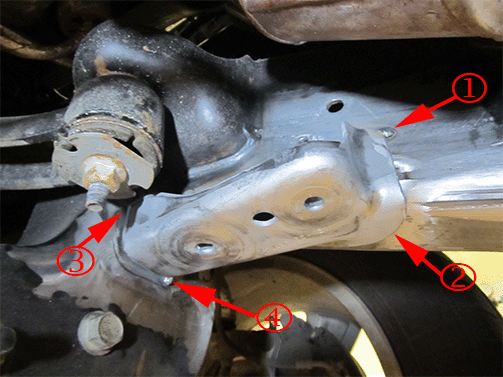
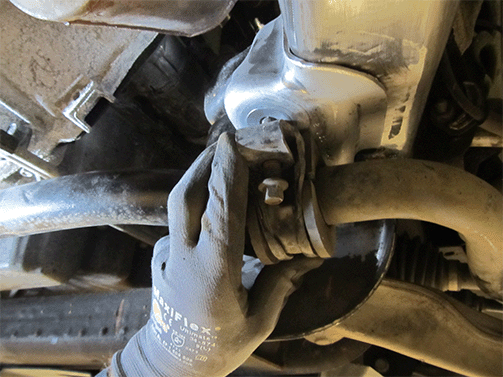
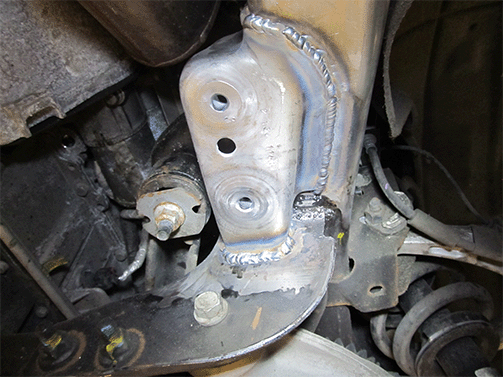
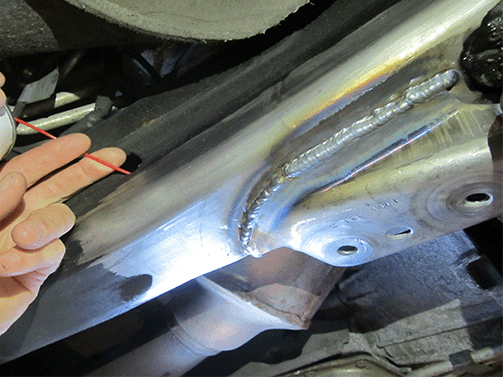
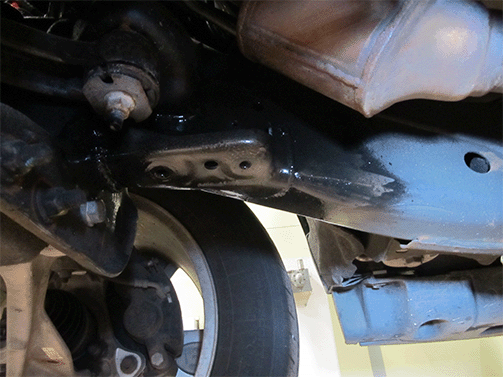
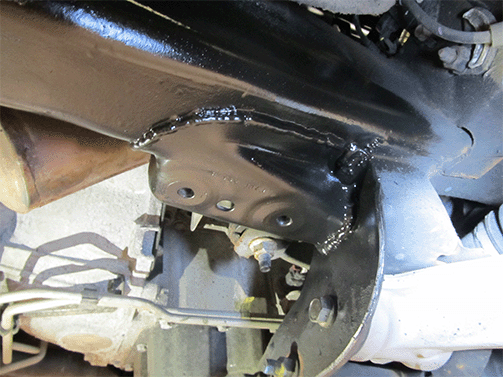
15-NA-082: Clunking Noise from Front of Vehicle During Turns and/or Bumps Chevrolet Silverado 1500, Suburban 1500, Tahoe 2007 2018 All All GMC Sierra 1500, Yukon, Yukon XL 1500 2007 2018 All All Condition Some customers may comment on a clunking noise originating from the front of the vehicle that is more predominant during turns or traveling over bumps. Cause This may be caused by a damaged stabilizer shaft frame bracket. There have been some cases in which the bracket is cracked, as shown. This condition has been found to be the result of insufficient welds between the bracket and frame rail. There have been some cases on older vehicles of corrosion affecting the bracket. Correction If you encounter a vehicle with the above concern, follow the procedure below to install a new stabilizer shaft bracket to the frame. Disconnect the negative battery cable. Refer to Battery Negative Cable Disconnection and Connection. Raise the vehicle in the air and inspect the stabilizer shaft frame brackets (both left and right) for any abnormalities or cracks and inspect welds to ensure good alignment and integrity. Refer to Lifting and Jacking the Vehicle in SI. Note: Be sure to inspect frame rails for any cracks or damage in relation to the stabilizer bracket. If the frame rail itself is cracked or damaged, repair should not be attempted. Once verified that the bracket is damaged or the welds are insufficient, remove the stabilizer shaft. Refer to Stabilizer Shaft Replacement in SI. On 4WD models, once the stabilizer shaft is removed also remove the front frame/front axle mount exhaust heat shield (1) located above the stabilizer bracket. With the stabilizer shaft and shield removed, using a rag and wax/grease removing solvent, remove the wax coating and any grease, oil, or undercoating from the truck frame in the affected repair area. Important: Be sure to remove all wax coating around the areas of the bracket. If the wax coating is not fully removed, this could affect the weld quality when installing the new bracket. After all the wax coating is removed, using a cut off wheel, remove the old bracket from the frame. Warning: To avoid personal injury when exposed to welding flashes or to galvanized (Zinc Oxide) metal toxic fumes while grinding/cutting on any type of metal or sheet molded compound, you must work in a properly ventilated area, wearing an approved respirator, eye protection , earplugs, welding gloves, and protective clothing. Important: Be sure to not cut the frame in process of removing the bracket. After the bracket has been removed, using an angle grinder with 24 grit sand paper or equivalent clean the areas of any excess bracket weld material from the frame so that the new bracket can sit flush in the location of the old one. Important: Be sure to not grind away any frame material, only remove the weld material. Clean the area of all debris in preparation of the new bracket to be welded to the frame. Important: Be sure to inspect frame rails for any cracks or damage in relation to the stabilizer bracket. If the frame rail itself is cracked or damaged, repair should not be attempted. After the area is clean of all debris, place the new bracket in the location of the removed one. The bracket should seat against the frame crossmember bracket in the most forward position, along the lower surface of the frame rail, and along the inner surface of the frame rail in the rear. Note: The new bracket will need the welding locations stripped of all coating. Be sure to grind all edges of the new bracket so that the quality of the weld will not be affected. After the bracket is in location, tack weld the bracket to the frame in all 4 corners of the bracket. This will keep the bracket from moving while welding the bracket fully to the frame. After the bracket is tack welded in the location, loosely position the stabilizer shaft to verify that the bracket is in the correct location. Refer to Stabilizer Shaft Replacement in SI. After verifying that the bracket is in the correct location, remove the stabilizer shaft. Refer to Stabilizer Shaft Replacement in SI. Continuous-weld the new bracket into position. Ensure the rear vertical weld (1) is extended approximately 15 mm above the edge of the bracket. Note: When welding, be sure to start from the bottom of the bracket and work your way upward. Note: Gas metal arc weld using ER70S-3 electrode and an Argon CO2 protective gas mixture. Alternatively, meeting AWS 7013. Note: Provide a continuous weld around the bracket. If access does not permit a continuous weld, make a 6 mm minimum overlap of adjacent welds. Warning: To avoid personal injury when exposed to welding flashes or to galvanized (Zinc Oxide) metal toxic fumes while grinding/cutting on any type of metal or sheet molded compound, you must work in a properly ventilated area, wearing an approved respirator, eye protection , earplugs, welding gloves, and protective clothing. After the bracket has been fully welded to the frame, using Lloyd’s Pure Prep™ Metal Surface Preparation P/N 25418 (10 fluid ounce bottle), or equivalent, saturate a towel or Scotch-Brite™ (3M) pad with the pre-diluted solution and scrub the area well, rendering a foaming of the Pure Prep.™ This will greatly improve adhesion and corrosion resistance in the repair areas. Using a water dampened clean towel, remove any residue and dry the affected area. Dry the repair area completely using an air hose to blow dry the frame and bracket. Check the repair area for phosphate treatment by wiping it to see if any corrosion residue can be picked up. Correctly treated areas will not have any residue on the surface. Apply a light flash-coat of Lloyds Kryptonite Metal Treatment P/N 36502 Life Long Rust Protection (14 ounce aerosol), or equivalent, to all bare areas of the frame where the wax coating was removed. This first coat should flash in approximately 3-5 minutes. Apply a light flash-coat to the inside of the frame rail using existing access holes, as shown. Insert the straw of the aerosol can as far as possible, and slowly work the straw back out while applying material. Apply a second coat of Lloyds Kryptonite. This can be a heavy coat; double and triple passes with this product, over a light first coat, are not a problem. We suggest top coating the Lloyds Kryptonite with Daubert Nox-Rust® P/N X-121B “One Coat Rust Preventative Coating” (aerosol), or equivalent. Reinstall the stabilizer shaft with new stabilizer shaft clamp bolts. With new stabilizer thread cutting bolts, drive the bolts to cut the new threads, then loosen the bolts two turns and then torque to 50 Y (37 lb ft). Refer to Stabilizer Shaft Replacement in SI. Note: The stabilizer shaft clamp bolt attachment holes on the new bracket are not threaded, the clamp bolts are thread cutting. On 4WD models, install the front frame/front axle mount exhaust heat shield. Reconnect the negative battery cable. Refer to Battery Negative Cable Disconnection and Connection. 84037074 Bracket – Drivetrain & Frt Susp Frm Stab (Left Hand) 84037075 Bracket – Drivetrain & Frt Susp Frm Stab (Right Hand)
-
Popping sound while turning left
jay webb replied to GP Phillips's topic in Troubleshooting & Recalls
im sorry i responded to you with the wrong message PIT5533B: Creak Click Pop Crack Type Noise From Front Suspension/Frame Area While Making Turns - (Jun 12, 2018) Condition Some owners may comment of a creak, click, pop, crack type noise from the front suspension or front frame area while making tight turns. It may also be noted the noise can be felt in the foot well area. Cause It has been found that this type of noise could be caused by either insufficient torque of the front suspension: Frame crossmember Lower control arm bolts Correction 1 To correct this concern loosen and then re-torque the four front frame crossmember bolts/nuts: First Pass: 70 Nm (52 lb ft) Final Pass: 110 degrees Correction 2 To correct this concern loosen and then re-torque the four front lower control arm mounting bolts/nuts: Tighten 175 Nm (129 lb ft) Important: If the front lower control arms nuts and washers are removed, be aware the washers are directional washers and MUST be installed in the same direction as they were removed. -
check the seal at the fire wall on driver side at the steering column. there is a bulletin about this noise and that seal not being installed correctly from the factory. if this is the issue. it says remove the seal and re install properly. no parts needed.
-
physically they both fit and will screw on just fine with no leak. internally they are not the same. gm tech here. as what Newdude stated.
-
typically after market / independent shops dont like touching batteries that have a fuse block on top of them. you can replace it yourself if you have some common sense. be careful if you use to much force on the fuse block it can break it and cause issues. im a tech for a gmc dealership. i dont even unhook the fuse block /cables. i take off the pos short cable, the neg cable , take out the support bar that runs asside the battery. pull the fuse cover off , release the tabs that holds it to the battery , move it out of the way, remove the battery hold down and the bolt holding the surge tank down and you have enough room to remove/replace battery.
-
Popping sound while turning left
jay webb replied to GP Phillips's topic in Troubleshooting & Recalls
thats the thing there is no bulletin, its not in service information. some of the techs at my dealership went to what they called a "sharp shooter" meeting with engineers from gm. this is what came from the meeting. why gm has not this into a bulletin i have zero clue. -
the steering gear/rack is electronic . it really dont get slop in it persay. you can have a bad shaft that goes from the column coming through the fire wall to the gear it self. the column has a bolt at the bottom of the it inside the truck at the fire wall, one that connects the shaft to the other shaft and one that connects the lower shaft to the gear. typically in these type of steering gears if you have an issue its hard to turn/steer slop can be caused by tires, steering shaft, inner/outer tie rods , control arms, alignment.
-
14 Sierra 5.3 ltr Stalls, Low Speed, Idle, Turning??
jay webb replied to sourdough44's topic in Troubleshooting & Recalls
its not a recall but a bulletin. there is multiple issues that can cause this. 1st bad battery that has to be tested and make sure its good 2nd bad battery cables, the lil red cable from battery to battery fuse block and the neg cable these need to be voltage drop tested. if they have too high resistance they need to be replaced. 3rd pos cable not installed correctly at starter. 4th bad ground either at the A pillar on driver side under the speaker, or can be on the frame on the neg battery cable. these trucks have so many electronics on it if it has a bad battery, bad cables or grounds they will do all kinds of stupid things. it does not like voltage issues. -
these engines are direct injected. they have known injector failures, i have replaced alot of these injectors. its not only on the trucks, but other direct injected engines like the 3.6 in the enclave and acadia. they can preform an injector balance test and pinpoint what injector(s) are bad. its typically about 5 hrs labor plus +injectors + seal kit+ high pressure fuel lines.
-
Popping sound while turning left
jay webb replied to GP Phillips's topic in Troubleshooting & Recalls
i am a tech for a gmc dealership. if you have noise in the front end while turning,there is a bulletin regarding this. it is to re-torque the lower control bolts and cross member bolts. would be covered under bumper to bumper if out of bumper to bumper typically 1 hr labor would be the charge no parts. -
18-NA-349: Ticking Noise Inside Vehicle While Driving Condition Some customers may comment a noise that may be described as a spark, knock, detonation, tick or an exhaust may be heard when driving the vehicle. The noise will be most pronounced near the driver’s side footwell area. This noise will not be observed outside of the vehicle. Cause The cause of the condition may be that the steering shaft seal was incorrectly connected. Correction Remove and reattach the steering shaft seal.