

Chevyspeedster
-
Posts
14 -
Joined
-
Last visited
Chevyspeedster's Achievements
")
Enthusiast (2/11)
5
Reputation
-
 Anyone else having these strange scratches show up behind their cab? They’re on both sides. I’m thinking it may be from airflow from normal driving. I haven’t been on a highway too much so not ‘high speeds.’
-
So I usually leave my vehicle in sport mode. 2024 1500 RST 6.2L with active exhaust. This has a secondary pipe coming out the muffler which I assume has a butterfly valve in it where this wire is going into it. Nevertheless, when the truck first cold starts, it’s nice and loud with a throaty raspy sound as to be expected. I like it this way because if someone were to start it in my driveway while I’m sleeping I’d know about it. Also, if I remote start it, I can tell it started… Anyways, the truck just had some updates. I thought this was only for the radio which seemed to fix a connection issue where there’s no volume in the car (for now). So I thought nothing of it. Now I’m realizing that the truck always starts in normal mode, which I don’t want. I thought maybe I bumped it with my knee getting out, which I’ve done before and to the lights knob also. I’m just wondering if this is really the case? I’d prefer it to stay in the last set configuration. Or at least let me set that in the vehicle settings. 1. Start in normal mode always. 2. Start in sport mode always. 3. Start in trailer mode always. 4. Start in last known configuration. ie normal, sport, trailer. All the downfalls of this truck and now this … I’m very displeased.
-
That blank pin at the top, just use these guys: 18-16 Ga. Female Metri-Pack Terminals, GT 150 Series $5 for a 25 pack and you only need one of them...
-
120v outlet in bed
Chevyspeedster replied to mcgee500's topic in 2019-2026 Silverado 1500 & Sierra 1500
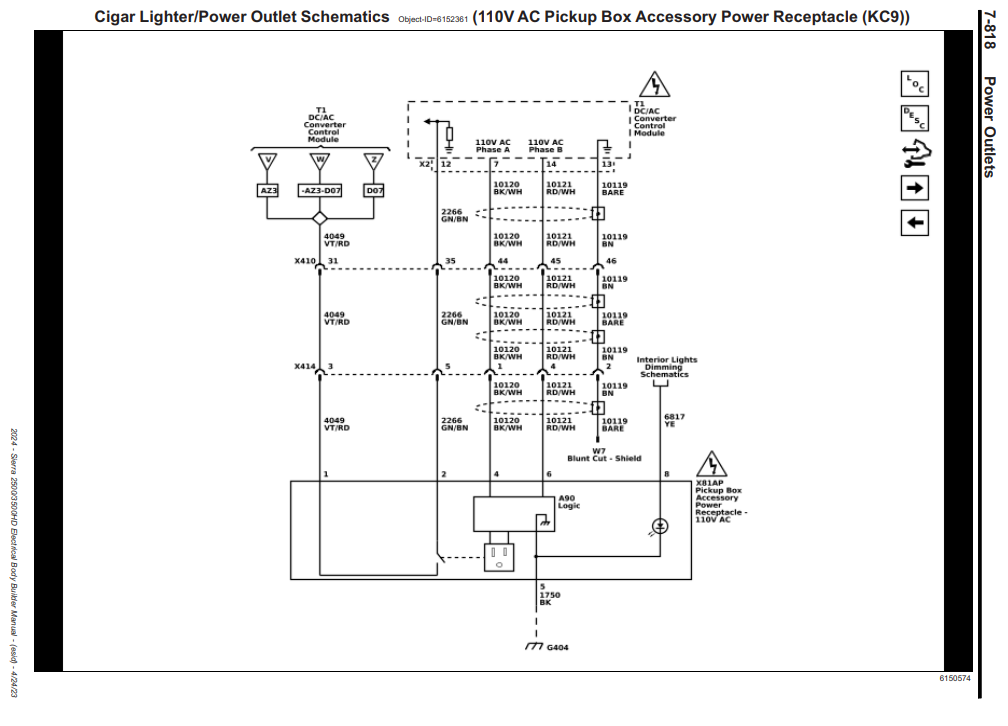
Just in case anyone is looking for the wire schematic for the Box / Bed Accessory Power Outlet Receptacle. Looking into tapping into this and using it for a LED bed light signal myself...
-
I know it's an old thread, but ebays got a bunch for around $90-$100. Just make sure you get one with the mounting bracket and hardware. Should be good to go. https://www.ebay.com/itm/326300905430?mkcid=16&mkevt=1&mkrid=711-127632-2357-0&ssspo=jOf8Hq_fShe&sssrc=2047675&ssuid=671WBU8RTAW&widget_ver=artemis&media=COPY
-
More finished shots. On the last picture you can see the wire looped a little high. That will be adjusted tomorrow when I get some sunlight to work and install the crimp sleeves. But I wanted to make sure I had plenty of wire. The end result will look nice like it it stock. I like the clean looks and not the aftermarket wires all over the place. Hope you've learned something and enjoyed
-
Here's the almost finished shots. It of course got too dark but tomorrow I'll install the crimp sleeves and everything else to clean it up for a nice install. Cheers all
-
Last few pictures should do it with the actual wire ran through. I'll post maybe one or two more when it's all tidied up.
-
You can see what the screws look like from underneath and they will be out of the way from interfering with anything. It's just the plastic covering of the battery down there. The box closes nicely and should be a very tighty install.
-
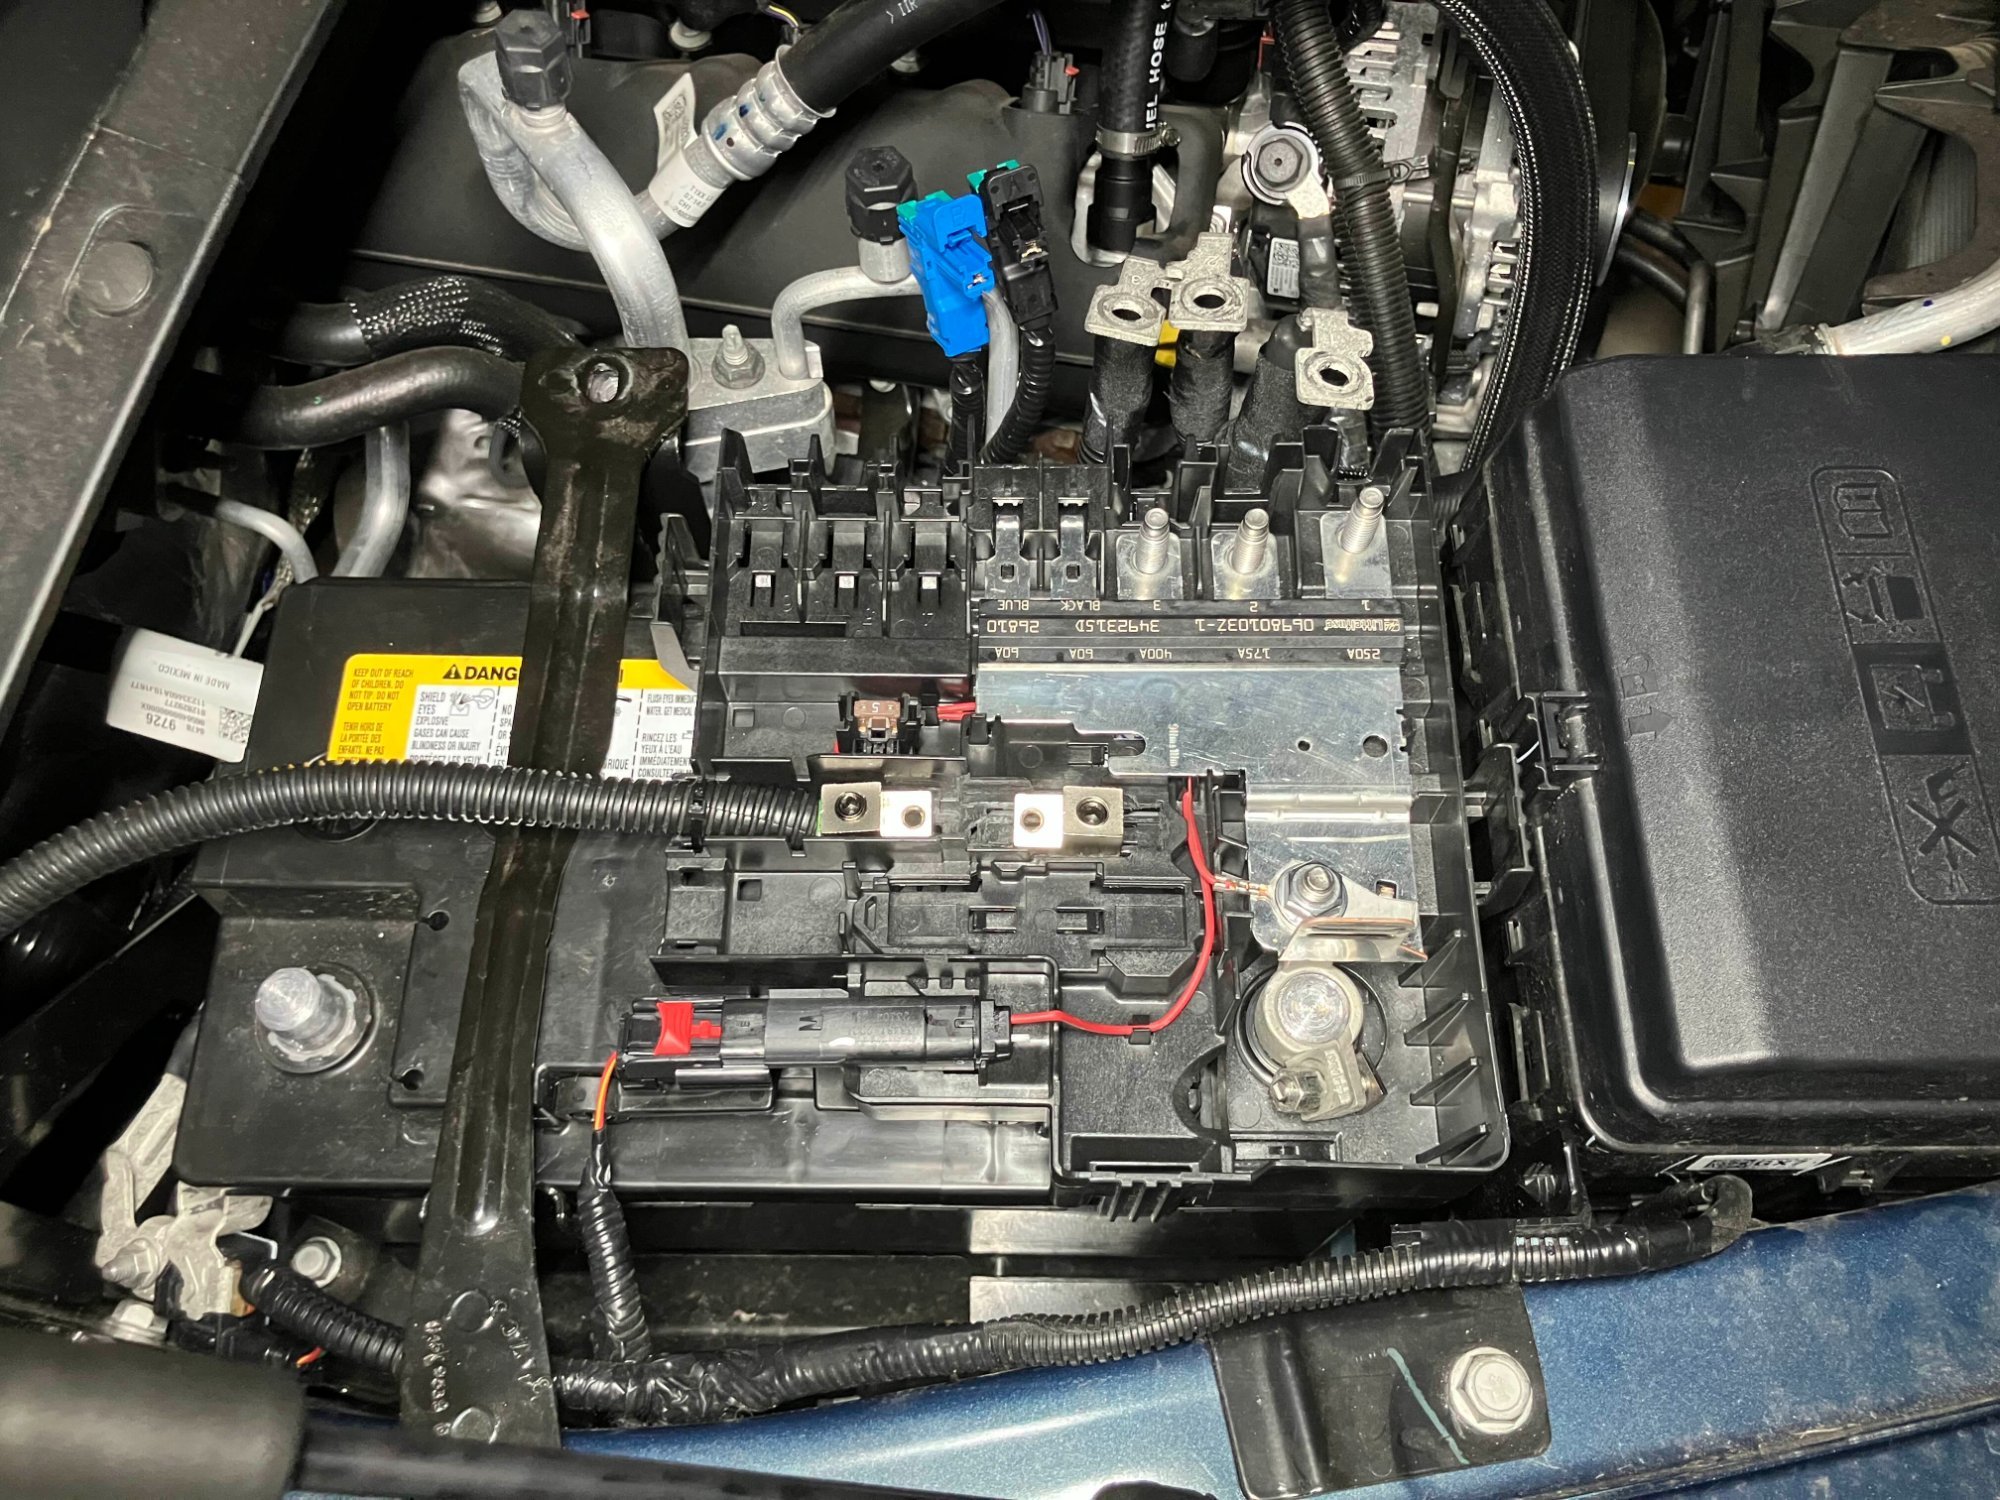
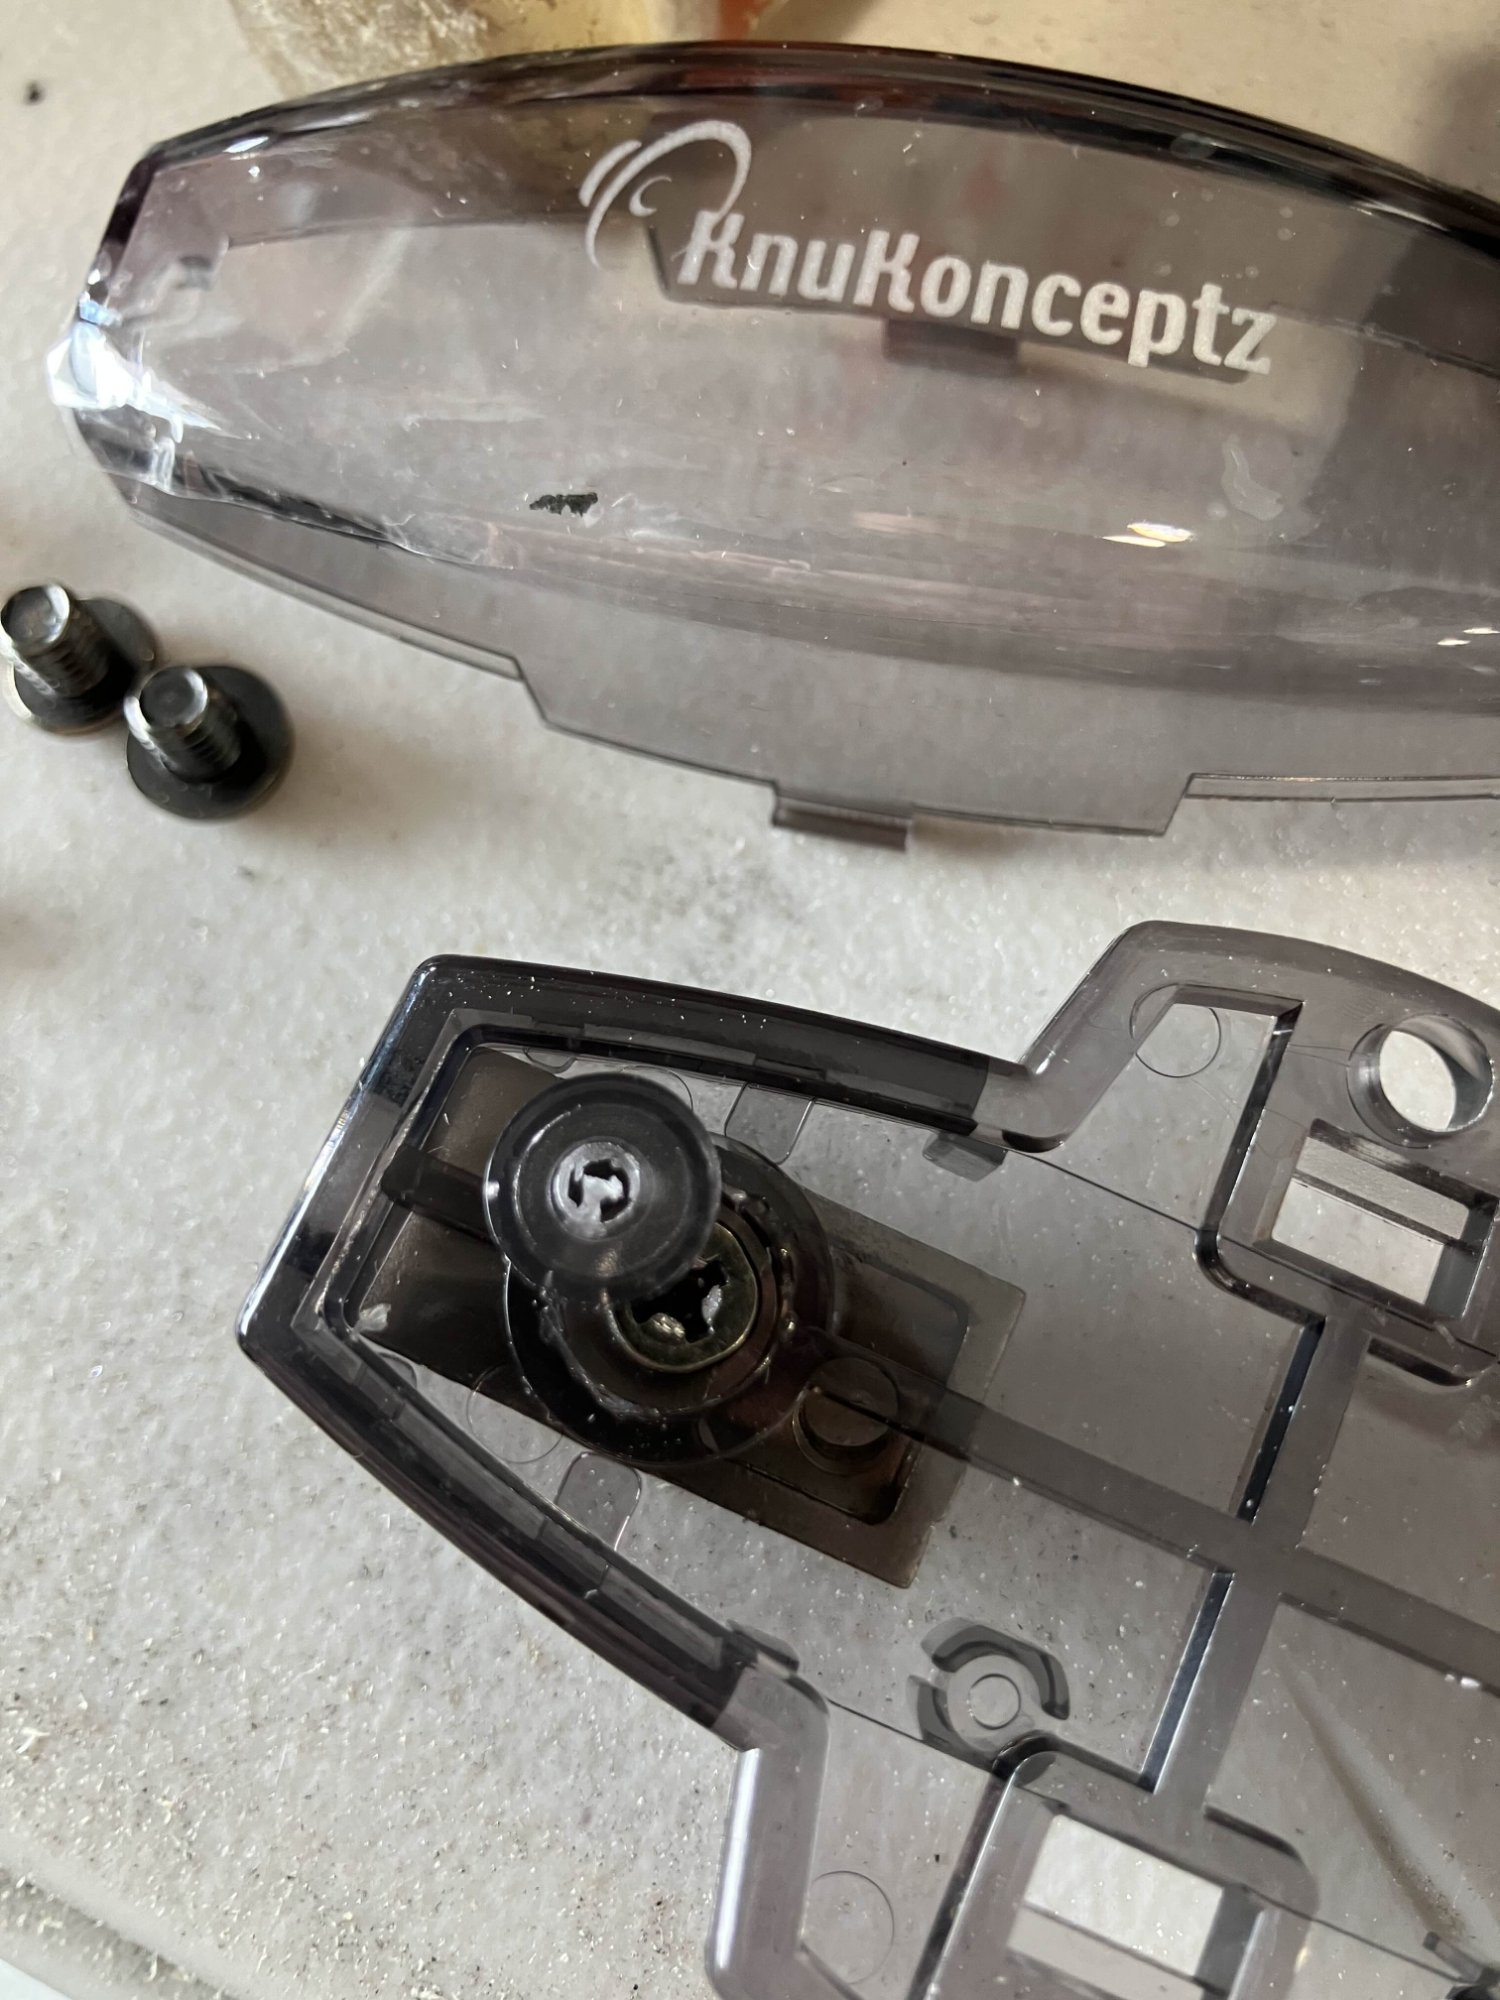
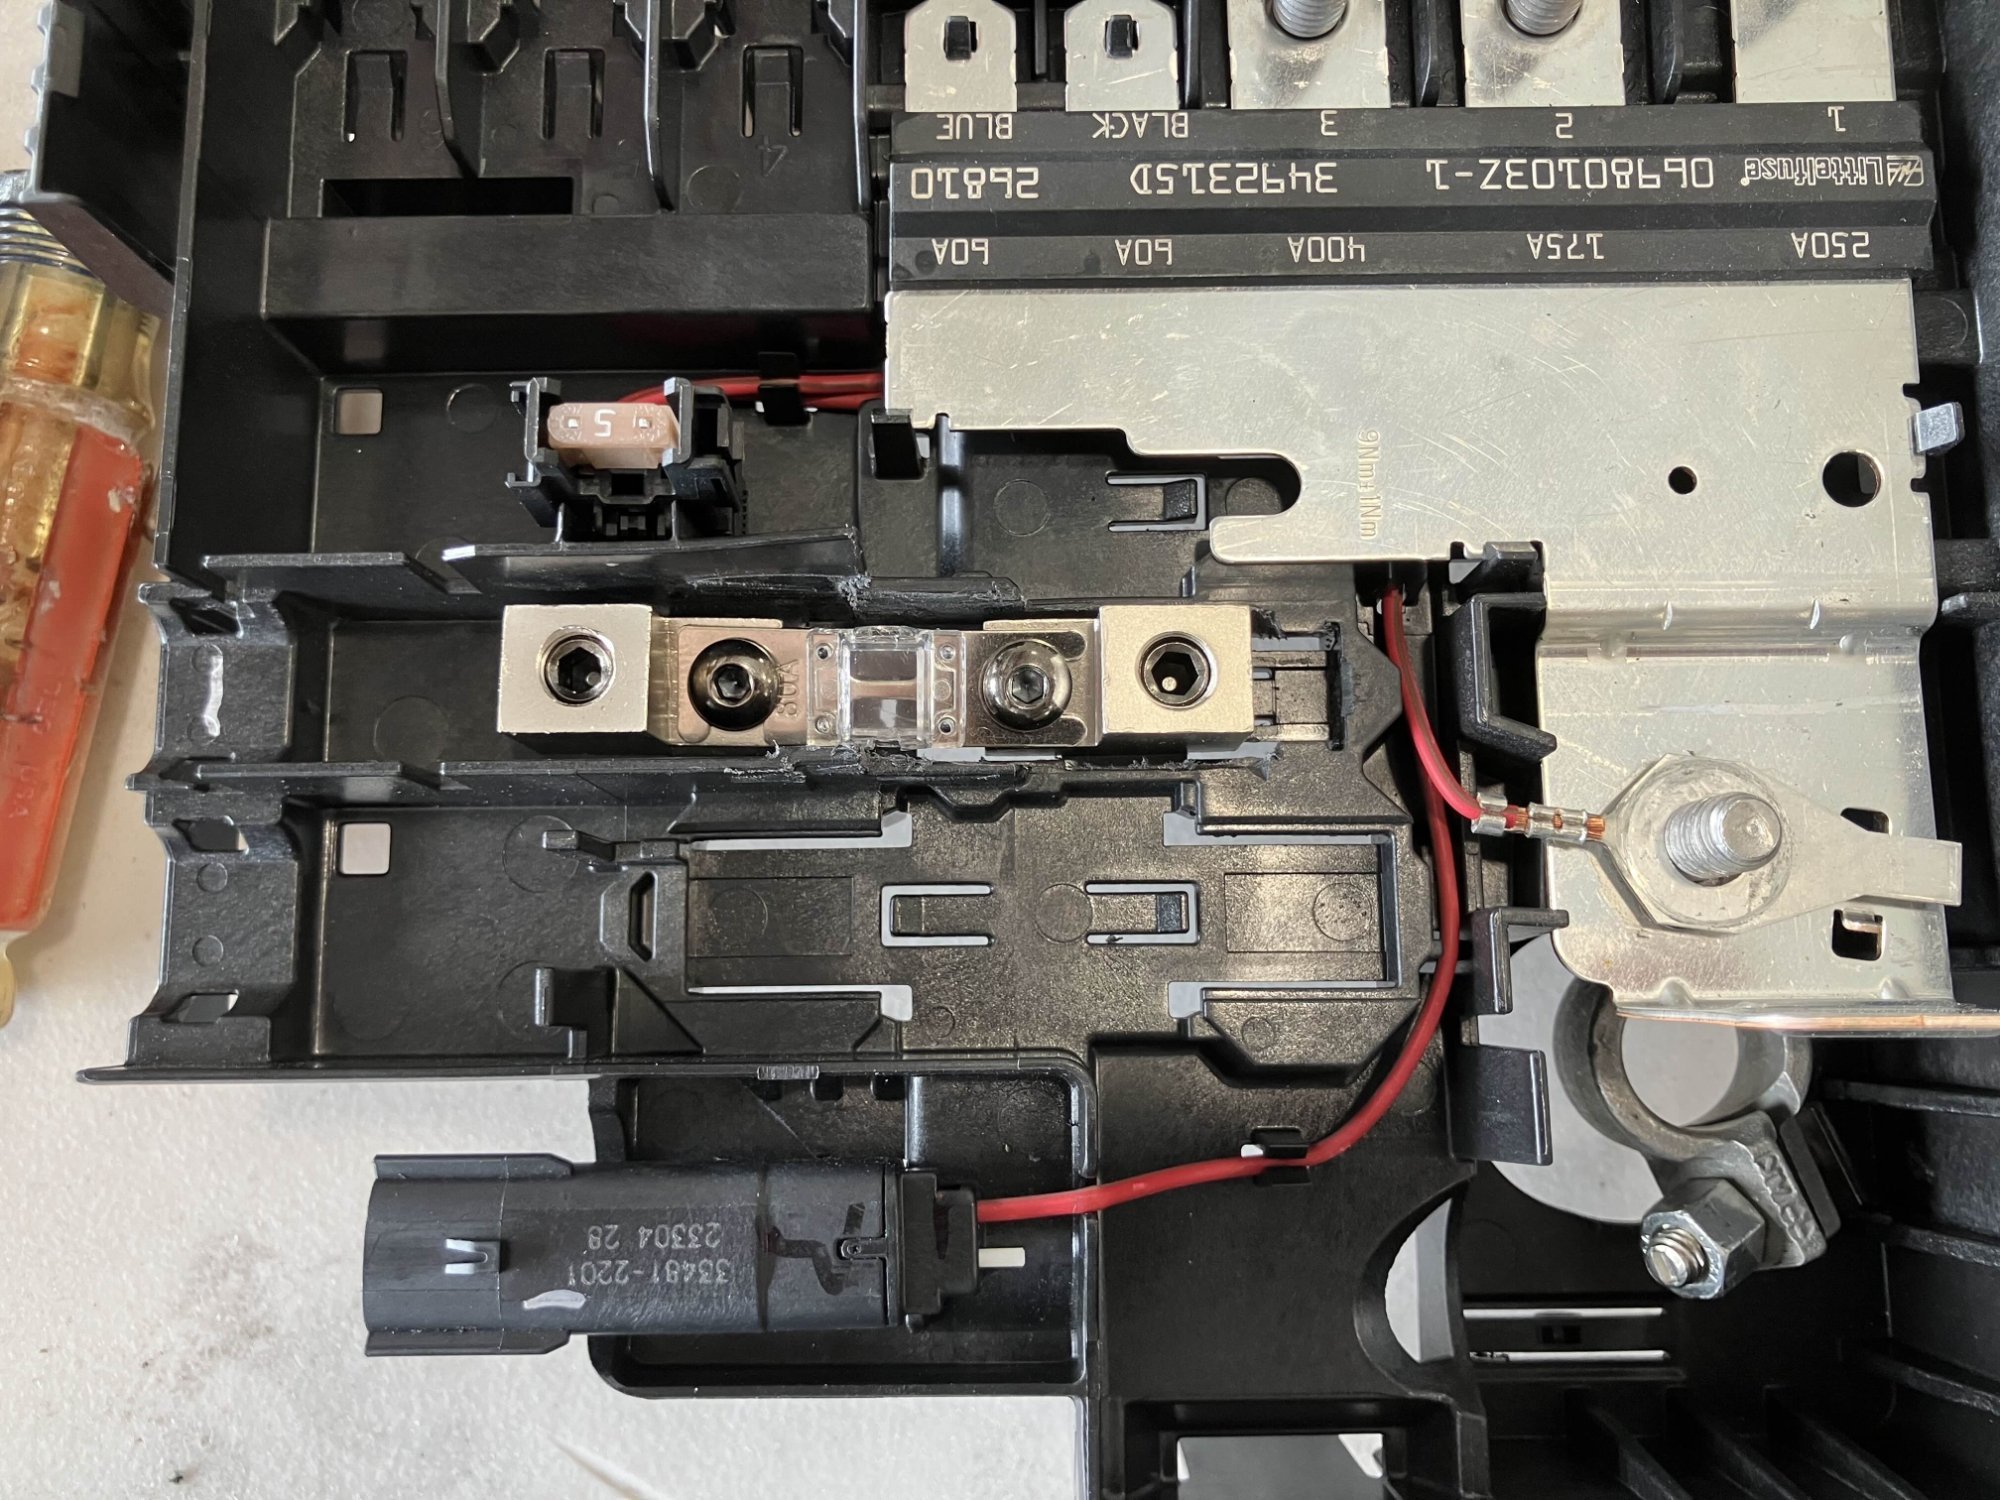
Update on the build. I removed the fuse block (bus bar) above the battery from the truck. Also dremeled out the channel in the plastic to run a KnuKonceptz 4/8 Gauge in Line Mini - ANL fuse holder. I specifically chose to go with this fuse holder because of the way the fuse blocks are made. The metal is carved out at a 90° and drops the fuse down into the block instead of other designs remaining a larger higher mounted fuse. There's also an angle to it, instead of being mounted flat. I really wanted to go with an automotive inline breaker but couldn't think of a way to mount it nicely and it would most likely take up too much room in the trucks fuse block and I didn't want to dremel the whole thing out. I feel like the amount I demeled was enough, and IMO it will looks nice. I then drilled a 9/64's hole in the base of where the screws are in the KnuKonceptz block and the screw caps just popped out. Then disassembled the fuse holder. The 9/64's holes are a perfect size for the screws to mount in the trucks fuse block channel. The trucks fuse block is made out of a plastic that you can thread these screws into and they then will tightly be held in place to then screw in the KnuKonceptz fuse holder blocks. This will also act as a thread lock tight somewhat and help captive the screws from backing out in the future. (that's the hope anyway)
-
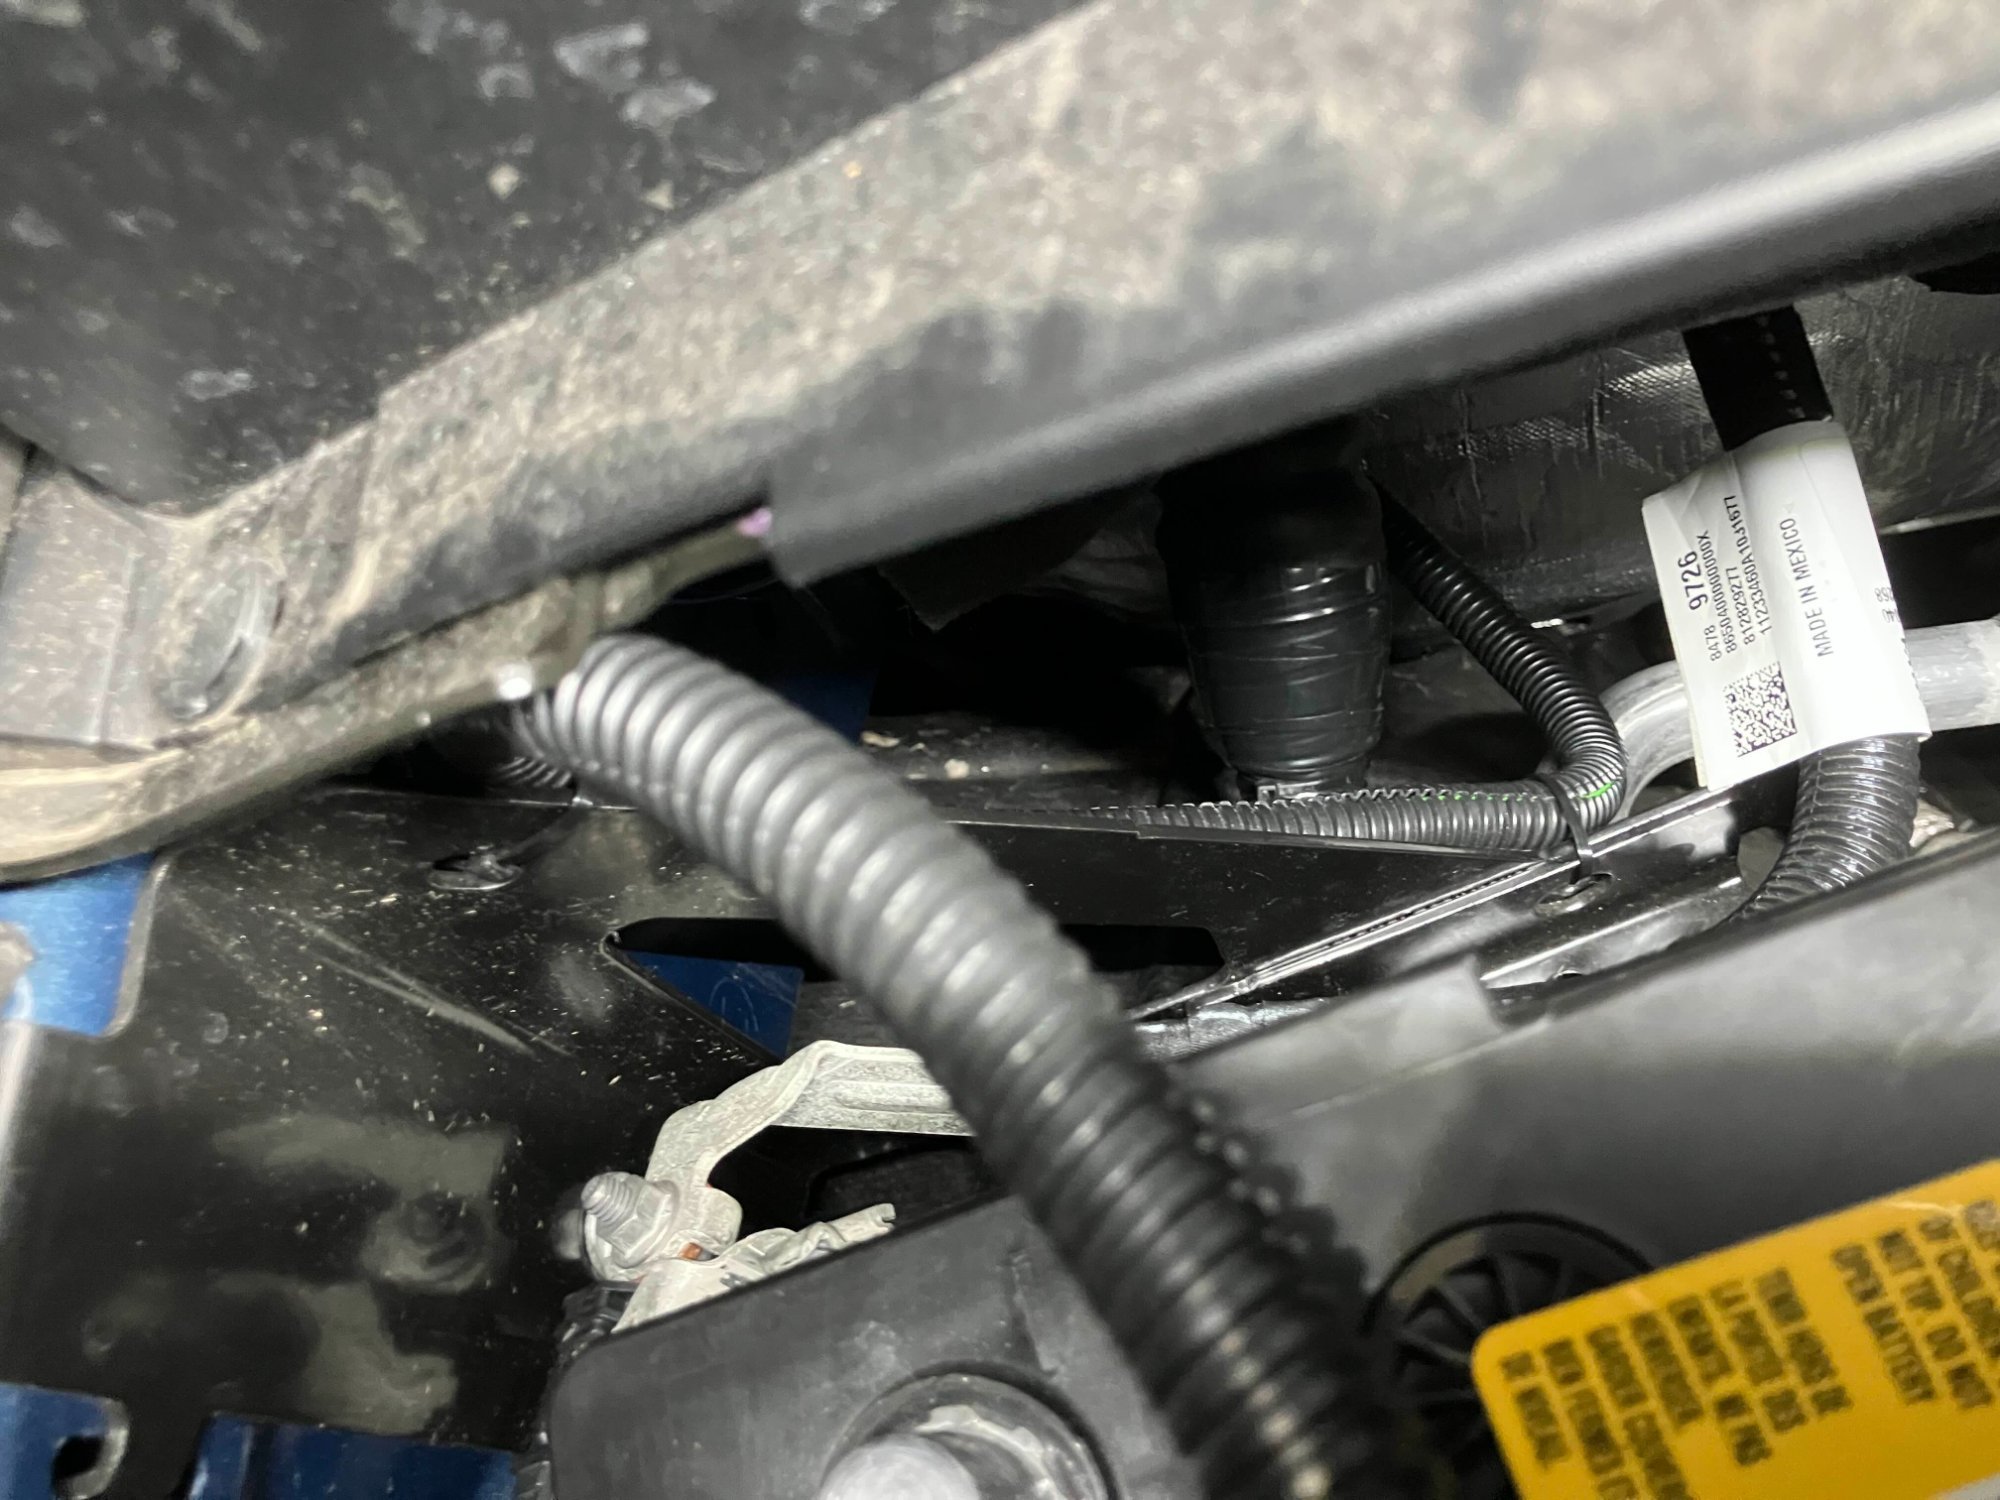
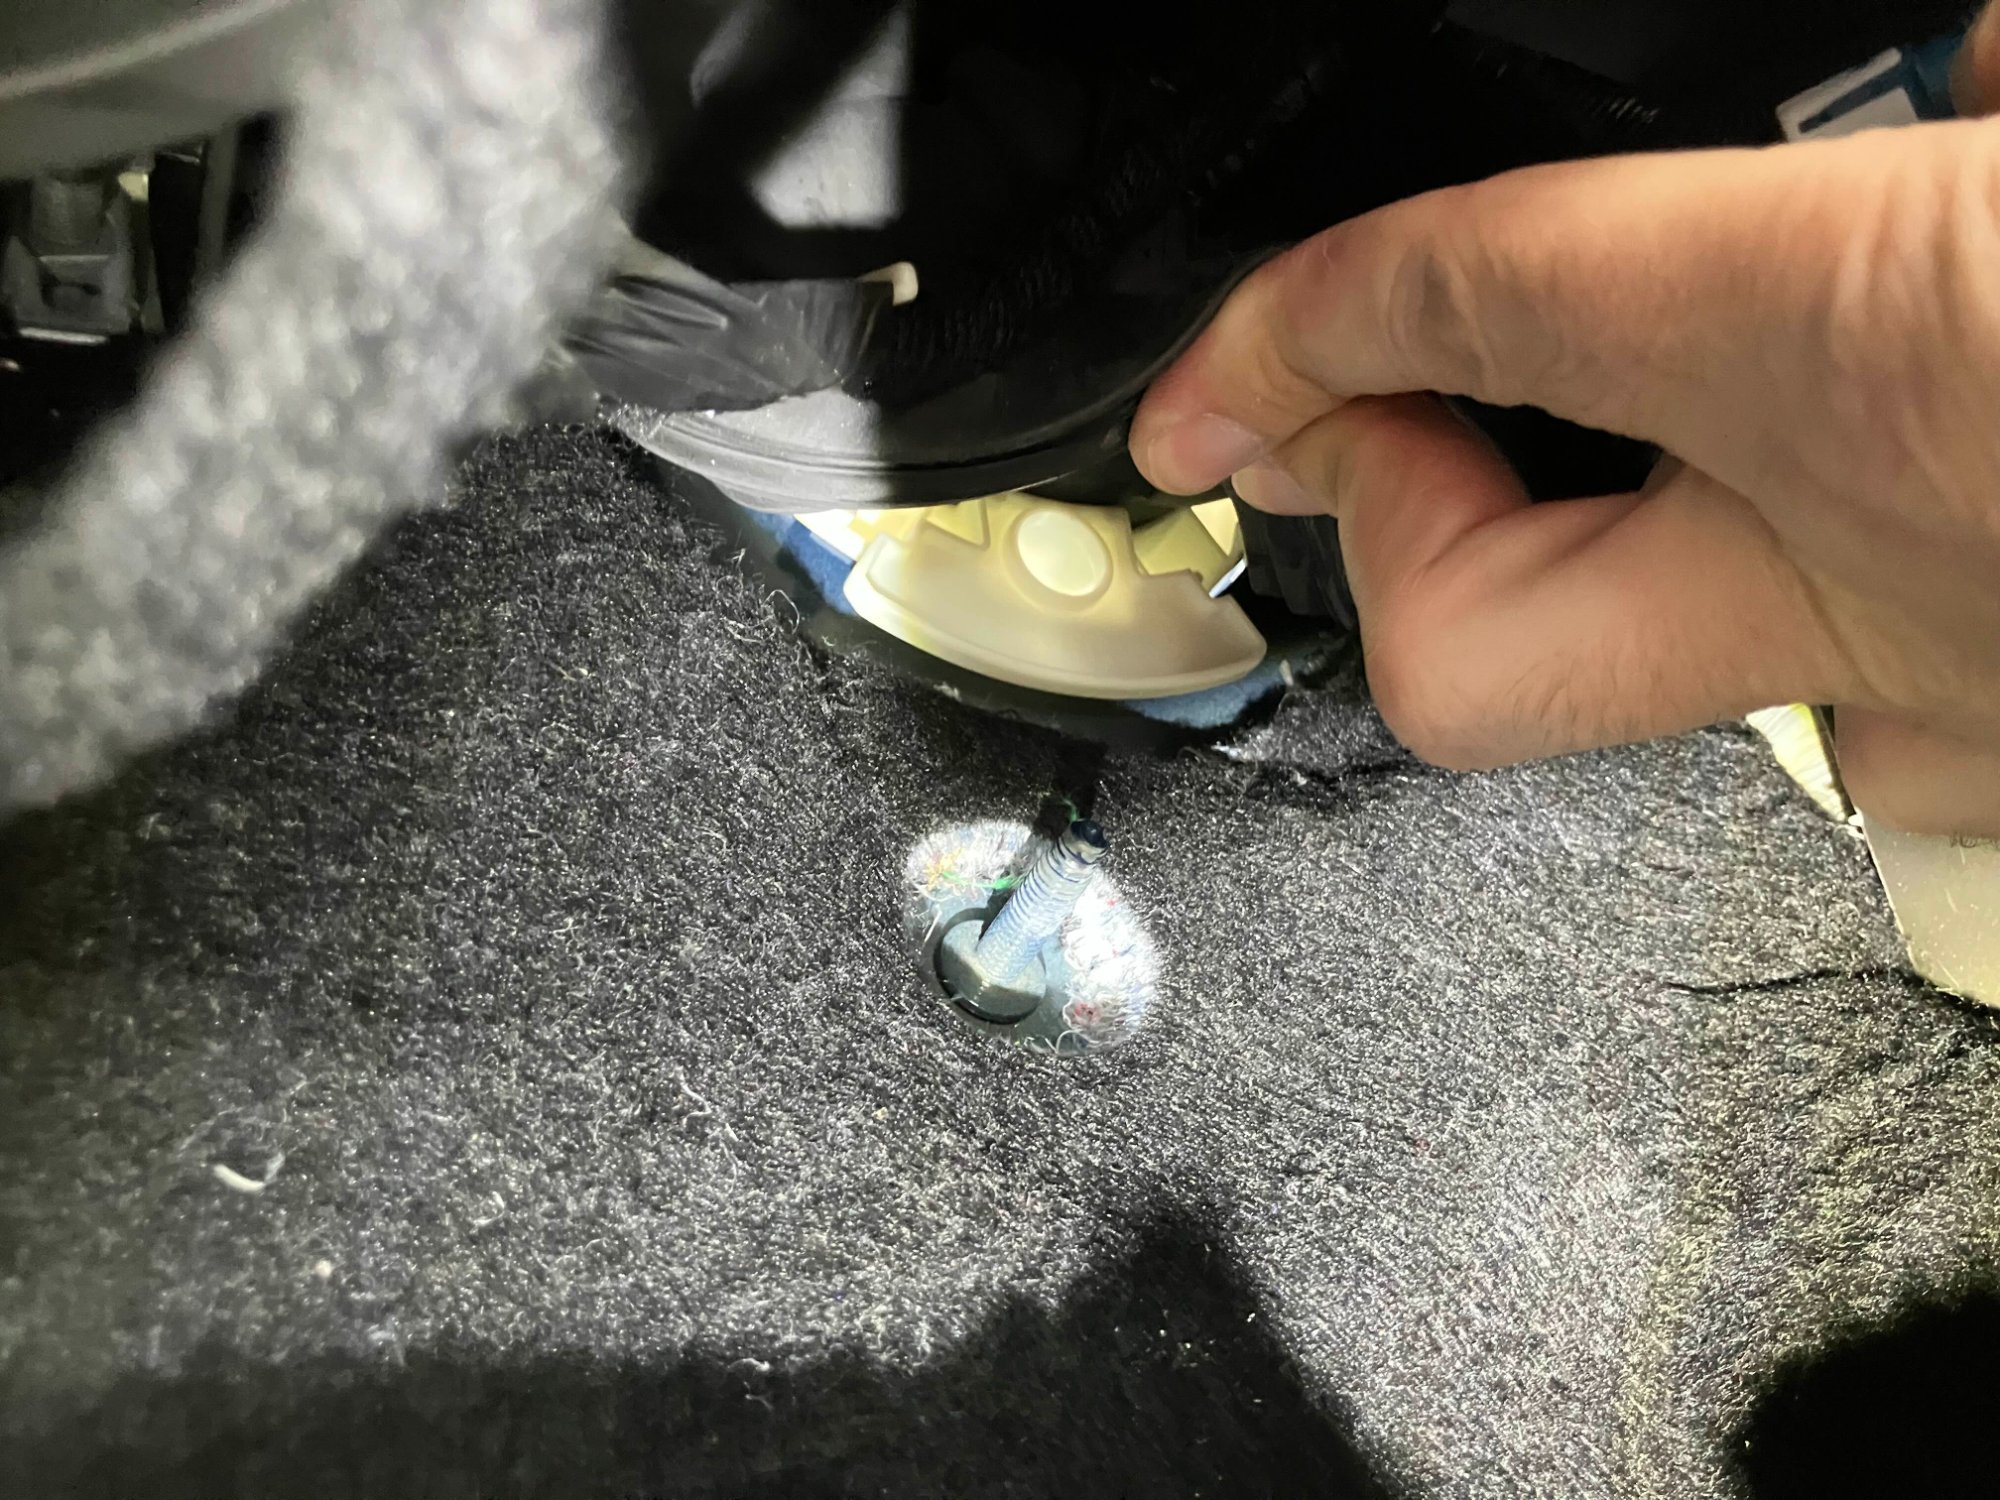
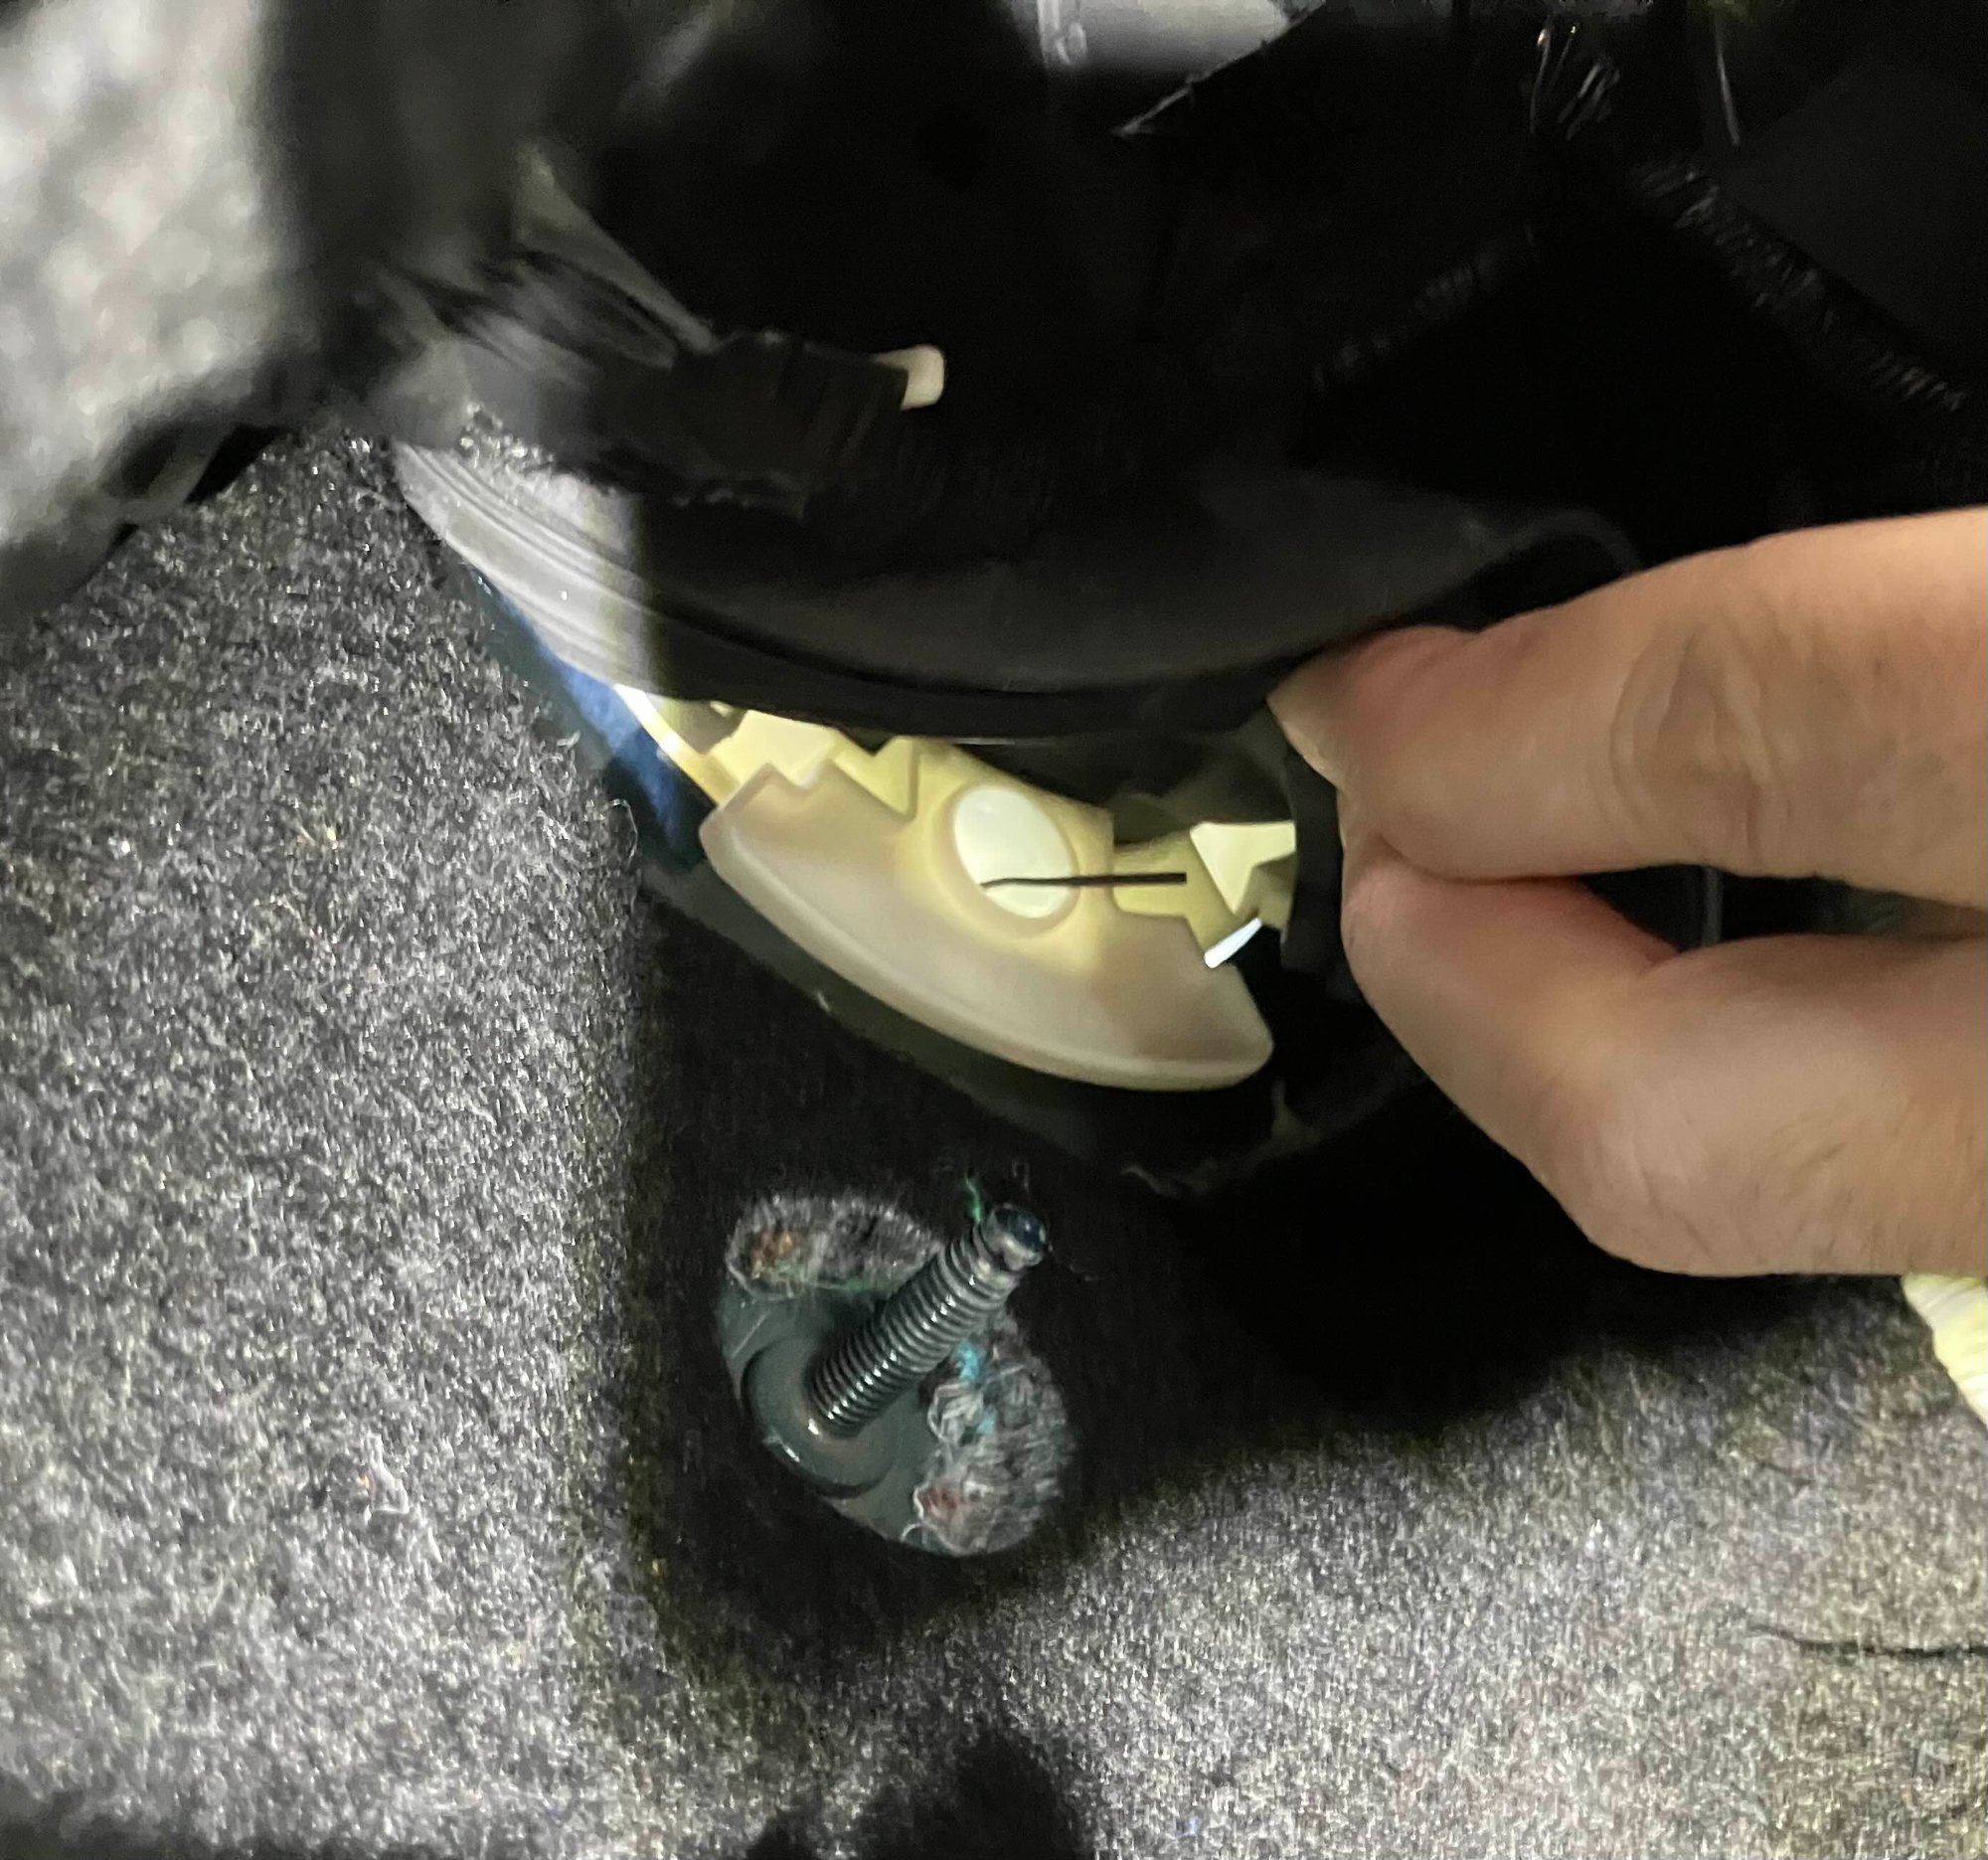
It's the same as before, just a little different as to where the nipple was. It's no longer easily seen from on the side of the grommet. They've moved it to the underside of the firewall passthrough wire harness. You can see it clearly underneath in the photo below. Pic 1 is from the engine bay. You can see the channel where the wire will exit/enter the truck. Pic 2 is from inside the truck and what is looks like if you peel the grommet back, which does not need to be done because then you'll need to replace the rubber around the grommet to around the plastic shroud which is not the easiest thing to do. Just use an exacto #1 and cut a plus from the inside of the truck in the nipple. Pic one shows where the wire will exit. Pic 3 shows a 4ga wire in it. It fits 4ga wire really well. No sure about 2 or 0... you may have to trim the nipple off then just make the plus/X cut bigger. I also did not need to remove the battery to do any of this. Just work from mid engine with a ladder/step stool. Not the side of the truck. Hope this helps a bit more.
-
Chevyspeedster changed their profile photo
-
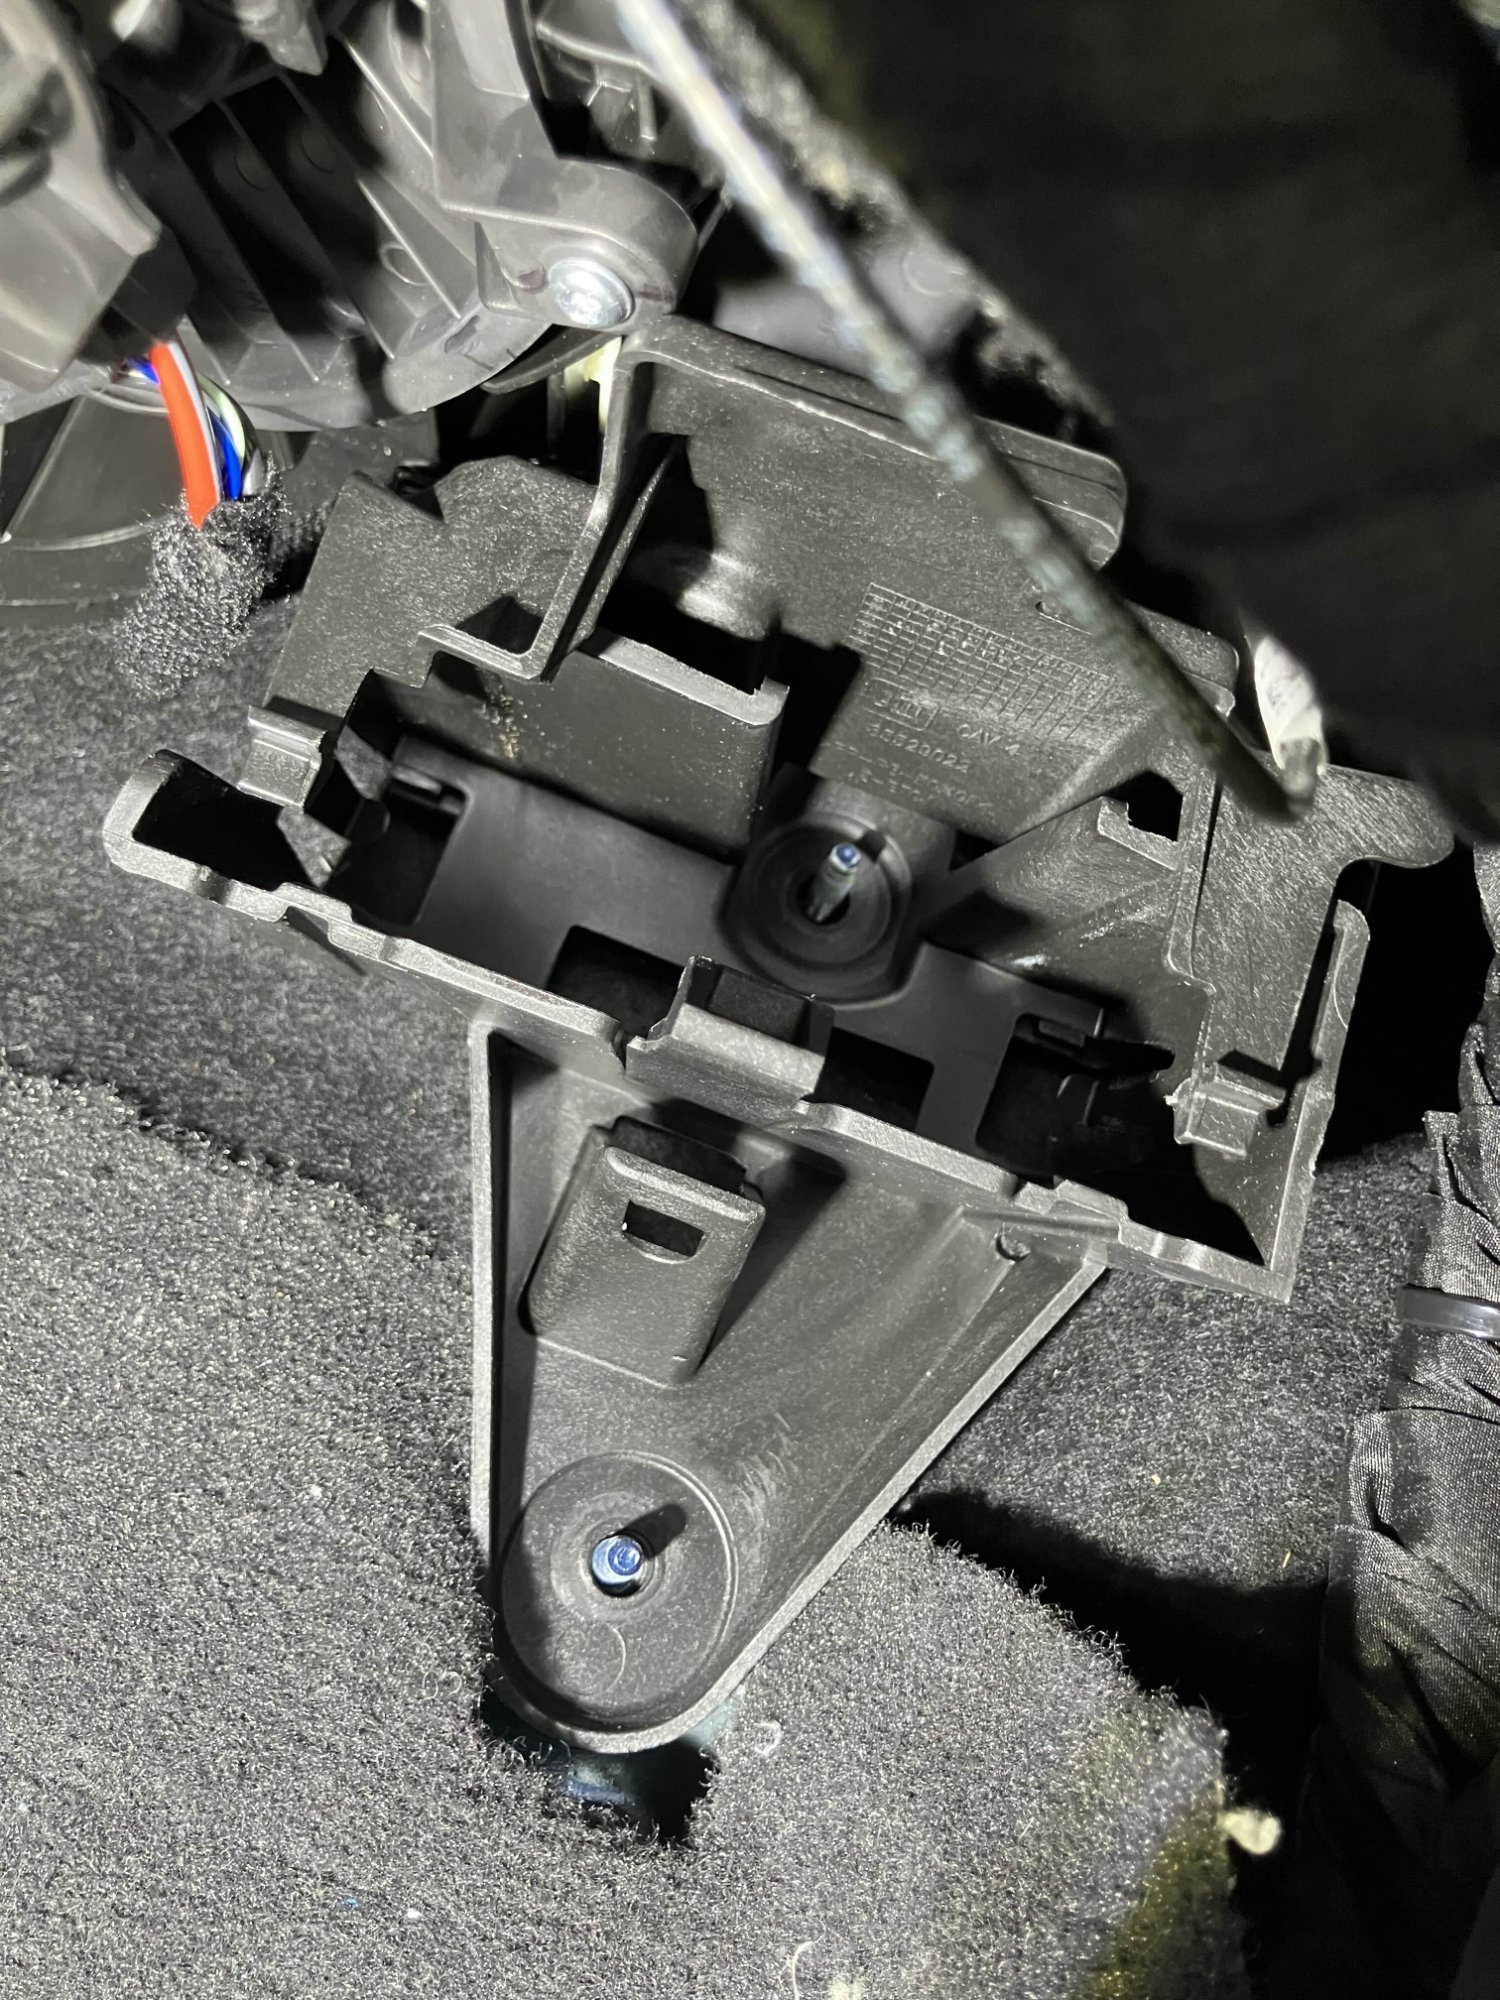
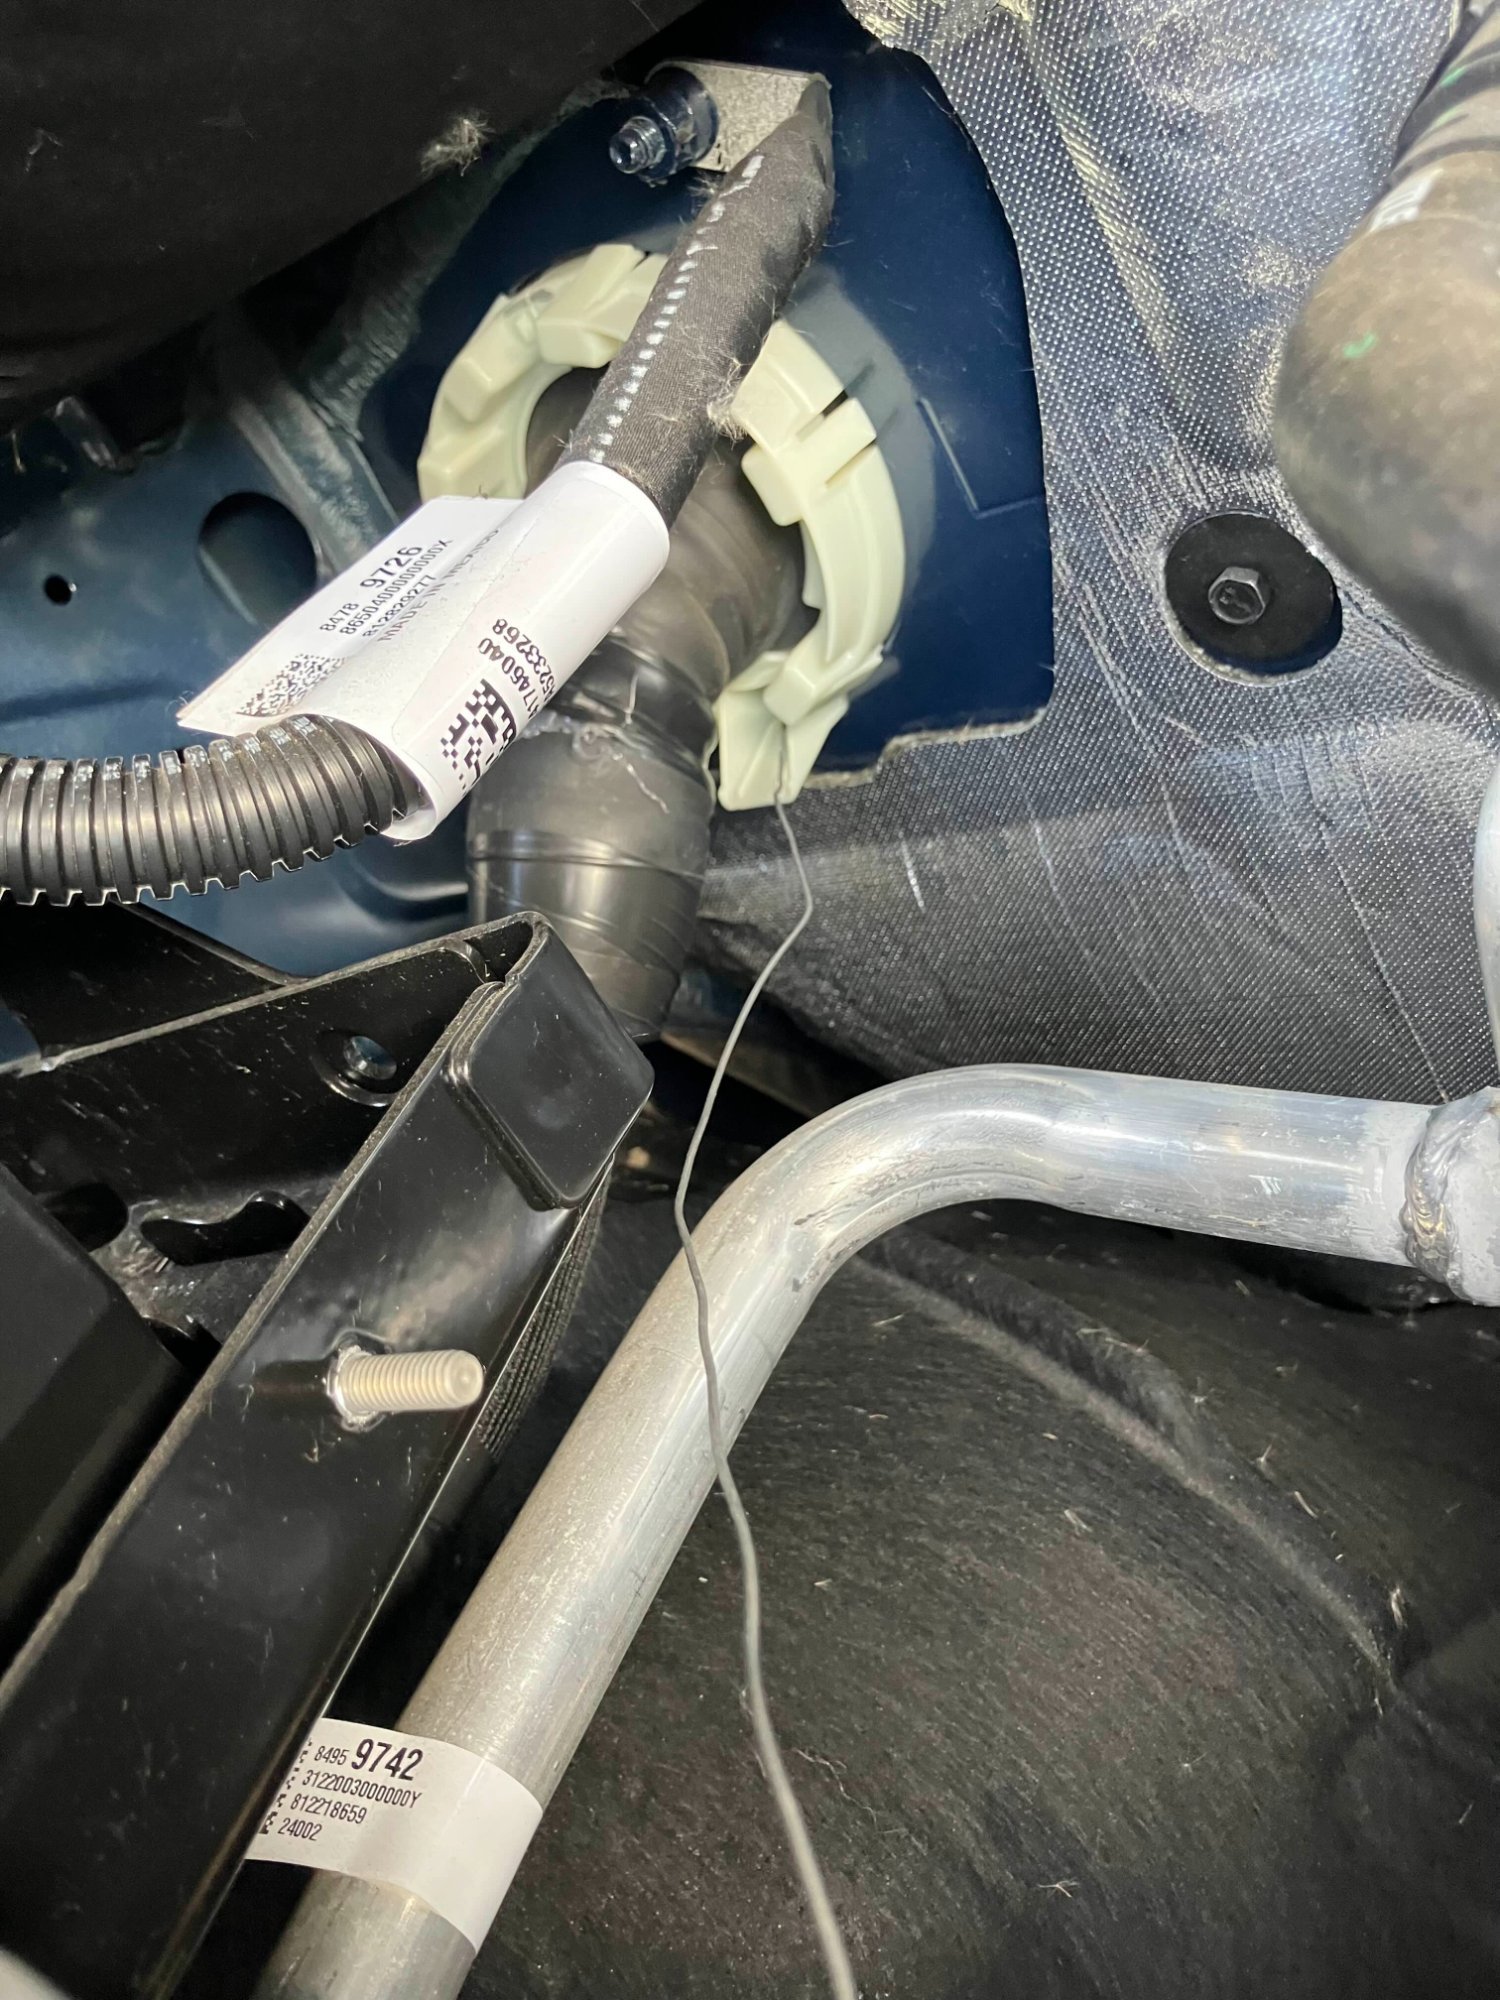
Hey all, first post and hoping this can help out. As many of you know and or finding out, the 24's and up are apparently a new style Firewall Grommet system leading into the truck from behind the battery. But not to worry, this will hopefully be the clearest new how to so far without a youtuber making a video of this. The truck now, instead of having a nipple coming from the firewall grommet on the engine bay side, is now a plastic bezel. The nipple can be located from under the dash still, however, and is still just as easy as an install as before. Pic 1 is from the engine bay. You can see the channel where the wire will exit/enter the truck. Pic 2 is from inside the truck and what is looks like if you peel the grommet back, which does not need to be done because then you'll need to replace the rubber around the grommet to around the plastic shroud which is not the easiest thing to do. Just use an exacto #1 and cut a plus from the inside of the truck in the nipple. Pic one shows where the wire will exit. Pic 3 shows a 4ga wire in it. It fits 4ga wire really well. No sure about 2 or 0... you may have to trim the nipple off then just make the plus/X cut bigger. I also did not need to remove the battery to do any of this. Just work from mid engine with a ladder/step stool. Not the side of the truck. Step 1. Take out the multifunction power supply converter box and bracket that is located behind the glove box and bolted to the kick panel right underneath the firewall grommet. The two tabs holding this box in need to be pulled towards you (the rear of the truck) and slid up. They will be blocked by the A/C fan I believe it is, but nevertheless cannot be pulled all the way up enough. Carefully pull it out. You'll have to finagle it a bit, but the box will come out. This is the only way to access the second 10mm nut that's on the stud holding the bracket in place. You do not need to remove the wire harness. I didn't. Remove both 10mm nuts with an extended socket. Step 2. I used an exacto like #1 blade and sliced a plus sign in the power wire pass through nipple. Step 3. Electrical tape a long zip tie to the wire. Use a little soapy water or some lubricant (I used just a little petroleum jelly) to slide the power wire through the hole. I went from the inside of the truck and pushed it to the outside (inside the engine bay). Continue install as you would with all the other older amp/power wire install guides out there. ...Special Notes... You may need to remove the plastic cover kickplate that is plastic welded to the floorboard part of the carpet placeholder cover. I did this by removing the fuse box cover plate then removing the 8mm screws. This allows you to pull the panel backwards and pop out the kickplate. The floorboard part must be pulled upwards. Do not try to separate these two pieces at the seam! They are plastic welded together. For another good run through check out here: https://www.trailboss.org/threads/firewall-grommet-change-in-the-2024-lt-trail-boss-for-power-wire.2109/ Hope my photos are more helpful.


-
Forum Statistics
250.4k
Total Topics2.7m
Total Posts -
Member Statistics
342,855
Total Members8,960
Most Online
-
Who's Online 3 Members, 0 Anonymous, 460 Guests (See full list)