


sharkeysierra
-
Posts
190 -
Joined
-
Last visited
Content Type
Profiles
Forums
Gallery
Events
Articles
RPO
Store
Blogs
Everything posted by sharkeysierra
-
Yeah that’s what I meant, ?
-
I believe the amp is under the center console.
-
I PM d you, also see instructions for the camber plates that I have attached. https://www.belltech.com/extras/docs/BBGC/4951.pdf edit: it’s installed correctly as far as placement. Just missing the pin that adjusts your camber that holds the plate in place. Chances are they are missing on both sides.
-
Pm’d
-
Yeah they installed it wrong, and I want to say backwards. AND you are missing the pin the supposed to sit in that slot. I put a couple yellow dots where that pin supposed to be.

-
Yeah, if they installed it, they didn’t do it right because the camber and caster are the same. take a picture of your camber plates at minimum and post it here? The camber plates, the slot is supposed to be extended another .25 - .5 inch. I’m almost willing to bet they did not do this. The bushings May have had to be glued in, if not pressed in. They will turn if not done properly. I had a set of DJM camber bushings, they had to be glued in to stay. I thought I did it right the first time and after left the shop, before I got home the bushing turned on me and sucked my wheel in negative camber. At 4/6, the plates or the bushings should get you into alignment alone and both together will get you far positive. I do know when I was 4/6 with upper and lower a arms, the camber was within .1 - 2 of factory spec in camber.
-
Are you sure the shop installed these correctly? With just a 4/6, you should be dang near 0 as is or at least under -1 I would make sure they were installed correctly, usually the bushing kit should be rotated inward to the frame so it pushes the a arm out. The camber plate kit needs to have the factory slot lengthened to take full advantage.
-
Illuminated GMC emblem
sharkeysierra replied to Dick Messerly's topic in Modifications, Wheels & Tires
Will do!! I’ll also include the process of weaving it through the tail gate -
Illuminated GMC emblem
sharkeysierra replied to Dick Messerly's topic in Modifications, Wheels & Tires
I’ll take pictures later on today or tomorrow. BUT if you were to get under your truck, from under the truck look up where your tail light is located, you should see only one wire loom going up. Follow that wire loom back down to the plugs near the spare tire. you can also use your license plate lights as well. I felt it was better to use the tail lights as I feel it’s more current. Which could also be a lie, I just felt better using the tail light. -
Illuminated GMC emblem
sharkeysierra replied to Dick Messerly's topic in Modifications, Wheels & Tires
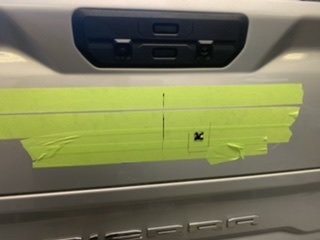
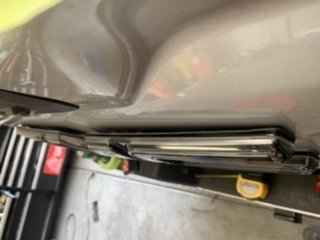
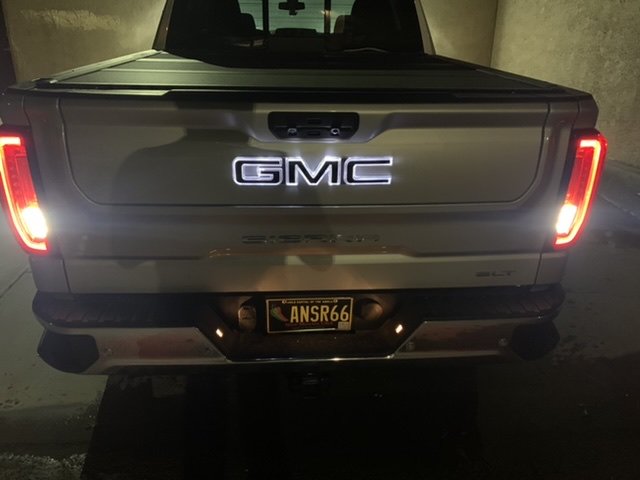
How I put the front emblem on the back of my truck. -First, you have to remove the 3 piece emblem. I heated up the emblem with a heat gun. I eventually pried off the emblems and left some of the double sided tape adhesive on the truck. There are many detailed methods over the internet on how to remove the emblems on a factory vehicle. - Next, I needed to clean up the adhesive. For this I used an adhesive rubber wheel with the drill attachement. Not my go to but I was trying to hurry up before my wife asked me to bring her lunch at work. The adhesive wheel left some rubber due to heat buildup. I used a polisher and some compound to clean it up proper. - Now you have the clean slate to work with. I put tape down as my next step was to find center on the tailgate. The highest strip of tape was used to keep the line of the factory emblems, I later adjusted this as it seemed it was off - Now for me, this was the most difficult step. I took my pliers to the clips on the back of this $300 emblem. Just grab and twist, they come off almost flat. I followed it up with a grinder and flap wheel to make sure it laid flat. - From here, I laid more tape down to cover the surface area of the emblem. The toughest part of this is trying to line the emblem up close to level. I spent time on this as I believe it is the make or break part of the process. Once I had it where I thought it was good, I pressed down on the emblem so that the plug in the back of the emblem would indent the tape. The emblem should be parallel to the tailgate when looking from above, down. - If you pressed hard enough, you will see the outline of the plug in the tape. Weirdly enough, this next step was less stressful then popping clips off an emblem. I drilled a .5 inch hole in the tail gate in the center of the indentation. This is not enough and I inked in the rest of the outline and filed smaller holes to the corners. I did raise the emblem up toward the handle (?) due to it being the multi pro and there is a crease on the inside that may cause an issue if you keep factory placement. It’s moved up about .5 -.75 inch from factory placement. I did not want to chance it. - From here, I took a small triangular file and took the time to file the eventual square flat all around. This step took me about 30 minutes. I had a die grinder, but could not find my bit. It could have taken 5 minutes if that... Above is the measurements I took. - I kept test fitting the emblem, turns out I had to open it up more to account for the base of the plug on the emblem. I would venture to guess 13/16 or 7/8s. - After I got enough after multiple test fits, I was happy with it. The hole will be covered up with the emblem. - I pulled all the tape off except the highest one so I could know my center line. With both the emblem and tail gate prepped.. I found the emblem has more of a curve then the tailgate. The curve looked real similar before I ventured to do this. Nothing a quick press in the middle wouldn’t take care of. - Next I loaded the emblem with 3M double sided tape. Turns out, that it is actually difficult to peel the backing off to actually mount the emblem. Luckily it’s curve helped me only tack the sides on while I measured center, up/down and left to right. Boom... mounted.. - I cut the end of the pig tail that comes with the emblem. Plugged it in, and ran wire through the tailgate to the wiring harness of the passenger side tail light. I actually took the tail light off but realized there is another plug point by the spare tire. That’s where I wired in the emblem to come on with the lights like the front does. Forgive my spelling errors, did this from my phone. As much as I tried to take pictures, once I got into the mode, all that went out the window.
-
I have a Springfield XDS that I bought as my wife and mine first pistol back in 2010 I think. I like it, easy to use and clean, has never given me an issues. I have shot glocks/berettas/h&ks and they each have something I like. I think if I bought one of those as our first hand gun I would biased to them as well. You can not really go wrong with a glock/Springfield/h&k/ruger/s&w as a first hand gun. I’m biased to Springfield and if I get another one, it will be another Springfield most likely.
-
Front/Rear Bumper Vinyl Wrap
sharkeysierra replied to Rooks's topic in 2014-2018 Silverado 1500 & Sierra 1500
The best thing to do is just to order samples of what may be the closest match. When I had my summit white, I never found a match but some companies had found some close matches and never mentioned what it was. In my experience, everything either had a blue or yellow hue. -
Problems tinting windshield?
sharkeysierra replied to birdsdawordxxx's topic in Modifications, Wheels & Tires
There is definitely a lot of water/solution used to clean or used to lube the tint before it’s squeeged. So that’s a viable excuse to sign that waiver. Especially with a POV story above. There are other tint shops around as well. -
Illuminated GMC emblem
sharkeysierra replied to Dick Messerly's topic in Modifications, Wheels & Tires
Mc New - It’s the front emblem modified. what details would you like to know? early morning shot below
-
Illuminated GMC emblem
sharkeysierra replied to Dick Messerly's topic in Modifications, Wheels & Tires
-
Illuminated GMC emblem
sharkeysierra replied to Dick Messerly's topic in Modifications, Wheels & Tires
How much? -
You can get the flip kit and buy a raised shackle to get you that 4” drop you are looking for.
-
What did you pay for your truck?
sharkeysierra replied to fishingtruck's topic in 2019-2026 Silverado 1500 & Sierra 1500
My wife is a RN and with that, she got just shy of 4100 with the first responder discount. I still over paid.







-
Forum Statistics
250.5k
Total Topics2.7m
Total Posts -
Member Statistics
342,915
Total Members8,960
Most Online
-
Who's Online 11 Members, 0 Anonymous, 533 Guests (See full list)