
mikeyk101
-
Posts
1,329 -
Joined
-
Last visited
-
Days Won
14
Content Type
Profiles
Forums
Gallery
Events
Articles
RPO
Store
Blogs
Everything posted by mikeyk101
-
In my case, I was getting a P050D first and then started getting a P0301. I ended up bringing it in and it was diagnosed with an injector problem in Cylinder 1 where injector was stuck open. Injector was replaced and it's been fine ever since. Your P0306 points to Cylinder 6 so that would be where I would start.
-
 Just a bit of advice... If you are considering something like the lower Rough Country spacers, I would highly suggest changing out the supplied bolts that come with the kit so you don't run into the problems I did. The bolts in the kit are threaded on the end but smooth sided from about the middle down to the heads. I think fully threaded bolts would be a better choice. I found out the hard way that the supplied bolts basically rusted themselves into the lower control arm and were a bear to figure out how to get out. I would think a fully threaded bolt would have ended up being much easier to remove. Here is a thread that discusses what I ended up with...
 -
Center Brake Light - Replacement Options
mikeyk101 replied to reardiff's topic in 2014-2018 Silverado 1500 & Sierra 1500
3rd brake light gaskets are available in aftermarket. Here is one that I bought for mine some time ago. I had read about problems with the 3rd brake light leaking here and other forums and figured it would be good to have on hand in case. This particular one had been recommended and had good reviews. Shortly after buying it, I ended up with the dreaded leak. Since mine was still under warranty, I took it to the dealer and let them fix it. They did and it hasn't leaked since. They installed a new oem gasket so at least dealers can get them. Mine is just sitting on a shelf waiting in case it happens again. https://www.ebay.com/itm/174035410493?mkcid=16&mkevt=1&mkrid=711-127632-2357-0&ssspo=nA6hqFjBR_e&sssrc=2349624&ssuid=SX1w3s_iQIW&var=&widget_ver=artemis&media=COPY -
What have you done to your K2 today?
mikeyk101 replied to block8head's topic in Modifications & Accessories
IMHO, I don't think it made a big difference. It seems to shift as it should. When I first changed to the 275/60's the speedometer read slower by a couple miles an hour than I was actually going and shifting did seem a bit off. Kind of hard to describe. After I did the correction, the speedo is pretty dead on as checked with a separate GPS and shifting seemed normal again. -
What have you done to your K2 today?
mikeyk101 replied to block8head's topic in Modifications & Accessories
Just a quick FYI, when I got mine, I plugged it into the truck and it wouldn't work. I don't recall exactly what message was but something about not working on my make and model truck. I thought maybe I got the wrong one. After further reading, I was supposed to hook it up to a computer and use the app to select my model truck as well as do an update. Once I used the RC app on computer, I selected the proper make and model and then after plugging in, it worked just fine. -
What have you done to your K2 today?
mikeyk101 replied to block8head's topic in Modifications & Accessories
I just went with the Rough Country calibrator because I didn't really want to get into all the tuning stuff. It was still a bit pricey at just over $200 but did what I needed. I have a Range AFM and between the 2 I'm happy. The RC calibrator can also compensate for rear end gear changes as well if needed. I have 275/60R20 tires on mine now from the stock 275/55R20. Surprisingly I set the calibrator to 32" tires instead of 33" and the speedo is perfect. Not sure why but obviously GM doesn't calibrate for the OEM 32" wheels for some reason... -
Infotainment software update (download?)
mikeyk101 replied to ocv1328's topic in Troubleshooting & Recalls
https://www.tsbsearch.com/Chevrolet/16-NA-042 -
2015 Sierra W/T to no so W/T
mikeyk101 replied to 04palass's topic in 2014-2018 Silverado 1500 & Sierra 1500
I might have to give that Eastwood stuff a try. No visible rust on the rockers that I can see but I'd like to keep it that way especially living in a location with lots of snow and as a result, plenty of salt on the roads... -
What have you done to your K2 today?
mikeyk101 replied to block8head's topic in Modifications & Accessories
No you won't! It's a wicked sickness that has no cure, especially when you've gone as far as you have already... -
Brake pad fitment...
mikeyk101 replied to mikeyk101's topic in 2014-2018 Silverado 1500 & Sierra 1500
Lesson learned... OEM is usually the best choice. My new AC Delco pads came today. It took all of about a half hour to swap out both the left and right fronts. They went together exactly how they were supposed to and weren't tight at all on the clips. On my bike, I tried aftermarket pads one time and they made strange whooshing sounds whenever braking. Changed them out right away to OEM Honda pads and life was good again. The original pads had worn just fine and I shouldn't have tried saving a few bucks. Same with this Silverado. Tried to save a few bucks and was pulled in by the lifetime warranty of free pads everytime the old ones wore out. Would have been nice if they actually fit properly but from now on, OEM pads on every brake change. Hopefully the rotors are OK but should be. My adventure on this started less than a month ago and there doesn't appear to be any unusual wear. For those, I went with OEM from the beginning... -
Brake pad fitment...
mikeyk101 replied to mikeyk101's topic in 2014-2018 Silverado 1500 & Sierra 1500
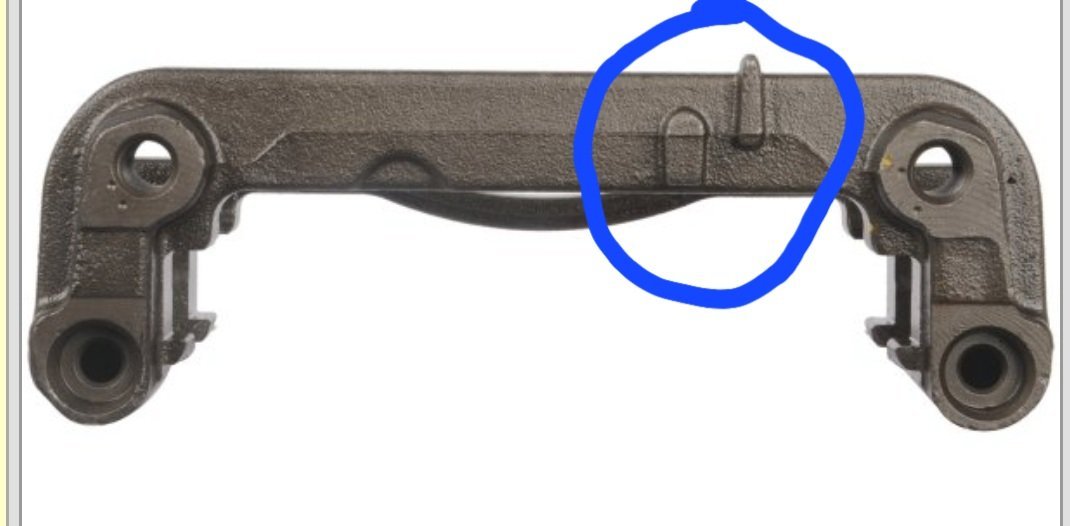
After looking close at the different brackets in photos, I did find a difference. Not sure exactly what the purpose of these nubs but it does show that there is at least this difference. First the right side Then left side so I guess this might scrap that idea of a fix...
-
Brake pad fitment...
mikeyk101 replied to mikeyk101's topic in 2014-2018 Silverado 1500 & Sierra 1500
Well still having issues with the front left side. Not as bad as it was but there is still a slight drag. It seems fine on highway but doing a bunch of stop and go city driving, it seems like the inside pad doesn't completely release. I'm done with these pads. I know I could probably grind off some of the sides of the ears but I don't have a way to carefully grind them. I'm throwing in the towel on these aftermarket pads and ditching these for some actual AC Delco pads. I have them ordered and they are supposed to be delivered on Sun. Hopefully this takes care of the problem. The weird thing is the pads on right fit perfectly. As far as I know, there was just 2 sets of pads in the box but nothing indicating left or right side. Only difference is the inside and outside pads. But... the caliper brackets look identical. However, when I bought the replacement brackets, one was listed as left and one as right. Visually, I really couldn't tell the difference. If switching to the AC Delco pads doesn't fix this, I may just try buying another right side caliper bracket and seeing if that will mount on left side. This isnt my first rodeo and have always done my own brakes and on many different vehicles. This is the first time I have run into problems like this... -
Probably. A link to recall was posted by @IGG in his comment above https://www.winknews.com/2021/03/04/more-than-430000-tires-manufactured-by-cooper-tire-recalled-for-potential-sidewall-separation/
-
I have the Falken Wildpeaks (275/60R20) and I've been pretty happy so far. I had them installed in Feb 21 and at 52k miles. I'm now at over 75k miles and still in great shape. I did have to have them road force balanced again back in July of this year because I was getting some vibration. Luckily I bought them at Duscount Tire and can get them rebalance for the life of the tires as well as free rotations. They confirmed that one tire was off a bit and corrected it. Nice and smooth again after that...
-
What about the negative battery post itself or that negative battery cable? And when you tried jumping, did you attach the negative jumper cable to the engine block?
-
Brake pad fitment...
mikeyk101 replied to mikeyk101's topic in 2014-2018 Silverado 1500 & Sierra 1500
That's exactly what I had but really only seemed to effect the driver's side pads, especially the inboard. These exchange ones seem to be doing much better. I will keep this in mind if I experience any more issues but, fingers crossed, so far so good. -
Sometimes deleting the phone from the head unit and then doing a bluetooth re-pair it will solve these issues.
-
Yes, quite possible. Make sure to read the post on page 2 by Dick Lichon. It could possibly be the negative post on your battery...
-
Brake pad fitment...
mikeyk101 replied to mikeyk101's topic in 2014-2018 Silverado 1500 & Sierra 1500
Update... Well I had some problems with this. The front brakes weren't locked up but there was some noticeable drag. It was pretty obvious by the way the trans shifted as well as using the throttle. Also my instant mpg screen showed a lower mpg than what I was used to. Also when taking my foot off the throttle, the speeds dropped off quicker than when they were supposed to. There was also a noticeable vibration that was new. It would even drop going downhill. I had a drive that was about 45 miles of highway driving and then about another 10 miles of lots of stop lights and stop signs. When I stopped, there was a definite smell coming from front left wheel well. Right front seemed to be ok. Fun part was that I had that same drive to return on. Not thrilled but had little choice and at least the brakes weren't frozen. So last night, I ordered new caliper mounting brackets figuring that maybe new ones would help with the caliper fit. That didn't help. I ended up hooping on my bike as the truck was in pieces, bringing the new caliper mounting bracket for left front along with the pads mounted on them up to thto show them what was happening. They agreed with me that there was a problem with the fit. They exchanged these pads with a new set with the agreement that I bring back the other right set of pads when I brought the old mounting brackets for the core deposit. Before leaving, I did a test fit with the new pads and new clips. They fit better but still seemed a bit tight but not as bad as the ones I was exchanging. Once back home, I installed everything on left wheel and pumped the brakes. I was able to spin the wheel and no unusual noises. I then went to the right side and swapped out everything and pumped the brakes. I did notice that the right side seemed to fit exactly like I was used to. But since I had another set of new pads, clips, and new mounting bracket, I went ahead and put them on. After the brakes were pumped, I spun that wheel and it seemed fine. I went back to Oreillys and dropped off the old mounting brackets and right pads. On this drive, it felt like it was supposed to with throttle and shifting. The speeds dropped much more slowly and held steady on some short downhill sections. Also once I stopped at store parking lot, there was no unusual smells. I had other things to take care of at the house so I wasn't able to do a longer test. I have plans to do that tomorrow though. It looks like I should be good now... -
Brake pad fitment...
mikeyk101 replied to mikeyk101's topic in 2014-2018 Silverado 1500 & Sierra 1500
Well I still had the old inside pads and the old pads so I decided to check the fit on those. They fit a bit tight as well. So for now, I'm not going to worry about it but just pay attention for anything unusual. -
So I finally received my rotors and AC Delco brake pad clips tonight so I went about installing them. Better late than never I guess but thats another story. I already had a set of brake pads I had bought over a year ago from Oreillys, BrakeBest Select Ceramic brake pads. Background on those, when I bought them, I thought it might be time to replace the front pads as I was getting a lot of squealing. After checking the pads, I discovered they still had plenty of life left but the caliper clips were a bit rough. I swapped out the clips with the ones from the new set of pads and used some disk brake quiet paste in between the shims and pads. This took care of it and they've been quiet since. So now it really was time for new pads. I replaced the seals on the caliper bracket, cleaned up the bracket where the clips go as well as use a little dab of lubricant under the clip mounting location and installed the clips. I then bolted on the caliper mounting bracket. So far, so good. The one thing I did forget was to put some anti seize on face of hub before putting rotor on and realized after I had everything back together. At this point, after the fiasco I just went through, I'm going to wait for now before tearing it all back down again. But when it came to installing the pads into the caliper mounting bracket clips, the outside pad went on and had the springy feel that I expect. When installing the larger inside pads, they fit extremely tight and didn't have the springy in and out feeling. They just seemed too tight. I did dab just a slight bit of lubricant on edges of mounting tabs for both the inside and outside mounting tabs. The inside pads did seem to have a very minimal gap but not much. After getting the wheels on and torqued, I took it out for a drive. It seems to handle fine. No unusual noises and there really didn't seem to be any real drag. I only went a few miles but have a longer errand to run tomorrow. So should I be concerned about the fit of the inside pads or is that normal? I'm now wondering if there may be a slight difference between the mounting clips for the BrakeBest pads and the AC Delco replacement clips I just bought.
-
Rotor bolts necessary?
mikeyk101 replied to mikeyk101's topic in 2014-2018 Silverado 1500 & Sierra 1500
Since I can, I'm just going to go without. 1 less thing to go wrong the next time around. But like I mentioned, the face of bolt had no rust on. And after pounding old rotor off, what was left easily came out without much effort. The only thing I can think of was the backside of face became frozen and rusted onto the rotor mounting bevel. Although it wouldn't surprise me after what I went through when removing the Rough Country level spacer bolts. That was an adventure I never want to go through again. Pretty sure it was the fault of the bolts. They were only threaded on tip half instead of the entire bolt. If they only used bolts that are completely threaded, there would be less chance of the bolts getting rusted in place on lower control arms.... -
Rotor bolts necessary?
mikeyk101 replied to mikeyk101's topic in 2014-2018 Silverado 1500 & Sierra 1500
Cool, that makes things easier. Thanks. -
So I'm in the process of changing out the brake pads and rotors on the front of my 2016 Silverado 1500. The parts I need won't be delivered until later this afternoon but I decided to get a jump on getting the old stuff off and ready for the new parts. Right side went well and I got everything off. Then I went to left side. Everything up to the rotor went fine until it came to removing the T30 bolt holding the rotor on to the hub. The T30 bit was fitted into the bolt and when turning the socket wrench, the bit broke off in the bolt face and was flush! Oh Yay!!! This was part of the reason I decided to get it started so if any problems popped up, I could get it taken care off to make reassembly easier. So I decided the best way to tackle this was to drill the face off the bolt. It took a while but finally mangled it up enough that a couple pounds with my mini sledge got the rotor off. There was enough of the bolt exposed sticking out of the hub that I could grab it with a pair of vice grips and got it out. And it didn't take much effort to do that. The face wasn't rusted and neither were the threads so not sure how the bit snapped off in the head. But so now, I'm just waiting for the new parts. I called around to several auto parts places including a Chevy dealership and no one has one in stock. I have seen some posts that said it was only used by factory when originally installing the rotors and really isn't necessary. I'm tempted to just put the new rotors on and leave this bolt off on both sides. Any thoughts on this?
-
Do you have the sticker in your glove box to see the RPO codes? All you would have to do is look to see if you have XL7 or XL8.


-
Forum Statistics
250.4k
Total Topics2.7m
Total Posts -
Member Statistics
342,769
Total Members8,960
Most Online
-
Who's Online 13 Members, 1 Anonymous, 1,094 Guests (See full list)