
MotoMedic
-
Posts
1,458 -
Joined
-
Last visited
-
Days Won
16
Content Type
Profiles
Forums
Gallery
Events
Articles
RPO
Store
Blogs
Everything posted by MotoMedic
-
Anyone else notice the "adaptive valve" just after the muffler? Looks like it's a simple spring-operated flapper valve. Explains why, when I rev my engine, the intake is louder than the exhaust! ha Got my Magnaflow 5x8x18 today... add it to this week's "To Install" list.
-
Depends on your dealer.. some will do a swap while others might charge you to have the truck shipped. Locate your truck, then talk to your dealer, and decide if you'd rather possibly pay a little extra or just wait two months for order.
-
For those yet to order, GMC (corporate, not the dealer) will search the entire U. S. for a truck with any specifics you give them. Go to GMC's website and click the Chat icon. Tell the rep exactly what you want and they'll tell you where's the closest match. Might be quicker than waiting the 8 weeks.
-
Those #'s are from 2WD with the factory "nose dive" angle. If you really wanted to squeeze every MPG out of her you could drop the rear a tad, add a bed cover, and even go so far as the adding close out panels under the truck (simple thin sheets of aluminum mounted similar to skid plates but the full length of truck frame). Though depending on how you use your truck, those might be unrealistic.
-
I bought my truck & then drove about 200 miles of interstate to get home. I averaged 21-22 MPG, going 77 MPH, with an outside temp between 85-90 degrees.
-
609 miles on odometer (about 200 hwy, 400 city) & DIC shows 16 MPG average (that's with AT tires, level, & front air dam removed)
-
HID Headlight Bulbs / HID Projector Retrofit
MotoMedic replied to MotoMedic's topic in Modifications & Accessories
-----DAYTIME RUNNING LAMPS (DRL)----- When the HID kit, relay, & capacitors are installed correctly, you should have no issues with the operation of your DRL's. *Many non-SLT owners have inquired about permanently disabling their DRL's. Unfortunately on the 2014+ trucks, the DRL's are controlled by the ECM and you can't simply pull the fuse like on previous models. There's currently a separate topic dedicated to this issue: http://www.gm-trucks.com/forums/topic/157553-disabling-daytime-running-lights-drl/ -----NON-HID LIGHTING TOPICS----- Aiming / Adjusting the Headlights - http://www.gm-trucks.com/forums/topic/158300-aiming-adjusting-headlights/ Aftermarket LED DRL Strips - http://www.gm-trucks.com/forums/topic/158526-silverado-led-daytime-running-lights/ Halogen & LED Headlight Bulb Upgrades - http://www.gm-trucks.com/forums/topic/156233-halogen-led-non-hid-headlight-bulb-upgrades/ LED Fog Bulbs & Lights - http://www.gm-trucks.com/forums/topic/156170-led-fog-bulbs-lights/ LED Front Light Bars & Pods - http://www.gm-trucks.com/forums/topic/155567-led-front-light-bars-pods/ -
HID Headlight Bulbs / HID Projector Retrofit
MotoMedic replied to MotoMedic's topic in Modifications & Accessories
-----HID FOG LIGHTS----- Installing HID fog light bulbs in the 2014's has so far been a mixed bag. Some members have installed operated them for months without incident, while others have had their HIDs melt the fog light housings. It seems to happen across the board and isn't due to one brand running hotter than another. It might possibly be to duration of each use, with some magic number of minutes that, if you exceed, it'll begin melting the plastic. No one has really shown any evidence for why some melt and others don't. So that said, if you choose to install HID fog bulbs, realize it's a toss up on them damaging the housings. -----HID FOG LIGHT BULB UPGRADE SHOPPING LIST----- (1) HID Kit This HID kit will include two HID bulbs and two ballasts (ballasts regulate the amount of current flowing to the HID bulbs). When ordering, you must specify the bulb number, wattage, and color temp: Bulb Number: 5202, 9009, or H16 are acceptable (all three are physically identical but were designated with different numbers by different agencies) Wattage: The majority of HID fogs on this forum have been 35 watt. With those, like I said above, it's a toss up. The 55 watt will absolutely melt your fog light housings. Some discovered 25 watt kits while searching online, but there has been debate if they're actually 25 watt or just re-labeled 35 watt kits. Hard to say what's correct. Color Temp: The actual color of the light, measured in Kelvin. 3500K is stock yellow, 4500K to 5000K is white, and 6000K is white with hints of blue. Color temps of 7000K & above are very blue/purple and are definitely not recommended. (2) 5202 male / 9006 adapter *optional* Most HID fog kits only have two bare wires for connecting to the stock source (which sometimes have metal pins on the tips). You can either jam these pins in the factory fog sockets, cut into the factory wiring and splice in the wires, or purchase 5202 adapters off eBay which you can connect to HID kit and then easy snap into the factory connections.- 3,363 replies
-
- 5
-

-
- hid
- headlights
- (and 1 more)
-
HID Headlight Bulbs / HID Projector Retrofit
MotoMedic posted a topic in Modifications & Accessories
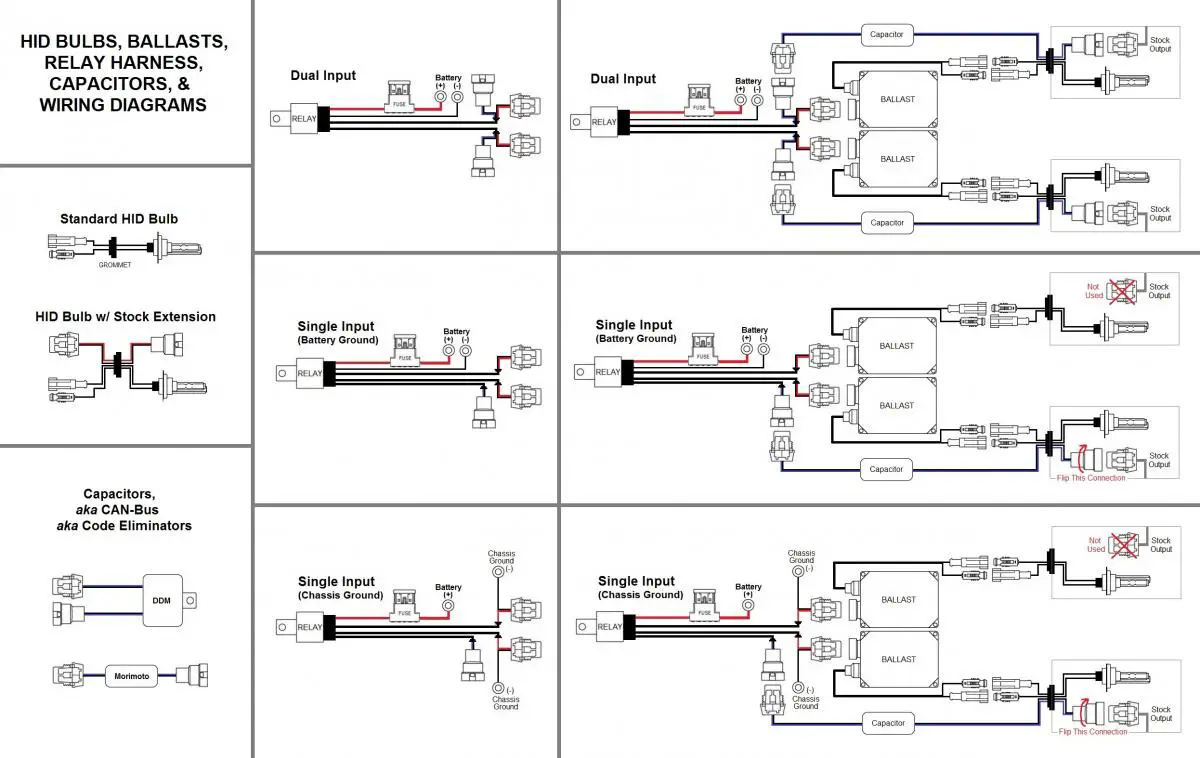
**The Sierra & Silverado HID topics have been merged and edited, in an attempt to create one comprehensive HID topic** This topic will cover HID information, HID headlight bulb upgrades, HID fog light bulb upgrades, as well as installing aftermarket HID projectors/bulbs ("retrofit"). This information was last updated on 04/18/14 -----DISCLAIMER----- Automotive lamps, reflective devices, and associated equipment must adhere to the United States §571.108 Standard #108 to be legal for road use (http://www.fmcsa.dot.gov/rules-regulations/administration/fmcsr/fmcsrruletext.aspx?reg=571.108). Your state or local governments may also impose standards and restrictions on vehicle lighting. If you choose to install HID bulbs and/or projectors, you alone are responsible for compliance and possible legal consequences. -----HID BASICS----- Lumen - a measure of the total visible light emitted by a source Incandescent Bulb – The traditional bulb design which passes electricity through a filament inside a bulb containing an inert gas or a vacuum. The filament heats up and gives off light. Unfortunately, only 5 to 10% of the electricity supplied is converted into light, with the rest being lost as heat. Halogen Bulb – An improved incandescent bulb, which is filled with a Halogen-family gas, allowing it to operate at higher temps and produce more light. The average 9006-type 55watt Halogen headlight bulb produces roughly 1000 lumen. HIR (Halogen Infrared Reflective) Bulb – A further improvement on the incandescent bulb, these Halogen bulbs are given special coatings on the interior of glass which reflect infrared back into the filament, allowing it to run even hotter/brighter than a standard Halogen bulb. The average 9012-type 55watt HIR headlight bulb produces roughly 1700 lumen. HID (High Intensity Discharge) Bulb – A different bulb design from the incandescent, these arc-type bulbs look similar but do not use a heated filament to produce light. Instead, an electrical arc is created between two metal tips in the presence of special gases and vaporized salts contained in a bulb. The electrical arc converts the gases & salts into plasma, producing significantly more light per watt. HID bulbs are often called Xenon because many early HID’s used Xenon gas inside the bulb. The average 9006-type 35watt HID headlight bulb produces over 3000 lumen, while only using two-thirds the power of Halogen bulbs. LED (Light Emitting Diode) – Technically not a bulb, LED’s are a type of semiconductor which produce light through electroluminescence. The short version: electrons jump around and emit photons of light. LED's are very efficient, operate at low temps, and are the future of lighting, but are currently still too expensive to compete with HID’s when it comes to total light output per dollar. Which headlight bulbs do the 2014+ GM trucks use? Silverado - H11 Halogen bulbs for low beams and 9005 Halogen bulbs for high beams. Sierra - 9012 HIR bulbs which function as both the low and high beams. What are projector headlights? Traditional headlights utilize a simple reflector, which results in significant light scatter, similar to a flood light. Projector headlights incorporate a lens forward of the reflector to control the light distribution, resulting in more focused light pattern. They also contain a shutter between the reflector and lens which creates a cutoff line, blocking light above a certain height. Projectors were created to reducing glare to other drivers & pedestrians, as well as reduce white-out in fog & snow. The Silverado's projectors have fixed shutters and function as low beams only (they have a separate traditional headlight for high beams). The Sierra's projectors have movable shutters. The shutter is closed when using low beams and opens when you hit the highs, allowing more light output. This setup is strictly mechanical and the output of the bulb does not change whether using lows or highs. Why upgrade to HID bulbs? Projector headlight systems were originally designed to be used with HID's. Instead of offering HID's in the 2014 trucks, GM opted to go the cheap route and use halogen bulbs instead. The result is headlights many of us consider inadequate, at best. Installing HID bulbs helps to partially correct what many see as a significant design flaw. HID bulbs are not perfect (primarily because of GM's use of inferior lenses and reflectors in the stock projectors) but are a substantial improvement over the stock halogen bulbs. What is a projector retrofit? A projector retrofit is the process of installing HID projectors into vehicles that were originally equipped with standard halogen reflector headlights. It has also come to include any upgrades to a vehicle's existing projectors, whether they be the halogen or HID variety. Aftermarket HID projector retrofits are the best lighting upgrade currently available, but have significantly higher costs and generally require a greater knowledge & skill level to install compared to HID bulb kits. -----HID HEADLIGHT BULB UPGRADE SHOPPING LIST----- Three main components are required for HID install: (1) HID Kit, (1) Relay Wiring Harness, (1) Pair of Capacitors / Code Eliminators / CAN-Bus (1) HID Kit This HID kit will include two HID bulbs and two ballasts (ballasts regulate the amount of current flowing to the HID bulbs). When ordering, you must specify the bulb number, wattage, and color temp: Bulb Number: Silverado - H11 kit Sierra - 9006 or 9012 kit Wattage: The majority of HID kits come in either 35 watt or 55 watt. I personally recommend the 35 watt, which are 150% brighter than the stock bulbs, but not too bright that they draw unwanted attention to your truck or blind other drivers. There are a few members on here running 55 watt kits with no heat/melting issues. Color Temp: The actual color of the light, measured in Kelvin. 3500K is stock yellow, 4500K to 5000K is white, and 6000K is white with hints of blue. Color temps of 7000K & above are very blue/purple and are definitely not recommended. (1) HID Relay Harness The relay harness will consist of relay(s) and the necessary wiring to connect to it to the battery, ballasts, and stock headlight output(s). This harness allows the HID's to run straight off the battery and is required for a proper installation. (1 to 2) Capacitor(s) / Error Code Eliminator(s) / CAN-Bus On the 2014's, the factory headlight wiring contains a type of "electronic noise" known as PWM (pulse-width modulation). When PWN is introduced to the relay or ballasts, it often causes the HID's to flicker/fail and the relay to make a loud buzzing sound. Capacitors correct this issue by filtering out the PWN and passing along a clean signal to the relay/ballasts. If you purchase a single input harness, you need (1) capacitor to complete a proper install. If you purchase a dual input harness, you need (2) capacitors to complete a proper install. That said, the vast majority of vendors only sell them in pairs. -----HID HEADLIGHT BULB BRANDS & VENDORS----- Morimoto (made in South Korea) Morimoto's are the Mercedes of HID's. High quality stuff but at a high premium. If you decide to go with Morimoto's, you need to buy the HID kit and choose the included HD relay harness option. You'll also need to purchase separately a pair of CAN-Bus error code eliminators. (1) HID Kit with included HD Relay Harness + (1) pair of CAN-Bus = $180 + S&H http://www.theretrofitsource.com/ DDM (made in China) DDM is a US vendor that drop ships HID kits straight from the factory in China. On the plus side, you save a ton of money on the price, but the trade off is their shipping takes 2 to 3 weeks. Normally, I try to stay away from cheap chinese electronics, but myself and many others on this forum have been using DDM for years with no issues. I highly recommend their kits as an economical alternative to Morimoto. That said, a few forum members have reported receiving bad ballasts that failed to ignite right out the box (based on what I've seen on the forum, I'd say it's 1 in 50). DDM will send you a free replacement, but you do have to wait 2 more weeks. I don't think I've seen any members report bulb/ballast failures past the initial install. If you're worried about being that 1 in 50, you can go with a higher-end brand HID kit or you could order two DDM HID kits and have plenty of spare parts (that's what I do, because two DDM kits are still half the price of one high-end brand kit). **I do not have any direct interaction with DDM, other than as a HID customer, nor am I paid/compensated for recommending their products - I'm simply think it's a good deal** (1) HID Kit + (1) Relay Harness + (1) pair of Capacitors = $55 + S&H http://www.ddmtuning.com/ 250MotorSportz (made in China?) I really don't know much about this company or their HIDs Forum member icecrm is affiliated with them and he posted a really good "How To" HID install with pics further down in this topic. (1) HID Kit + (1) Relay Harness + (1) pair of Capacitors = $170 + S&H http://www.250motorsportz.ca/ Amazon / eBay (made in China) You can find all kinds of different brands/vendors on Amazon, eBay, and other online retailers. There's no "wrong" brand to buy, as the majority are all made in China anyway. Most people on the forum are either Morimoto or DDM, but I'm definitely not saying you should only choose from those! -----HID HEADLIGHT BULB INSTALLATION----- When completed correctly, installing HIDs is a simple process that makes a dramatic improvement. No kit out there will be a 100% plug-n-play setup because of the 2014's sealed headlight design. Current kits are roughly 75% plug-n-play, mainly involving connecting plugs and installing +/- leads to battery/grounds. The 25% exception exists because all HID kits will require the drilling of a small hole in the headlights' rear-facing removable caps to allow the bulbs wiring to reach the ballasts. It's not difficult by any means and, because the caps are removable, you can buy replacements if you ever decide to remove your HIDs in the future. Testing - Before beginning any install, you should test your bulbs and ballasts! The last thing you want to do is go to all the trouble of installing everything, only to find out you have a bad component. With the engine off, lay out the parts on the radiator cover and make all the necessary connections. For the test, use the driver's side factory headlight output, since it's the less difficult to access. It's often also easier to use jumper cables to connect the +/- for this temporary setup. Once you're ready, test the lights with the engine off and then with the engine on. If possible, do in daylight to test DRL activation and then cover light sensor on dash to simulate night to test auto-headlights. Wiring - In order to access the rear of passenger headlight and complete a proper install, you will need to raise the air box's cover and remove the lower portion of box and filter. You can leave the top attached to the intake tube and just move it out the way while working. The cover is held on with (4) screws. The lower box is held in with rubber plugs along the bottom... just yank straight up on box to remove. There are several different styles of wiring harness out there, but whichever you end up with it's important to determine if it's a Single Input or Dual Input harness. Each has a slightly different wiring method. -Single input harness will have two headlight-type plugs for the ballasts and a third input designed to connect to the stock headlight source. You must flip/reverse the connection between the stock signal and capacitor to account for the truck's reversed polarity. From the capacitor, you'll then connect relay, to ballasts, then to bulbs (see attached diagram) -Dual input harness will have two headlight-type plugs for the ballasts and two inputs designed to connect to the both stock headlight sources. You will not flip any connections during wiring. The stock signals connect normally to capacitors, who then connect to relay, to ballasts, then to bulbs (see attached diagram) Regardless of which you have, just remember the flow should be "Stock Signal ---> Capacitor ---> Relay ---> Ballasts ---> Bulbs" Access Holes - Most HID bulbs come with rubber grommets pre-installed on their wiring. If yours didn't, you can pick the up at a parts store. Basically you just drill the appropriate sized hole removable cap, pass through wiring, and secure the grommet in the hole. You might also consider using butyl rubber or silicone around the grommet for extra moisture protection. (icecrm has a good picture of this in his post later down this topic). Bulbs - This should go without saying but never touch the glass part of the headlight bulbs, HID or Halogen! The oils on your fingers may cause them to shatter when they head up. Many HID kits include additional O-rings, so that you can adjust the fit of the bulb in the socket. If your kit did not include any, and you feel the bulb isn't seating correctly, you can pick up spares at any parts store. Keep in mind however, the majority of HID bulbs will never fit as tight/snugly as the stock halogen bulbs, so don't fret too much. It's important to note there is a certain orientation in which the bulbs must be positioned when inserting into the stock housing. I can't remember the exact was to insert them as it's been a good while since I did mine, but there's a simple way to check if your are correct. When parked about 10 feet from a wall, if you notice little diamonds of light above the cut-off line, it means you need to rotate the bulbs' orientation slightly (if you thumb is at the 9 o'clock position when removing, without changing grip, try inserting the bulb with your thumb at 12 or 1 o'clock). If you're not sure about your wiring harness, a specific connection, or anything else, feel free to shoot me a message.
- 3,363 replies
-
- 10
-
-
- hid
- headlights
- (and 1 more)
-
Sorry, I'm adding an amp and 10" sub to the existing system. The 2014's Bose low end sound is very disappointing.
-
Like the title says, what's the best way to add an amp for sub to the GM Bose system? Hoping there's something better than tapping one of the rear speakers and adding in-line converter.
-
2014 GMC Sierra: Back-up Lights - 921 (W16W) Center Cargo Lights - 921 (W16W) Center Stop Light - 921 LL Fog Lights - PS24W Front Turn Signals - 7443 LL High/Low Beams - HIR-2 (9012 LL) License Plate Lights - W5W LL Rear Side Marker Light - 194 Rear Turn/Stop Lights - 7444 LL 2014 Chevy Silverado: Back-up Lights - 921 (W16W) Center Cargo Lights - 921 (W16W) Center Stop Light - 921 LL Fog Lights - PS24W Front Turn/Park Lights - 7443 LL High Beam Lights - 9005 LL Low Beam Lights - H11 LL License Plate Lights - W5W LL Rear Turn/Stop Lights - 7444 LL Bulb Names/Sizes Cross-reference Table: Common Lighting Themed Topics: Headlights: Aiming & Adjusting http://www.gm-trucks...ing-headlights/ Headlights: Halogen & LED Bulb Upgrades http://www.gm-trucks...-bulb-upgrades/ Headlights: HID Bulbs & Projector Retrofits http://www.gm-trucks...ector-retrofit/ Fog Lights: HID Bulbs (HID Fog Bulbs are covered in the HID Headlight Topic) Fog Lights: LED Bulbs / LED Lights http://www.gm-trucks...g-bulbs-lights/ DRL's: Disabling Daytime Running Lights http://www.gm-trucks...ing-lights-drl/ DRL's: Aftermarket LED's http://www.gm-trucks...ng-lights-drls/ Sierra SLE - SLT Headlight Swap http://www.gm-trucks...for-slt-w-leds/ Front LED Light Bars / Pods http://www.gm-trucks...ight-bars-pods/ Interior LED Accent / Dome Lights http://www.gm-trucks...-lighting-fuse/ Exterior LED Accent / Puddle Lights http://www.gm-trucks...ng-pods-strips/ Reverse / Rear Cargo LED Bulb Upgrades http://www.gm-trucks...se-cargo-bulbs/ Add-on LED Reverse Lights / Pods http://www.gm-trucks...se-lights-pods/ GM & Aftermarket LED Bed Lights http://www.gm-trucks...il-bed-lighting
-
Carpet in wheel wells?
MotoMedic replied to Sir Dan's topic in 2014-2018 Silverado 1500 & Sierra 1500
STAINMASTER®...? -
Disable Seat Belt Chime Nanny
MotoMedic replied to wescollins's topic in 1999-2013 Silverado 1500 & Sierra 1500
Eh, after 9 years it's not really exciting anymore... the less I have to do the better! ha -
Disable Seat Belt Chime Nanny
MotoMedic replied to wescollins's topic in 1999-2013 Silverado 1500 & Sierra 1500
I really hope your decision to skip wearing the seatbelt isn't based on one of those "my friend would have died in the wreck if he were wearing a seatbelt" stories. As a medic, I can promise you that you're 1,000,000 times better off with it on. I consider myself a great driver.. I always wear mine b/c of all the other horrible drivers out there! Just my $0.02 Hopefully you don't get in a wreck and break your face on steering wheel, shatter your legs because they crash into lower dashboard or get your scalp removed by the sun visor. (seen all those things happen without belts) -

-
Forum Statistics
250.4k
Total Topics2.7m
Total Posts -
Member Statistics
342,765
Total Members8,960
Most Online