Leaderboard

.thumb.JPG.2c573de60d3a3a4407c7d92298db46dd.JPG)


Popular Content
Showing content with the highest reputation on 02/06/2025 in all areas
-
3 points
-
A homeless guy asked me for money today, so I looked in my pocket for change, but all I had on me was a $100 bill. I thought to myself "Do I really want this $100 going towards alcohol, gambling and wild women?...Nope, not today!!" So I gave him the $100.3 points
-
2 points
-
Machinations II Did we agree that 0W20 is a fuel economy move? That we would go lower but wear would make life so short they couldn't afford the warranty work. This hasn't been happening like setting that pot of frog on a blow torch. API Spec SAE 30. 100 C viscosity range 9.3 cSt to <12.5 cSt. 150C HTHS 2.9 cP minimum. Valvoline SAE 30. 100 C 10.3 cSt. 100 C HTHS 10.2 ish 150C HTHS 3.3 cP. Warren Oil 5W30 100 C 10.9 cSt 100 C HTHS 6.9 cP! 150 HTHS 3.2 cP 100C SSI is 9.4 cSt. That part in red is the viscosity the cam and lifter see. This is a SAE 20 with a 5W30 label and it's legal. AMSOIL SS 5W30 100 C 10.3 cSt. 150 C HTHS 3.1 cP AMSOIL Euro 5W30 100 C 11.3 cSt 150 C HTHS 3.6 cP (Huston, a winner!) Red Line HP 5W30 100 C 11.9 cSt 150 C HTHS 3.7 cP (Competition is AMSOIL SS not EURO) Red Line HP Euro 5W30 100 C 11.6 cSt 150 C HTHS 3.6 cP. I'd bet dollars to donuts that both of these brands use a Star polymer and have an SSI of 0. MPT30K 5W30 100 C 10.9 cSt 150 HTHS 3.9 cP. Also has a SSI of 0 and 100 C HTHS shear loss of 0% This one uses NO VII. Back in the day we had zero shear down because we didn't use VII's and reasonable HTHS values and SSI 0 results Big Box Oils are chock full of low grade VI and in use, under shear are a grade lower than their label. THAT is how they get the Fuel number while the public is thinking this oil is so advanced we get better mileage from the same SAE Grade. Oh brother. Oh it's the same GRADE it just isn't the same viscosity...IN USE AT OPERATING CONDITIONS. Then the OEM increases the water temp, the oil temp and load and gets that viscosity lower and the film thinner. It has said SAE 5W30 on the bottle for decades but the vis has been on a slide to zero ever since. Partly by chemistry and partly by REGULATION. The SAE grades have gotten thinner the HTHS minimums lower and lower. I don't hate or love any particular brand but I use the ones I KNOW have the goods to get the job I WANT DONE, DONE. If Red Line, Torco and MPT all go belly up tomorrow then I go to the next best I can source and grade up. And when they take that option away the nest best I can find. At some point I ride a horse. But I won't swallow the being sold as technology. What I won't do is buy an inferior oil if I have a better choice. I don't base that on blender owned lab work. I do it on tear downs and running UOA/VOA's. This WILL mean that I WILL use some additives. ZDDP. And I'm not using a W20 that in use is a W10.1 point
-
1 point
-
Rarer than a Bigfoot sighting
 1 point
 -
Good to hear.1 point
-
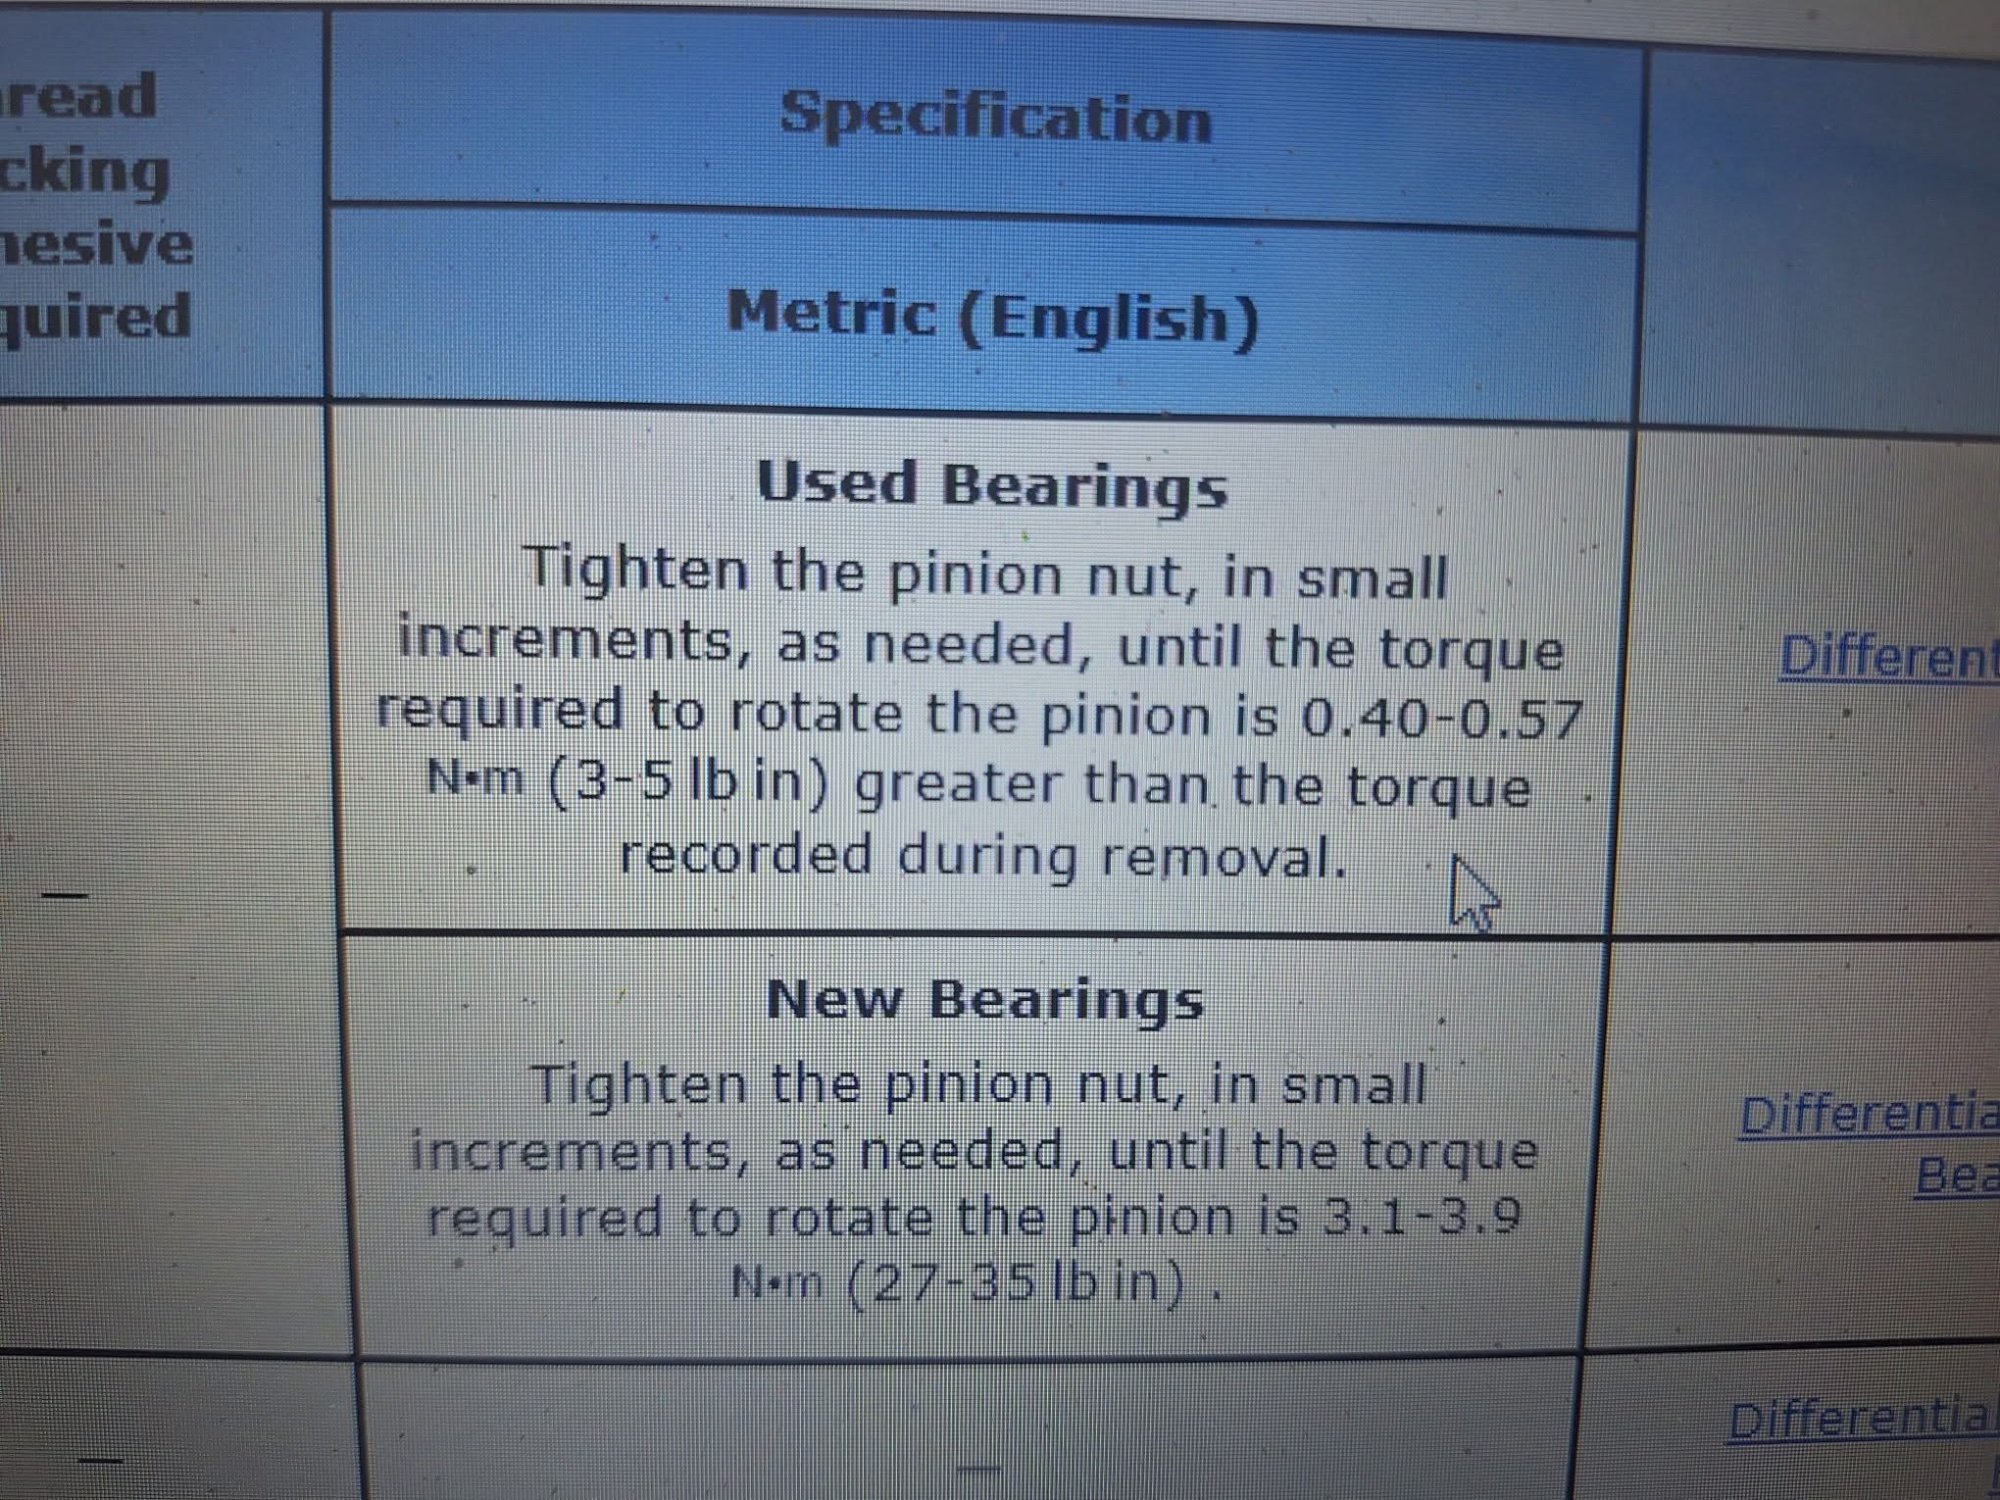
There's no torque spec to crank down on the pinion nut. Torque is established by the rotational torque reading in inch/pounds. You don't measure how much torque it took to remove the nut and add 3-5 pounds when putting it back on. Some guys like Marty who use witness marks get away with it. I reckon that Marty didn't crank past the full width of the witness mark when he put his back on. Half a hair maybe, Grumpy Bear?1 point
-
Fair questions. You are familiar with boiling frogs in a pot? What do TRUE synthetics bring to the dance? For the same 100 C viscosity they improve the HTHS viscosity. They are more oxidation resistant. Can, in synergies, improve lubricity, or slickness and due to the high VI's of most reduce the amount of VI needed to span a particular grade. But Nick, this is in response to everything that is being taken away. Lower ZDDP levels, for example, reduce base oil oxidation resistance (they do the heavy lifting) so they TRADE one for the other instead of Synergizing a true improvement. That in response to REGULATION that is requiring lower phosphors levels. Ditto reduced Calcium levels. Often at the sacrifice of TBN which would lower OCI IF a synthetic base stock wasn't helping improve oxidation to begin with. So that is why more common and yet, not always. PAO is being replaced by Group III/III+ and a good dose of marketing As far a not fixing what ain't broke.....PROFIT MARGIN. You run a nice business. How do you like increases in your overhead? What is your response to that? The dog and pony show going on in lubrication is pathetic given the science we have. No new regulation that improves our daily life is made without an ROI. Someone is making a killing on the destruction of ICE. For every one thing they improve (base) they take away that advantage with less of something or a cheaper less effective alternative. (adds) they are in a race to the bottom of the drum. Every generation forgets the past and like Lemmings MUST repeat their forefathers errors. Because hey, every 16 year old believes his fathers is out of touch and an idiot. Every 30 year old thinks those 70 are feeble minded old sots. Here's a question for you my friend. Why do people believe the person that lies to them with the greatest skill? With the biggest 'Branding". The largest marketing budget? The.....1 point
-
If oil has not improved over time, "better", then why change what isn't broke and why is synthetic now more the norm?1 point
-
Maybe it’s where I lived during the seventies. The average life of a vehicle was 100K miles. About 10 years for older or low mileage drivers. Payment’s lasted 3 years so no one complained. Now most any vehicle will last 200K miles. For most people that’s over 10 years even in Texas. Not many people keep a vehicle that long. My 20 year old truck runs like a champ but weird stuff goes out on it. Rubber brake lines, pristine leather seats are getting brittle. All the rubber gaskets are hardened. I only deal with it because it looks nice and I drive it 20 miles per day. I play my phone through a blue tooth speaker because only one speaker works in the truck. But it looks good and runs good. All on regular proscribed oil. Oil isn’t the problem time is.1 point
-
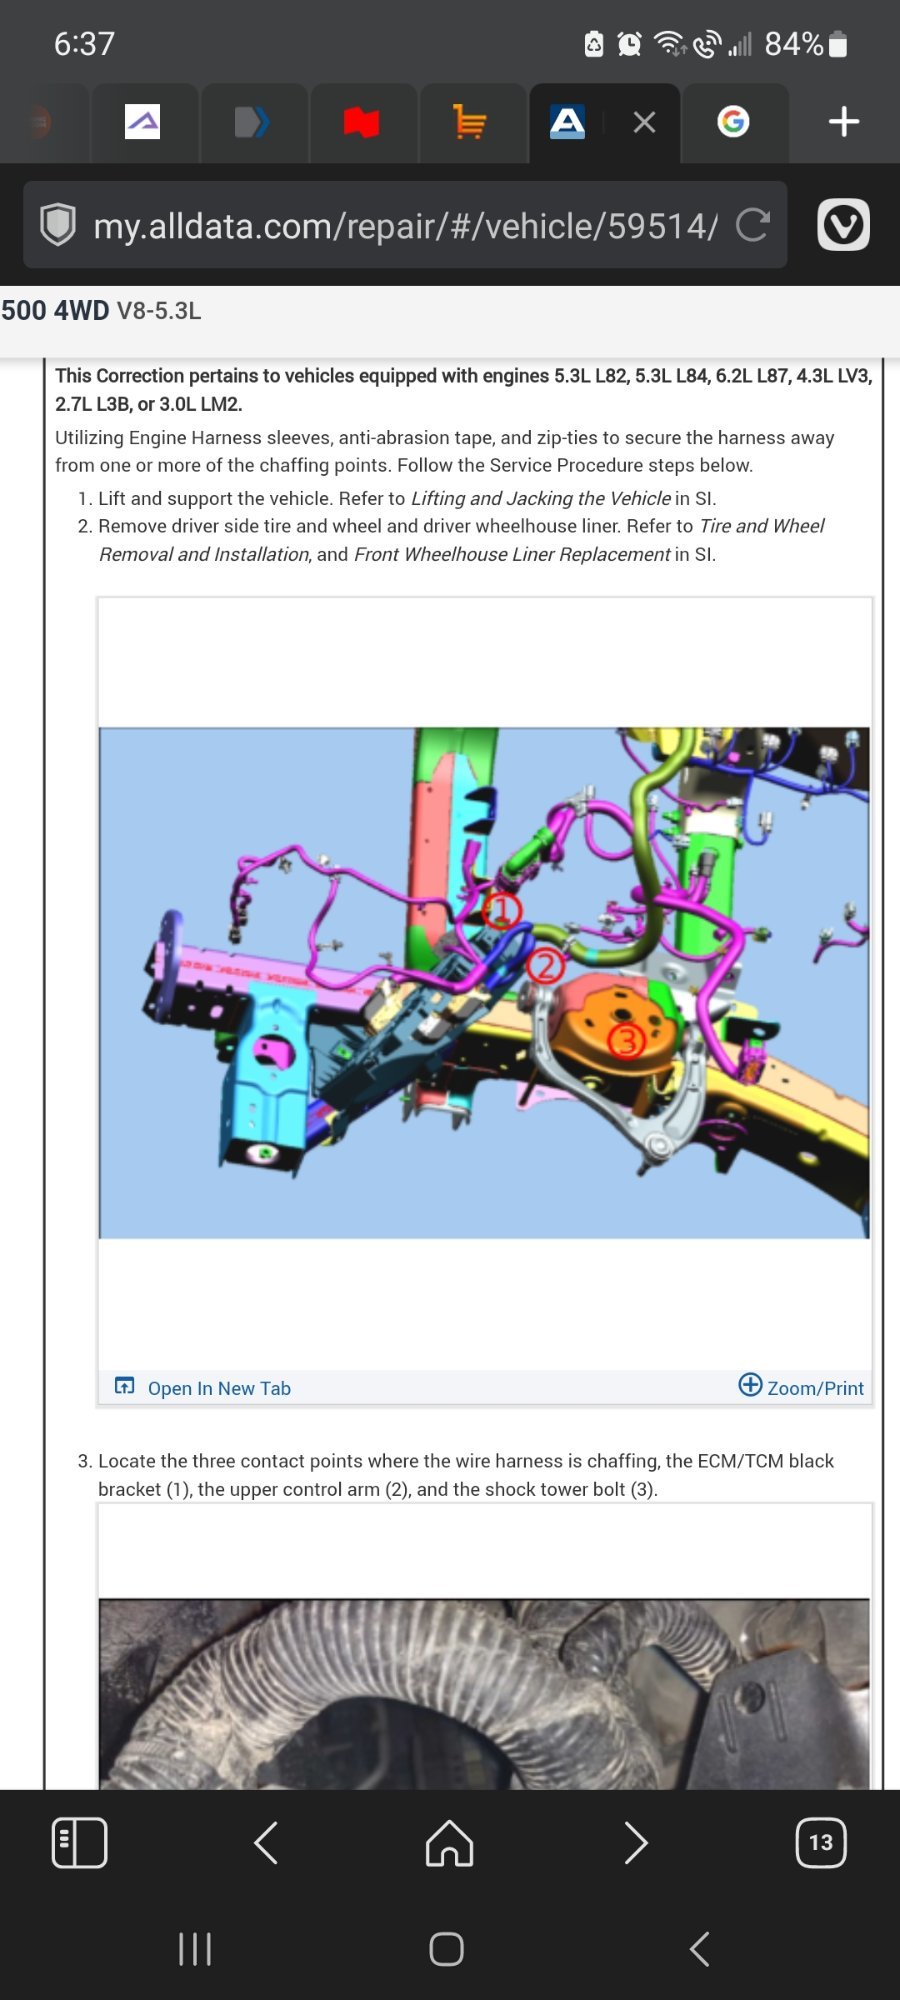
From my research there many people one gm forums that have brought their truck into the dealership (for months) for this issue, they changed the battery, starter, underhood fuse panel, the fuel pump module, the steering column module, ignition switch, harnesses and they still don't have it fixed.that video above is another perfect example of a the dealer doing the parts cannon to troubleshoot. The result is the customer is frustrated about wasting there time/ not having a truck, the dealer and engineering are scratching their heads on an issue that is labour intensive to figure it. Thats why I will never bring my truck to the dealer. If you ask chatgpt which is the most unreliable truck for every year from 2019 to 2024, the answer for every year is the gmc/chev 1500. Ford doesn't use corrosion prone ground straps. For those years the f150 was at the top of the reliability rankings. So what is the solution to all these problems? Having a truck that didnt want to start start 50 times in 4 years with 85k km of ownership has left me severely regretting choosing a brand that I thought was reliable at the time of buying it.1 point
-
Unless you've got paper thin hands, no. All you really need to do is lower the tank enough to change it, or raise the bed just enough to change it.1 point
-
'22 Sierra Elevation 5.3 is a dealer custom done by a local shop here. It came with 20X9 or 20x10? matte black rims (unsure of manufacturer? and actual width size?), 305/55/R20 BFG KO2s, no rubs. Has a RC lift either 3" or 4" (conflicting info from dealer) and the plastic mud flaps are trimmed. Looks like some carpet is trimmed off also. Planning to replace the wheels sometime soon but the ones I want are backordered so I'm waiting awhile to see if they become available. Not sure if I'll go with the same tire size ?
1 point
-
If you do not have a factory trailer brake controller, there is a CMHSL wire taped up under the dash. I believe the wire is orange on these trucks and it should be marked.It is in the aftermarket trailer brake controller bundle. Look it up in gmupfitter.com. It is up by the steering column.1 point
-
It would be easier if the search feature was used. But alas, no joy so, they keep asking and I keep answering. It seems there is a belief that IF you ask the question often enough the answer will change.1 point
-
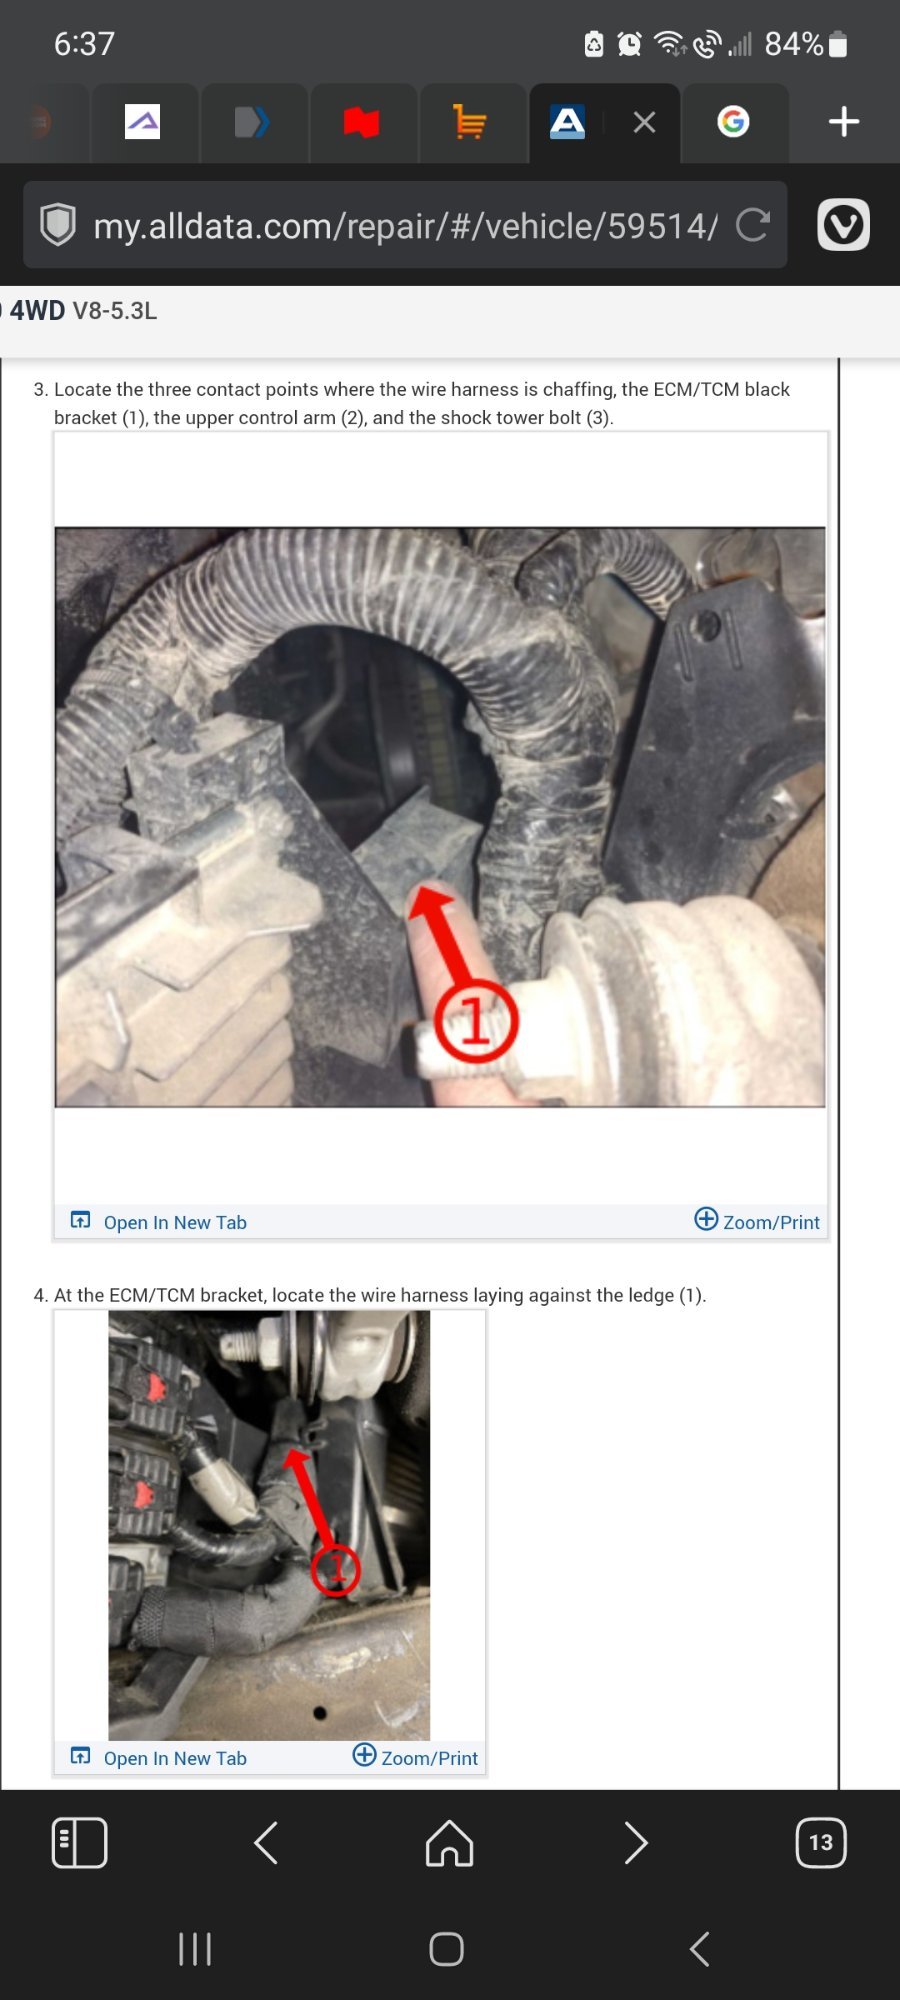
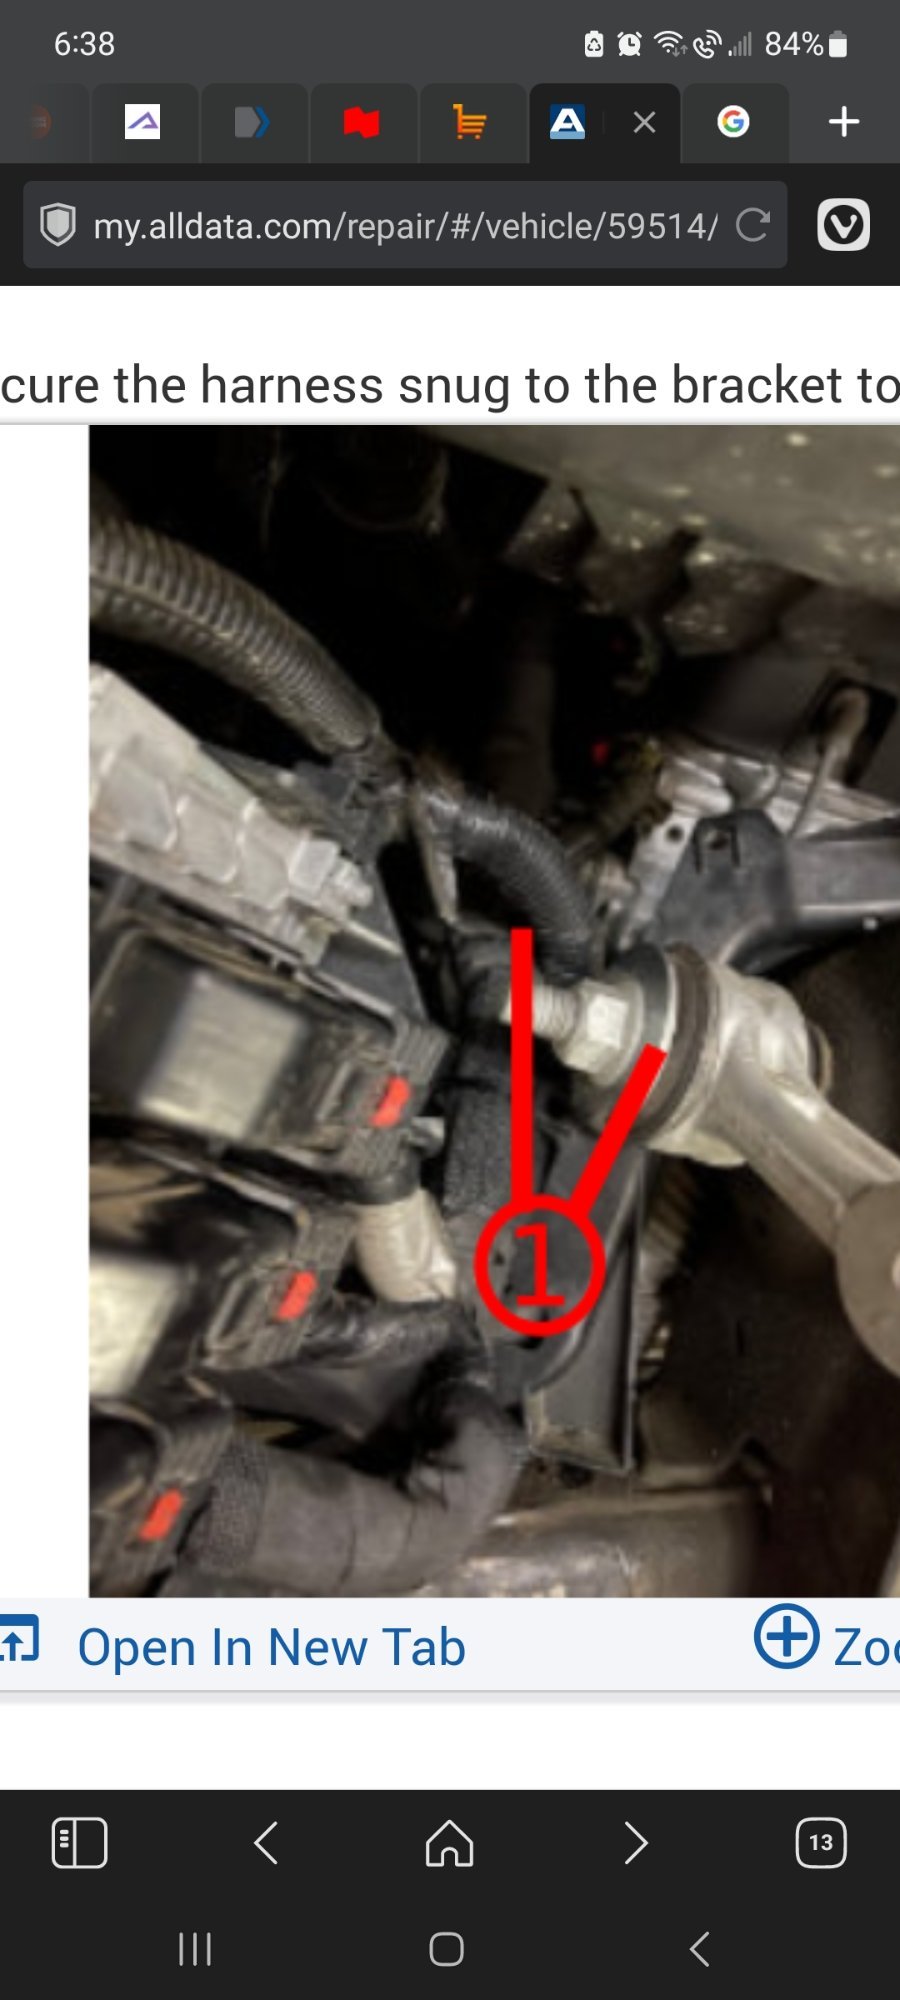
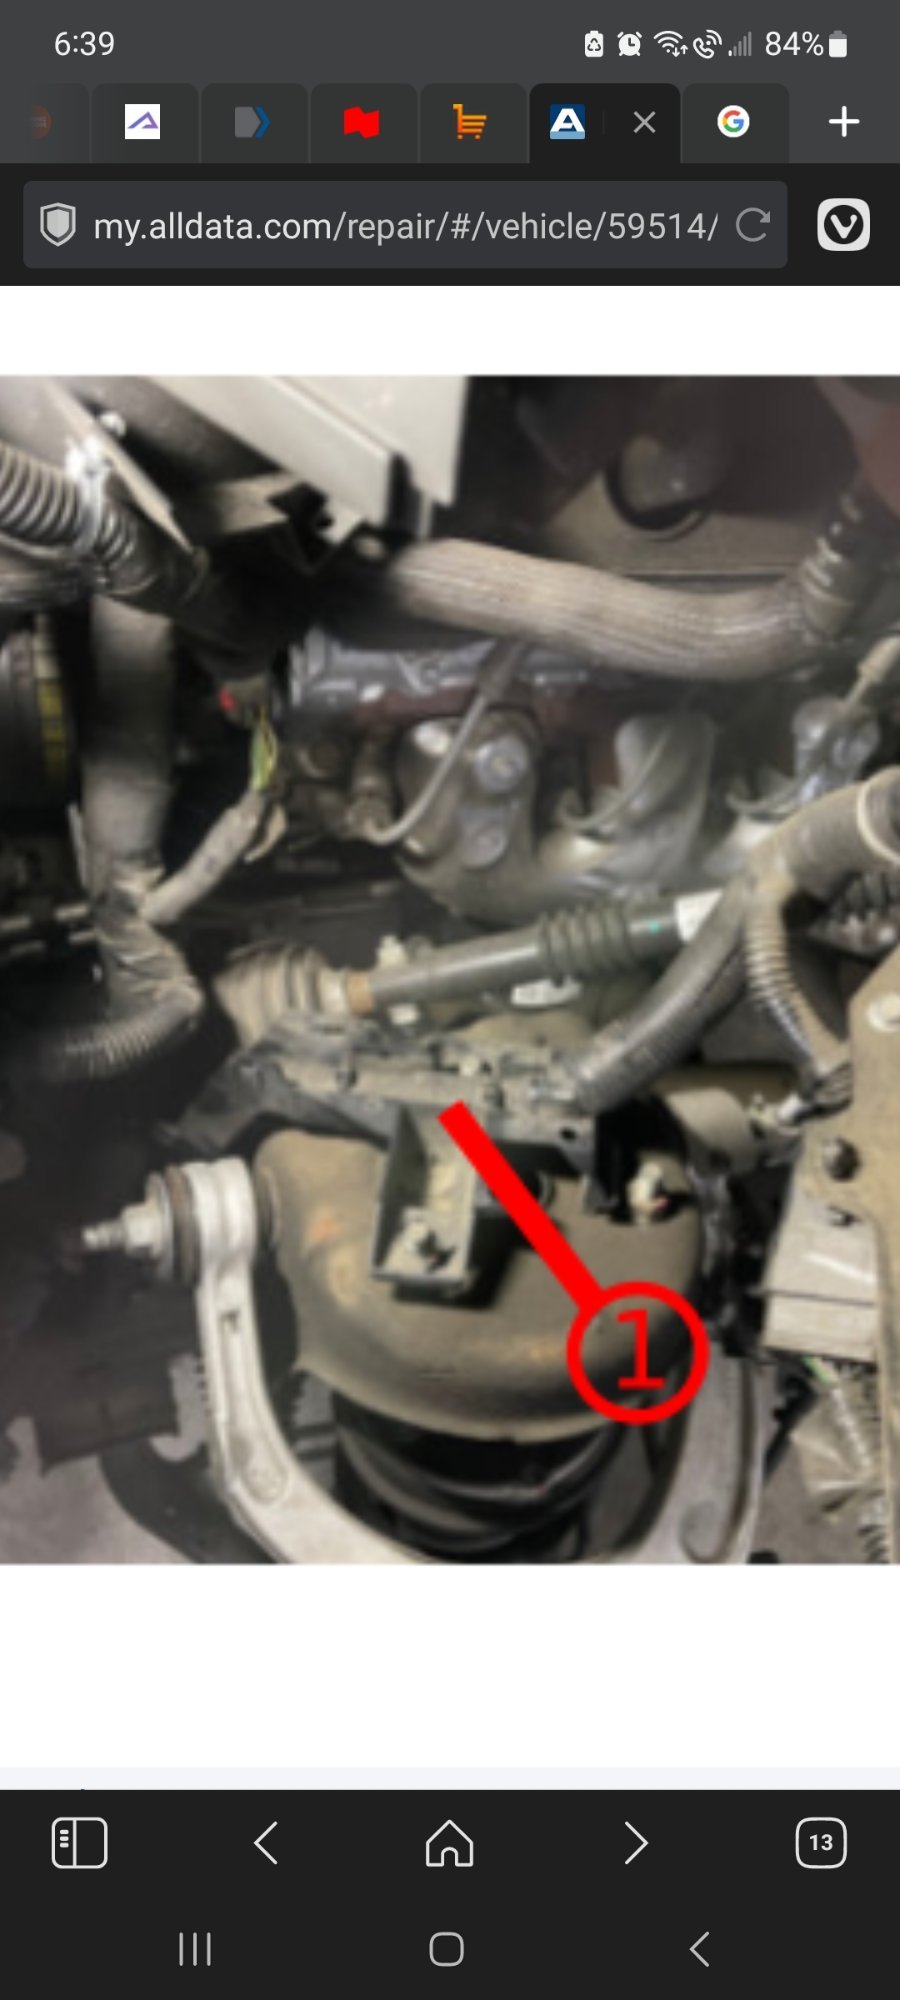
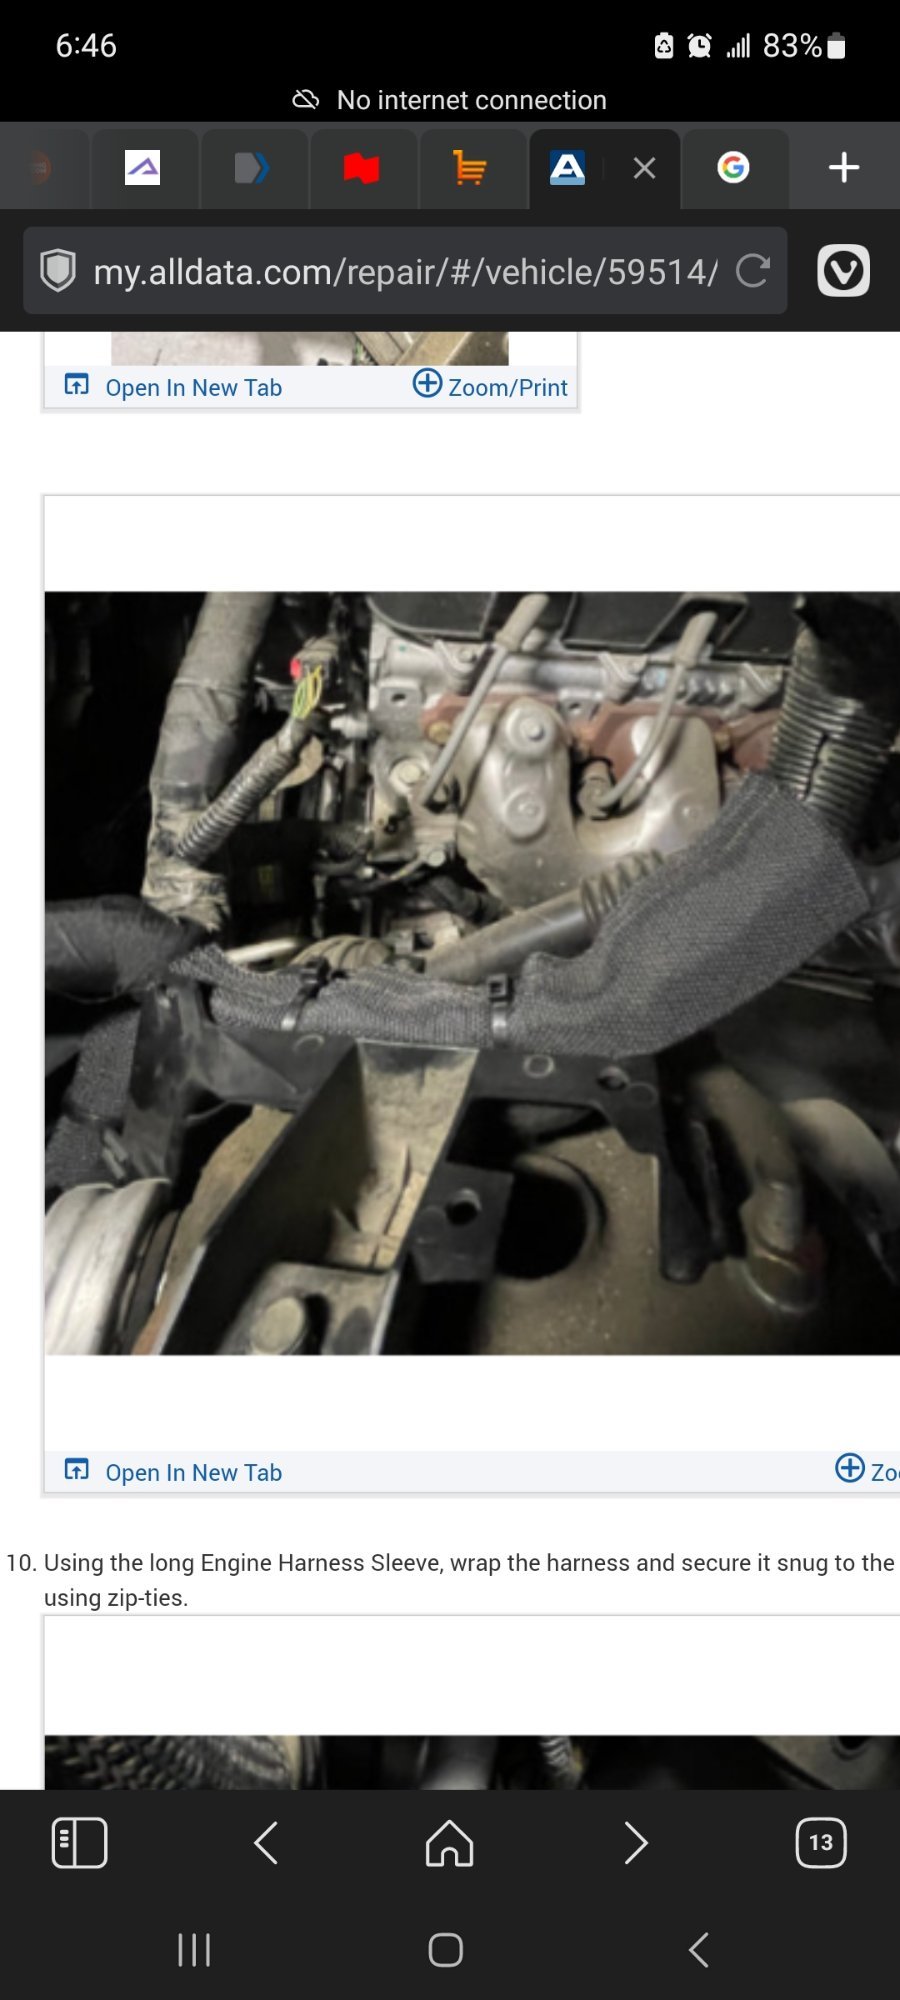
I fixed all my problems Cleaning the fretted ecm connectors definantly fixed my issue.Basically because they put the truck together with no dielectric grease from the factory. The vibration between the unlubricated male and female ECM terminals cause wear, which caused dust to accumulate between the contacts (this dust is only visible in the first close up pic). That dust is the resistance that caused the bad connection when it was cold. I had no issues starting repeatedly for 2 weeks at -20C to -35C after I only cleaned the ecm male terminals and replaced the ECM Ignition relay. My starting success rate was 10% before doing that when it would be colder than -20C. See the pics of the brutal terminal fretting. here. https://drive.google.com/drive/folders/1XUT38ks-bXoX2nkBImeKDQfxghTkoD82?usp=sharing I found more issues with my truck bellow which would of caused me to loose my power steering and brake boost due to my severly corroded ground which had 84000KM (on my 2019 just like in the video ) on it in the salt belt (theres a bulletin on this) For anyone that wants to see pictures of the ECM harness MOD I did (reroute so it doesn't wear/ hydraulic hose wrap mod), every ground location in alldata diagrams, the new weather resistant ground straps I made to replace the gm corrosion prone straps and the location of my corroded ecm wire, check out my google drive pics link. https://drive.google.com/drive/folde...XI?usp=sharing I drilled a few holes in the ecm plastic mounting bracket to feed zipties threw the holes to secure harnesses to the ecm bracket that were previously just wearing on the bracket previously due to the poor routing (its the oem way) of the harness. The corroded grounds behind the right front fender liner are well hidden as I never spotted them everytime I was under the truck with it on the hoist since owning the truck. Thanks to silveradosid in helping me resolve this problem. Both straps were corroded, Engine to cab and Cab to Frame. See the all data pics for exact ground locations in the link above. I spent 2 days inside the engine bay with the airbox out, taking apart the ecm harness, inspecting for opens, soldering the coroded ecm wire for ECM switched ground for HIGH speed cooling fan (temporary fix), putting the ecm harness back together properly, securing the harness, so it wont wear on anything. The loose wires inside the harness are now taped tightly together .If I have anymore issues I will be buying a new ecm harness.which is arround 750 CAD. The problems I noticed with the GM's jackpot ECM/TCM/ FAN harness routing are: After 4 years of driving, the engine harness cable trays succured to each stut frame mount on both sides of the engine, were unsecured flopping arround with every bump, all the zipties holding the harness to the black plastic cable trays were loose.Meaning the harness was free to move with the cable tray that was free to move. There were rocks between the harness and the cable tray poking at the harness.This didn't seam to cause any damage to the harness, I have not opened that up yet for inspection. I used flange nuts to tighly secure the cable trays to the existing studs from the stut mounts (see in the pic). I used hydraulic hose wrap on the cables in those trays and anywhere there is a jackpot of harness that can wear everywhere. I rerouted the Fan harness from the ecm harness so it can't wear, also secured it to the ecm bracket (made holes in it for zipties). The octopus jackpot section of the ecm harness next to the ecm was taken apart for inspection. I noticed none of the wires were tighly taped together inside the harness bundle. Which is no good considering that the harness is always getting tugged on when the engine torque raises the engine/flexing the engine mounts, pulling on the harness which is connected to a fixed frame object (ECM). The fan harness wore on the corner of the plastic ecm mounting bracket. The chaffing from 4 years of driving did not penetrate the tape arround the harness, it caused the loosely danging wire inside the harness to wear and corrode severly a wire which was the switched ecm ground that sends the High speed signal for the cooling fan. (no code for this ever) The ecm mount seemed quite flimsey/to flexible (maybe so it flexes when the engine pulls on the harness?) which was likely causing more vibration between the ecm and its harness terminals.(possibly why my ecm male terminals were fretting) I used a HD strap pull the ecm down tighter to the frame. Great spot for an ecm, gm will probably save a billion dollars in recalls if there is no data log to investigate for crashes caused by something that would require a recall . The ecm is behind the bumper, it will likly be immidiatly be destroyed during frontal impacts. I took apart, cleaned and inspected the ecm/ tcm connectors, all other connectors nearby, and applied dielectric grease (since it was assembled with no dielectric grease in mexico) which should prevent any future fretting between terminals. I learned that fretting is caused by not using dielectric grease. Every ground underhood was installed on a painted surface. I removed the paint and cleaned and dielectric greased every under hood ground. After I did all that. While driving, I noticed the OBD voltage is no longer all over the place, no longer noticably lower in voltage than all the ecm ignition voltages and all the ecm ignition voltages are not irratic anymore. The truck cranks a bit faster and I have had no codes or cold starting issues at all now. I will be cleaning the grounds in the cab and checking out the BCM connector pins for corrosion/fretting as salty winter boots are constantly bringing in fresh salt into the cab.1 point
-
Torque spec is different on the previous gen I believe.1 point
-
My 2015 had this leak. Found it to be leaking around the seal not through it. New seal with a smear of RTV clear on the O.D. then drove it in. Leak free since. 10 years now. Didn't know about the torque spec. I used a witness mark.1 point
-
Start with the P0711 first then. As someone else mentioned already the converter might not be locking due to it not knowing the fluid temp which could decrease MPG. As for the plugs, you'd be surprised. Modern GMs are VERY sensitive to aftermarket engine components. Plugs, wires, MAF, MAP and especially O2 sensors.1 point
-
Are you getting any codes for transmission temp sensor fault? If you have no brake drag, and the transmission temp sensor isn't at fault, I'd get a set of OEM plugs. Use the old # 12622441 and not the new one 19459511. Don't get an "OE equivalent".1 point
-
If you have a 2016 with 6.2, there's extended coverage on the trans temp sensor. GM released a special coverage that extends the warranty to repair this, up to 10 years or 120,000 miles. It's special coverage #N192291660. This isn't a cheap fix, mine went out not long ago and was $900 out of pocket. They have to drop the pan and replace the sensor and harness. For whatever reason the special coverage only applies to model year 2016. Although I'm not sure this has anything to do with your MPG issue, I had the same as you with erratic trans temp readings then eventually a check engine light that would come on and off but didn't seem to change MPG. Here's a separate post on it you may find helpful.1 point
-
Unfortunately I dont have the old plugs, otherwise I would do just that. I tossed them with all the packaging from the other components. I did think about the brake dragging, but I have checked the rotor temps after a long ride and don't seem to have any big differences in temperature. I'm also not putting any more foot into the pedal, it just seems like as soon as i rest my foot on the pedal the instant MPG meter drops to below 10, even during slow acceleration. I will for sure try the MAF sensor and report back. Not sure how to look into the data log but I am sure I can figure it out. This may make the most sense to me. its funny, sometimes it seems like all of a sudden I am getting better gas mileage again ( judging by the instant meter) and I jump back to the trans temp reading and it shows a steady temp. Almost like sometimes the sensor does behave correctly, and when it does, that's when the mpgs go back up, but it could just be my imagination... that instant mpg meter doesnt tell the whole story.1 point
-
In addition to the above: The transmission temperature sensor, if it is bad, could be preventing torque converter clutch lock up; this would lower mpgs, especially on the highway.1 point
-
Ditto on what CamGTP said. Plus since you did a brake job, I would also check to make sure you don't have a brake dragging. If you still have the old plugs, you could put them back in to see if your MPGs go back up. If the MPGs do go back up, then the NGK plugs are the issue. Just a thought...1 point
-
If I was trying to figure it out I'd be looking at a data log to see how the engine is running on the freeway. Like watching various sensors and fuel trims to see what they are reading. If you haven't ever cleaned the MAF sensor, I would do that too.1 point
-
So I have figured out how to get a Vtrux to pass smog, even in California. It took a lot of digging and some CANbus reverse engineering. Via definitely did not ever intend for these to pass smog test on their own. Basically, what's going on is that many of the O2 and catalyst monitors run in the 'deceleration fuel cut-off' (DFCO) state. Normally, the truck would enter this state whenever coasting on the highway, but since the Vtrux doesn't have the transmission anymore, when you're coasting on the highway, the engine drops to idle and the tests never complete, no matter how much driving you do. In order to get the tests to run, you have to get the engine into the DFCO state, which in the Vtrux means backdriving it with the electric generator motor. With a bit of digging around on the truck's CANbusses, I was able to figure out the message that carries the torque command to the generator motor's inverter, and then rigged up the truck with my laptop, a couple USB-CAN dongles, and a Python script to modify that message and backdrive the generator at certain times. With this, I was able to get the monitors to run, then I undid the mods I did and was able to get it to pass smog and get my plates. I made a video detailing the whole adventure here, and I attached my script as well. Overall, the Vtrux has never fully stranded me but it has a history of being fussy. It used to like to not start on me sometimes, but I eventually found that the 12V battery negative terminal was loose and that fixed most of the issues I was having. It sometimes faults while charging, which I am starting to think is an issue in the charge harness, since it doesn't seem to fault once it's fully charged. I've also had shut off suddenly on me a few times, once when I stomped on the brakes while the generator was going at full power which makes me think that was some sort of reaction to overcurrenting the battery (full regen+full generator power might be too much for it). The other times it was hot out or I was working the truck hard, so I think this might just be it overheating, especially since I checked the motor cooling ATF reservoir and it looks a little low. generator_runner.py1 point
-
I thought about the canyon when I bought my last 1/2 ton. I like the size and the V-6. When I was looking you couldn’t get the extended cab anymore. When it came to cost I got a 1/2 ton cheaper and with more options.1 point
-
I've run into an issue. I've talked to a couple of GM Parts Websites. Some have the oem GM fog lights but can't get the authorization code for a dealer to access the BCM to program it. So I'm bypassing the BCM and going old school. I've added LED's to a rocker switch I already had that kinda matches the interior backlighting color and will be installing a fuse/relay under the hood. I will drill a small hole in the firewall which I will insert a grommet in it before running the wire cable. I will wire the white (blue tint) LED to the interior lights circuit and the symbol LED will be wired in with the fog light relay. I will tie in the switch contact positive wire to a circuit that is HOT with the ignition key in the RUN position. If the fog lights are accidentally left ON, turning the ignition key switch to the OFF position will also turn OFF the fog lights to keep from draining the battery.
1 point
-
Recent shots from the rail yard1 point
-
3.0 Duramax doesn't even have a thermostat.0 points
-
I was given this. So based on what I’ve seen I’ll have to take the wheels and brakes off to do this. I have a digital torque adapter with a “peak torque” setting which will freeze the max torque applied after completing. You think that will will be sufficient to measure the torque? Also does it matter which direction I turn the the pinion nut to measure that torque? Edit: After re-reading this it looks like I just need to measure how much torque it takes to remove the pinion nut then add 3-5 lb in when putting the new nut back on.
0 points


This leaderboard is set to New York/GMT-04:00