Leaderboard
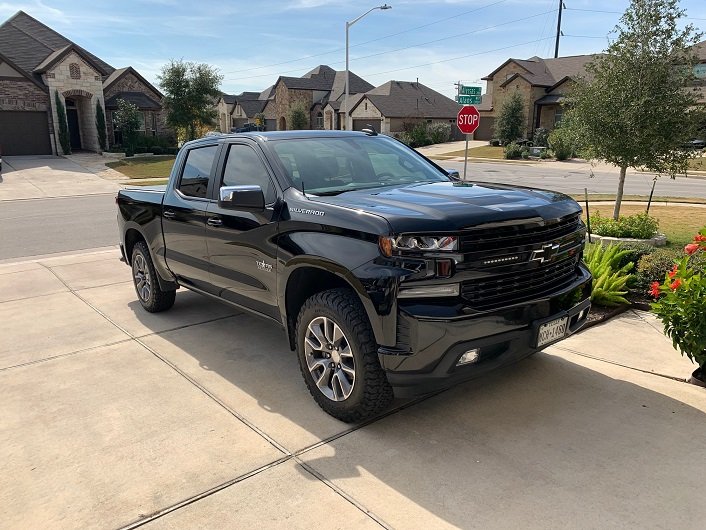
.thumb.JPG.2c573de60d3a3a4407c7d92298db46dd.JPG)


Popular Content
Showing content with the highest reputation since 11/30/2011 in all areas
-
Hauled this precious cargo home for the first time from the NICU after 40 days! Sent from my SM-N900V using Tapatalk26 points
-
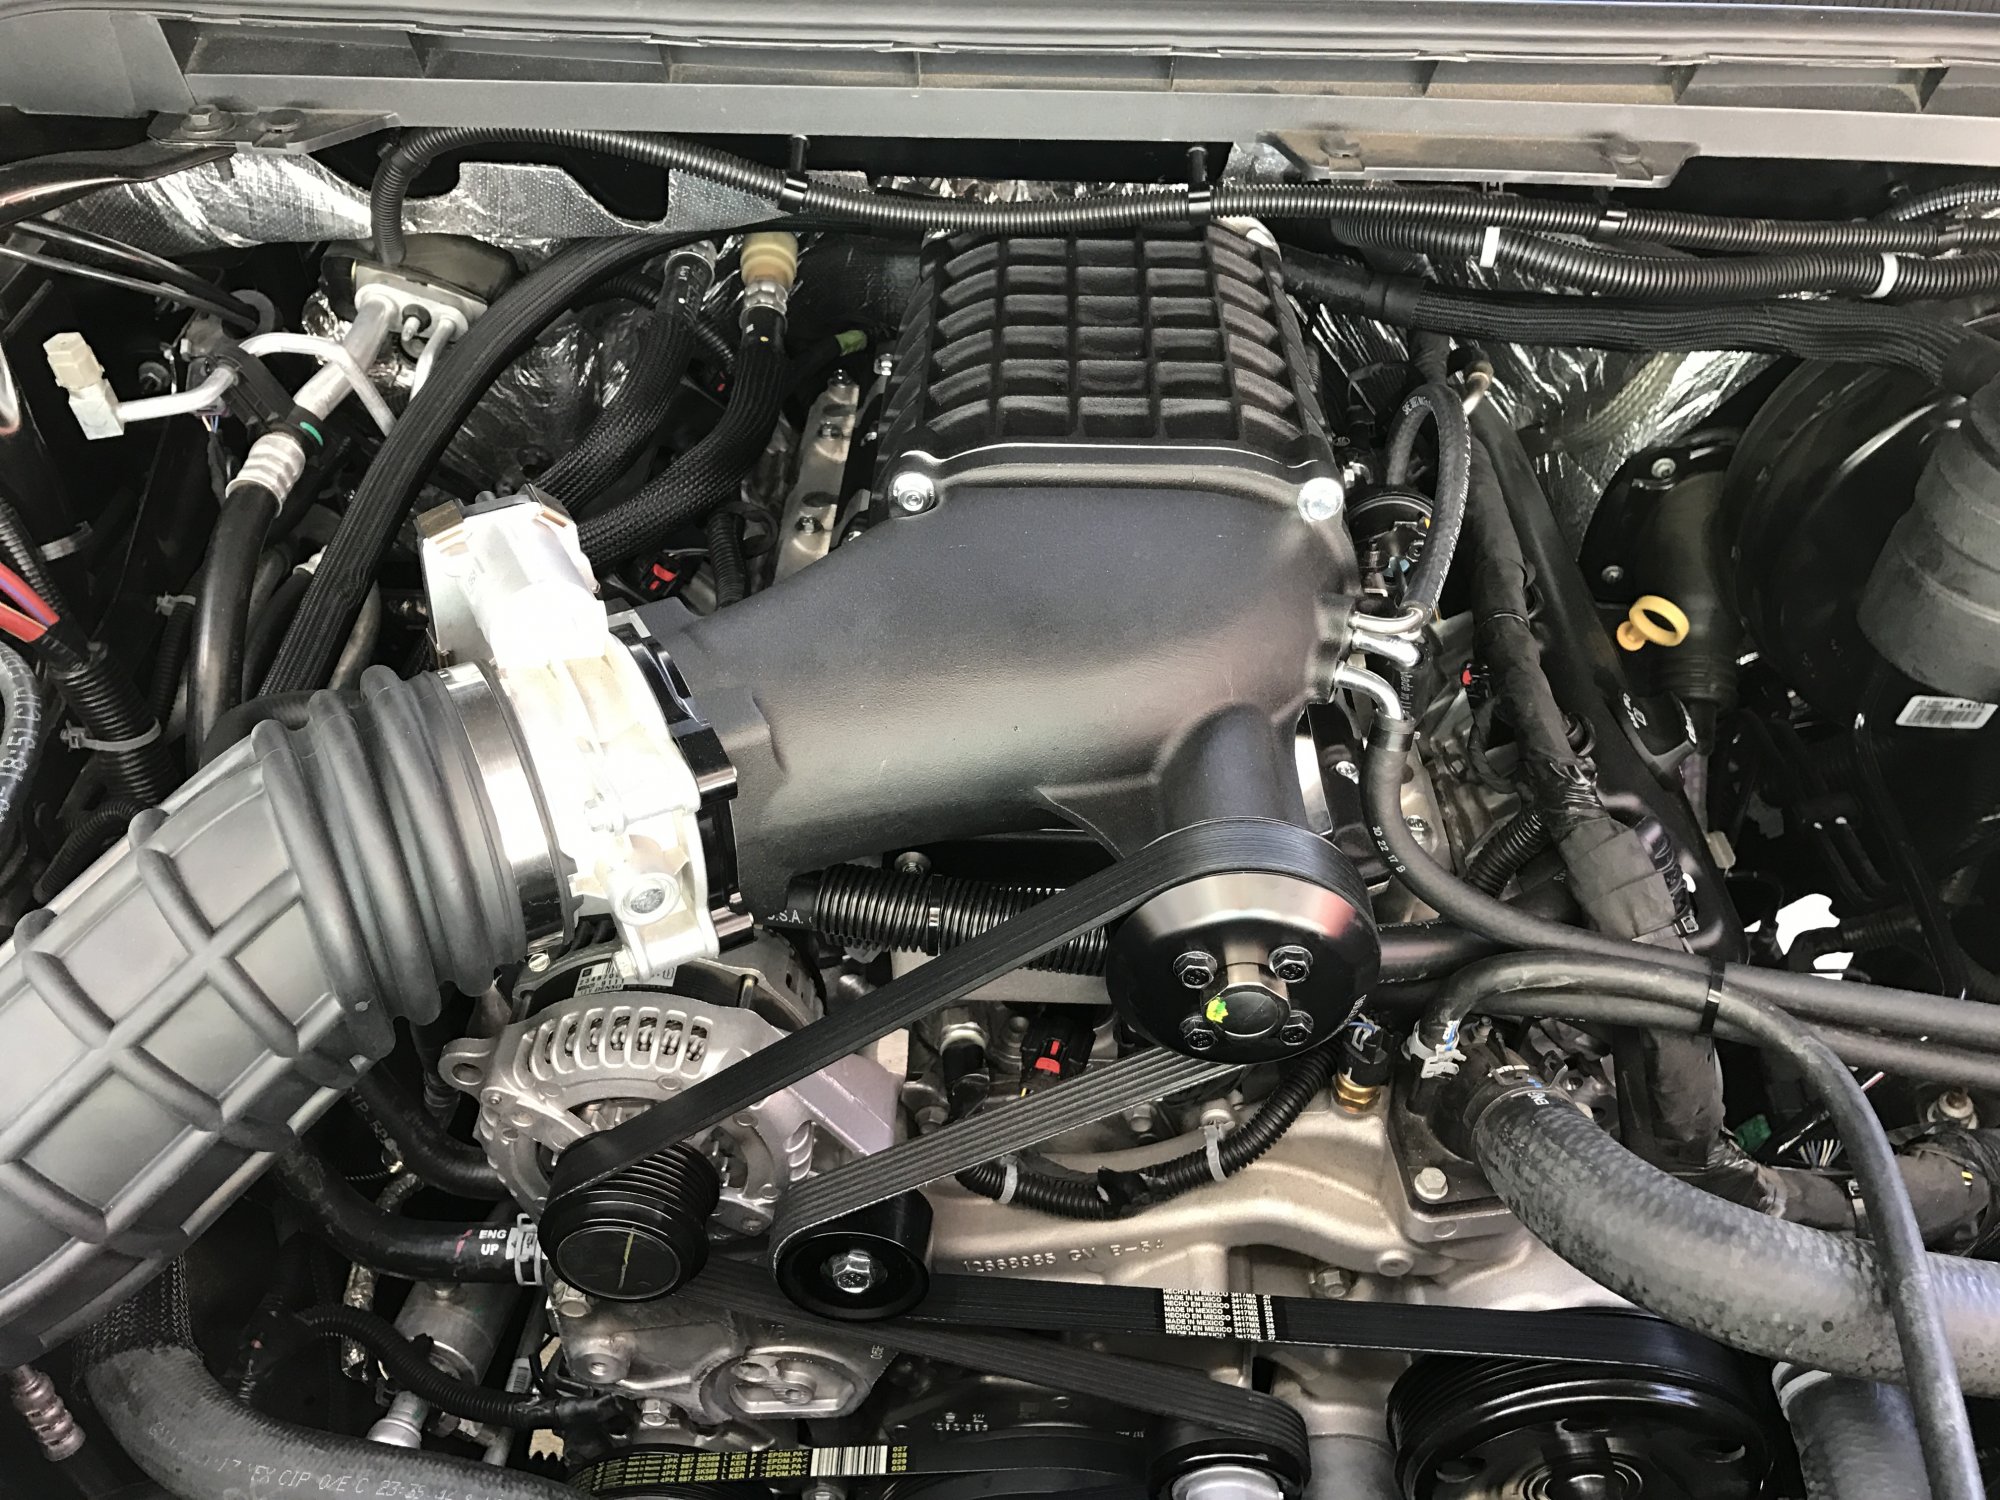
I installed this thingy on the top of my 2017 6.2L. Not really sure what it does, but my truck goes really fast now.
 24 points
 -
Discovered this today.... if you press on the skinny pedal on the right, you can find Ford F-150's in the rear view mirror... They just appear there... its like magic!22 points
-
I found out this weekend that while using Android Auto (maybe CarPlay as well) if you rotate the right radio knob it will zoom the map in and out.22 points
-
22 points
-
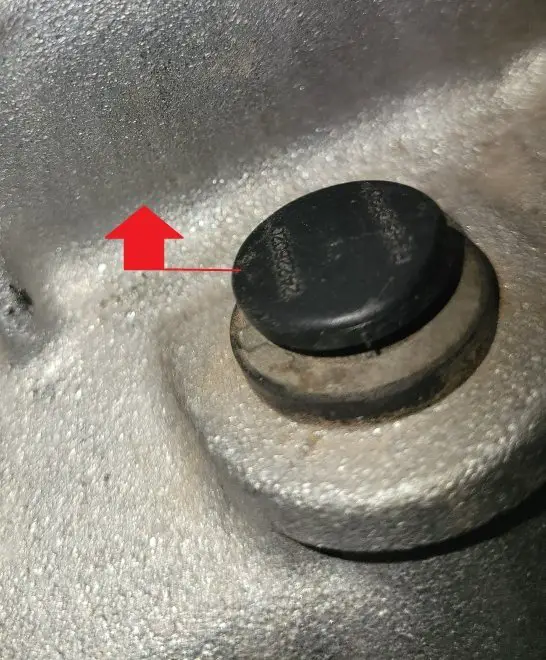
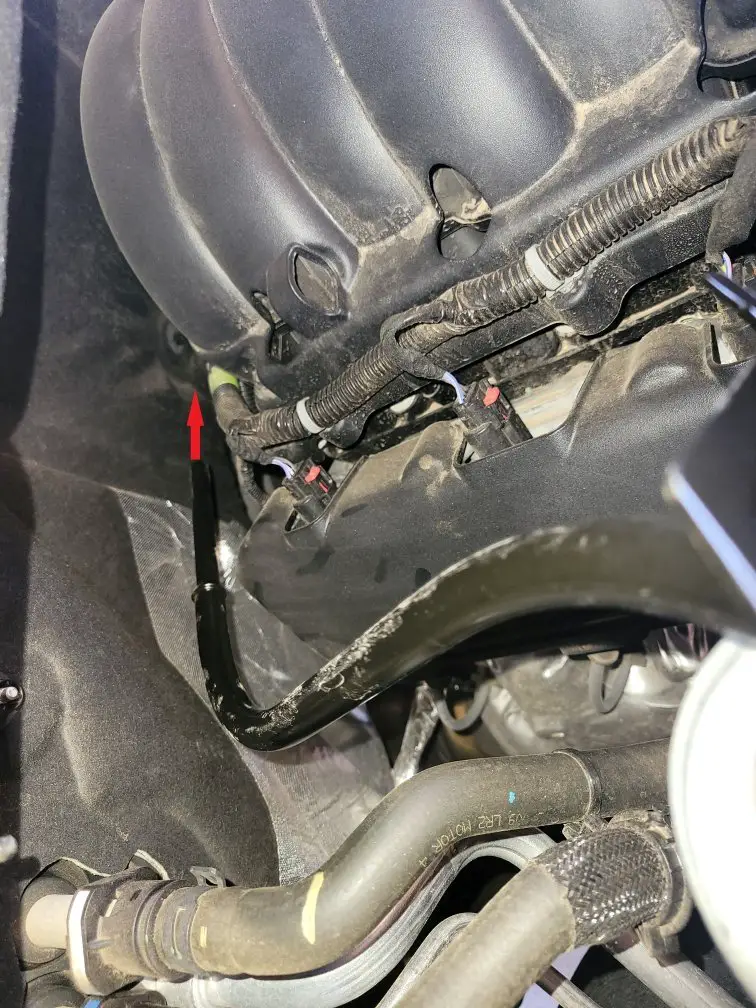
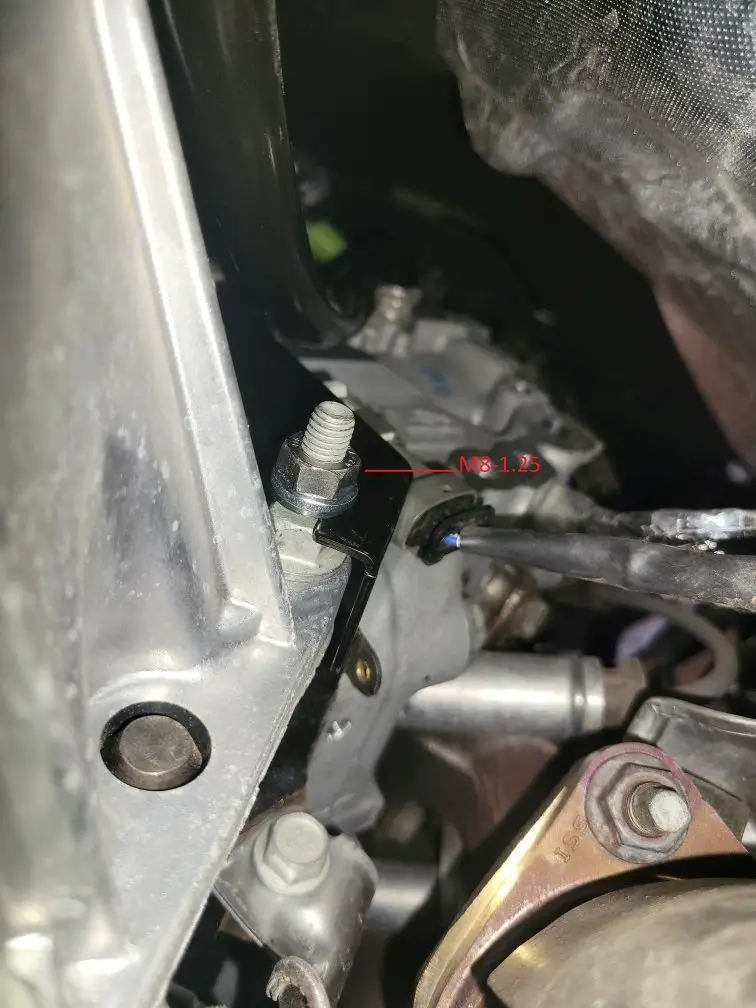
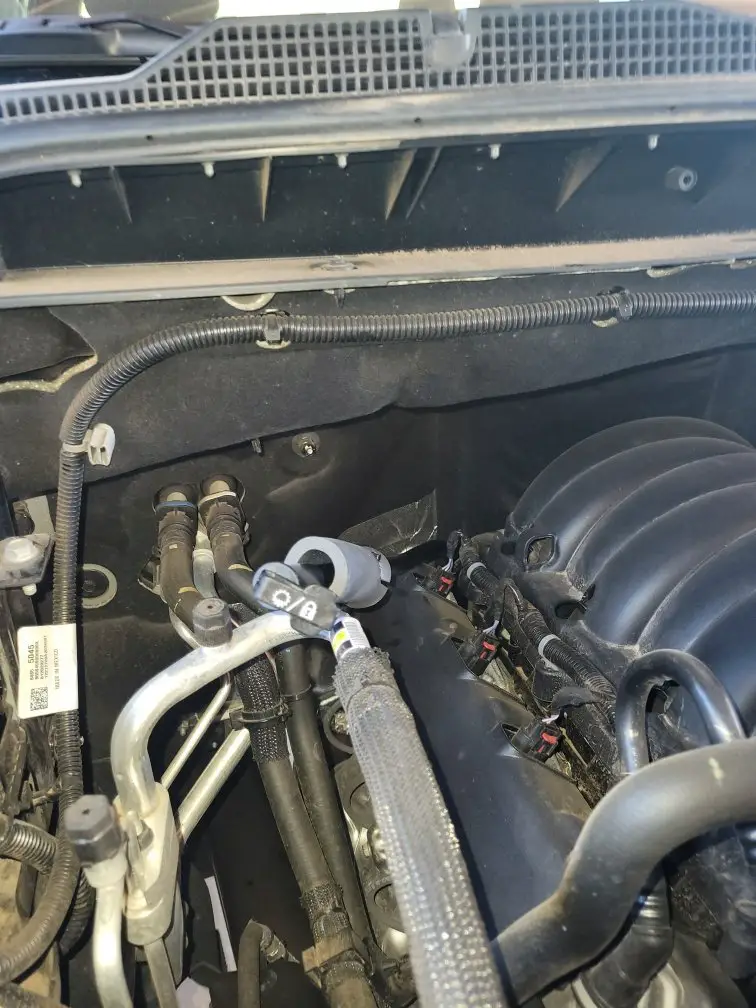
A direct fit transmission dipstick is available for 2020-2023 HDs using part numbers from a 2019 model. You will need the following: Dipstick tube: 24265546 Dipstick (indicator): 24271875 Seal/grommet for dipstick tube: 15796802 (1) Flange Nut or lock/flat washer & nut: M8-1.25 Start by crawling under the truck and removing the heat shield between the pass. side catalytic converter and the transmission. Use a 10mm socket (if you can find one ) for the front bolt and a 13mm deep socket for the rear flange nut. A 1/4 inch drive ratchet works well in these tight spaces, but a box end wrench will do as well. Next, dampen a paper or shop towel and reach up and clean around the area of the dipstick tube boss to limit dirt and grime from entering the transmission during tube install. Now, raise the center pin in the factory installed plug to prepare for removal. I was able to use my fingers but a small flathead screwdriver or trim removal tool would work if yours is stuck. Next, we are going to pry up the remainder of the factory installed plug. I used a trim removal tool but a flathead screwdriver would work as well, just be sure not to gouge or damage the boss area. The factory plug has multiple ridges on it to keep it seated so it might take some working. After a good pry with my trim tool the entire plug shot into orbit in one motion. Now the fun part. Getting the tube to drop down just right can be tricky, especially as there are a few wires to dodge on the way down. I found that angling the fill tube towards the driver side and twisting as it went down from the top was the best way. Avoid jamming the tube with force that could bend it, tear the heat blanket on the firewall, or sever an existing wire. Use patience (and a step stool) and you'll get it. Once you've got the tube down, grab your seal/grommet and give it a light coat of Dexron VI ATF to ease installation. Now take the seal/grommet and slide it on to the dipstick tube. Move the tube over to the boss and slide it in, making sure that you have achieved a full contact/seal with the transmission. A cellphone or mirror can help here. Align the tube bracket slot with the extended stud from the transmission bellhousing. Using one hand to give some downward pressure on the tube, work a M8-1.25 flange nut onto the stud. My local parts house was out of flange nuts so I used a lock washer, flat washer, and nut combo. Keep downward pressure on the tube while you tighten with the 13mm deep socket. Reinstall the heat shield that was removed previously. Almost done! Grab your dipstick and give it a light lube around the seal area with Dexron VI... ...and send it home! Now as far as a proper hot check, I've always used a minimum transmission temperature of 145'F. The GM check procedure for these trucks says 86'F-122'F, but that's using the inane check plug thingy on the back of the transmission pan. Previous to that design, the hot check temp for Dexron VI was always 145'F min to 190'F max (ATF expands with heat). Perhaps there is someone out there with a service manual for a 2019 and can verify, but there you go folks. This truck should have had one of these sticks from the factory, and we HD users can debate with the non-believers (they do exist) why below or in different threads, but luckily we have a factory fit solution using original GM parts with about ~$60 bucks and some elbow grease! Special thanks to @64BAwagon for doing the leg work on the part numbers and the initial install. I found his thread (on a diesel site) while pondering if this was possible and his previous work made it a breeze. Get to dippin!
21 points
-
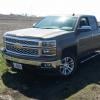
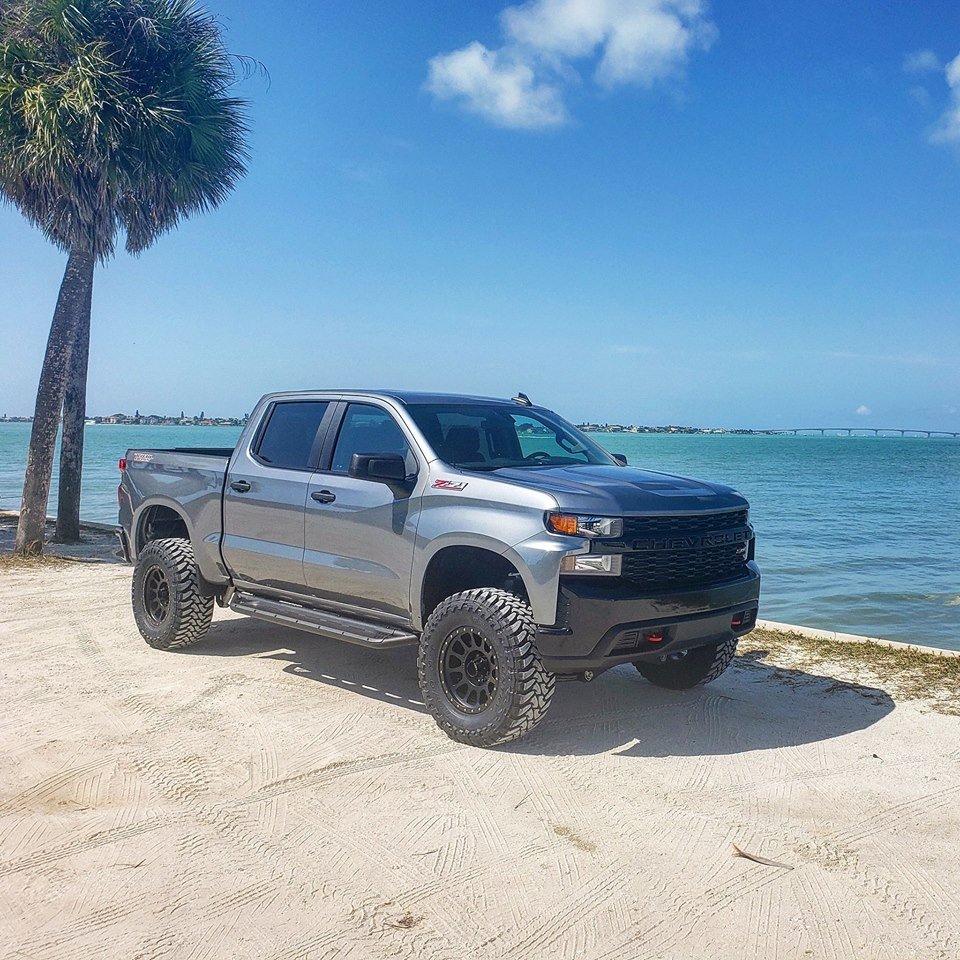
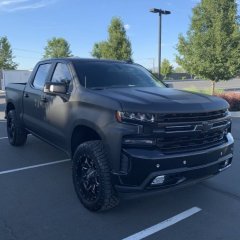
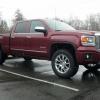
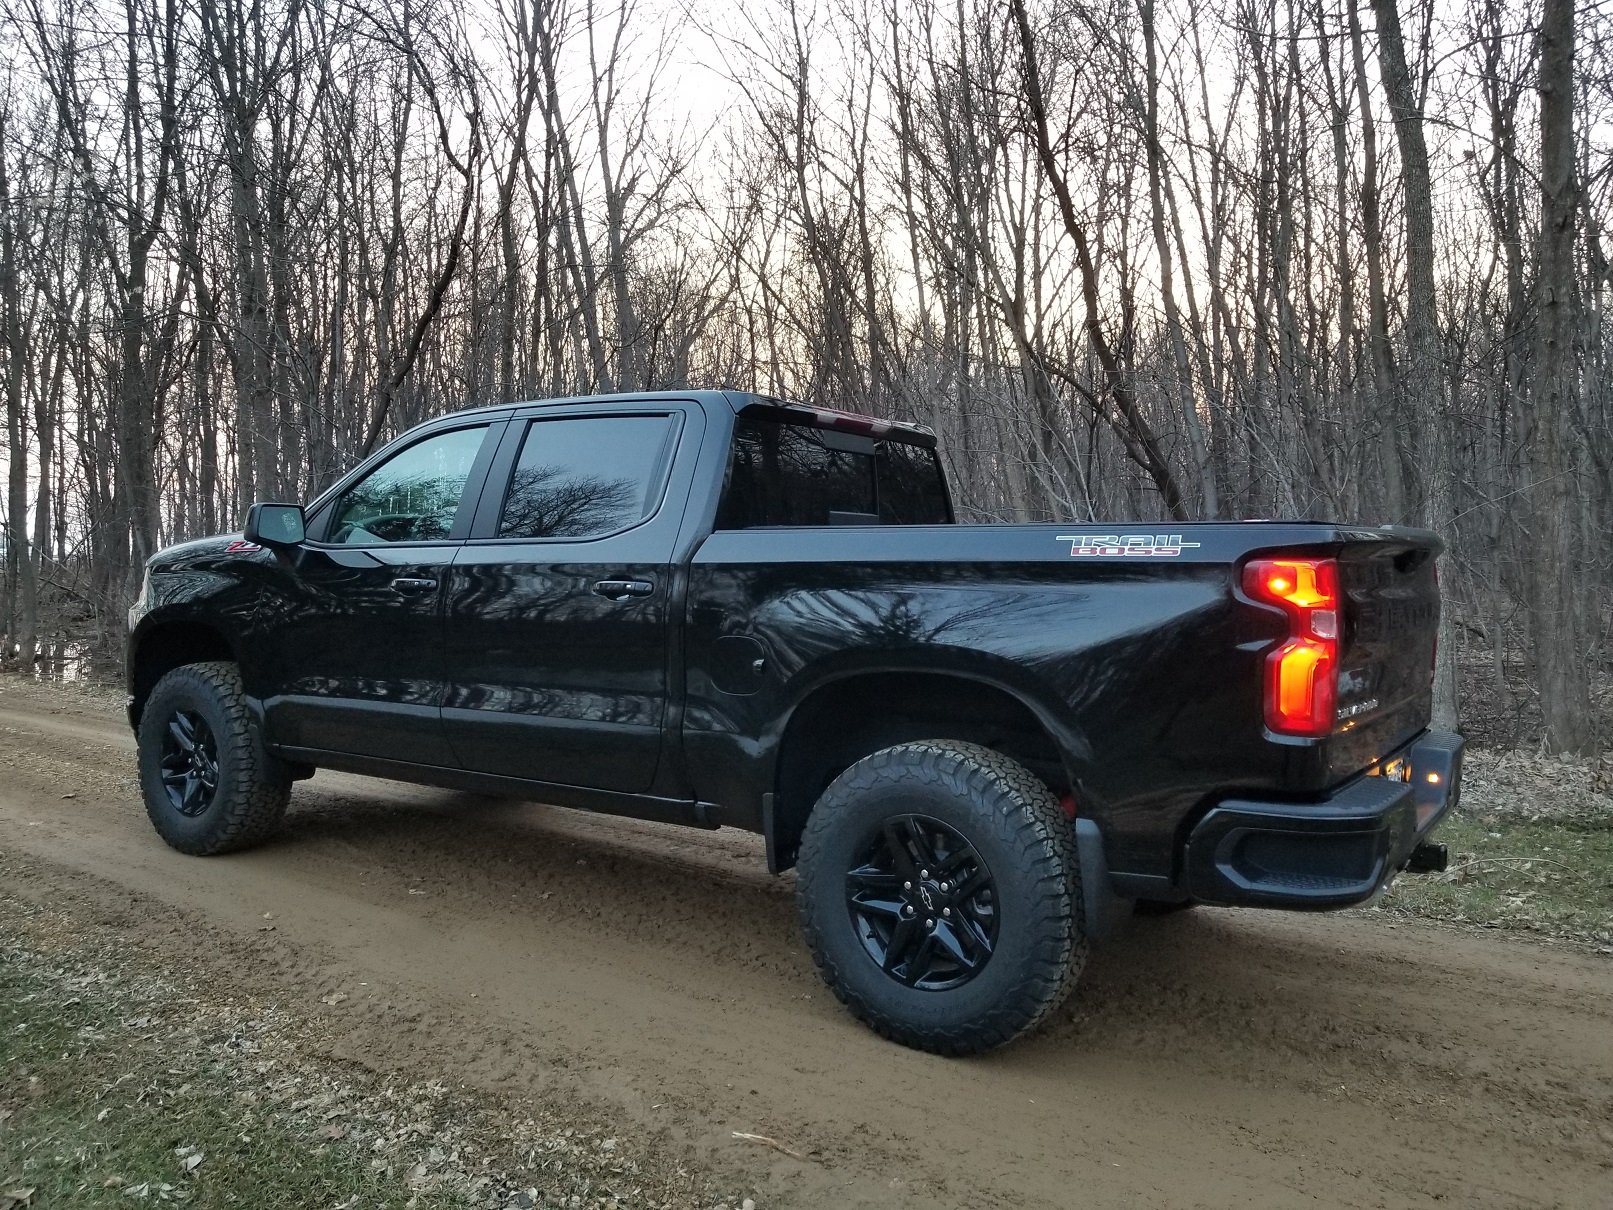
Fabtech Trail Boss / AT4 4" lift Method 305 NV 18x9 -12 4.5" Toyo MT 35x12.5r18
18 points
-
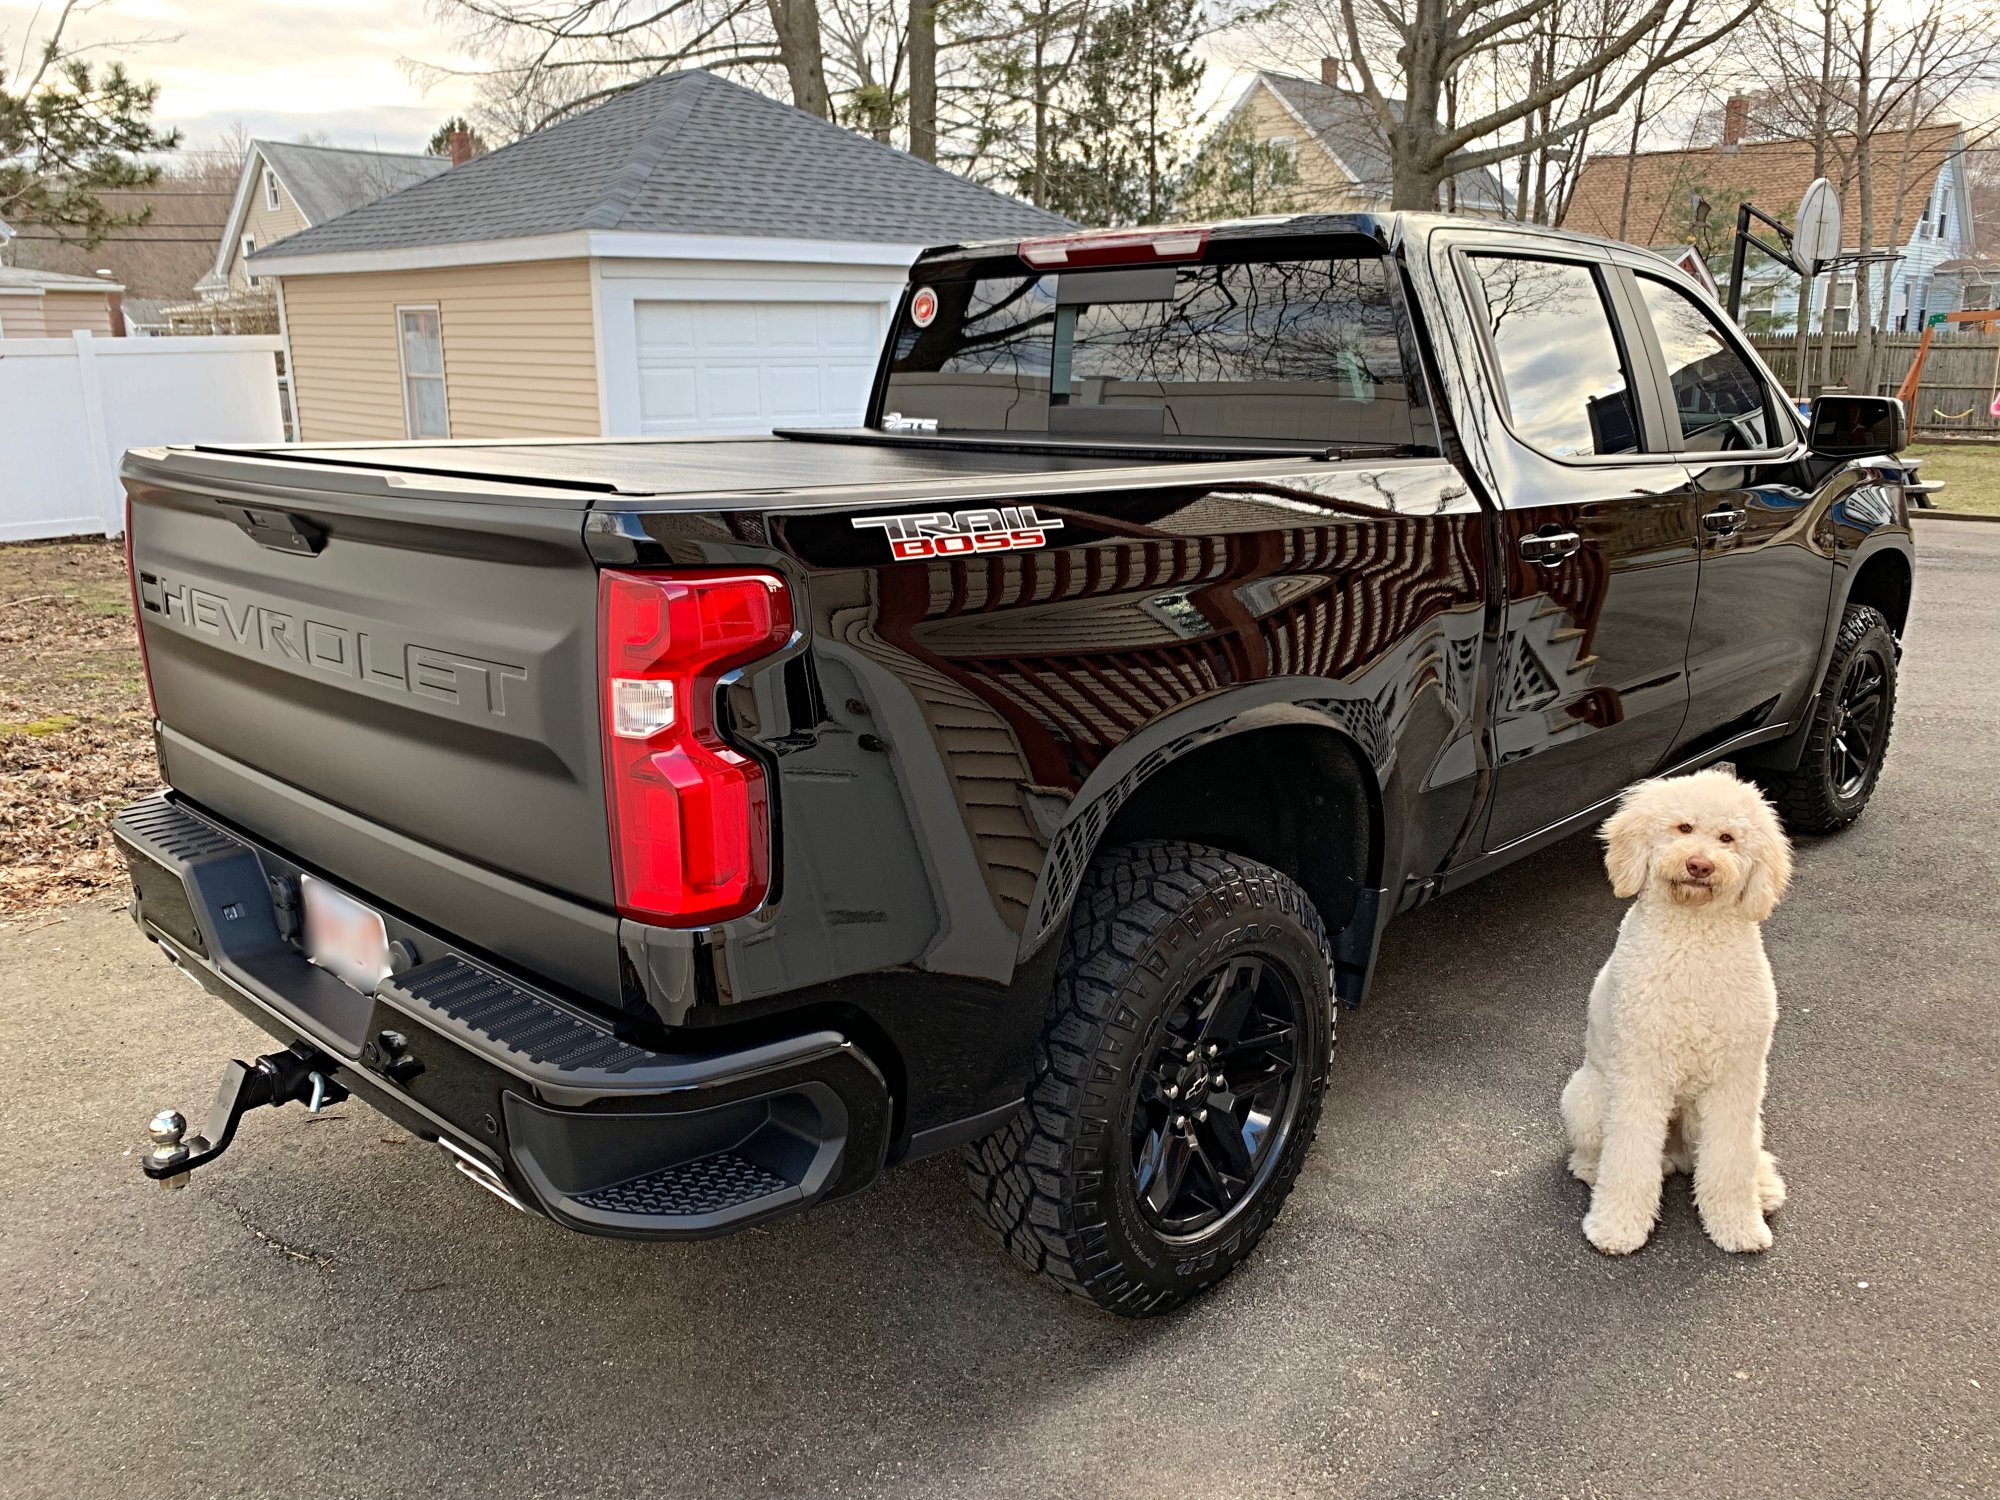
Been a while since posting here since I barely get any time to myself these days - Picked up an embossed grille and stole the upper trim off of it. Retrofitted it into my grille. - Got my headlights back on. Got the corners cleared with Klearz (courtesy of Crisp GM Customs). - Testing out these aftermarket DL3 Mirrors. They support power fold and memory (just like the factory DL3s) - Handles are now switchbacks (courtesy of Crisp GM Customs) - Truck got a bath (LOL) - so neglected. UPR Catch Can, Borla Catback Exhaust, and new NavTV - GM650, and Redline Emblems are next on the list to be installed - IF I can get a free day. Sent from my iPhone using Tapatalk18 points
-
All, Due to the overwhelming interest in folks wanting to upgrade their mirrors, I wanted to start this thread, hopefully, with all the information pertaining to the process of upgrading your mirrors, the different mirror types, the GM supported upgrade path, the non-GM supported upgrade path, what all is involved, and any known issues. I receive about 15-20 PMs daily around this upgrade. I will try to respond to all as I am able to. Please read through this entire 1st post in its entirety as I hope it answers all your questions. I also hope that this thread is your “one-stop shop” for all questions surrounding this upgrade. I have spent MANY months (since June 2016) trying to understand these mirrors and what all is involved to make the upgrade successful. Like many of you reading this thread, you have probably spent countless hours researching online, reading threads upon threads, and watching YouTube videos for some info and guidance. For those that have tried this upgrade on your own, you have probably ended up with the same results of something not working correctly, which ultimately landed you back here on the Forum. I have helped numerous members here achieve the same upgrade desires with success. This started out with me wanting to upgrade the standard DL8 Mirrors on my 2016 Silverado, 1500, LT, CCSB, 5.3L Gas Truck. I have helped members with Standard DL8 Mirrors upgrade to DL3 Mirrors as well as members wanting to upgrade to Towing Mirrors. So, let’s get started… Mirror Types: DE2 Mirrors - These are the basic mirrors found on W/T Trucks. They do not have power anything. They are manual adjust, manual fold, etc. DL8 Mirrors – These are the most common mirrors found on LT/SLE trucks and are the next level from DE2 Mirrors. DL8 Mirrors are Heated, Power Adjust, and Manual Fold. If your truck has 1LT/2LT options, this will most likely be the same mirror. DL3 Mirrors – These are mirrors are the “Premium” version to the DL8 Mirrors that most folks are wanting to upgrade to. These mirrors are typically found on your higher trim LTZ/High Country and SLT/Denali trucks. These mirrors are: Heated, Power Adjust, Power Fold, Turn Signal, Puddle Lamps, and Auto Dim (Driver’s Side). Towing Mirrors – These mirrors are the larger mirrors designed to help with towing. These mirrors can be found as options in some 2500/3500 Heavy Duty Trucks. They come in (2) main flavors. DPN – These are Manually Folding, Manually Extending, Heated, Turn Signal, Cargo (also referred to as Courtesy Lamps), and Clearance Lamps (also referred to as Park/Running Lamps) DQS – These are essentially the same as DPN except they are Power Folding and supports Mirror Memory if your truck has this feature. Aftermarket Towing Mirrors – There are TONS of aftermarket options out there. The result should be the same (for the most part) on the upgrade. The way that manufactures “pin” their connectors, they typically pin them the same as the GM - OEM ones. Watch out for any Manufacture that says they have the “option” of adding a separate harness or connector for added functionality. If it’s not already in the connector, I would stay away from those or contact me for mirror connector customization. [/url] Note: RPO Code - K40 Option (Exhaust Brake) for Diesel Trucks. If you have a Diesel Truck, you will NEED to get the appropriate DL3, DPN, DQS Mirror WITH the K40 Option. This is basically a temperature sensor on the passenger side mirror. Without this, you will get a Check Engine Light (CEL) error come on with an “Ambient Temperature” message on your DIC (Driver Information Center). This is NOT an issue with Gas Trucks. You can install a passenger mirror with the temperature sensor on a gas truck with no issue (I am using a K40 optioned DL3 Mirror on my truck). Here is a video I put together on the entire process. This video covers the following: Removing the Door Panel Removing the Door Harness Installing the Power Fold Switch [/url]GM Supported Upgrade Path – Upgrade DL8 or DL3 Mirrors to Towing Mirrors: There is a GM Supported Upgrade path for those that have DL8 or DL3 Mirrors that want to upgrade to Towing Mirrors. Reference the “Vehicle Acceptability for Retrofit” for details – Document ID# 4174686. Can also be found here. https://www.dropbox.com/s/q4eldhgg2x8i10q/Camper%20Mirrors%20-%2023371780.pdf?dl=0 If you have questions on what RPO Codes your truck has, please check your glove box for details. There are possible BCM and/or Memory Module Calibrations required that can only be done at the Dealer. Please check with your dealer on the upgrade and these calibrations. I do not know what these calibrations actually do. They seem to be the most required on trucks with the A45 RPO (Seat Memory) code. So this applies mainly to LTZ/High Country, SLT/Denali trucks wanting to upgrade to Towing Mirrors. If you are an LT/SLE trim, you shouldn’t need any BCM calibration. You certainly won’t need a memory module calibration, because an LT/SLE doesn’t have Seat Memory and therefore, won’t have a Memory Module. For those that require the RZY Harness – Part # 23387133. Installation instructions can be found here. https://www.dropbox.com/s/pz2y2o9kj02g66p/RZY%20Installation%20Instructions.pdf?dl=0 Installation of the RZY Harness is a very detailed/technical process that requires you to add the missing “pins” to the driver and passenger door hinge connectors (on the body side). It also involves landing the other end of these missing circuits into the BCM (for the turn signals), X61A Junction Box (for the Cargo lamp), and under the hood (through the firewall) into the X50A Fuse Block (for the Park Lamps). This is MOST common on 2014 Trucks and some early 2015 Trucks. You can also confirm this by removing the X500/X600 Door Connector like in the photos below. If you are missing pins, be prepared for some work ahead of you. If you do need the RZY Harness, I created a "How To" Installation Video here: Here is an additional video showing the detail of the RZY Harness. Non-GM Supported Upgrade Path – Upgrade DL8 Mirrors to DL3 Mirrors. For those that have DL8 Mirrors, there is NO - GM Supported upgrade path to upgrade DL8 to DL3 Mirrors. This is a custom application that requires either: A custom DL8 Harness (made by me), a DIY KIT (also made by me) to add the wires yourself, or you can hardwire this yourself using your own methods. Your existing DL8 Harnesses will NOT be pinned for the Turn Signal, Puddle Lamps, Ground, and Auto Dim (Driver’s Side) circuits. I WILL support you in any direction you end up going with. If you try to install the DL3 Harness with your DL3 Mirrors, you will have turn signals, puddle lamps, and heat working. You will lose all functionality of the passenger side mirror and some adjust functionality of the driver side mirror. This is due to the DL3 content differences with how these functions are achieved and based on the A45 Seat Memory option. If you have a Gas Truck, you can use either DL3 Mirror options with or without the K40 (Exhaust Brake) Temperature Sensor. To achieve Power Fold on your DL3 Mirrors, you will need a new Driver’s Side - Mirror Adjust Switch which has the Power Folding option. Part # 23154702 has been the most common part #. This part is a simple drop in and swap out of your existing Mirror Adjust Switch. No other harness modification required to achieve Power Folding. Power Fold options can be added to either the DL3 Mirror upgrade or the Towing Mirror upgrade. Also, there are two variations of the Power Fold Switch - Part # 23154702 and Part # 2348841. As you compare the photos, you’ll notice that the connector portions are keyed DIFFERENTLY. One is symmetrical and the other isn’t. Please do NOT force your connector if you feel resistance. If it doesn’t fit, there is a reason why. If you force the connector (which some people have), you will blow a fuse. For Reverse Tilt (mirrors automatically tilt down when in reverse) and Key Fob Fold/Unfold (ability to fold/unfold mirrors with Key Fob) – These features are supported by the BCM/DIC Options and are not supported in this upgrade. These features are found in the higher trim LTZ/High Country and SLT/Denali models. Note: I am currently testing an aftermarket mirror fold module. If you would like information on that, here is a thread I created for that. http://www.gm-trucks.com/forums/topic/196138-2016-silverado-lt-fold-your-dl3-mirrors-with-your-fob-like-an-ltz/ 2014 – Known Issue: On 2014 Trucks, there is a known issue where the Puddle Lamp Circuit doesn’t supply the needed 12 Volts to the mirrors to power the Puddle Lamp. When measured, there is only 2.8 Volts being sent by the BCM. This results in a dim puddle lamp. A workaround for this is to perform a “diode mod” from the Dome Lamp Circuit to the Puddle Lamp Circuit. Diode needed is 1N4004. If applicable, I will include a diode for free when you buy my Custom DL8 Harness. Puddle Lamp Diode mod instructions can be found here: https://www.dropbox.com/s/ehhoz7vtq8j7g87/Puddle%20Lamp%20Diode%20Mod.pdf?dl=0 WT/LS – Trim Owners: I had the opportunity to work with a few members' truck who were WT, Trims. Trucks had the convenience package. This package has power windows, power mirrors, and power door locks. I can confirm that you can upgrade to DL3/DPN/DQS (or most any other mirror) IF you have power adjust mirrors. I was also able to help one with manual adjust mirrors Custom Plug and Play Harnesses – $285 Shipped to (50 US States - for Canada, please add $47.95) I offer a Plug and Play harness for either the DL3 Mirror upgrade or the Towing Mirror Upgrade. Custom Harness Set (Driver and Passenger) is $285 Shipped via USPS Priority Mail, Canada - please add $47.95 Each harness is carefully unwrapped, modified, and built like factory using the same gauge wiring and terminals/pins as GM, and rewrapped using automotive harness tape. Auto Dim (Driver’s Side) circuits are added to the Driver’s Side Harness for use on DL3 Mirrors. In the event, you add an Auto Dim Rear View Mirror later, your Driver’s Side Door harness will be already pinned appropriately to support the upgrade. I offer a $100 Core Refund when you send your stock harnesses back to me. Support by me through the entire upgrade process until you have achieved the desired the result. Full Refund (minus shipping) if my custom harnesses don't work. Custom DIY Kit – $65 Shipped (Ships First Class Mail with Tracking - for Canada, please add $10) For those that want to perform this upgrade on your own, I offer a DIY Kit. Kit is $65 Shipped, ships First Class Mail with Tracking. $70 Shipped to Canada This kit will have the pre-terminated wires with the pins crimped according to the application. Instructions created by me, detailing how to perform the upgrade process along with wiring diagrams for Driver/Passenger sides and where to land the wires. You would be responsible to installing the wires/circuits into your existing harnesses. Disclaimer: You are performing this work at your own risk. I will also provide you with ANY information regarding this upgrade even you don't buy from me. My goal is to help everyone achieve their mirror upgrade goals. If you decide to move forward with ANY purchase or if you have additional questions, please let me know. It is helpful to know all the details of your truck to provide the best possible solution. For example: 2016 Silverado, LT, 1500, Crew Cab, 5.3L Gas. Thanks, everyone! Hope to help as many people as I can to achieve this upgrade! Please enjoy this Time Lapse Video to get an idea of what is involved with the customization of the harness. Each set takes about 1hr to modify, plus another hour test. So a completed set is roughly 3 hrs to build and test. How to remove the DL8/DL3 Mirror Caps. How to remove Tow Mirror Caps.17 points
-
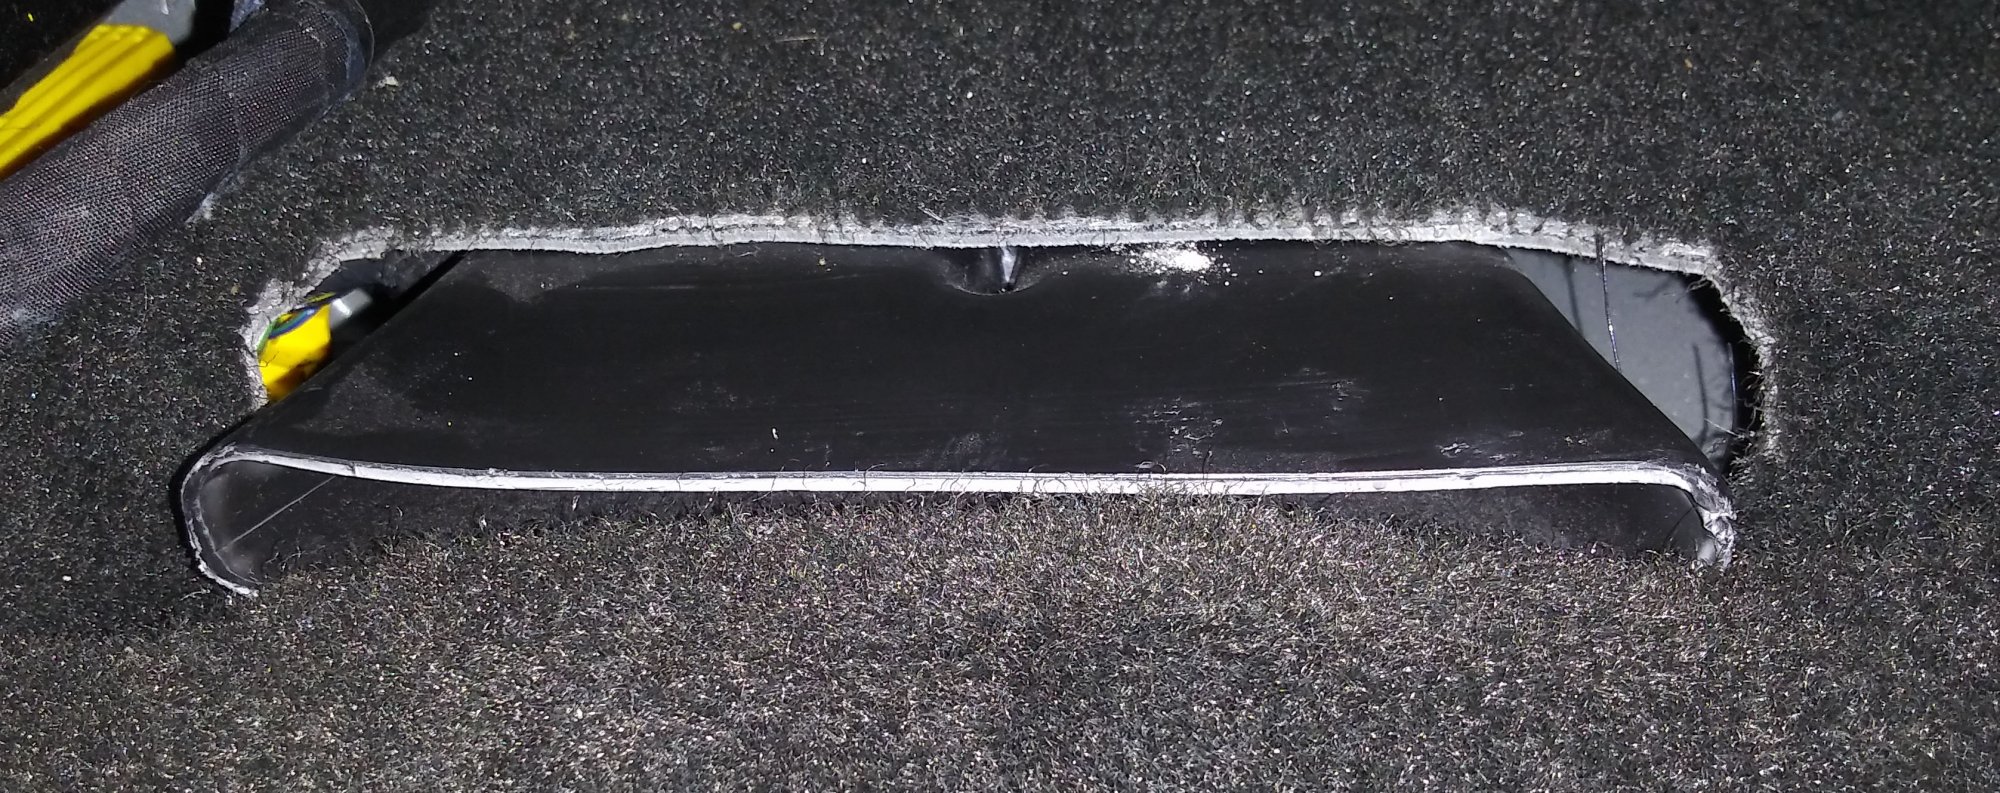
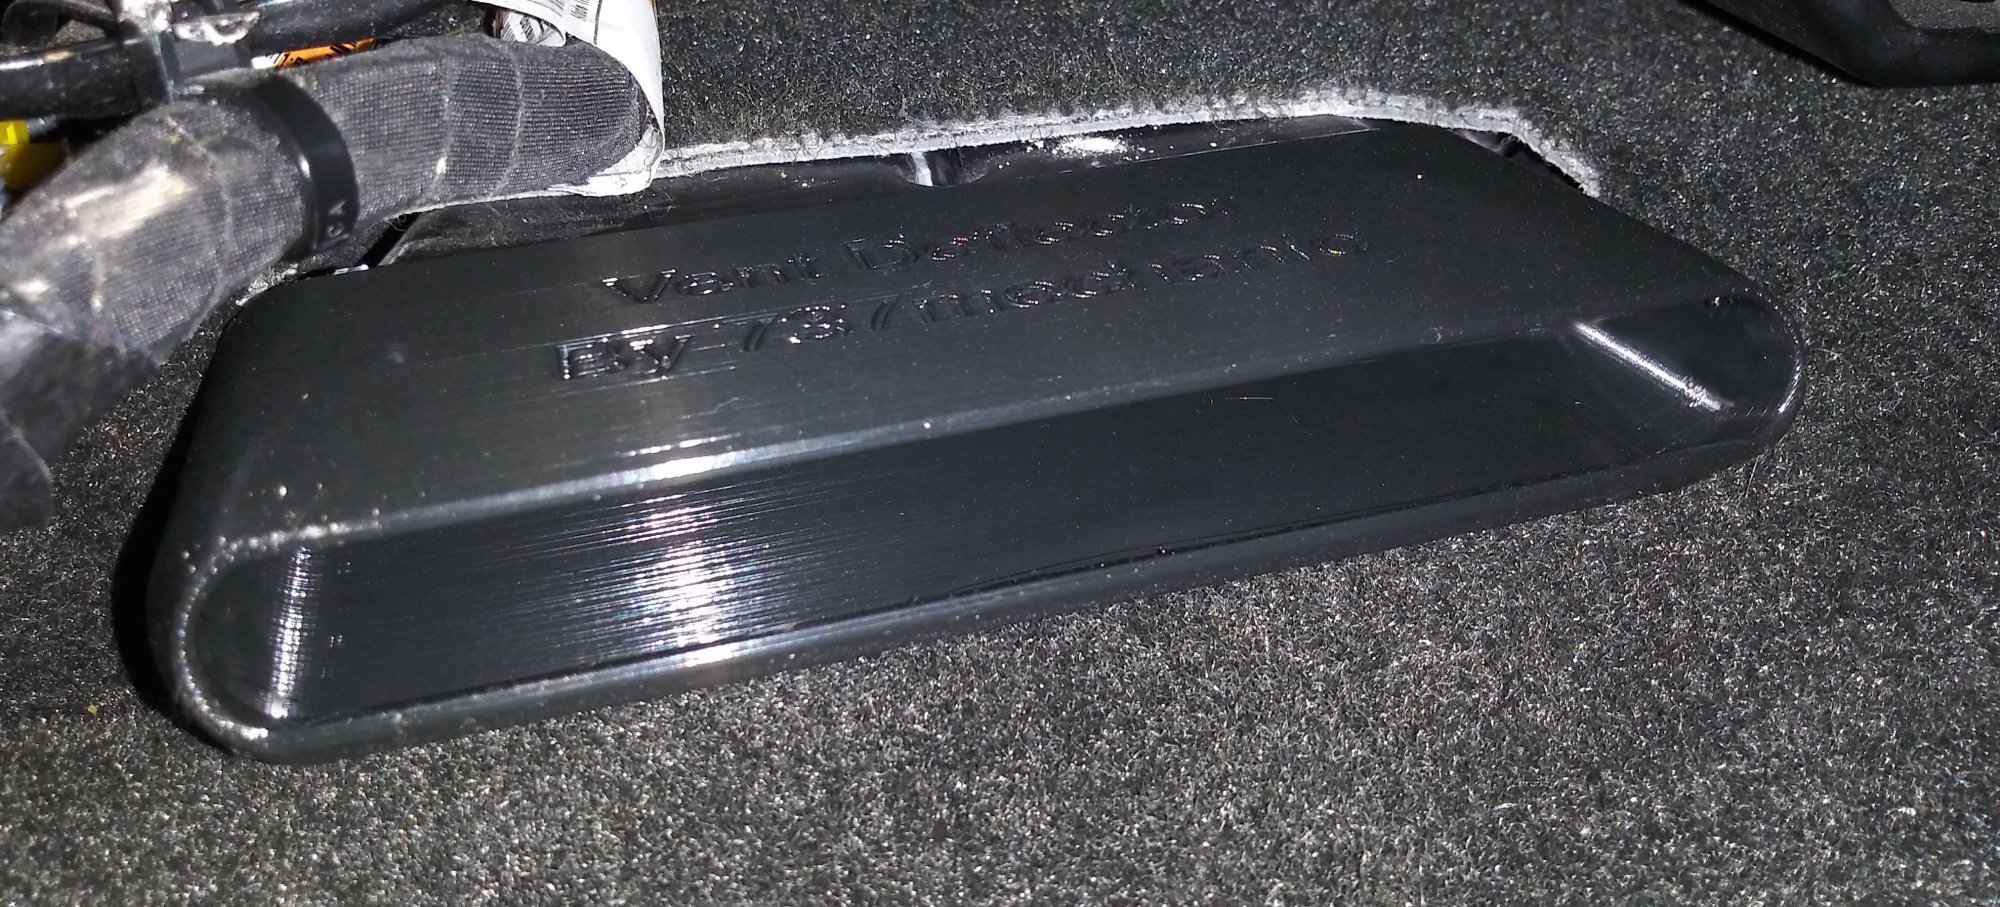
Hi Guys, I have noticed that a lot of the vents or air ducts under the seats of these trucks are covered or partially covered with carpet. Because of that I modeled up some adapters that you can print on a 3d printer and slide on the vents/ducts under the seats so the air is deflected upward and they keep the carpet from covering the vents. I made a video showing how they work and I put the link too the 3d printer files in the description so you can download and print your own. Video showing how the vent deflectors work and the files needed to print your own
17 points
-
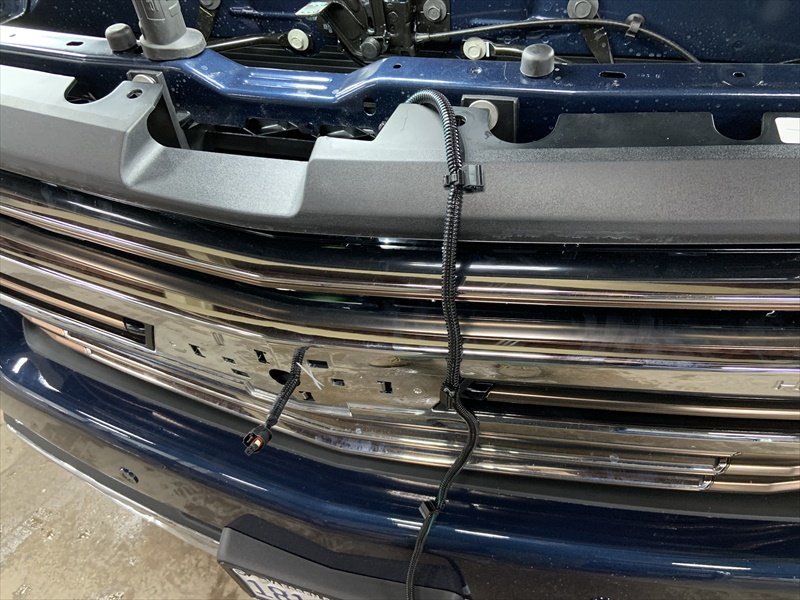
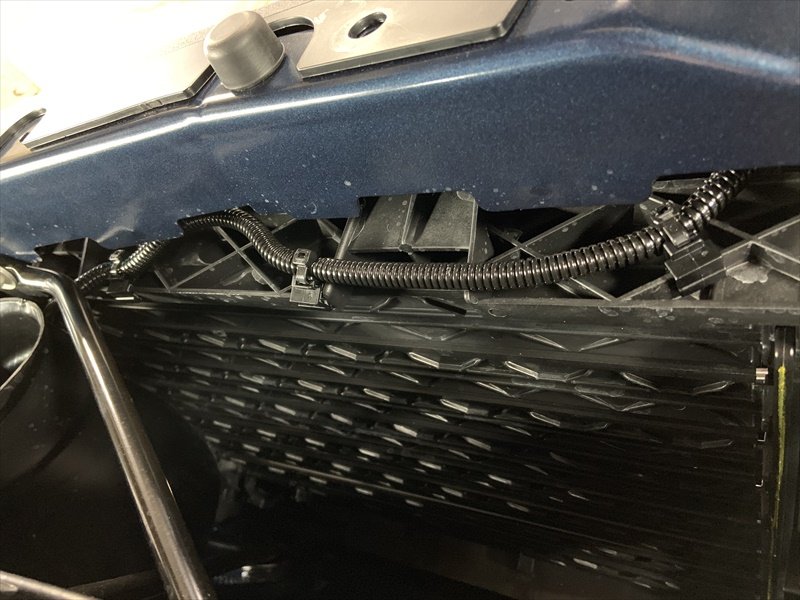
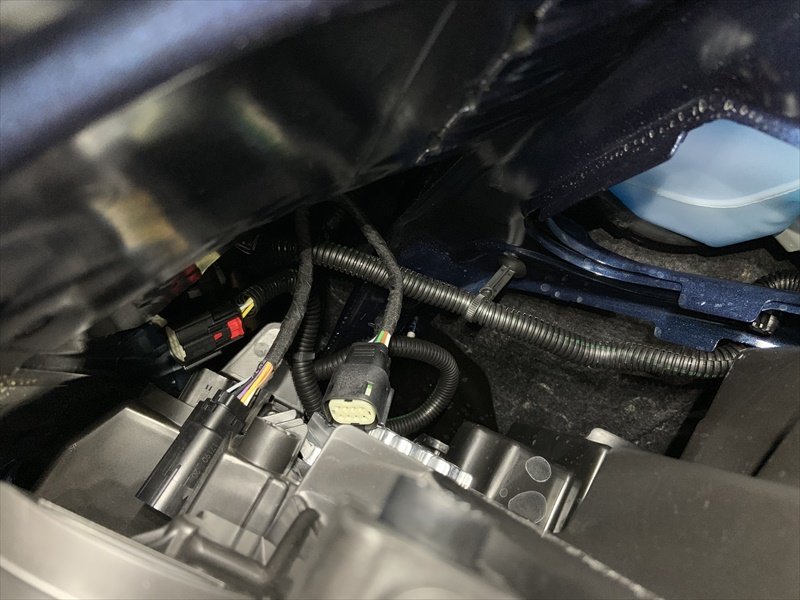
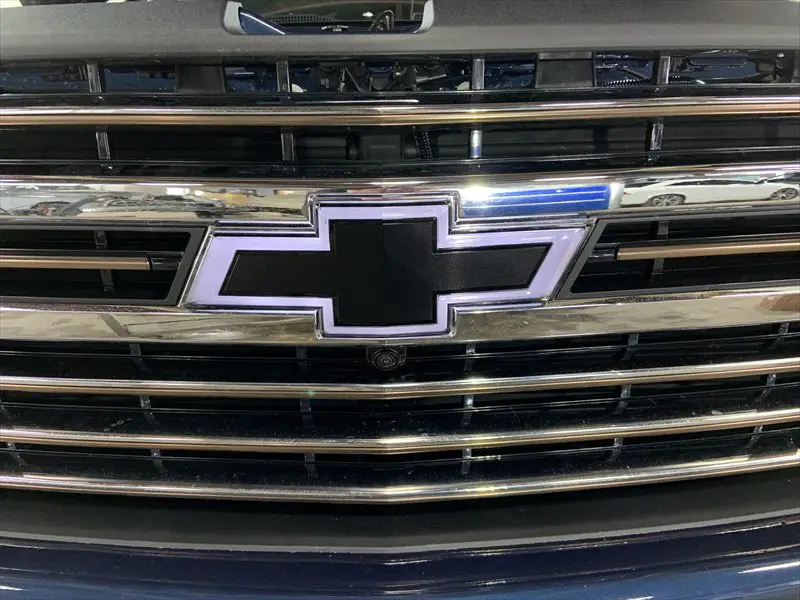
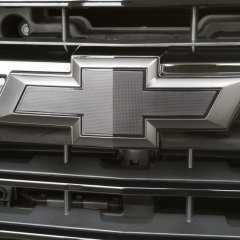
I picked up a GM accessory illuminated front bowtie ($275 list price) from the dealer and installed it today. Looks awesome at night! Here is a step by step to show anyone else that wants to install their own. Open the hood and remove the hood safety latch handle, it uses 2 torx bit screws. It needs to be removed to get the upper radiator cover off. Take out the push-pins holding the radiator cover on and then remove it. Then take out the 10mm bolts that hold the top of the grill in. Next pull the top of the grill out, it has a little catch on all the top parts. You have to lift it up then pull it out. Then grab the grill above and below the main bar next to a light and pull the grill away from the light. It is tight and you will probably think you are going to break it but it will come loose. Do the same with the other one. Once the grill is pulled back you can get to the backside of the emblem. Now you can get the old bowtie out, reach in there and 4 tabs hold it in. Just push the tabs and it will pop out. Once it is out put your wiring through the hole, hook up the new bowtie and snap it into place. Now run your wiring along the upper radiator support and in behind the left headlight. Then disconnect the truck headlight connector and connect your illuminted bowtie wiring harness to it, then connect the bowtie harness into the headlight. Secure all the wires and turn on your lights and test it. It should be fully functional. Ok, now you just put everything back together in reverse order. Getting the grill all snapped back in is easier with 2 people to line everything up. Make sure you have all the tabs and pins lined up before you push it in or you could snap them off. The grill is sort of at an angle and you have to lift, line up all pins and tabs and then push it in.
17 points
-
Turned out pretty nice IMO. Still trying to decide if I should blackout the badges and side mirrors or leave them chrome...
17 points
-
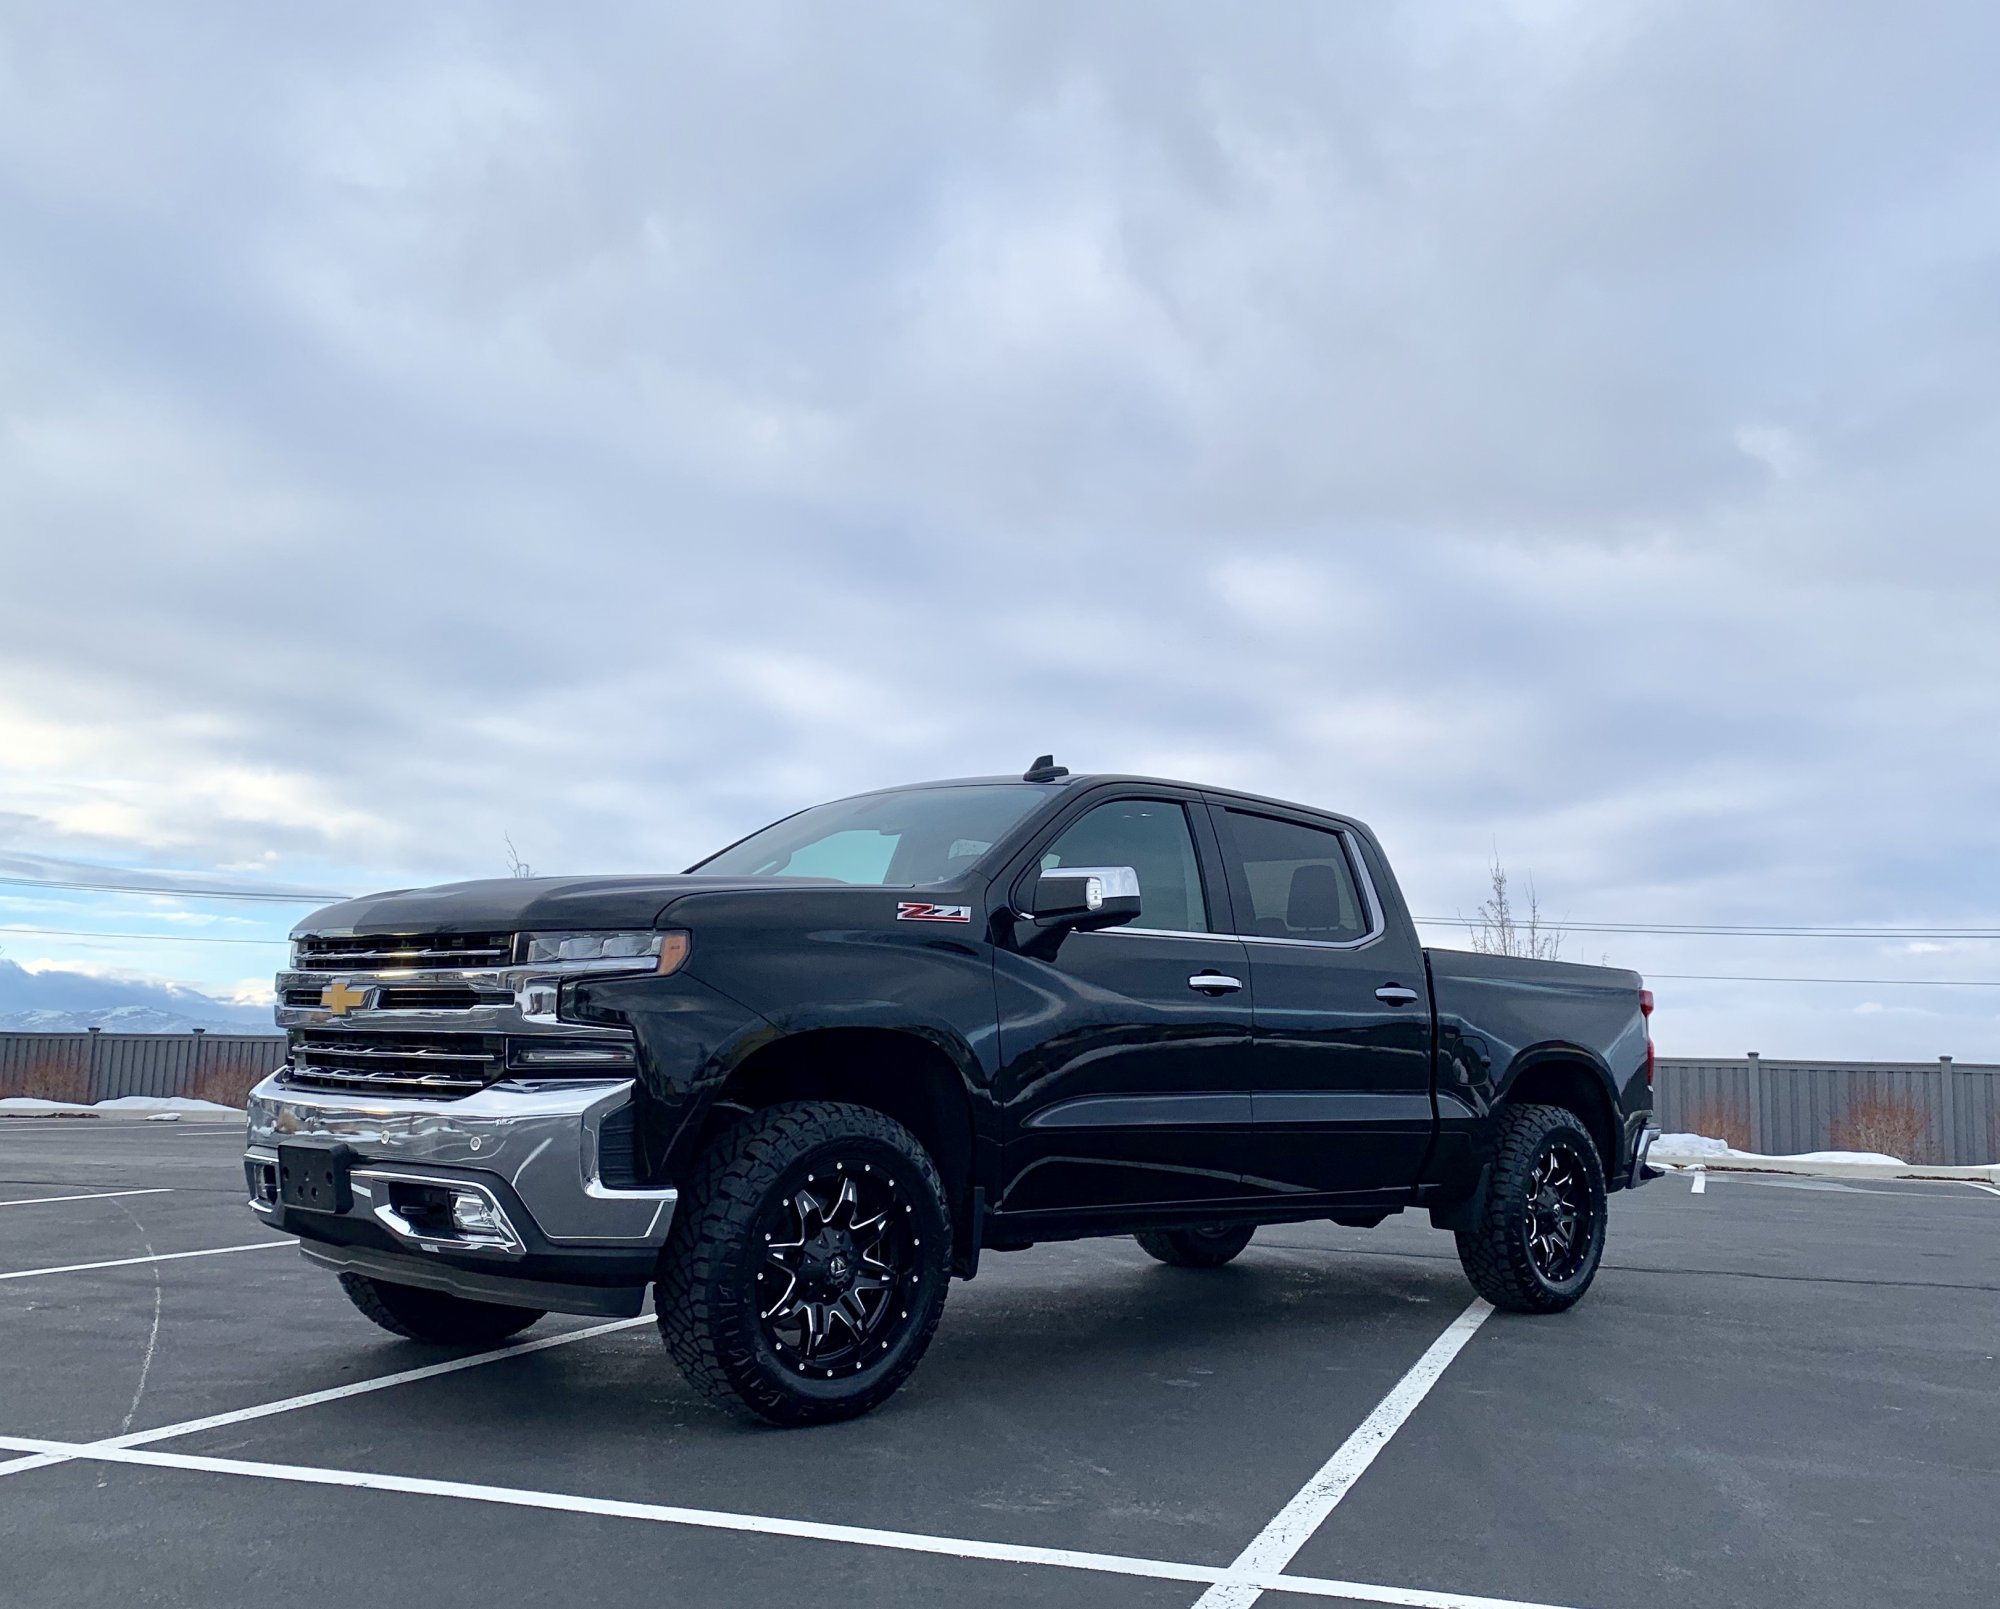
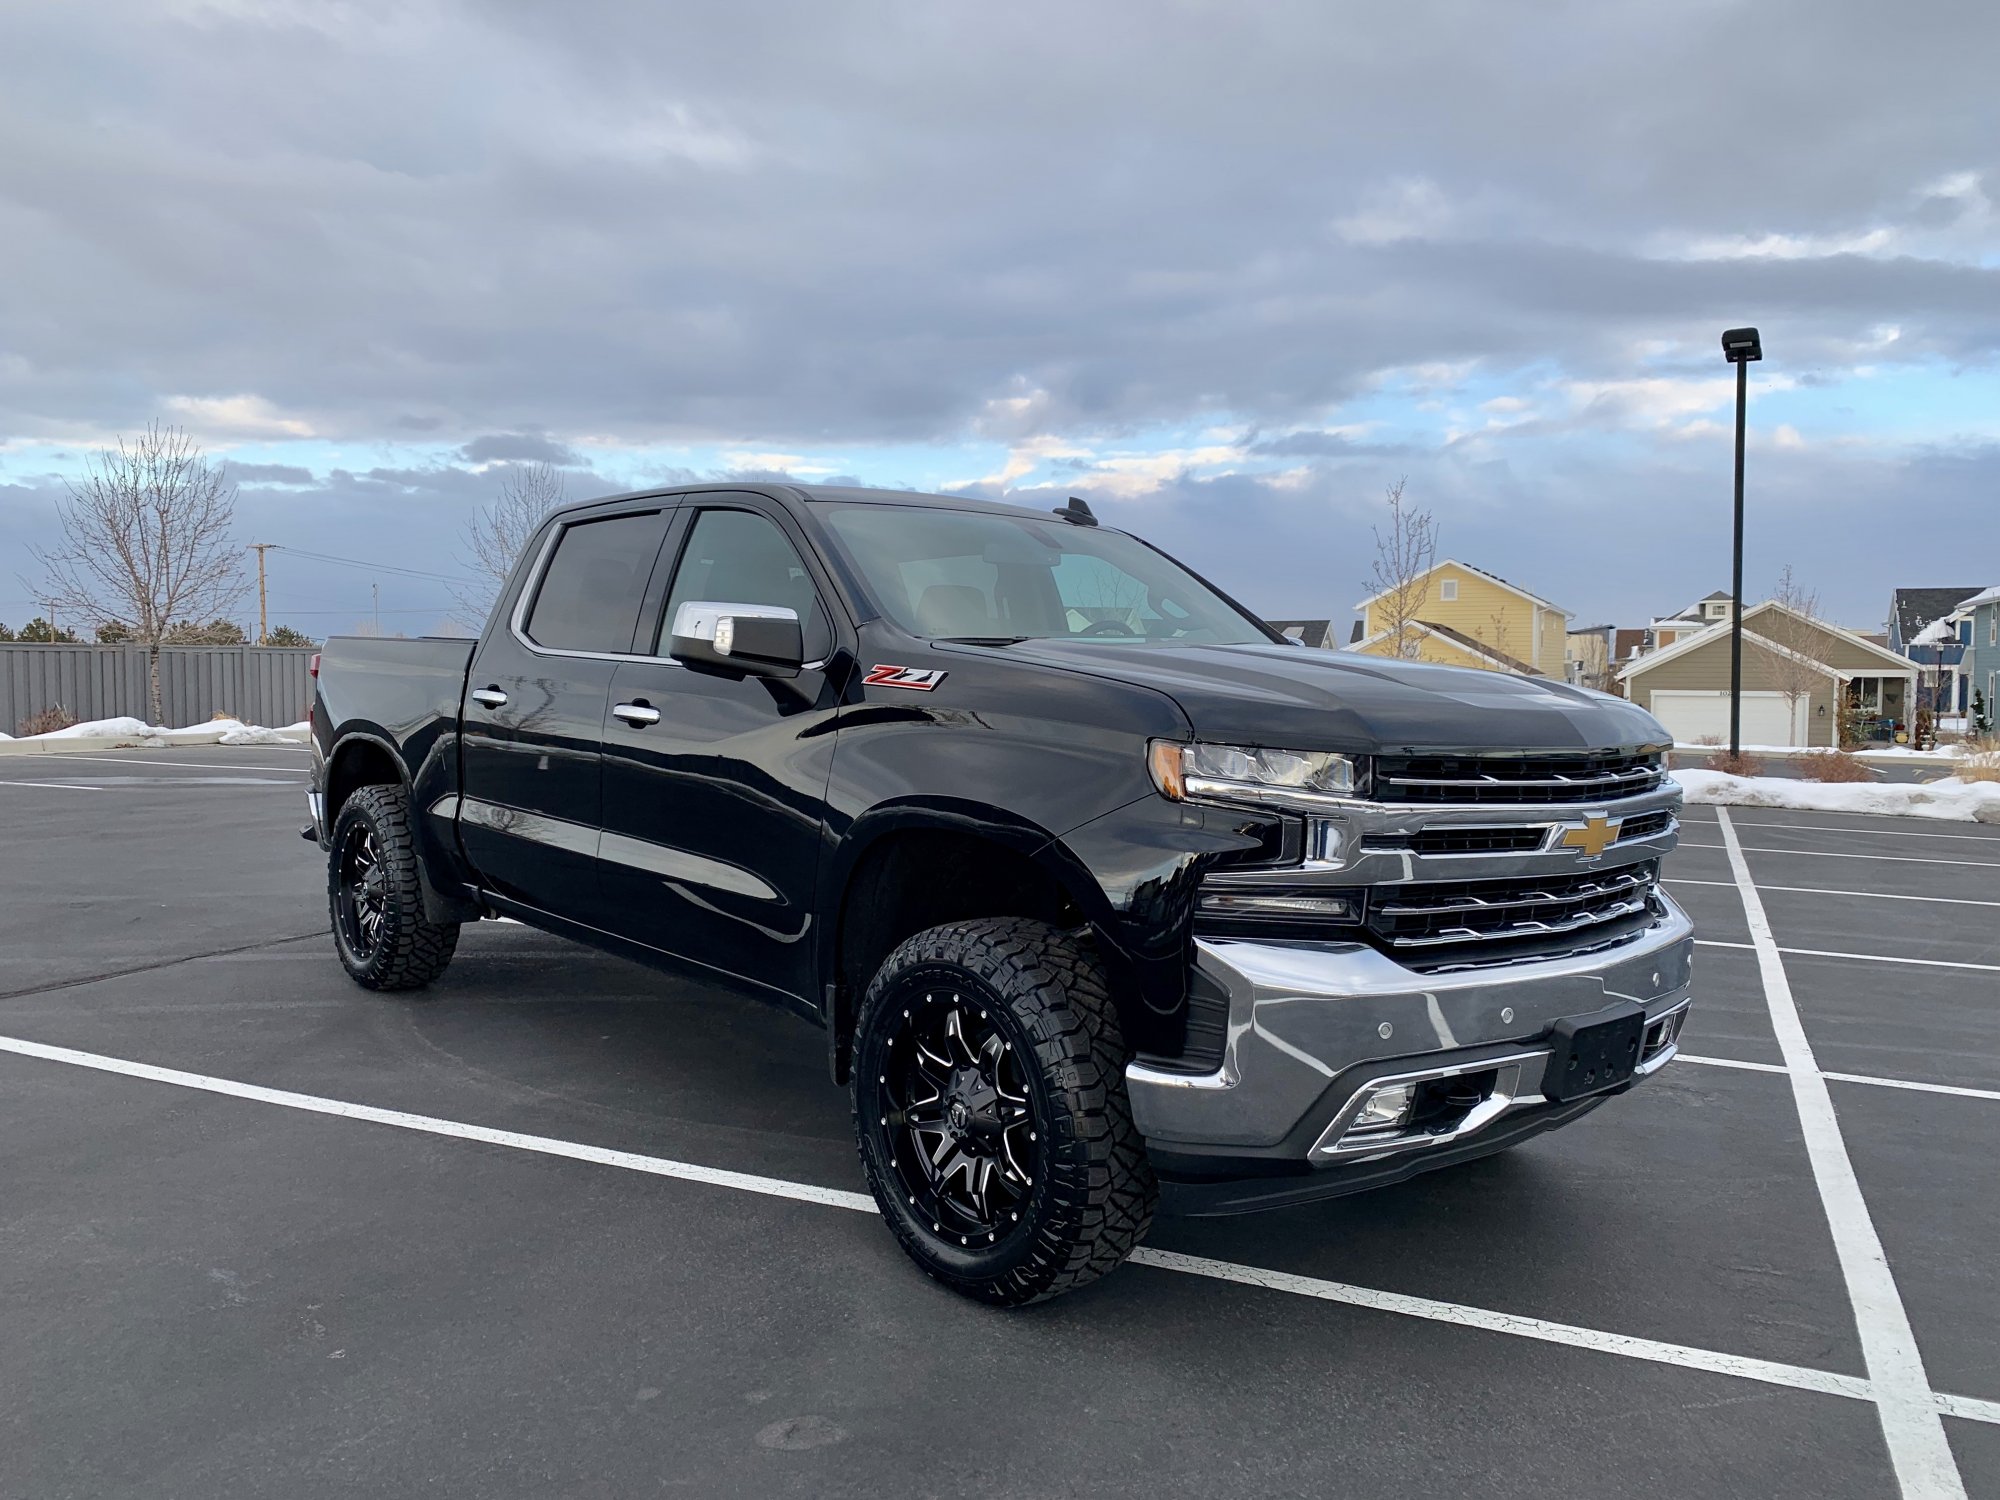
Here is our new 2019 Silverado RST. For details on all the modifications, here is a link to my build thread:
17 points
-
Finally arrived! Pacific Blue Sierra
17 points
-
Seat Memory Retrofit (RPO - A45) by pgamboa So I gave everyone a sneak peak of my radio that showed the “Comfort and Convenience” options. This option is an option when you have the A45 - Seat Memory Package, typically found on LTZ, High County, SLT, and Denali Trims. Since owning my truck (2016 Silverado LT, 1500 CCSB), I started down the path of adding Seat Memory because I thought this was upgrade path in order to add DL3 Mirrors (power fold, turn signal, puddle light, etc.) I originally only wanted DL3 Mirrors but it seemed (at the time) that I could or would need to add Seat Memory since all the circuits for DL3 Mirrors and their harnesses were built for Seat Memory. When I realized that adding Seat Memory was never going to happen and couldn’t be done, I always wanted to know why. The MAIN reason why it has been said it couldn’t be done, wasn’t because that it couldn’t, but because of all the hardware, wiring, and programming requirements needed in order to achieve it. There is a HUGE parts list, a TON of wiring, then the programming. I’m here to share my retrofit details with all of you! Let’s start with my truck first. 2016 Silverado 1500 LT, CCSB, Gas, 5.3L, 2WD. Came with Factory Heated Leather Seats, Power Adjust Driver Seat, Power Adjust Pedals, Rear Park Assist Sensors, Rear Sliding Window, DL8 Mirrors. I came across an opportunity to buy a complete interior that came from a higher trim truck (mainly for the heated/cooled seats is what I wanted) and took this opportunity to give this another shot, considering that I would have a majority of the hardware. Retrofit Requirements: First and foremost - Programming. There is a K40 - Seat Memory Module that lives under the Driver’s Seat. This needs to be programmed to your truck. Programming done by WAMS - www.whiteautoandmedia.com. @GTPprix Thanks for this! The K40 Seat Memory Module was sent off to get programmed to work with my truck/my VIN. Hardware - DL3 Mirrors, DL3 Door Harnesses, DL3 Door Panel Harnesses, DL3 Power Fold Switch (different than the non-Seat Memory Power Fold Switch), DL3 Passenger Window Switch (DL3 Passenger Window Switch has two inputs as opposed to one), Heated/Cooled Seats, K40 Seat Memory Module, Pedal Adjust Memory Motor (still need to source one). Wiring - There is a TON of wiring needed. There are about 10-12 circuits that need to be added to the driver side seat connector X310 (cabin side). These circuits go forward and land in various places (X51L Fuse Panel, X61A Junction Box, Pedal Adjust Motor, Passenger Seat, both Door Jambs (cabin side), Passenger Side Kick Panel). You will also need to access both door jamb (cabin side connectors) to remove circuits that will no longer be used in favor of new seat memory circuits. So, as you can see, you will have to have the ability to overcome this as it can be a bit overwhelming. You will also need to ability to comprehend the schematics differences between Seat Memory versus non Seat Memory. There are several circuit redirects and circuits that get abandoned in favor of new circuits to live in those slots, etc. So…as you can see, this is why it always been understood as “it can’t be done”. I have everything working EXCEPT for the pedal adjust - memory recall. I can manually adjust the pedals using the adjust button on the I/P. The pedal motor is different in Seat Memory versus Non Seat Memory, so I will be exploring that soon. It seems that I am missing a pedal position sensor. This is fully functional now Here is a list of what I gained and what is working: Key Fob Mirror Fold In/Out Reverse Mirror Tilt Mirror Memory Pedal Memory Seat Memory Set Switch 1 & 2, Easy Exit Heated/Cooled Seats on both seats Power Adjust Passenger Seat Power Adjust Driver Seat Driver Seat - Haptic Feedback (when in Reverse) What doesn’t work Pedal Adjust Memory Recall - This is the last piece of this upgrade and is a work in progress. I am exploring the requirements for this. Pedal Adjust Memory Recall works now after installing the Pedal Adjust Position Sensor. $15 on eBay for that. I couldn’t drive my truck for 3 days since the driver seat was moved ALL the way forward when it was removed from the donor truck. This was done to gain access to the rear bolts needed to remove the seat. I was NOT able to get the power adjust on the driver seat to work until day 3 of this project, therefore, making the truck not driveable. I inadvertently had to make a “Seat Memory Bypass, Power Adjust Harness” to be able to move my seats in the meantime. This custom harness bypasses the Seat Memory Module and provides power to the adjust controls. Depending on the need for this, I may make/sell this harness for those without seat memory that want to install these heated/cooled seats, and be able to adjust the driver side. The Driver Seat adjust controls go THROUGH the Seat Memory Module. So until you can get entire system to work, you won’t be able to adjust the driver seat. If you currently have Factory Heated Seats, adding cooled seats is rather simple and is plug and play (no programming required). If you DO NOT have Factory Heat, I don’t know how much more work is needed to gain that. Most likely, you’ll need programming for the K29 Seat Heating Control Module and/or BCM. Since I have Factory Heat, the K29 Seat Heater Module was already present under my factory seat, so to gain cooling for the Driver Side, I only had to land one wire for the Vent Motor from the passenger side over to the driver side. For the most part, the passenger seat was Plug and Play. I was able to quickly gain power adjust on that side since its controls do not interface with the MSM Memory Seat Module). However, you WILL get an airbag warning error because the seat position sensors are all handled by the MSM. Without a fully functional MSM, you’ll have to add the physical Seat Position Sensor to get this error to go away. There is really NO easy way to integrate this. No Plug and Play harnesses that will make this all work. So please don’t ask me about one - LOL. You really need to have an understanding of how to add missing circuits and circuit redirects. I had to redirect circuits in 4 places. I did make 2-3 mistakes in this project. I forgot to land missing circuits (totally missing them) and I landed circuits incorrectly - blowing the pedal adjust fuse. So…you have to be fully prepared if you decide to tackle this project. Here are some photos to share. I also took some video clips of the entire process and will try to put a video together. Enjoy! Dash Swap was done only because I had the seats already out, so might as well swap out my vinyl dash for the leather that came with the interior I bought. Since I had to remove seats and carpet to gain access to the cab side seat connectors, might as well Sound Deaden. Lol. New Comfort and Convenience options! Cab Side - Passenger Seat Connector (X320) Cab Side - Driver Seat Connector (X310) - With my harness loom of new circuits added. The dreaded X61A- Junction Box An impromptu harness I had to make to adjust my driver seat without the MSM working. The impromptu bypass harness. Can’t drive like this. Seat now adjusted to optimal driving position! LOl16 points
-
Thank you @newdude your knowledge is off the charts amazing. You don't ever brag, you don't ever make anyone feel bad, you truly are a great guy. I for one really appreciate your knowledge and your desire to share your knowledge and help others. Thank you sir!!16 points
-
Some more Sent from my Pixel 4 XL using Tapatalk16 points
-
Deep matte black vinyl wrap with a gloss black chrome delete!
16 points
-
Just got her Saturday! Leveling kit, tires and wheels all done on this fine President’s day! Next up, black bow tie, tinted windows.
16 points
-
Hey everyone, I've been lurking the site for a while now and figured I would share some pics of my 19 trail boss. I cleaned it up and figured I should take a few snap shots. Enjoy!16 points
-
I used my 4 wheel drive16 points
-
Picked up my special ordered 2019 Trail Boss about 2 weeks ago. Loving it so far. Lots of mods already.
16 points
-
so i had an idea a while ago... i have been using a 2x8 in the back of my truck as a 'divider' (just sliding it into the little groves on each side of the box). it worked great but i wanted to do something a little 'more'. i came up with 2 layouts that i liked - i ended up going with the bottom one: one of the pieces of equipment i have with my business is a laser cutter, so using taped together file folders i created the template.... put the template on the 2x8.... and transferred all the 'cut outs' i wanted to use a router, but to make life a little easier, i drilled out as much as i could first.... once the drilling was done i screwed plastic jigs to the 2x8 (i made the jigs with the laser cutter, just 1/8" plastic. my thinking was that the little wheel on the top of the router bit would just follow the cut out in the plastic.) it worked great! then use wood filler on all the screw holes... then sand it and get ready to paint.... and here it is... overall i'm really happy with it. the only thing i need to do is go get another can of flat black. i grabbed a can of what i thought was flat but ended up being semi gloss! ha! oh well, will add the final flat coat in the next couple days after i can get to a hardware store if anyone else wants to try the same thing i'll see if i can attach the file i used with my laser cutter... silverado box divider.ai ^^maybe it worked?? it's just an ai file - nothing special. if the above file didn't upload properly and you'd like to try this just fire me a private message with your email address and i'll send the file. the one thing i'd still like to add is a piece of stainless steel to the back side, but just behind the chevy logo - i think that would look sweet. i just need to get to a local metal shop16 points
-
Jump Seat to Full Center Console Retrofit Plug and Play Harness by PGAMBOA For those of you looking to swap your Jump Seat to a Full Center Console, I now have a Plug and Play Harness for this upgrade! This long awaited - PnP Harness will allow you to EASILY perform this upgrade. NO cutting or splicing needed! Center Console - Plug and Play Harness is $150 Shipped anywhere in the US. For Canada, please add $24.95. Since there are several versions and configurations of center consoles and truck trim levels, I feel that I have covered a majority of the configurations that are out there. There will be several assumptions on the ability to perform this upgrade and I’ll try to be as detailed and comprehensive as possible. Please see the different USB Cable configuration diagrams at the end. Assumptions: - 2014-2015 Center Consoles will have different USB Cable requirements than 2016-2017 AND will have different USB Hubs. The PnP Harness should be compatible, but you MUST verify the connector under the passenger AND the front of the console! Since this is a custom product, there will be NO REFUNDS on it. - Center Console MUST have its factory harness intact and not modified. - Connection under the Passenger Seat AND Front of Center Console must look exactly like the diagram. There is a variant X314 Connector under the seat, so yours MUST match in order for this harness to adapt. - Additional GM USB Cables must be purchased separately (based on your console year) to get USB Hubs functional. - Wireless Charging - Wireless Charging became available on 2016 and 2017 consoles. If you are looking at adding a Wireless Charging Lid to a 2014-2015 Console, please PM me for requirements. Also, there are known issues with 2016/2017 Consoles with the Wireless Lid and charging iPhone 8 and iPhone X Phones. There are workarounds for this that require some form of modification to the charging module. You can also swap the module for a 2018 Module that DOES charge iPhone 8 and iPhone X phones. Please PM me for questions on specifics. - Your truck MUST have an existing 110V AC Outlet AND (1) - 12V DC Cigarette Lighter Plug as you will be reusing those. My PnP Harness DOES NOT add the 110V AC Outlet if you don’t already have it. However, I CAN add an additional 12V DC Outlet connection if needed. - USB Cable connections will come from your HMI (Behind the Glove Box). You MUST verify that you have the USB Ports available, otherwise, your USB Hubs will not work correctly. - This PnP harness DOES NOT add any Car Play, Apple Play, or Android Play functionality. If your truck did not already come with it, you will not gain it. With this PnP Harness, you ***should*** have ALL the components in your console functional. Those options include: Front of the Console: Front - Left USB Hub (Dual USB - 2016/2017or Triple USB Hub 2014/2015 - Uses my Plug and Harness AND a USB Cable from the HMI Front - Left 12V DC Cigarette Lighter Outlet - Uses existing connections (truck must be equipped. If not, I can custom add this if needed) Front - Right 12V DC Cigarette Lighter Outlet - Uses my Plug and Play Harness Front - Right 110V AC Outlet - Uses existing connections (truck must be equipped) Inside Storage Compartment: Inside - Left 12V DC Cigarette Lighter Outlet - Uses my Plug and Play Harness plugged into the front main 42-Way Connector Inside - Right USB Hub - Uses my Plug and Play Harness plugged in the front main 42-Way Connector and USB Cable Inside - LED Lamp - Uses my Plug and Play Harness plugged into the front main 42-Way Connector Wireless Charging Lid (2016-2017 only) - Uses my Plug and Play Harness plugged into the front main 42-Way Connector Rear of the Console: 12V DC - Cigarette Lighter Outlet - Uses my Plug and Play Harness plugged into the front main 42-Way Connector THERE IS A LOT TO CONSUME HERE, SO PLEASE PM IF YOU HAVE QUESTIONS ON THIS. I WANT ENSURE THAT YOU UNDERSTAND ALL THE REQUIREMENT FOR THIS RETROFIT BEFORE PURCHASING. 16-Pin - Plug and Play Harness 23-Pin - Plug and Play Harness15 points
-
Hope nobody minds, but I'm going to start up a Quick Reference Guide for common parts/fluids/bulbs for the T1 HD trucks. I'll try to keep it updated if anything changes. If a mod wants to sticky it, I'm down for that too. Owners Manuals Chevrolet: https://my.chevrolet.com/content/dam/gmownercenter/gmna/dynamic/manuals/2020/chevrolet/silverado-2500-3500/2020-chevrolet-silverado-owners-manual.pdf GMC: https://my.gmc.com/content/dam/gmownercenter/gmna/dynamic/manuals/2020/gmc/sierra-2500-3500/2020-gmc-sierra-owners-manual.pdf Diesel Supplement: https://my.chevrolet.com/content/dam/gmownercenter/gmna/dynamic/manuals/2020/chevrolet/multimodel/2020-6.6-duramax-diesel-supplement.pdf Oil Changes 6.6 gas L8T (VIN code "7") Capacity: 8 Quarts AC Delco Oil Filter: PF63E / 19383806 Drain Plug Size: 12X1.75X18.15 6.6 Diesel L5P (VIN code "Y") Capacity: 10 Quarts AC Delco Oil Filter: PF26 / 89017527 Drain Plug Size: 12X1.75X18.15 Engine Air Filters 6.6 Gas: A3244C / 84121219 6.6 Diesel: A3248C / 84554703 Engine Fuel Filter 6.6 Diesel L5P: TP1015 / 23304096 Interior Filters Passenger Compartment Air Filter: CF185 / 13508023 Wiper Blades Drivers & Passenger Sides: 23387857 Spark Plugs 6.6 Gas L8T: 41-114 / 12622441 Glow Plugs 6.6 Diesel L5P: 68G / 12690238 Fuel Tank Sizes 6.6 Gas L8T, All Box/Cab Configurations: 36 Gallons 6.6 Diesel L5P Double Cab Long Box/Crew Cab Standard and Long Box Configurations: 36 Gallons. 6.6 Diesel L5P Double Cab Standard Box Configuration: 29 Gallons. 6.6 Diesel L5P Regular Cab Long Box Configuration: 28 Gallons. Diesel Exhaust Fluid Tank Capacity: 7 gallons Automatic Transmission Fluid 6L90 6 Speed MYD (Gas engine): DEXRON-VI Automatic Transmission Fluid 10L1000 10 Speed MGM/MGU (Diesel engine): DEXRON ULV Automatic Transmission Fluid. Transmission Capacities (Approximate): 6L90 6 Speed MYD (Gas engine) Pan Drop: 6.0 quarts Overhaul: 10.5 quarts Complete System: 12.4 quarts 10L1000 10 Speed MGM/MGU (Diesel engine) Overhual: 20.6 quarts Complete System: 22.08 quarts Transfer Case Fluid Electronic Shift Non-Autotrac MP 1625/1626–NQF: Dexron VI Electronic Shift Autotrac MP 3025–NQH: Dexron VI Transfer Case Fluid Capacities Electronic Shift Non-Autotrac MP 1625/1626–NQF: 2.4 Quarts Electronic Shift Autotrac MP 3025–NQH: 1.6 Quarts Brake System Hydraulic Brake System (Vehicles with DOT 3 brake fluid): DOT 3 Hydraulic Brake Fluid Hydraulic Brake System (Vehicles with DOT 4 brake fluid): DOT 4 Hydraulic Brake Fluid Wheel Lug Nut Torque All Models: 140 lb-ft / 190 N-m Front Axle 9.25" Axle Lubricant: 75w85 Synthetic High Efficiency Lubricant, 10-4091 / 19300457 Capacity: 1.9 Quarts Rear Axle 11.5" Axle Lubricant:75w90 Synthetic Lubricant, 10-4016 / 88900401 Capacity: 3.17 Quarts Rear Axle 12.0" Axle Lubricant:75w90 Synthetic Lubricant, 10-4016 / 88900401 Capacity: 3.17 Quarts15 points
-
I had a bit of spare time a couple years ago during the hottest week of the year and figured it would be a great time to do some hot weather tuning and while I was at it, a further eval of the cooling system. I collected a bunch of temp data some may find useful. I posted some similar data a couple of years ago but it was limited to a single “after” run with a couple of mods allowing people to pontificate upon what they thought the “before” results would have been with the stock cooling system. Unfortunately side-arguments were started by people who don’t understand how the cooling system works and it overwhelmed the information provided in the thread. So here’s a second try. This time I collected enough data from enough configurations there’s really no room for any argument, just the results, just what the data show. For the sake of simplicity we’ll compare two runs, one run with the completely stock cooling system and the other configuration the one I recommend for those towing heavy loads in the mountains in the summer with 2014+ V8 trucks—with two simple mods, a 180 thermostat and more aggressive fan settings in the tune. Two of the most common tropes on the internet regarding cooling systems are “the thermostat doesn’t do anything as soon as the engine is ‘warmed up’ so it won’t make a difference,” and “the fans don’t do anything at highway speed.” Both are simply very wrong, for a multitude of reasons. While it’s possible to conceive of specific situations in which one or the other modification won’t be of benefit, the vast majority of drivers (probably on the order of 99.999% if both mods are done together) will never run into one of these situations while running hotter than they’d like. The data below speak for themselves. As I’m sure some are wondering, runs were also made with the 180 thermostat and stock fan settings along with the stock thermostat and modded fan settings. The results were unsurprising, showing one mod helpful in some situations, the other mod helpful in others, but neither mod alone fully effective in all situations. Putting the two together makes each more effective and gives significantly improved cooling performance in all situations which is why I recommend both. This post is long enough and will be confusing enough to many readers already so sticking to comparing the two configs for now is probably a good idea. But keep in mind when I explain and attribute parts of the results to one thing or the other, I’m not making it up, I have the data to support the conclusions. Here are the stock fan settings: And with the 180 Thermostat these setting were used: A snapshot close to the top with the stock system: A snapshot close to the top in the modded config: Cliff’s notes results: Those were the peak temps reached by each fluid. As you can see, the modified configuration dropped peak temps across the board by about 20 degrees. Peak temps of course, don’t tell the whole story. Looking at the data in more detail is instructive. Each run was 20 miles up a mountain pass. The first 15 miles has a decent slope with the last 5 miles or so getting pretty steep—more than a 5% grade. The long runs ensure all fluids had plenty of time to be fully warmed up and find their steady-state on the moderate slope before the steepest final five miles. Ambient temps were right around 92 degrees most of the way up the hill on all runs. Also of note, the runs were made with the cruise on 65 MPH in Tow/Haul Mode for most of the way, but on each run the last ½ mile or so required reduced vehicle speed due to traffic at the top of the hill. Here is an elevation profile of roughly the last 10 miles of the run. Each chart only shows the last 10 miles of each run to better show the differences as the first 10 of each is pretty boring and just takes up space. Note this was not intended to be any sort of “ultimate torture” test or “proof test,” indicating success on this test would insure the cooling system can handle anything. I’ve towed heavier loads up longer, steeper passes and many south of here have done that in much hotter weather (but not while collecting data with a laptop). This was a comparison test to show the differences in performance of the cooling system configurations. Temps headed in the wrong direction on this test, even if they didn’t quite get out of control, should be a red flag for more severe use. Coolant Temp: Here you can see that after the first 10 miles of steady state climb (beginning of the chart), the cooling system is doing pretty well in both configurations and the thermostats are not even fully open (thus the ~25 degree advantage for the 180 thermo). That’s pretty good news, especially for those with the stock system who live where it’s flatter and any hills encountered when towing will be of moderate slope and/or length. When the hill gets steep for the last five miles, the cooling system needs to start working much harder. As both thermostats open more fully, the advantage of the 180 thermo of the modified configuration is slowly negated so the temps converge a bit, but the higher fan speeds of that config still give the system more cooling capacity—along with the stock thermostat not being open 100% until the very end of the test. As you can see, even running full blast up the steepest part of the hill, the modified config tops out in temp, reaching a new steady state. The hill could have gone on forever and it would not have gotten any hotter. Then when vehicle speed is reduced, temp comes down immediately. It is clear the fans played a key role with the modded config as the temp rise stops as the fans approach full speed. Programmed to reach full speed at 212 degrees, the temp stops rising 5 degrees short of that, so the fans get cranked up pretty high, but never quite actually get to full speed, indicating there’s still a little cooling capacity left in the system that would require a tougher test to utilize. If it was possible to program the fans to reach full speed at a lower temp (without them running full speed all the time, which I deem unacceptable for general use) it’s very possible lower peak temps would have been maintained with this thermostat. It’s also possible a slightly higher temp thermostat would have resulted in similar peak temps with these same fan settings. But you can’t use these fan settings with the stock thermostat (it's just too high) unless you want them blasting all the time. The temp for the stock config is still climbing when running at full speed and when vehicle speed is reduced to 50 MPH or so, the temp spikes quickly. Had the steep part of the hill been any longer there’s no telling how high the temp would have climbed. It didn’t quite make it to the danger zone in this test but it’s easy to see how it could in a tougher test. I personally have no interest in ever letting my coolant get into the 230-240 degree range and it’s clear with the stock config that would have happened with a heavier trailer, steeper hill or hotter ambient temps. Other vehicles begin going into various protected modes at such temps. For example, the EcoDiesel will begin “defueling” when the temp hits 244 and you’ll begin slowing down to 18-wheeler speed. The modded config on this truck provides a huge margin of safety before reaching such temps. When vehicle speed is reduced, the stock fan settings really hurt the stock setup. It is very common for speeds to be limited by traffic or road safety when towing and this shows that while increased fan speed helps significantly even at 65 MPH, it’s really, really needed at ~50 MPH. In some states there’s a 55 MPH speed limit when towing a trailer and sometimes there’s just too much traffic to go any faster. Many also tow on gravel/dirt roads, mountain trails, etc, where vehicle speed is kept low even when the engine is working hard. For those conditions the fan settings are even more crucial than they were in this test. Given these results, the engine cooling system seems to be more than adequate on these trucks, even without the NHT radiator. All one needs to do is “turn it on” a bit more aggressively with the lower temp thermostat and fans that don’t wait until you’re close to a meltdown before they crank on with some authority. I see no other mods needed for engine temp control in any situation. Oil Temp: Since the oil cooler is an oil/water cooler located in the cool tank of the radiator—so water temps have a direct effect on its effectiveness--it’s not surprising the oil temps stayed proportional to the water temps, beginning about 20 degrees cooler for the modified setup and converging a bit as water temps converged on the steep part. Again, the modified config found a new steady state in the middle of the most difficult part, indicating the hill could have gone on forever and temps would have risen no further. The stock setup, however, allows the oil temp to keep rising until the end of the hill—had the hill gone on another few miles, how much higher would the temp have climbed? 250 degrees on this test indicates it could get really toasty under harder use with the stock setup. For good fully synthetic oil (I run Redline) 250 is no big deal for short periods if infrequent. I don’t worry about the oil temp at all on my Camaro until it exceeds 300…but then again I change the oil on my Camaro after a single day at the track and don’t rack up that many miles on the engine so engine wear is less of a concern. I don’t think many people change the oil in their truck every time they tow something up a hill, so if you’re cooking the oil on a regular basis and still trying to run it 10,000 miles between changes, keeping the temps down a bit might be a good idea. 0W-20 is thin as water at regular temps, at 250+ it simply won’t protect as well as thicker oils of the same type. Yes, it reduces wear at startup, especially in cold weather, but it can’t do that and also be optimum for really high temps—so trying to prevent it from reaching such high temps is a good idea. For those who drive a truck for a couple years before trading it in it might not be so concerning, but for those who want to keep a truck long past the warranty period and put on a lot of miles, reducing engine wear is a smart thing to do. Using the EcoDiesel as an example again, it begins defueling when the oil hits 266 degrees indicating they feel that is very bad for the engine. Given these results, the stock oil cooler shows it is pretty effective. When the water in the radiator is kept to a reasonable temp in the modded config, the oil cooler is plenty adequate for keeping the oil temps in check. I don’t see a need for adding an aftermarket cooler or modding the stock system in any way, just keep the engine from running too hot when it’s working hard. Trans Temp: Here you can see on the moderate portion of the hill, the mods only made a small difference. Since most (or even all in some conditions) of the cooling comes from the air/oil cooler in the system, and the trans fluid cooling system has its own thermostat, lower water temps only have a small secondary effect on trans temps so the engine thermostat change alone won’t do much. And before the trans fluid thermostat is wide open, the increased fan speed only has a small effect. As the trans warms up, the increased fan speeds do help obviously as you can see the results begin to diverge as the hill gets really steep. In the stock config, the temp was climbing quickly all the way to the top. If the hill was longer, there’s no telling when it would stop. While for a shorter period of time than the other fluids, the temp does reach somewhat of a steady state temp in the modded config before vehicle speed is reduced indicating if the hill went on forever the temp should stay close constant. And the temp is low enough even if it gains another couple degrees, it’s a non-issue. The most worrisome part of the results for the stock system is the huge temperature spike at the top of the hill where vehicle speed is reduced. With the fans humming along in the modded config, there is no large temperature spike. This is an especially important thing for people to note who tow at lower speeds as described above. Towing in traffic is especially hard on the transmission as the on gas/off gas nature keeps the converter unlocking and slipping all the time, creating a lot of heat. The same can be said for winding roads/mountain trails. Unfortunately there are not separate fan settings in the computer based upon tranny temp, you need to get them on indirectly by assuming any time the transmission wants to get hot the engine will be warm enough that the modded fan settings I show above will have kicked in. This should work for most situations but it is possible (towing at low speeds, especially in very cold weather) that won’t always be the case. For pure highway towing the mods I listed above should be adequate. Keeping the transmission temps below 210 degrees in a test like this keeps you way out of the danger zone and nothing else is really needed. However, if you do tow at lower speeds a lot it may be worth it to you to add another layer of protection. The easiest way to do that is to bypass the stock tranny fluid thermostat and splice in an aftermarket one. This should have a similar effect as the lower thermostat does for the engine temp—giving it a lower baseline temp 95% of the time and keeping max temps lower by simply “turning on” the trans cooler a larger percentage of the time in mixed use and earlier during sustained hard pulls. I would not recommend simply bypassing the stock thermostat without replacing it with something. There’s really no advantage to running these modern transmissions colder than 180 or so and some disadvantages, especially in winter use. According to the data so far, the stock air/oil cooler seems adequate so I see no reason to advocate adding a larger aftermarket cooler at this point. But I don’t yet have any data for the system with a lower temp trans thermostat or lower speed testing. I’ll probably do that at some point and try to collect data in situations where the above mods might not be enough. Given the testing so far, I do think it would be very difficult to come up with a scenario where the above mods and the addition of a new tranny fluid thermostat are not enough to keep temps under control and wouldn’t advocate going to the hassle and potential downsides of installing a new cooler until some sort of data indicated it was needed. But more testing in this area is needed. Conclusions: For a 2014+ truck with a V8, even with the non-NHT radiator, I conclude the following for towing in hot weather where steep hills/mountain passes will push the cooling system to the max of its capabilities, in stock configuration and with two mods—a 180 degree engine thermostat and reprogrammed fans. Engine temp: In stock config the system is adequate for all but the harshest of conditions (harder than the above test). However there is indication a harder test could drive engine temps dangerously close to overheating, even if it doesn’t get to the point of spewing steam, it will come too close for comfort for many owners. With the two mods, the stock cooling system should be completely adequate for any situation. Engine oil temp: In stock config, the system is not adequate to keep engine oil temps in the range many users would like for longevity and in a tougher test could reach temps where warning messages appear, oil life is reduced, engine wear is increased, etc. With the two mods, engine oil temps are kept in check and the stock system should be adequate for any situation. Trans Temp: In stock config, the system is not adequate to keep trans temps in the range many users would like for longevity and in a tougher test could reach temps where warning messages appear, fluid life would be reduced and transmission could risk damage. In the modded config, trans temps are kept in check and the system should be adequate for any highway-speed condition where transmission heat is due to longer, sustained hard work as the engine temps will also rise triggering an increase in fan speed. The above test does not guarantee the system will be adequate in all lower speed conditions, especially in cold weather where the engine might stay cold enough the fans will not speed up (unless you have them programmed to stay blasting all the time which is not recommended for various other reasons). More testing and possibly other mods required (lower temp trans thermostat, larger cooler if high temps are still reached after that). One caveat for the entire cooling system overall is that these tests were done with the 6.2. It’s reasonable to suspect they might not have been as good (for each config) if tested on a 5.3 which will need higher RPM and lower gears to maintain speed going up steep hills. For a given load and a given hill, the 5.3 just needs to work harder than the 6.2. This does tend to put more heat in the fluids and I believe everybody thus far who has reported here getting warning messages when towing up passes and had to slow down has had the 5.3—even with the NHT radiator. So for concerned 5.3 owners I’d say look at the above results with the fact all temps may have been higher with a 5.3 in mind, making the mods an even better idea for the smaller engine. Another caveat is that this truck does not have those fantastic grill shutters…. I’ve done zero investigation into how those are operated and how much restriction they add even when open. Any restriction to airflow through the radiator only makes fan power more important, so if anything they would result in an even larger difference between the two configurations. One of the more important things this test reveals, is just how lucky we are. GM did a pretty good job on the cooling system of these trucks and big N/A V8’s are generally easier to keep cool than smaller turbo motors. Most never have any issue in completely stock form, and with a couple of simple mods that “turn on” the cooling system a bit sooner, we can work these trucks hard without worry, no matter the load, no matter the ambient temp. Other brands don’t have it so good. Before buying this truck, I was heavily looking at both the Ford Ecoboost and the Ram Ecodiesel. Both of those trucks have serious issues in tests like this. The Ram has it much worse—they run into the defueling conditions even with lesser loads on lesser hills and even in cool weather. It is very unlikely one of those could have completed this test without having to slow down to the 30-40 MPH range ½ way up the hill. They simply aren’t remotely as capable as these trucks are. Some owners spend money on bigger radiators, intercoolers, aftermarket oil coolers, different grills for more airflow, etc, but most simply seem satisfied to slow down to the 30-40 MPH range on big hills. They sure do get great mileage though. The Ecoboosts don’t have it quite that bad (they’re much more capable trucks), but they do commonly have issues. Heavy loads up long passes in high ambient temps—especially at high altitude—commonly heats them up to the point they enter “Reduced Engine Power” mode where the engine begins cutting boost until the turbos are basically shut off. Owners of these tucks also spend money on bigger radiators, intercoolers, aftermarket oil coolers, etc, but even with all that, nothing seems to “fix” the issue. We don’t need to worry about any of that. Owners commonly force downshifts to increase the engine RPM as a matter of course (sort of negates that whole “low RPM torque tows just like a big diesel” bragging point). Lots of Ecodiesel and Ecoboost owners end up upgrading to heavy duty trucks (usually of the same brand as they are loyal) simply due to frustration of overheating issues when the trucks are worked hard. It’s nice we don’t have to worry about that. Good job, GM.15 points
-
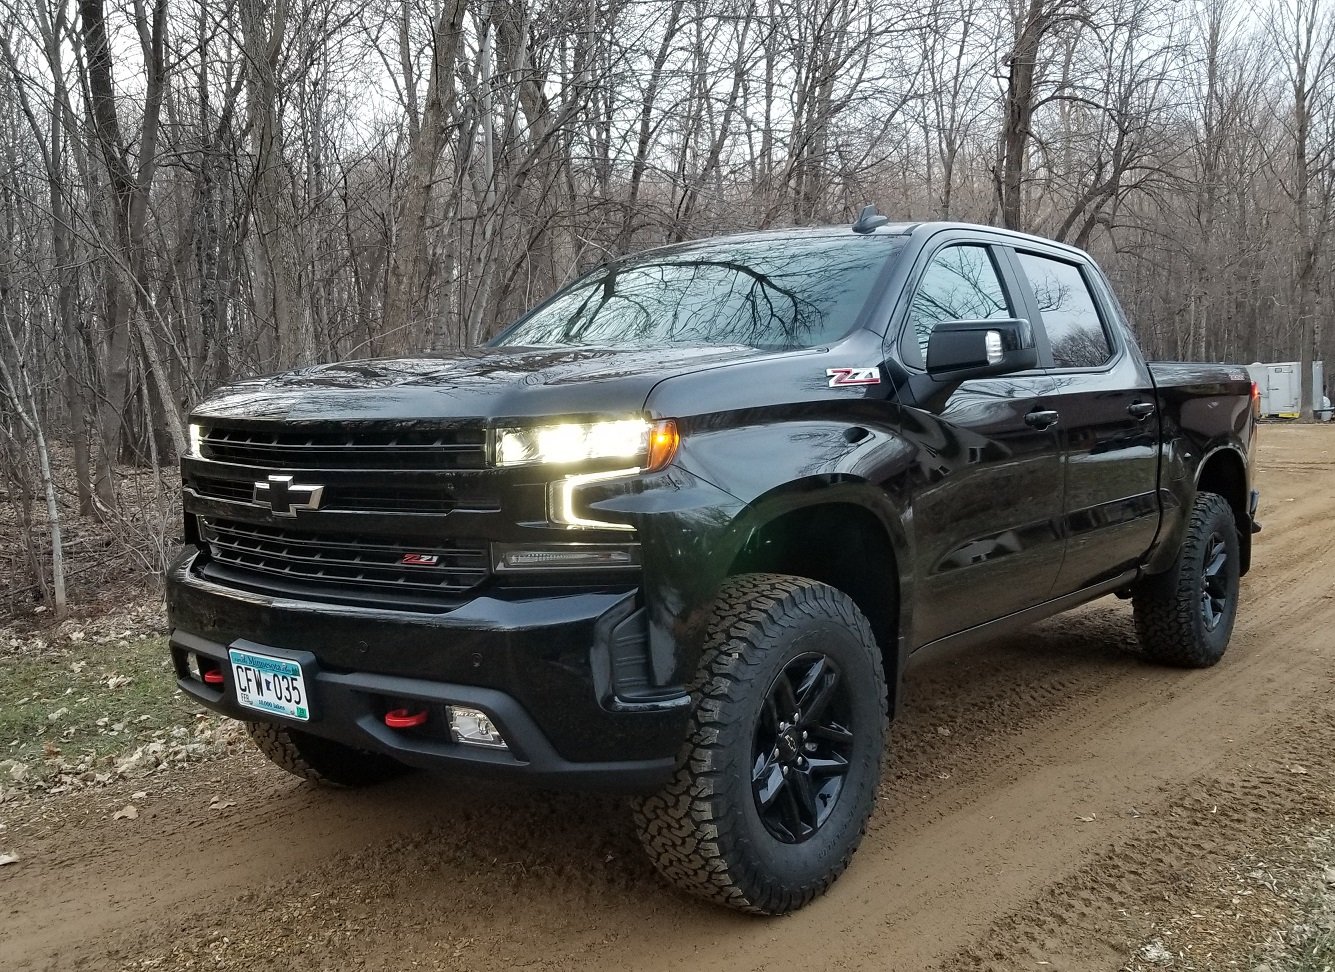
Now that owners are taking delivery of the new 2019 Chevy Silverado and GMC Sierra, I thought a quick reference guide to common routine maintenance items would be beneficial to us all. If you have information that you'd like suggest be added to this topic, just post below and I'll update this first post with any and all new/updated information. 2019 Chevy Silverado & 2019 GMC Sierra Routine Maintenance Quick Reference Guide -------------------------------------------------------------------------------- Digital Owners Manuals 2019 Chevrolet Silverado: 2019_Chevy_Silverado_Owners_Manual.pdf 2019 GMC Sierra: 2019_GMC_Sierra_Owners_Manual.pdf Oil Changes 2.7L(L3B) Capacity: 6.0 Quarts AC Delco Oil Filter: PF66 / 55495105 Drain Plug Size: TBD 5.3L(L84) & 6.2L(L87) Capacity: 8.0 Quarts AC Delco Oil Filter: PF63E / 19330000 Drain Plug Size: 15MM or XX Torx Engine Air Filters With High Capacity Air Cleaner: A3244C / 84121219 Without High Capacity Air Cleaner: A3246C / 84121217 Interior Filters Passenger Compartment Air Filter: CF185 Wiper Blades Drivers & Passenger Sides: 55cm / 21.7 Inches - GM Part Number 23417074 Spark Plugs 2.7L L4: 12688094 / 41-106-IP 4.3L V6: 12622441 / 41-114 5.3L V8 & 6.2L V8: 12622441 / 41-114 Fuel Tank Sizes Standard / Short Box (Gas & 4WD Duramax): 24 Gallons Standard & Short Box (2WD Duramax): 22 Gallons Automatic Transmission Fluid 6-Speed: DEXRON-VI Automatic Transmission Fluid 8-Speed: DEXRON-HP Automatic Transmission Fluid 10-Speed: DEXRON ULV Automatic Transmission Fluid (GM Part Number 19352619/Canada 19352620) Transfer Case Fluid All Models: 1.6 Quarts DEXRON-VI Automatic Transmission Fluid Wheel Lug Nut Torque All Models: 140 lb-ft / 190 N-m15 points
-
We have three trucks lined up. All 2015 Sierras, 1 SLT and 2 Denalis. Stock Headlights Morimoto Sierra-Spec HID kit in factory housing FX-R Retrofit with XB35 bulbs courtesy or a popular retrofitter FX-R Truck Morimoto Kit FX-R vs Morimoto FX-R vs Stock Results: The Retrofit is obviously the brightest. The FX-R is a very bright and has a good beam. Issues were the build quality. Broken tabs, stripped adjusters and missing parts meant that we were unable to align them to the factory truck we had on site. Awesome upgrade and WELL worth the work, but either do it yourself and make sure it's done right or pay for a skilled retrofitter. The work to open these lights is painful and getting it right is important. Not being able to adjust these ones that he purchased means we will be removing them tomorrow and installing the factory housings back in with a Morimoto kit instead. My Morimoto kit was still quite bright despite being a much higher kelvin. Having this kit in own vehicle, I'm quite happy. I will be doing a retrofit at some point but for the time being I am happy. I have had no issues with the install and have had no issues with reliability since. For the cost and effort, I definitely recommend the TRS kit for these trucks. Great improvement from stock with little work. Stock is obviously rubbish compared to either setup and should be changed out ASAP. Retrofit: 10/10 Function 2/10 Ease of install Morimoto 8/10 Function 6/10 Ease of Install Stock Shitty.15 points
-
Took her up to Fish Lake Utah this weekend. The Aspen are changing and they make great photo ops Sent from my Pixel 4 XL using Tapatalk15 points
-
I've been wondering when I would use the Task Lights on the back of outside mirrors... Just haven't seen much use for them... until the other day... Brought my kid's girlfriend home, and as he walked her to the door, their porch light was not on... they lingered a bit longer than I felt comfortable with, so I closed the mirrors and turned on the task lights... lit up the front of the house quite well I don't think my son was amused heheh15 points
-
Finally can say I'm an Owner now. Have had my eyes on a 2020 for a long time now. It felt like foreverrr. Sent from my SM-G975U using Tapatalk15 points
-
Here’s mine, I have full PPF (Paint protection film) the entire vehicle and stealth film on tail gate.. don’t mind my boy in the pic lol.
15 points
-
First paint correction and seal on the AT4 now that winter is over. This blue looks even better after a clay/polish/seal.15 points
-
No gap, be nice about Binki. He served with me on my last deployment to AFG. A child sent me a care package, Binki was inside. He was my Scout, FireWatch, ammo runner. I've had him for five years, still has AFG moon dust, and some sand left in him...
15 points
-
I know the K2 guys have one of these threads so I figured we should too. Think it’d be useful for others. Post pics of your setup! Make sure to add specs of the wheels/tires, spacers, suspension, rubbing/trimming... I’ll get it started.. Fuel sledge 20x10 -19 (no spacers!) Toyo RTs 285/55/20 1.5in leveling kit Rubbing on the mud flap a lil before full turn
14 points
-
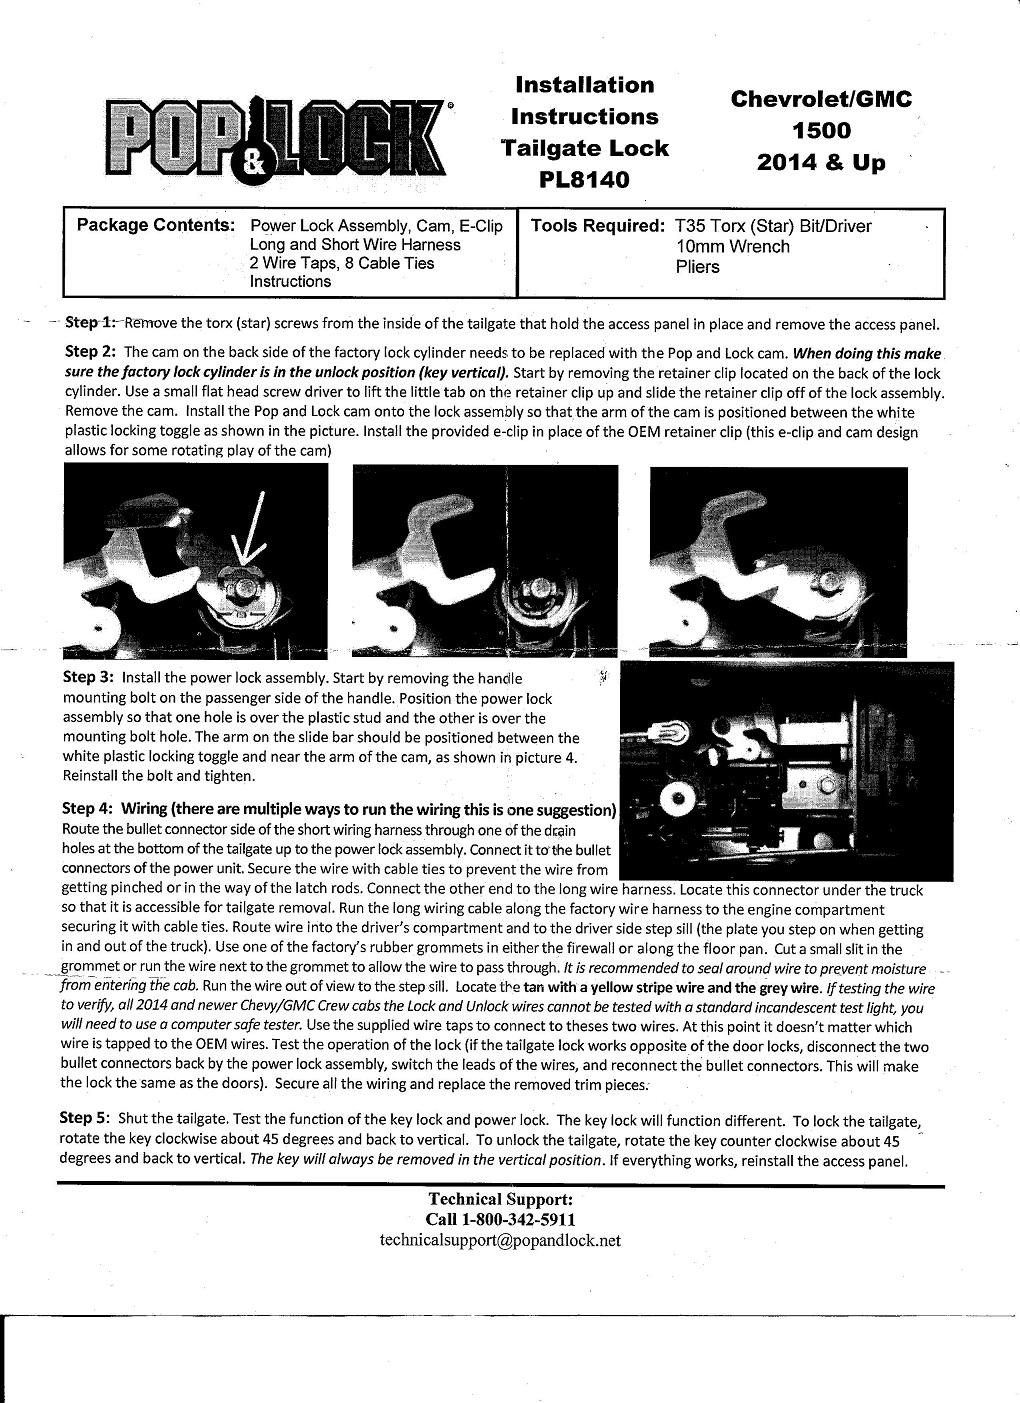
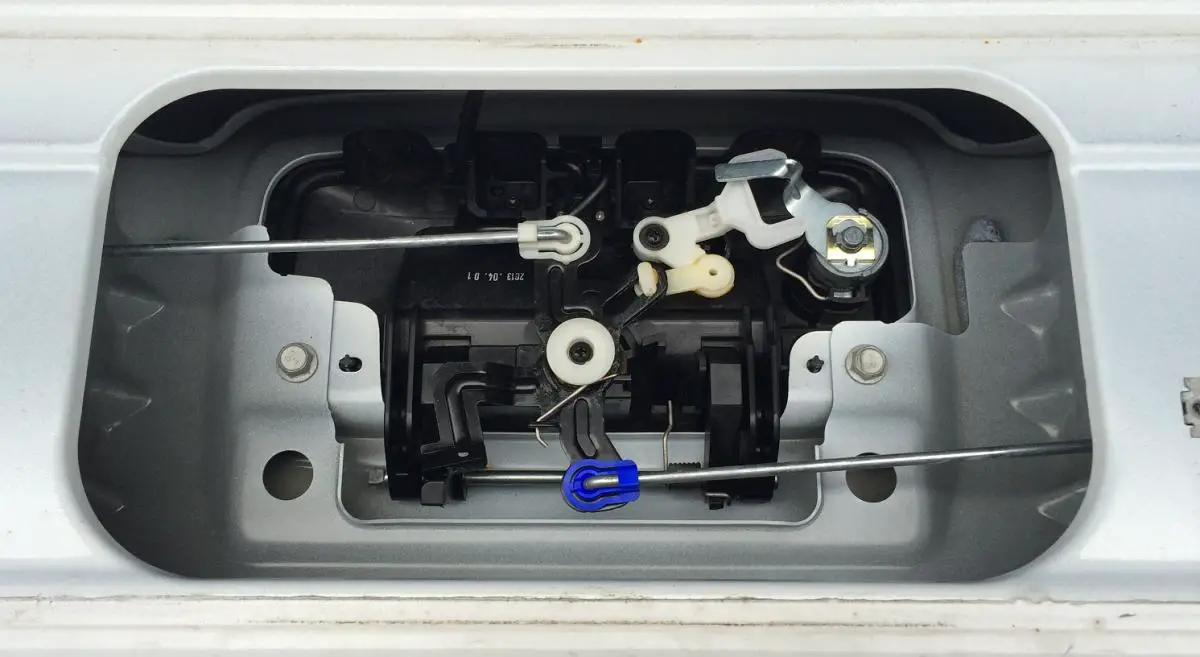
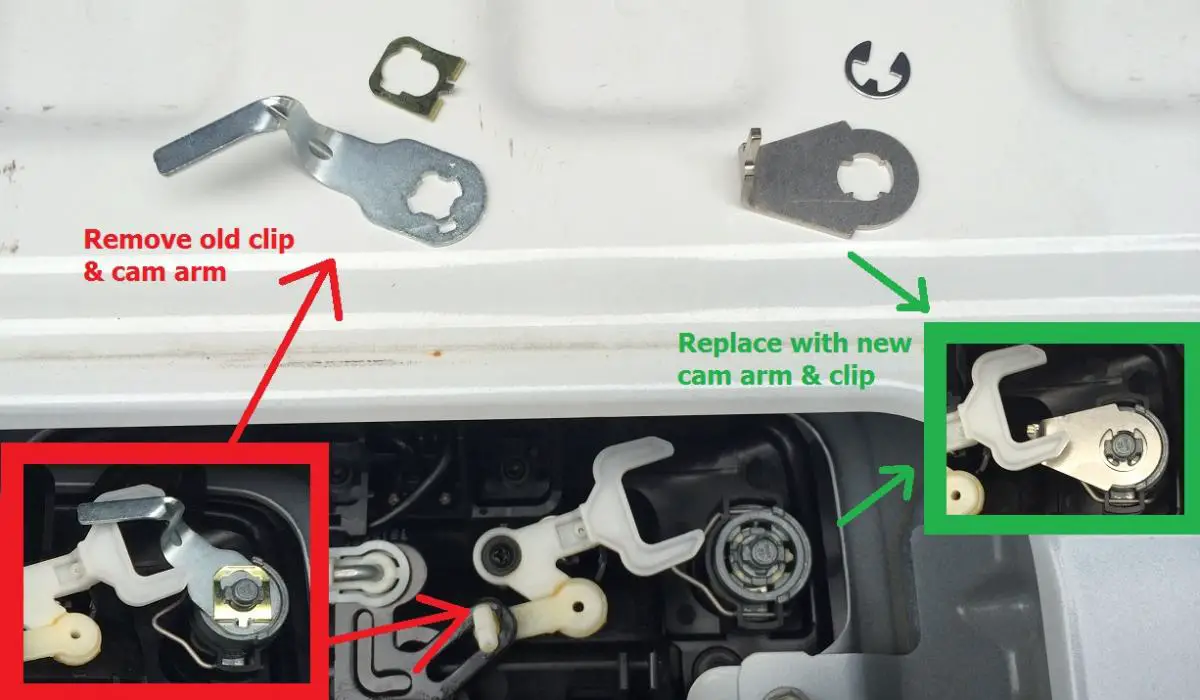
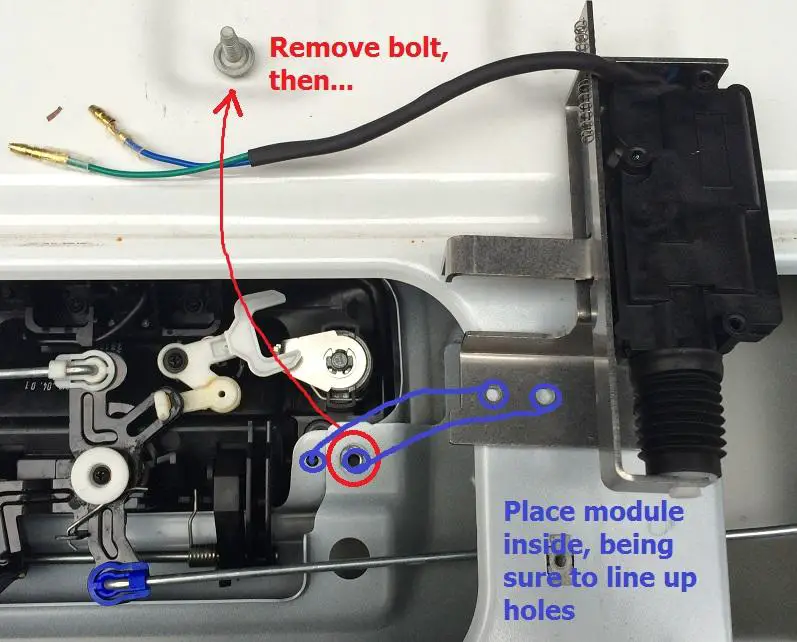
Pop & Lock Power Tailgate Lock Part #: PL8140 http://www.popandlock.net/Power_Tailgate_Lock/Power_GM_Tailgate_Lock/Power_Sierra?product_id=141 1) Unlock & lower tailgate. 2) Remove (8) torx/star screws from inner tailgate access panel. 3) Remove panel and you'll see lock assembly [pic 002] 4) Remove old retailer clip & cam arm [pic 003] 5) Replace with new cam arm & retailer clip [pic 003] 6) Remove bolt on lock side, and place power assembly inside, lining up existing holes [pic 004] 7) Make sure metal slide in between white plastic prongs, next to cam arm, then replace & tighten bolt [pic 005]
14 points
-
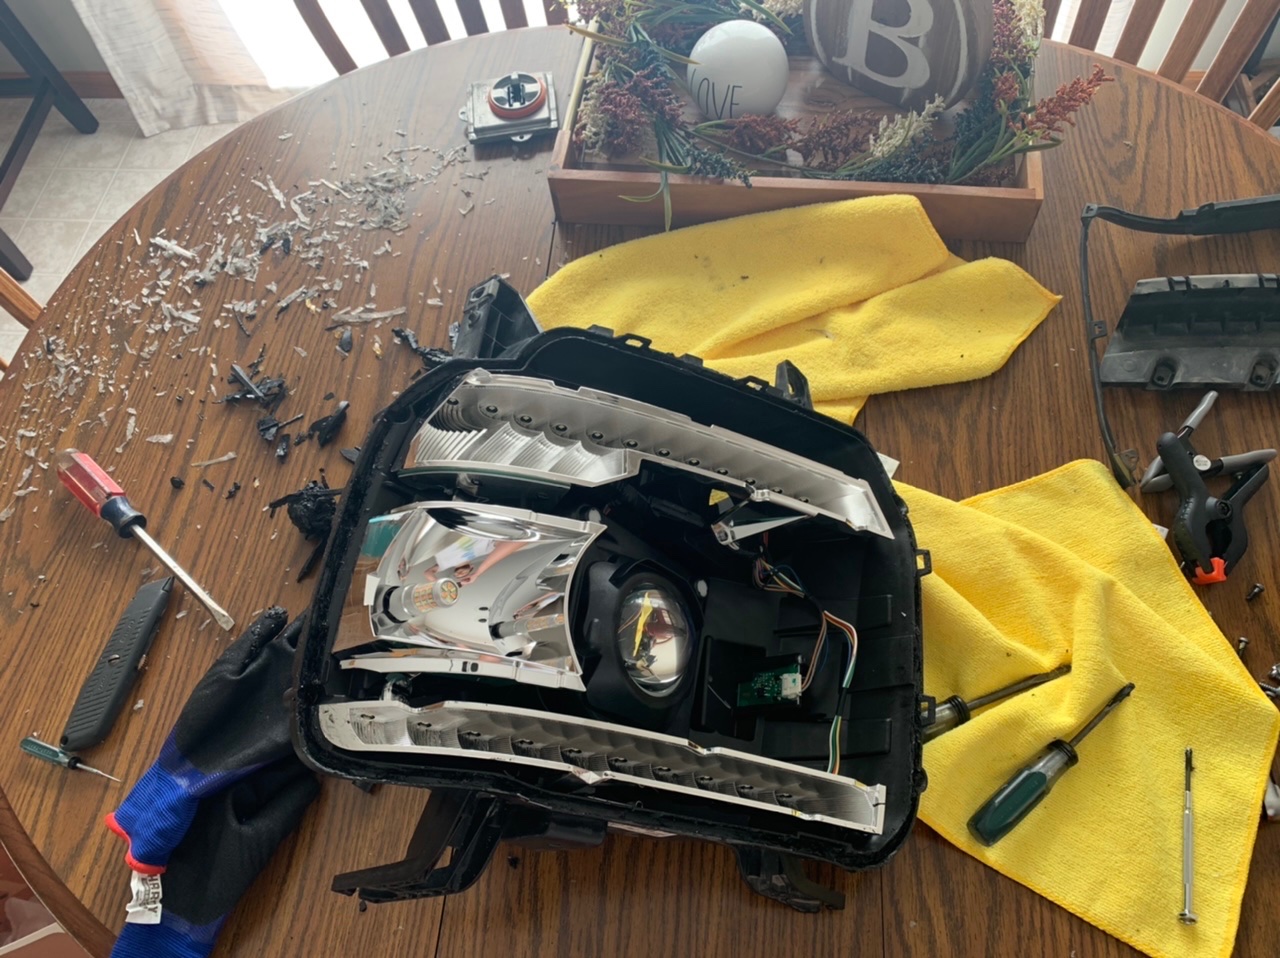
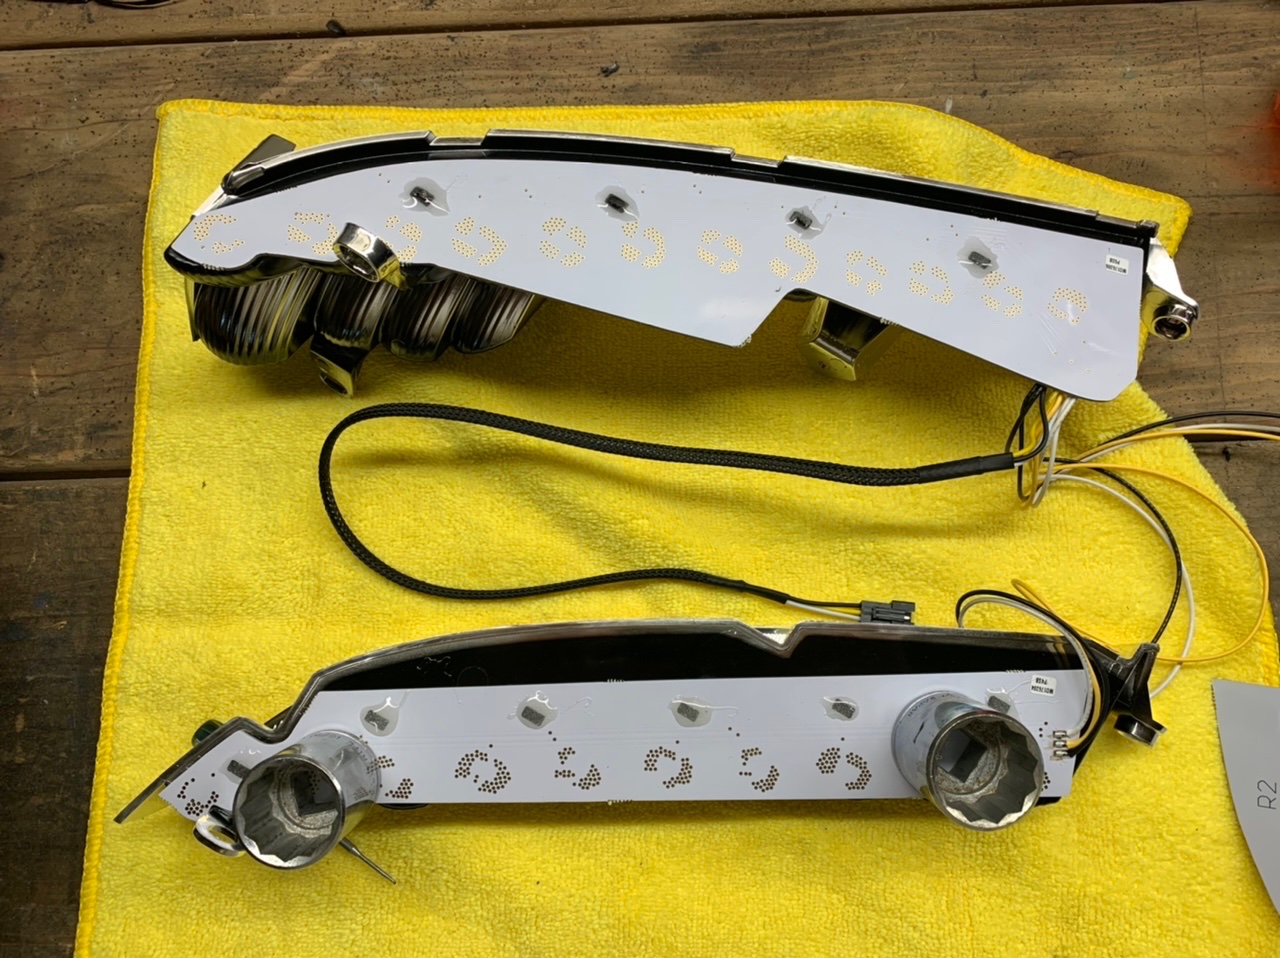
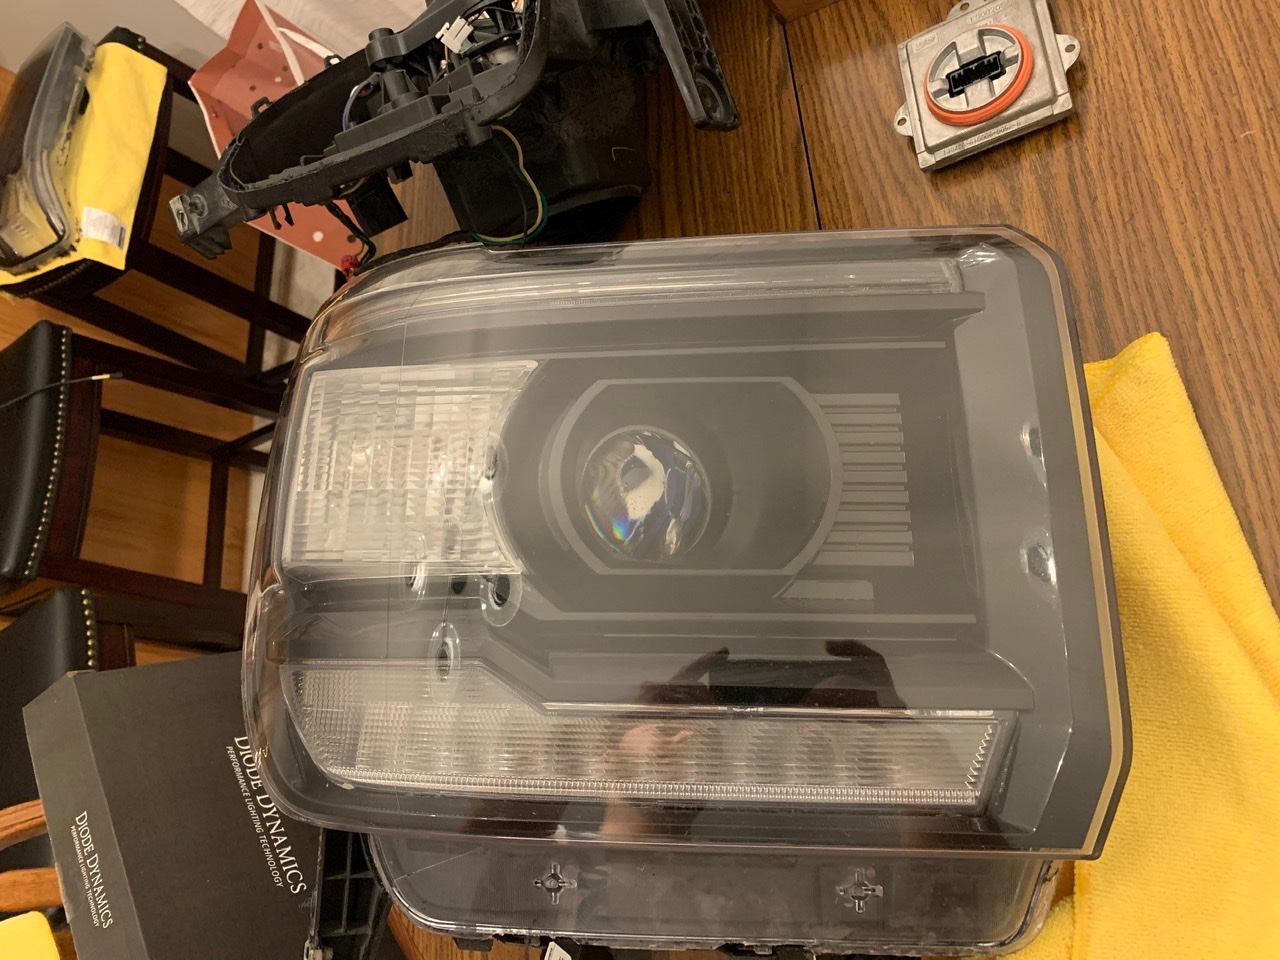
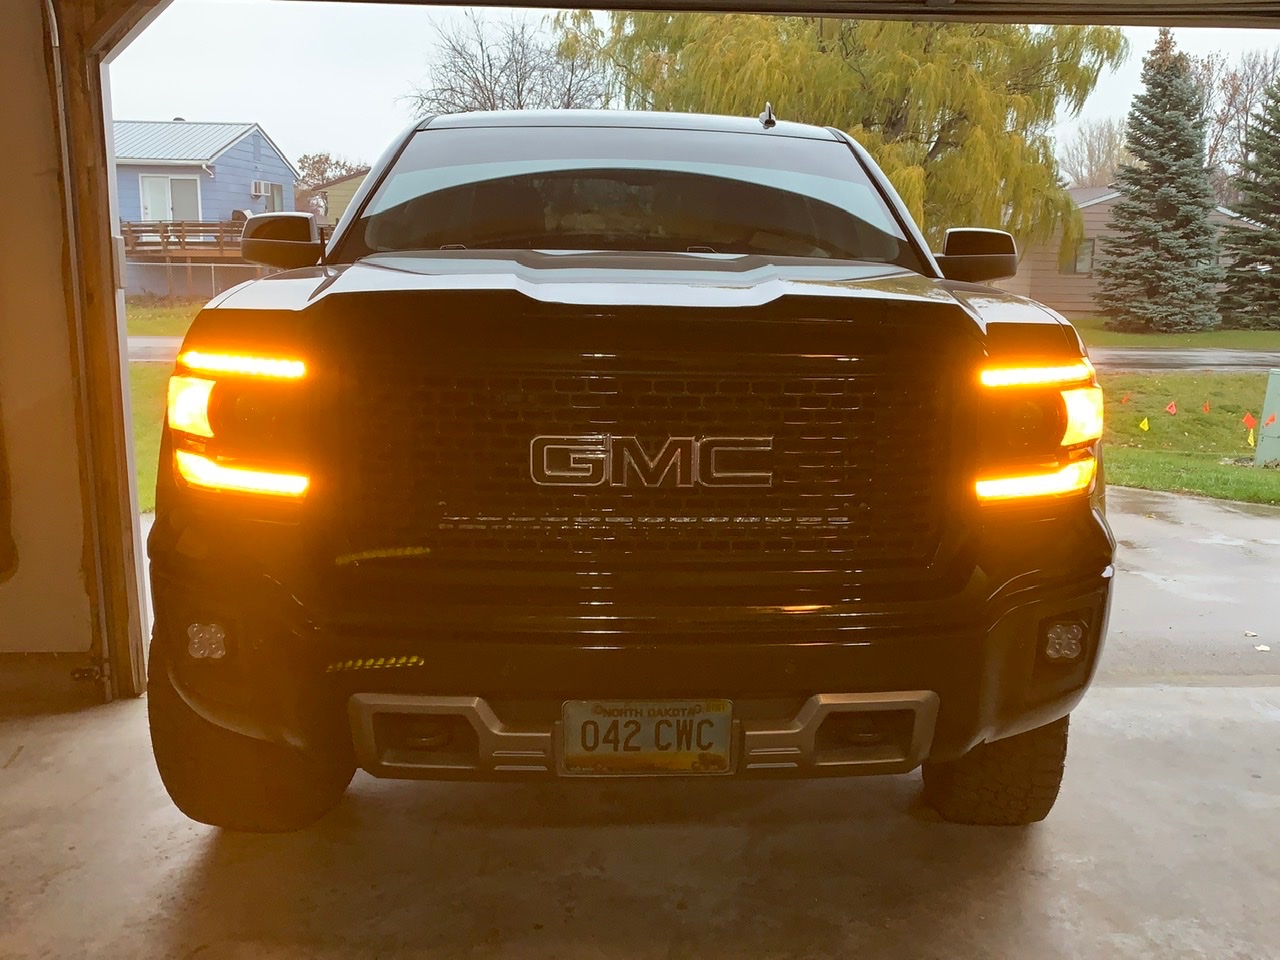
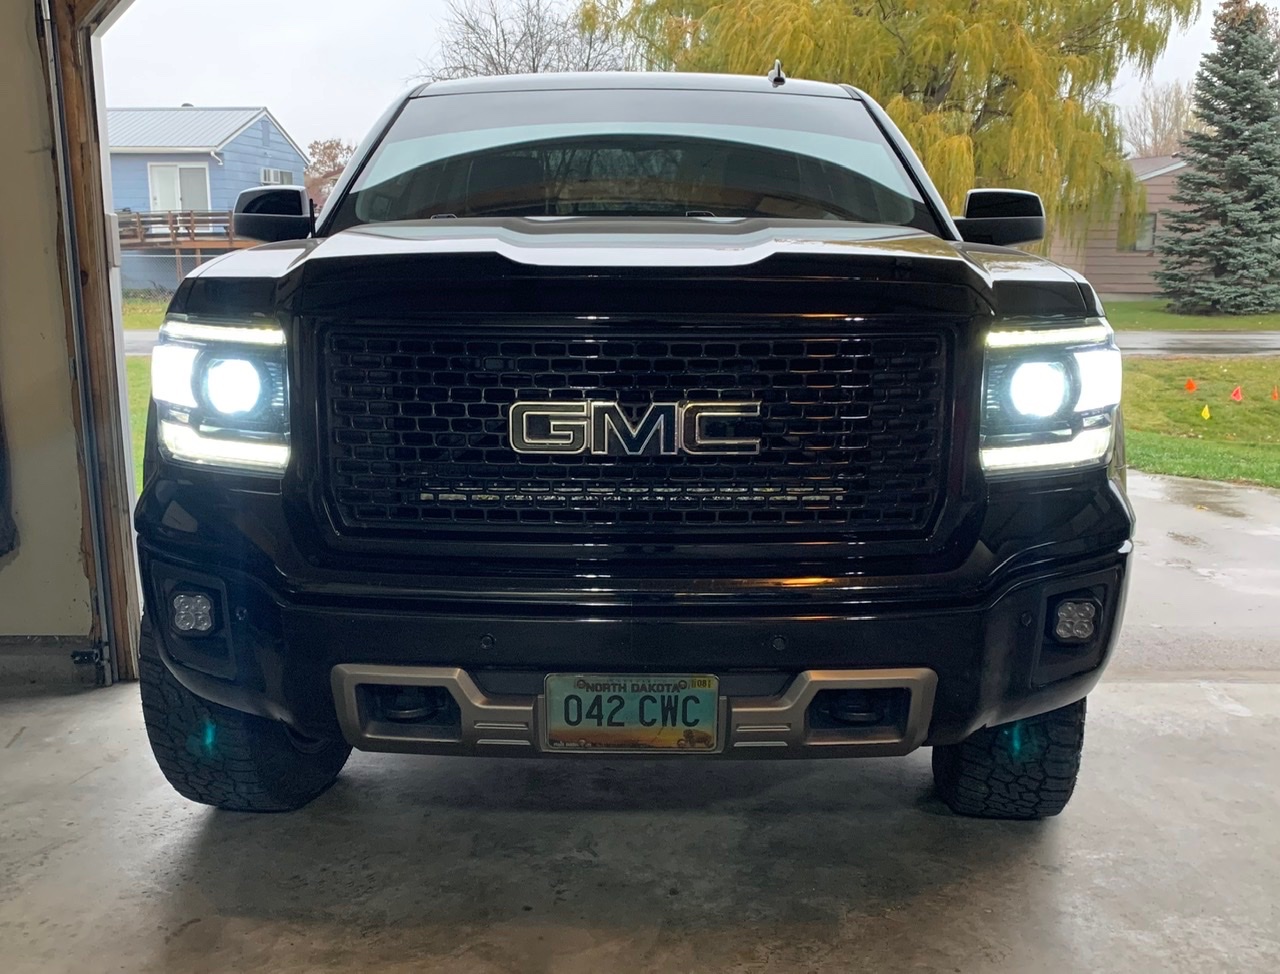
Had a few days off this week before I start my new job on Monday, so decided to tear back into the headlights. I can’t ever leave anything alone!!! Removing the old permaseal was a complete b!tch. When I opened them up the first time to install the Klearz, I went the easy way out and just mashed the perma down in the channel and put butyl over top of it. About 4-5 hours to remove everything and multiple times in and out of the oven. On top of that, I put a bead of clear silicone around the edge after the new butyl dried so had to get that off too. Live and learn... Took the chrome bezel out, used Easy Off heavy duty oven cleaner to strip the chrome. About 10 minutes in on the picture below. 30 min process and it results in gloss black. Installation of Diode Dynamics switchback DRL boards was next. Pretty straight forward process. 5 min epoxy to secure the boards. Reassembly of the lenses and bezels. PG9 cable gland on the back of the housing so I could mount the LED switchback drivers on the outside of the headlight. Wired it all up and test ran before sealing everything back up. Everything is good to go so back in the oven and sealed up! 250F for 10 min to soften the Diode butyl. And the final results. Super happy with how everything turned out!
14 points
-
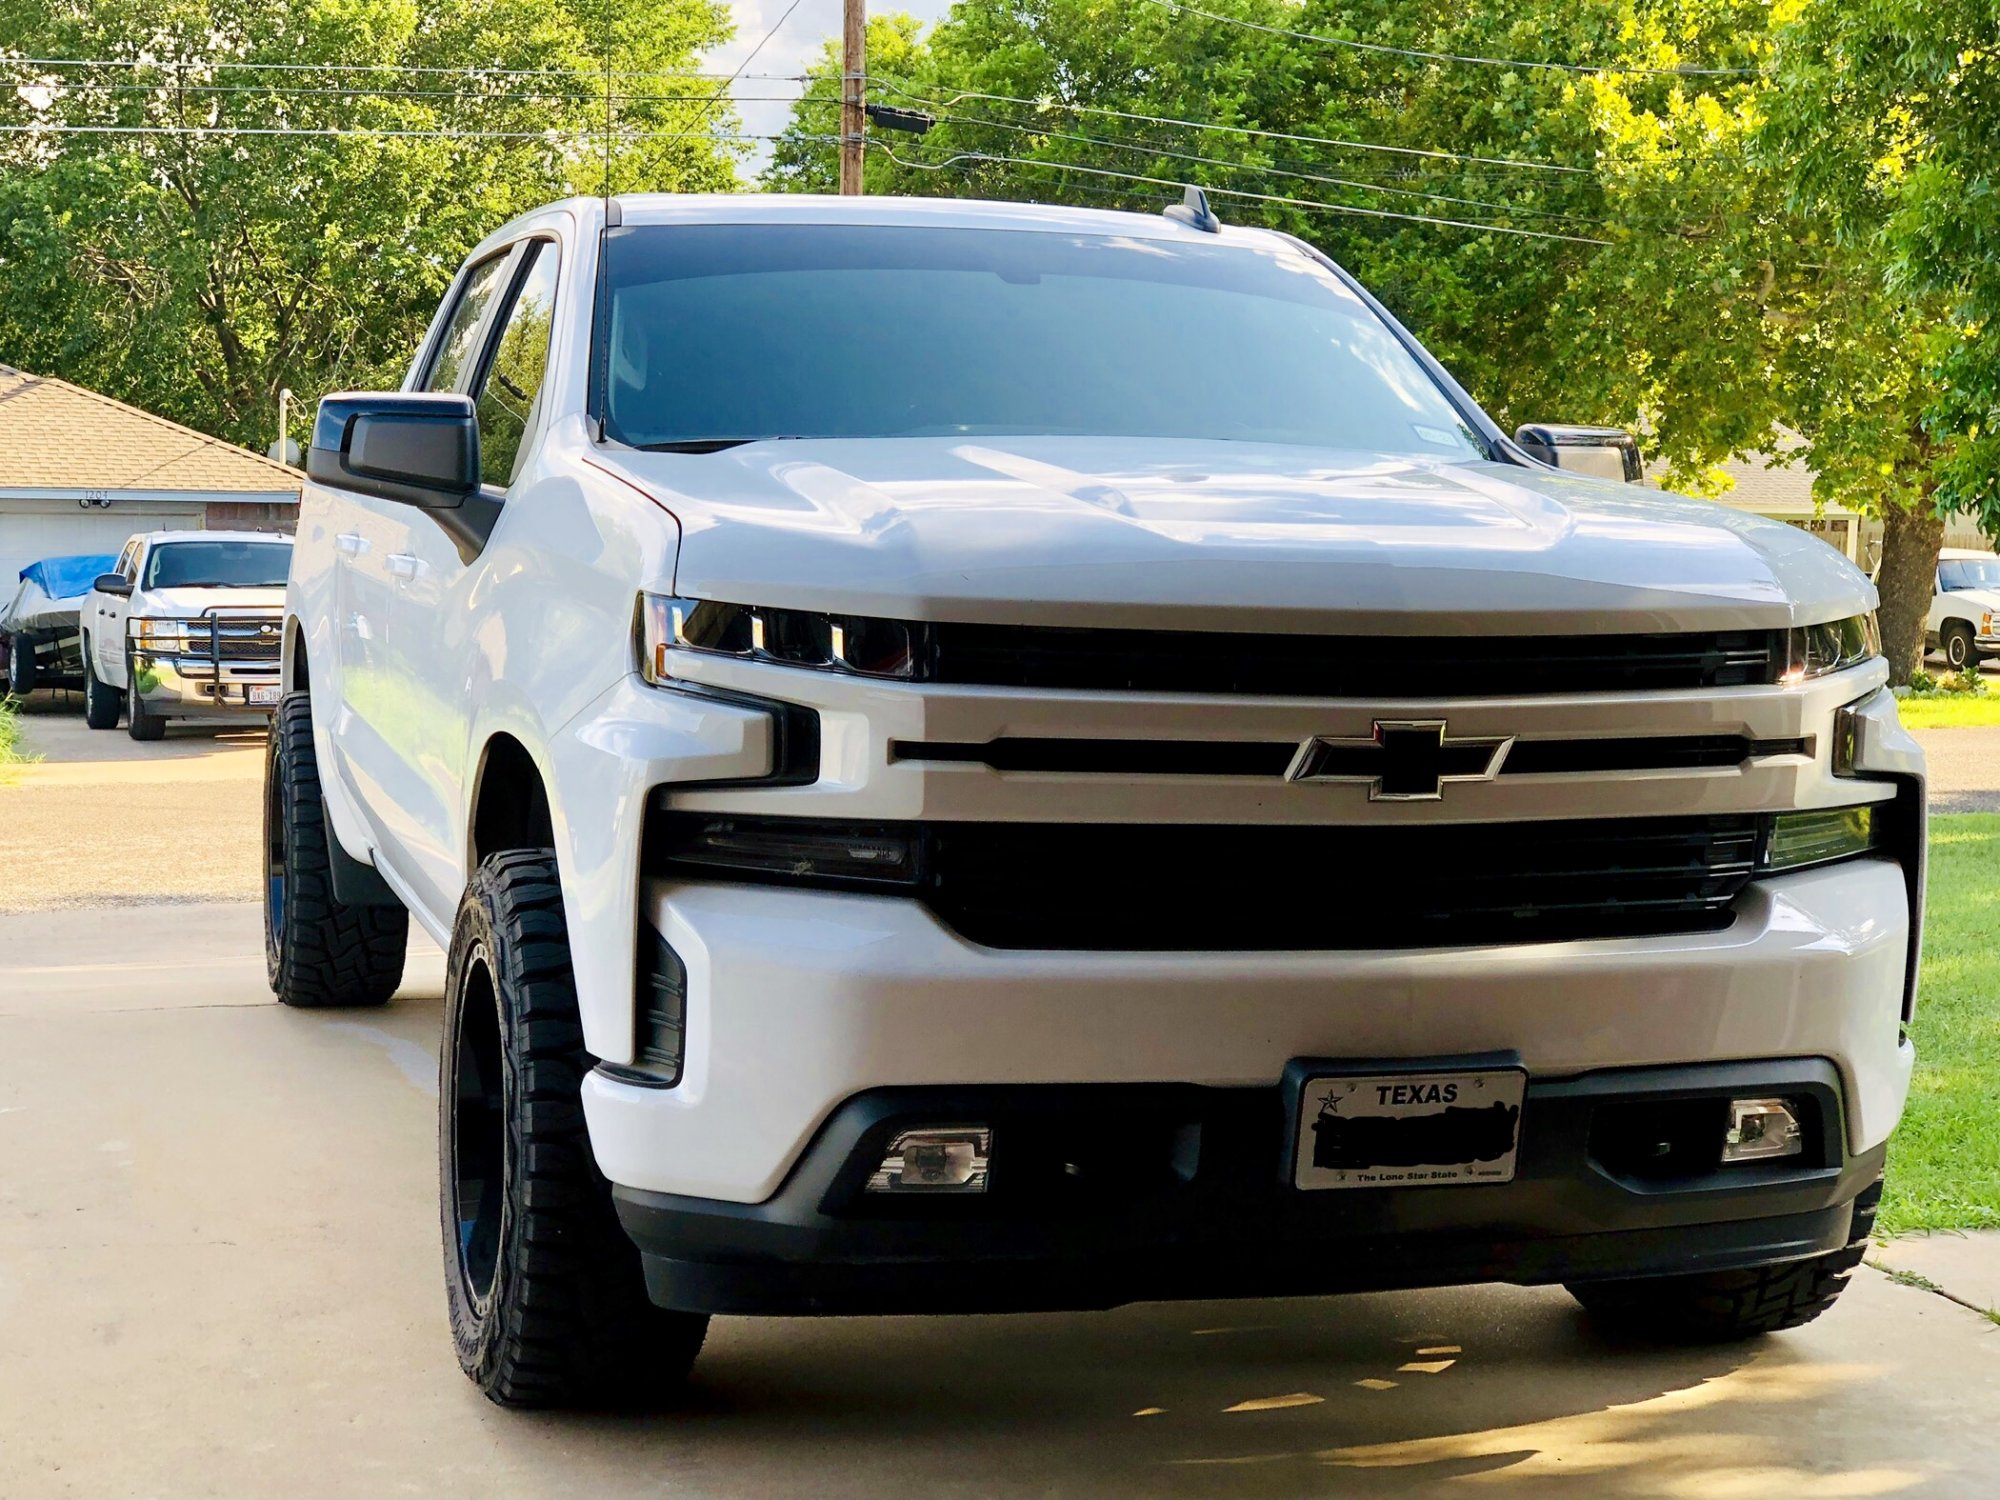
New to the forum, just brought home my 2018 Silverado LTZ Redline Edition. No stranger to modifying my vehicles and just ordered in a set of Morimoto XB Headlights as well as a Range AFM disabler. Trading in my 2018 Civic, big step up!
14 points
-
Just did my frontend 2014 Silverado to the 2016-18 Silverado LTZ frontend came out badass!!!! Thanks to @Viktorrocks15 for the installation14 points
-
My new ride Sent from my SM-G965U using Tapatalk14 points
-
Just installed new wheels on my AT4 Sent from my iPhone using Tapatalk14 points
-
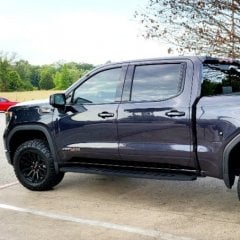
Not the greatest shot but Here's my Trail Boss. Wasn't planning on getting the Trail Boss until I saw it in person and kind of had to after that. Love it so far. Coming from a 2015 Silverado LT.
14 points
-
Washed and put ceramic booster on to really bring out the shine of the ceramic pro. Like a black mirror
14 points
-
14 points
-
It’s Sunday so yesterday still counts. Baby has new shoes. BFG KO2’s. Run them on my Jeep and swear by them. So far she’s de-badged and tinted. Next up is either a level or 2” lift. Haven’t decided yet. Sent from my iPhone using Tapatalk14 points
-
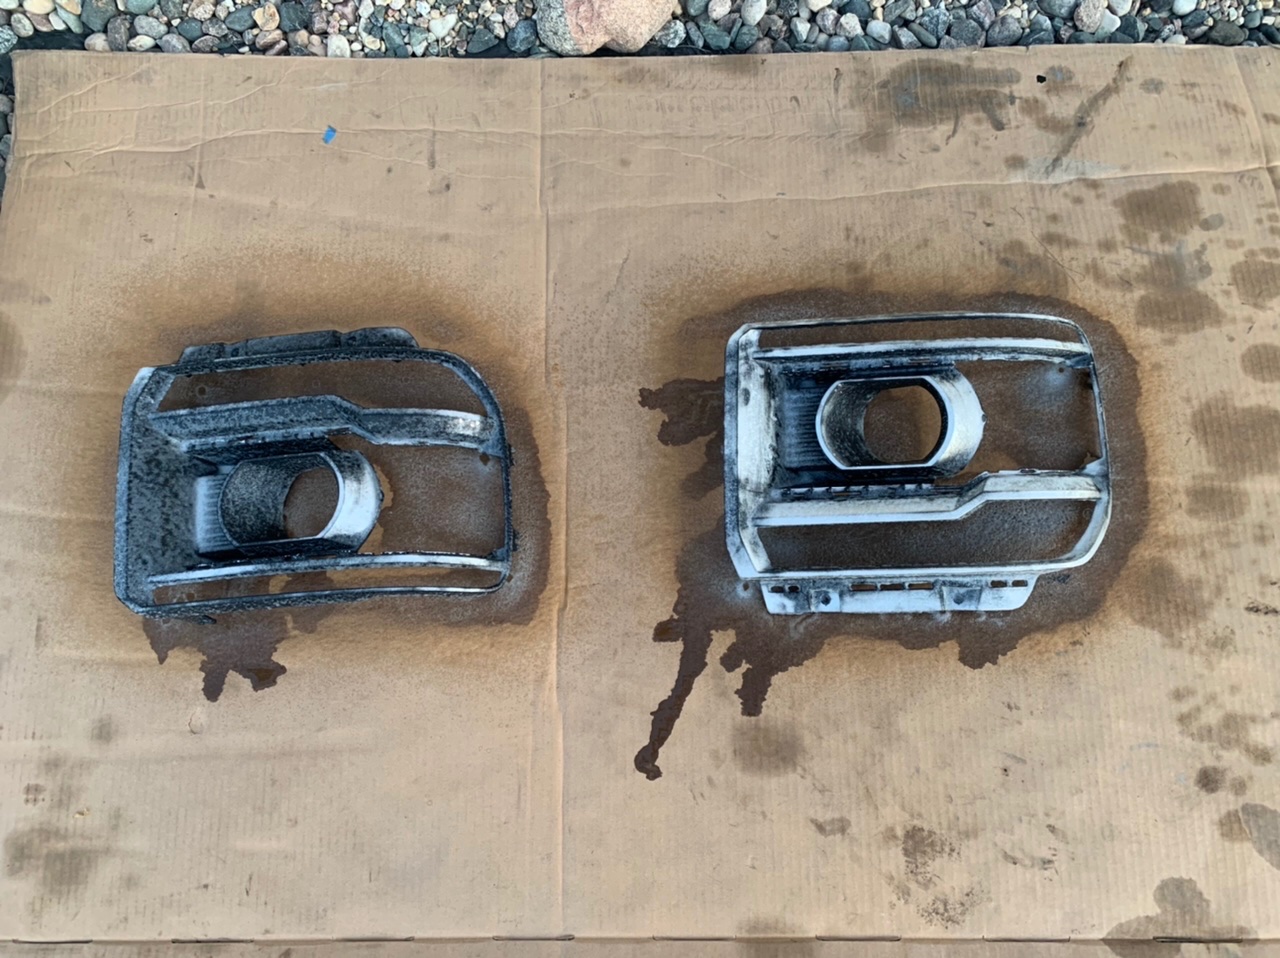
Decided to give my exhaust tip a makeover. I bought an MBRP Installer series exhaust for my 17 Silverado about a month ago. After a month of use and a weekend driving on the beach in salty water, the tip started rusting and looking like crap. I know its a cheap exhaust but I expected a little more life out of the components. Anyways powder coating is one of my many hobbies so I figured why not. Turned out pretty good and should continue to look good for the life of the exhaust. Prior to prep Sandblasted down to bare metal Sprayed and into the oven Final product14 points
-
My 2018 has an anti-sleep function and built-in seat and steering wheel massage. To activate the anti-sleep function, just get up to cruising speed on the highway. The vibrating and deep cabin rumble will keep anyone awake. The massage function is on any time the truck is rolling, it massages your back , butt and legs and the steering wheel vibrations take care of your hands. The transmission clunking kicks in ever now and again just to be sure you aren't asleep.14 points
-
Added to the family and took a really good picture with the truck Sent from my iPhone using Tapatalk14 points
-
Wife and I floated the Frio River in Texas this past weekend. Absolutely gorgeous and the water was flowing nicely. She caught a pic of me coming back over the low crossing.14 points
-
Just had these 35x12.5R18 BFGoodrich KO2's put on yesterday. Trailboss with 1" level, no rubbing. They may have fit without the level, but I didn't like the rake. The manager at the 4 wheel shop looked at the truck and said there was no way they'd fit. I insisted that they mount one up and test it, they fit perfectly. I may have to adjust the wheel well liner a little, will have to see how close the tire gets once I flex it offroad. I'll take some better pictures when I get a chance. The pics make it look like the front is higher than the back, it's not, ground wasn't level. No more listening to the song of the Duratracs!
13 points


This leaderboard is set to New York/GMT-04:00