

midwestdenaliguy
-
Posts
390 -
Joined
-
Last visited
-
Days Won
1
Content Type
Profiles
Forums
Gallery
Events
Articles
RPO
Store
Blogs
Everything posted by midwestdenaliguy
-

Money Light on 8-Speed, P0700+P0711
midwestdenaliguy replied to neekhalas's topic in Modifications & Accessories
Here are the details on the special coverage that extends the warranty for this issue: -
Just posted the details of the special coverage that extends the warranty on this issue. Includes part # for harness:
-
Wanted to make everyone aware of a special coverage if you are dealing with a faulty trans fluid temp sensor. I believe this is only for the 8 speed on the 2015 and 2016, but correct me if it applies to the 6 speed or other years as well. The sensor is attached to a wire harness inside your transmission and the original harness has been known to go bad, specifically the temp sensor. I had 2 codes light up the SES, P0700 and P0711. P0711 let's you know it's the sensor. A month and a half ago (7/29/2020), GM released a special coverage that extends the warranty to repair this, up to 10 years or 120,000 miles. It's special coverage #N192291660. They replaced the transmission wire harness (#24298757), the trans pan gasket (#24260071), trans filter (#24274402), and all trans fluid (new HP fluid - #19417577B). Additionally, it covers some of the exhaust parts too if they have to remove any to get the trans pan out (my dealer did not have to do this, most can slightly push down on the exhaust to get the pan out). But if your dealer needs to remove any of the exhaust, it's an exhaust seal and gasket that need to be replaced (#15077362 and #15035747). In addition to the SES light, apparently it can cause hard shifting when the sensor starts to go bad. I didn't experience this, but it's fairly common from what the service dept told me. You can also easily tell when the sensor is going bad by watching your trans fluid temp needle. It will erratically bounce up and down, sometimes slightly and other times it's big jumps. My 2016 GMC Sierra has the 6.2L paired with the 8 speed trans. Had this repair done under the special coverage extended warranty with 112,600 miles on my odometer. They got me in and out the same day.
-
Looks like OP is in Wisconsin. Man that's the one thing I don't miss about Michigan (born and raised there)...the salt and long winters that eat away at vehicles. Like what others have mentioned, I used to put a little anti-seize on the center of the brake disc/drum when I lived in the northern states. I know GM says not to do this, but never once had any wheel issues over the years.
-
Towing sag
midwestdenaliguy replied to Mark Frazier's topic in 2014-2018 Silverado 1500 & Sierra 1500
I've got the same hitch, one of the better purchases I've made for the truck! Quality is amazing, you pay for it but it's worth every penny. -
Looking for a QUALITY Bed Cover
midwestdenaliguy replied to Mo Weber's topic in Modifications & Accessories
I have the Bak Revolver X2 rolling hard cover and absolutely love it. The only difference between the X2 and X4 is the finish. X2 is more of a glossy finish and X4 is more of a matte finish. If you don't care about the finish, I'd check to see if the X2 can be delivered sooner. My only gripe is it does let in some water at the tailgate, it's not bad but it trickles in during a carwash. In normal rain there's very minimal water that comes in so I can't complain. As far as security, it locks tight. If someone REALLY wanted to get in it they could, but it would be some work and really obvious someone is breaking into the bed. -
They'll probably say no, but I'd call them up and ask to have the other bank done as well. Guys have had one bank replaced just to have the issue show up in the other bank. No sense in pulling all that apart just to be one easy step away from doing the other bank. The high pressure fuel lines have to be replaced each time new injectors are put in, so might as well do them all at once and consider it a cost avoidance.
-
TSB 18-NA-355 performed yesterday
midwestdenaliguy replied to BloodVessel's topic in Troubleshooting & Recalls
My dealership did 3 things all at once to fix the shutter for me: triple clean flush with new tran fluid, replaced TC, and reprogrammed the tran with an update from GM. This was done last year and while it was technically outside my warranty (miles) they got GM to cover the entire bill. I've driven ~35k miles since this was all done and have not had the shutter return. Sorry, cant say if it was any one of those in particular that fixed it. The dealership said they didn't want me coming back after only doing one of those so they did all 3 at once. -
If the cleaner doesn't do the trick, I wrote a how-to on replacing the injectors (assuming you're out of warranty). It drives me nuts when the dealer does all that work just to only replace 1 or 2 injectors. Everything is apart, just swap all injectors the first time instead of doing the job multiple times. If you want to test the TC theory, put the truck on tow/haul mode and it disengages the TC. If you still have the sluggish issue you know it's not that. Here's the injector how-to:
-
1. I fill until it seeps out, never had an issue on multiple vehicles doing it this way. 2. Looks like you've got a '17 Sierra with the 6.2, so it should have a reusable gasket. Personally, I don't reuse gaskets since you can buy a new one for ~$25-30. It's cheap insurance in my mind, but to each their own. You can also take out the old gasket and use RTV if you want to go that route. Pros and cons to each, RTV is cheap but can be messy to clean when you change fluids in the future - also need to carefully apply a consistent bead so it seals properly. Gaskets are quick and easy, but cost more. Up to you what's more important. 3. Here's what I personally use on my fluids, not pushing anything just letting you know what I go with: 5 qts total of AMSoil Severe Gear 75w-90 to cover front and rear diff's and 2qts of AMSoil ATL transmission fluid for the T-case. Front diff takes just over 1 qt (3.2 pints) and rear diff takes just over 2 qts (the 8.6 rear is 4.2 pints, 9.5 and 9.7 rear takes 5.5 pints). Good luck with the fluid change. I'd recommend a fluid pump if you buy the hard plastic bottles of fluid, but there are also easy squeeze pouch bags if you look for them and don't want to buy a fluid pump.
-
Wireless charging not working
midwestdenaliguy replied to bkesting's topic in 2014-2018 Silverado 1500 & Sierra 1500
Yikes, looks like GM missed the mark with the Gen 2 chargers as well. Never mind about the OEM option then. I know there's a thread on here about guys installing their own chargers underneath the lid. Do some searching and maybe go that route. -
Wireless charging not working
midwestdenaliguy replied to bkesting's topic in 2014-2018 Silverado 1500 & Sierra 1500
Swap out your console charging unit for the Gen 2 charger. The underside of the lid is held on with clips that pry off and expose the charger. The Gen 1 charger had issues apparently, maybe yours went completely bad. Here's a new one listed on eBay: https://www.ebay.com/itm/2017-2018-Cadillac-Wireless-Charger-Charging-Retrofit-iPhone-X-Android/283110063260 -
How-To: Replace Fuel Injectors
midwestdenaliguy replied to midwestdenaliguy's topic in DIY Guides & Reference Library
No problem. When I started my research I was surprised to see so many people dealing with misfires, rough starts, etc. all due to bad injectors. Warranty repairs were all over the place...some dealerships only replacing the injector(s) where the code was coming from, while others had all 8 replaced. Those out of warranty were quoted an insane amount for the repairs. If people find themselves in the unfortunate situation where this is needing to be done, hopefully this helps decide if they want to repair it themselves. -
How-To: Replace Fuel Injectors
midwestdenaliguy replied to midwestdenaliguy's topic in DIY Guides & Reference Library
I'm a believer in always using your vin number to find the right parts. You can call a dealership parts department and ask for the part numbers you need (some may or may not give them to you depending on how nice they are). You can also search by vin number on multiple OEM GM parts websites, like www.gmpartsdirect.com, and find the part numbers you need. Then do some shopping on multiple sites for the best price. FYI - OEM injectors are notorious for being on back order. I went through a seller on eBay that has a great reputation and match flows new OEM injectors. Has a great price too. This is the link to what I bought for my L86 (6.2L) engine, you can reach out to the seller with the last 8 digits of your vin and he will confirm which ones you'll need. I've been driving with mine installed for ~35k miles and have had zero issues. https://www.ebay.com/itm/Set-of-8-BRAND-NEW-OEM-Fuel-Injectors-Chevy-GMC-6-2L-2014-17-12668393/201906630442?ssPageName=STRK%3AMEBIDX%3AIT&_trksid=p2057872.m2749.l2649 Good advice, I'll reword the original post to strongly encourage it. -
How-To: Replace Fuel Injectors
midwestdenaliguy replied to midwestdenaliguy's topic in DIY Guides & Reference Library
I ordered the gaskets ahead of time and replaced them just in case they were in bad shape. I wanted to get it all done in one shot and not wait for something to arrive if I had to replace them. They looked good though, ~75-80k miles on engine at the time. Still replaced them since I had the new ones and they aren't that expensive. Cheap insurance I guess. This is a good call out, I'll add it to the original post. -
Happy to help. You inspired me to finally get my How-To posted on replacing fuel injectors. I couldn't find a write-up on how to do it when I replaced mine last year, so I wrote one myself. Give it a read and decide if this is something you want to tackle yourself.
-
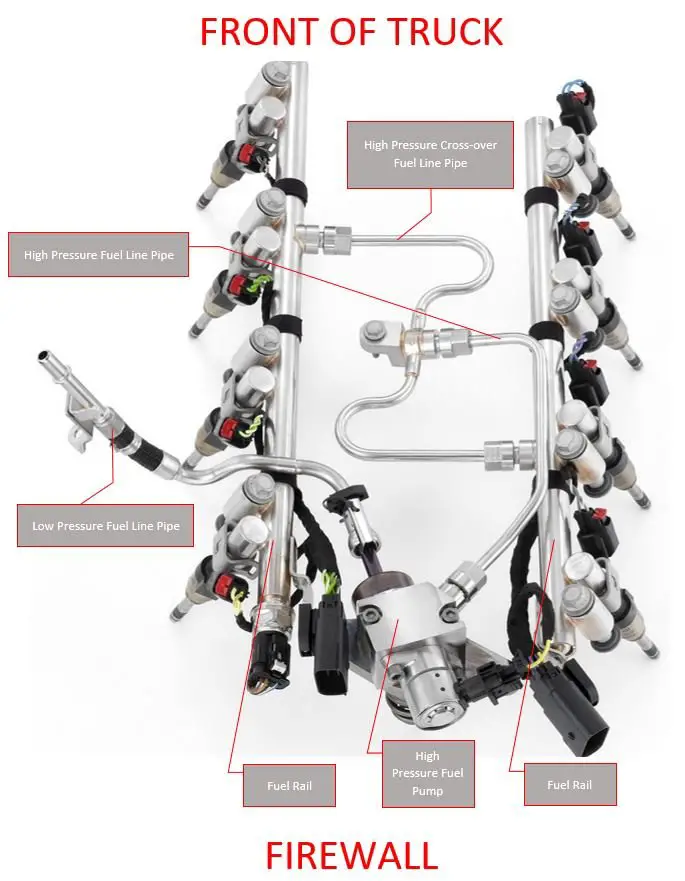
I ran into a rough start/misfire issue last year and ended up replacing my fuel injectors. I started a thread when I was troubleshooting it because I could not find any complete instructions, write-ups, how-to's, etc. on how to replace the injectors in our DI engines. In the thread I mentioned that I would post a how-to in this forum, appreciate everyone who chimed in to help. I try to give back because I have saved countless time and money learning from a lot of you. This took longer to post than I wanted thanks to having my firstborn (poor guy gets blamed for a lot of stuff - mainly farts), but finally got around to it! Below is a step by step guide on how to replace the fuel injectors on a 6.2L (L86) direct injection engine for the K2XX platform. If you have a different engine/platform you'll want to do your own research to ensure the replacement is done properly. DISCLAIMER: I consider myself handy and have the right tools to do a lot of jobs on my vehicles - but I am not a certified technician. I spend a LOT of time researching and asking questions before I do any repairs. This is the result of online research, talking to people in this forum, and talking to technicians that I personally know. I also grew up fixing cars with my family - who are engineers with GM. If you do not have confidence in replacing fuel lines and/or opening up the intake portion of your engine then you should let a professional do this work. You will need the following tools: - Torque wrench for both ft/lb and in/lb specs. - Socket set with extensions and a swivel adapter if you have one. There are some tight spots that you have to get to for bolts and a swivel adapter made it much easier. - Trim removal kit, not critical but makes it much easier. This really helped with a set of push on clips for a wiring harness that's behind the intake manifold. - MAF and throttle body cleaner if you want to clean your intake while it's apart, not critical though. - Blue loctite for high pressure fuel pipe fittings. - C-shaped fuel line removal tool, not required but greatly helps in quick removal of low pressure fuel pipe (can borrow a kit from an auto parts store). You will need the following parts (again this is for the 6.2L L86 engine - yours could be different if you have a different engine/platform). GM says you must replace the fuel pipes after removing them, they may leak fuel if reinstalling old fuel pipes: - Fuel injectors part # 12668393 - Intermediate #1 Fuel Pipe (crossrail pipe that connects both fuel rails) part # 12677002 - Intermediate #2 Fuel Pipe (from high pressure fuel pump to crossrail fuel pipe) part # 12677004 - Fuel feed pipe w/check valve (connects low pressure fuel line to high pressure fuel pump) part # 12618338 - Intake Manifold Gaskets (8) part # 12626354 (It's highly recommended to replace these, even if they look good. At ~$2 each it's cheap insurance.) Steps to replace fuel injectors (pics/diagrams attached to provide visual aid). Carefully remove everything in these steps as they are tied to the intake of your engine - don't rush it. Clean off top of engine before starting removal as debris can seriously damage your engine if it falls into the intake: 1. With truck off, pull fuel pump fuse from main fuse box in engine bay (fuse #21). 2. Start the truck and let it run until it stalls out (can happen within a few seconds or take as much as 30 seconds). This ensures fuel is run out of the fuel lines and the fuel pumps/lines have no pressure. If you do not do this step the high pressure lines you will be removing can spray fuel everywhere and cause damage/injury. 3. After truck stalls out, shut it off and unhook the battery so the truck has no power. 4. Remove resonator box/intake tube going into throttle body. 2 clamps are loosened - 1 at the throttle bottle and 1 at air box. Disconnect MAF sensor electrical connection on intake tube by air box. Disconnect both driver and passenger clean-side fittings (removed by pressing on the light gray plastic strip and squeezing it together and pulling the fitting off the barb). Resonator box is now free to pull out of engine bay. Lots of videos on Youtube show how to do this is you're still unsure. 5. Disconnect PCV hose fitting next to throttle body (same style fitting as clean-side fittings on resonator box). 6. Remove throttle body (1 electrical connection and 4 bolts). 7. Unclip electrical wiring harnesses that run along both sides of the intake manifold (3 plastic push clips on each side). Trim removal tool can be helpful here, but mine pulled out fairly easily by hand. 8. Remove 5 intake manifold bolts on each side (10 total). They are finicky to get completely out as they have a little catch ring on them to not easily fall out of the intake manifold. If you can't wiggle it completely out, just make sure it's not fastened to the engine block any more and leave them in the manifold - you can still remove the manifold with them loosely in it. 9. This part was a pain - but slightly lift up intake manifold and pull toward you as much as you can. This will give you *some* room, not much, to reach behind the intake manifold and pull out 4 more of the push style clips holding the electrical wiring harness to the back of the intake manifold. It's tight because the manifold is right up against the firewall. I used a trim removal tool to get leverage on the clips and pull them out. It'll be a pain to remove some of them, don't be afraid to give it some muscle. (See pic below showing where clips are located) 10. With the bolts and clips all removed you can now lift the manifold off the top of the engine. Remove the black foam pad under the manifold to expose the fuel lines/rails. Be careful and try not to drop debris in the intake openings. Now is a good time to clean your intake manifold and replace the gaskets. 11. Tape off or put clean rags in your intake openings to prevent anything from falling in while you remove the fuel lines, rails, and injectors. 12. Unplug the electrical connections to the fuel rails (on the ends by the firewall). 13. Remove the 3 fuel lines from the high pressure fuel pump and 2 fuel rails (see pic below for fuel line/rail set up on the 6.2L L86). I found it easier to remove the fuel pipes first while the rails are still installed (gives you more torque if you need it). The 2 high pressure fuel pipes should have loctite on them, but they did break loose fairly easily. There is 1 bolt holding in the crossrail fuel pipe. I borrowed a fuel line removal kit from Autozone for the low pressure fuel line, it clicks into barb fittings. The low pressure fuel line (rests just above the driver side fuel rail and clips into the high pressure fuel pump) has a special fitting on each side of the pipe that is a pain to release without a special tool. The tool itself is a plastic 'c' shaped clip that goes around the fuel line and pushes into the pipe end, releasing it. There are 4 bolts holding in each fuel rail (8 total). 14. Slowly pull out each fuel rail, I had to firmly wiggle them but they came out by hand. 15. Look in each injector port and make sure there's no debris/crap in there. If you see anything try using a vacuum hose to suck it out or use something else to carefully swab out any debris. You want the injector ports clean so the teflon gaskets on the injectors seat properly in the port. 16. Swap your old injectors with the new injectors on the fuel rails. There's a metal clip on each injector holding it against the rail that can be a pain to take off, but you need them so don't damage them. I used a flathead screwdriver to pry them off, they clipped back on easily. 17. Reverse these steps to put it all back together. Make sure you torque all bolts and pipe fittings to spec or else you risk damage and/or leaks. Below is a pic of the torque specs, I highlighted the ones you need. 18. Start truck up and pray you did everything correctly. 19. If you drink, crack open a cold beer and take pride in your work as well as saving big bucks. If you don't drink, crack open a cold apple juice and take pride in your work as well as saving big bucks.

-
Front/Rear Bumper Vinyl Wrap
midwestdenaliguy replied to Rooks's topic in 2014-2018 Silverado 1500 & Sierra 1500
FYI - I've removed the bumper on my 2016 Sierra and it's a little more involved than the Silverado bumpers. The Sierra's have a trim piece between the bumper and grille that has to be removed first. There are tabs that have to be released from behind the trim piece. I used a long flat head screwdriver to go up behind the trim and release each tab. You also have to loosen the wheel well liners (front portion only) in order to remove screws from each side of the trim piece. Once the trim piece is off you then have access to the bumper bolts. Not terrible, but tedious. Everything else is fairly easy after that, all bolts and screws. The trim piece is MUCH easier going back in, the tabs just lock in place when you push the trim piece in. -
Front/Rear Bumper Vinyl Wrap
midwestdenaliguy replied to Rooks's topic in 2014-2018 Silverado 1500 & Sierra 1500
Appreciate the update. This is the closest I could find to covering most of the bumper, but it's still not 100% coverage. And while the picture looks cool, I can't find a single pic of it actually being used. I'm afraid it might look like a cheap wal-mart auto section stick on mod. Plus at their price point, plus shipping, I might as well get the front bumper repainted and add a clear bra. https://www.ebay.com/itm/Fits-16-18-Sierra-1500-Air-Design-Front-Bumper-Guard-w-DRL-Lights-Black-GM28A04/203034867713?_trkparms=aid%3D111001%26algo%3DREC.SEED%26ao%3D1%26asc%3D20160908105057%26meid%3D0e27f2a99cec43baaff166815f2d9f83%26pid%3D100675%26rk%3D2%26rkt%3D15%26mehot%3Dnone%26sd%3D283940383278%26itm%3D203034867713%26pmt%3D0%26noa%3D1%26pg%3D2380057%26brand%3DAir+Design&_trksid=p2380057.c100675.m4236&_trkparms=pageci%3A35ad5062-d0ff-11ea-a15e-528baece0500|parentrq%3A96a8cf631730a4d6adaa2c1cffe4cc58|iid%3A1 -
Swapped out my XFer Case Fluids today...
midwestdenaliguy replied to bsprtsgrp's topic in Engines & Drivetrain
? I know right? I thought the same thing. -
Swapped out my XFer Case Fluids today...
midwestdenaliguy replied to bsprtsgrp's topic in Engines & Drivetrain
Replaced both differentials and transfer case fluids yesterday. Here's my transfer case plug. Bought truck with 55k miles and was told it was changed by the dealer. Silly me I didn't ask for the record from the dealership as it looked like all the plugs had the original factory blue loctite on them when I did the job yesterday. Both differential plugs were really clean though, almost nothing on them so who knows. Truck currently has 110k miles on it, so this transfer case plug is either all original miles or roughly 55k miles on it assuming it was actually changed when I bought it. Will definitely be changing more often, appreciate the discussion here.
-
Front/Rear Bumper Vinyl Wrap
midwestdenaliguy replied to Rooks's topic in 2014-2018 Silverado 1500 & Sierra 1500
Any luck finding a front bumper solution? I have a 2016 Sierra and it's the same front bumper as your 2018. Bumpershellz only has the 2014-2015 Sierra front bumpers. I've got a factory painted front bumper, but it's chipped like a mofo. Looking to cover it up. -
Unless I know the seller personally, or they have receipts from a reputable shop, I avoid buying lifted vehicles. Too many idiots out there who don't do it right or beat the crap out of it without doing proper maintenance. Go stock and then shop around for the lift that suits you best (if that's what you want), then install it yourself or go with a shop you trust. Then you'll know it's done right.
-
removing /disabling magna ride???
midwestdenaliguy replied to m3sparky's topic in 2014-2018 Silverado 1500 & Sierra 1500
I don't know for sure, but having completely removed my Magneride suspension and replacing with an all new kit (not Magneride - it's from Halolifts), the front Magneride coilover struts don't look any different than a standard one. I would think you are able to compress the spring, remove the old Mag shock and replace with your Bilstein shock. The only thing that makes the Mag shock special is the plug in the top, not other components from what I can tell. But like I said, I swapped mine for an entire kit that included all new front coilovers/shocks already assembled. I just swapped them in and out real quick using just the bolts. And FWIW, I use the X-ineering kit too for the electronics side and haven't had any issues - great product. -
Swapped out my XFer Case Fluids today...
midwestdenaliguy replied to bsprtsgrp's topic in Engines & Drivetrain
So how often do you swap?


-
Forum Statistics
250.4k
Total Topics2.7m
Total Posts -
Member Statistics
342,756
Total Members8,960
Most Online
-
Who's Online 12 Members, 2 Anonymous, 1,847 Guests (See full list)