Search the Community
Showing results for tags 'mod'.
Found 7 results
-
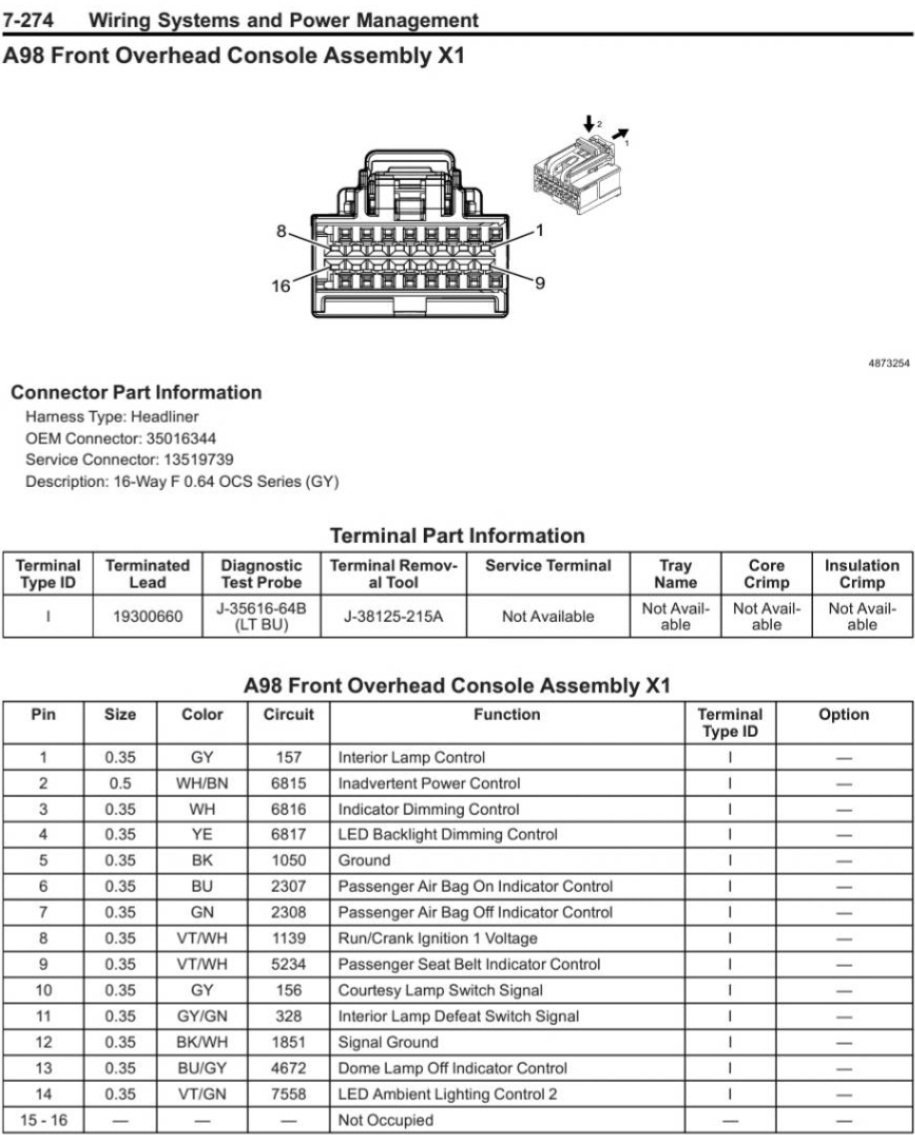
Only joined to spread the word. Like most of you I've been frustrated with the horrible interior lighting without easy fix. I also wasn't willing to have holes drilled in my trim pieces, or lose any functionality of my switches or courtesy lights. If that's of interest to you, I'll try to include screenshot of item since links die, and hopefully enough pictures to get you through so you don't have to spend multiple hours testing circuits to figure it out. The good news is the rear dome lights are so easy to do. Take the rear dome assembly down and take it apart. It's only held up with clips and a small pry tool to get it apart. Remove the 2 fresnel lenses out and put it back together. That's it. Probably 3X the usable light from the rear domes with a nice even spread. The front assembly is quite a bit harder. I'm not going to explain how to remove the assembly and take it apart, there's plenty of videos online. For this mod I ordered some neutral white 3/4inch clearance lights from Tecniq. They have a real nice pattern to them and plenty bright. I needed a way to power them so I used some mosfet trigger modules. Probably 10 bucks in parts if I didn't over order for another projects. I needed some diodes to prevent feedback and keep the bcm safe. I had some on hand. DONT FORGET THE DIODES. I removed the fresnel lenses from the front as well. I took everything apart and with a Drexel 'gently' made the leds fit roughly in the same position as the factory holes. It doesn't take much. I had to trim a bit from the bulbs as well. There's a tiny spot on the pcb board that produces 4 volts on either side corresponding to the lights. If your not comfortable soldering, it's pretty small. Next I routed the wires from the led through the holes directly behind them. I did have to cut some of the rubber out, but be careful not to take too much. Once the pcb was back in, I ran the wires towards the rear and again used the Drexel to make room on the back piece for them to come out. Then I wired them to the mosfet modules. You might have to knock the tiny led off of the module. It's a tiny power draw but these module are meant for 5 volts and we're working with 4V. Mosfet module Requires Vin, Gin, Vout, Gout, trigger, and trigger ground. I place the diodes in the the Vout. Make sure the orientation is correct. Module power out to led. Pigtailed Gin to trigger ground. And made some quick disconnect leads for the power in. I connected to power and ground directly to the wiring harness via t-taps. I know people have said you can mess up the bcm that way, but considering the leds only draw 40 mA @12V each I wasn't worried about it. Connected ground to number 5 pin on the grey harness. I'll have to apologize, I don't remember which wire I connected in the harness for power. It was late and I was very frustrated. I initially connected to number 14 but I lost some functionality. There was another wire that hade 12v power at all times and I hooked it up there. I believe it was pin number 10. Anyways I hope this helps. I know gm dropped the ball on these truck for interior lighting. Mine are so bright now I have zero issues. Have full view and it's bright enough to see everything. The lights up front don't shine at my eyes, and they light up the floor. I'm not even going to do the floor lamps now! 10/10 upgrade! P.S. I'm going to throw some pictures of the interior up here so you can see the bightness. Don't judge, she's a work truck! Lol ANMBEST 10PCS DC 5V-36V 15A(Max 30A) 400W Dual High-Power MOSFET Trigger Switch Drive Module 0-20KHz PWM Adjustment Electronic Switch Control Board Motor Speed Control Lamp Brightness Control https://a.co/d/19L4oGi https://www.ebay.com/itm/292380373219

-
I just saw a Tahoe LT on my way home from work using the LEDs as DRLs at full 100% brightness just like the LTZ models. Yes, I am sure it was a LT model and it looked totally stock even with the entry level honeycomb pattern grille. He was going the opposite way so I couldn't stop him to ask. Someone out there has figured it out! Does anyone have an update for this mod?
-
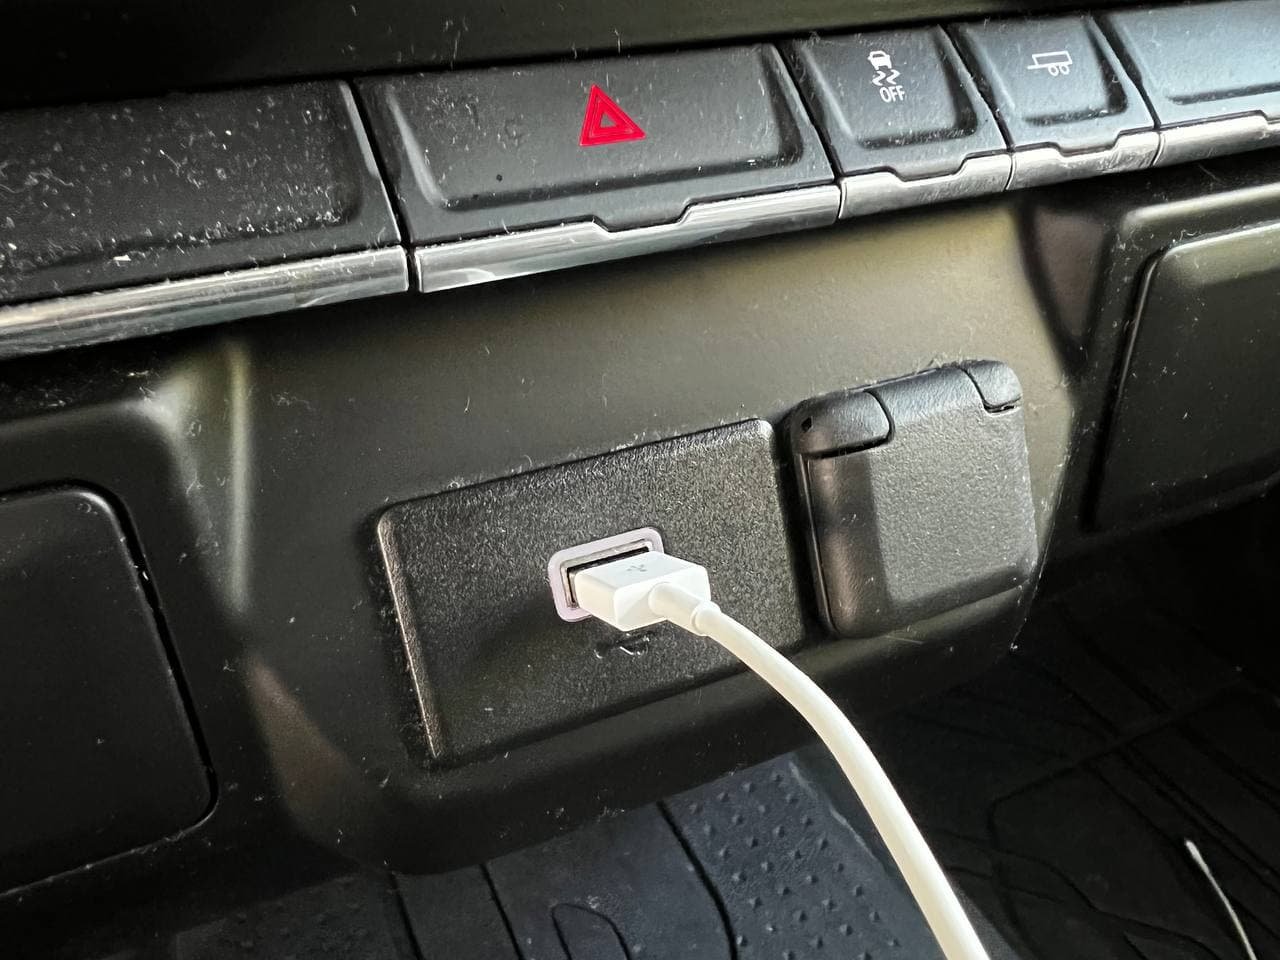
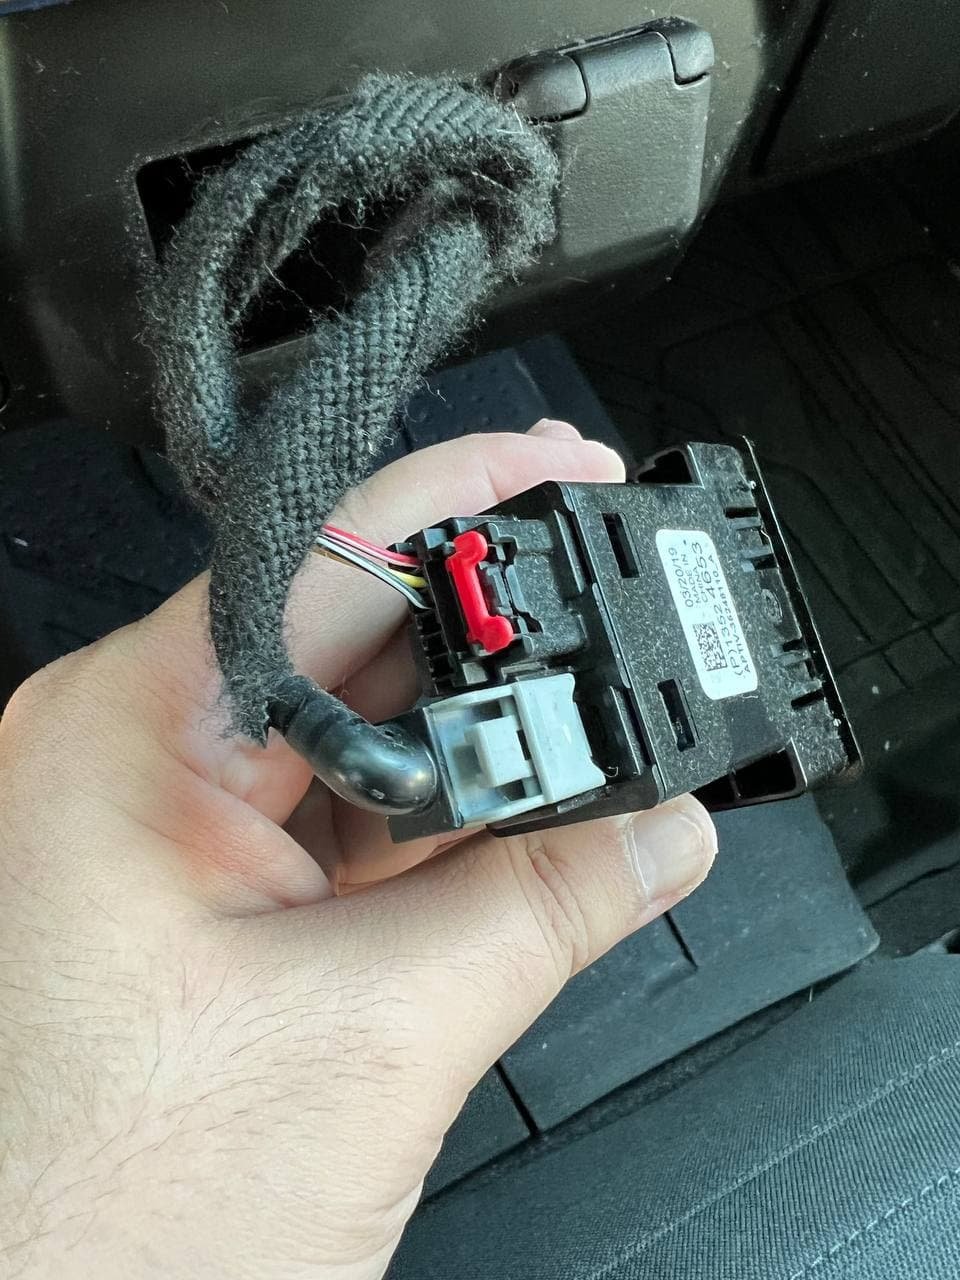
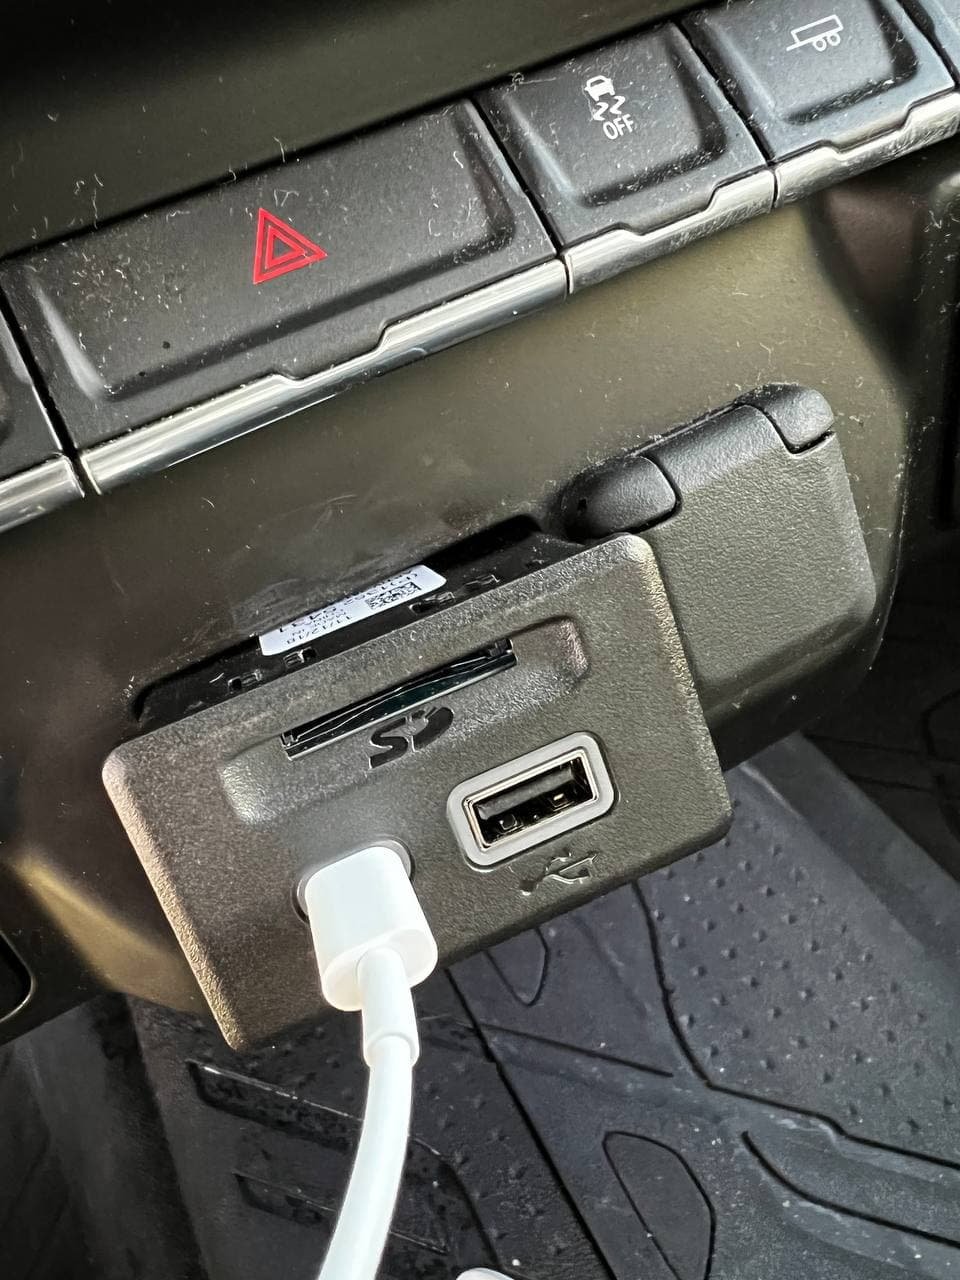
Part: GM 13525431, Receptacle Assembly, Multi Media *Jet Black Just posting a thread on here if someone who has a 2019 Silverado with the one USB type B port, you can easily upgrade to a module that has a USB-C, USB-B, and an SD card port very quickly and easily in under 5 minutes. I bought mine from eBay and it ran me $27.19 plus shipping. I bought a trim removal kit on Amazon and used the one circled to pry it from the bottom and when the bottom popped out a bit, I pried it from the left side and it just popped out very quickly. After that, just unplug the old one and plug in the new one. FYI, I also bought the module that just has just the USB-C and USB-B ports (without the SD card port) and I don't believe that one would work since it needs an extra cable to be plugged into and I was searching around and didn't find one -- you probably need a different harness for that one. What I've noticed so far is that Apple CarPlay will pickup my iPhone a bit faster, skip through the songs a bit faster, and it charges my phone a bit faster, as well. I haven't tried the SD card functionality yet but I can hope that it may be a necessary requirement for people that have IOR radios to upgrade to the IOS ones with navigation.
-
I got a 2017 Silverado 2lt with remote start and recently a peer of mine got his truck stolen. I want to add something to my truck to prevent that but I can’t really afford the viper alarm system at the moment so i want to install a kill switch in the ignition. If someone could share the wiring diagram that would be awesome because I can’t seem to find it and I was curious if there was a way to install the kill switch without losing my remote start.
-
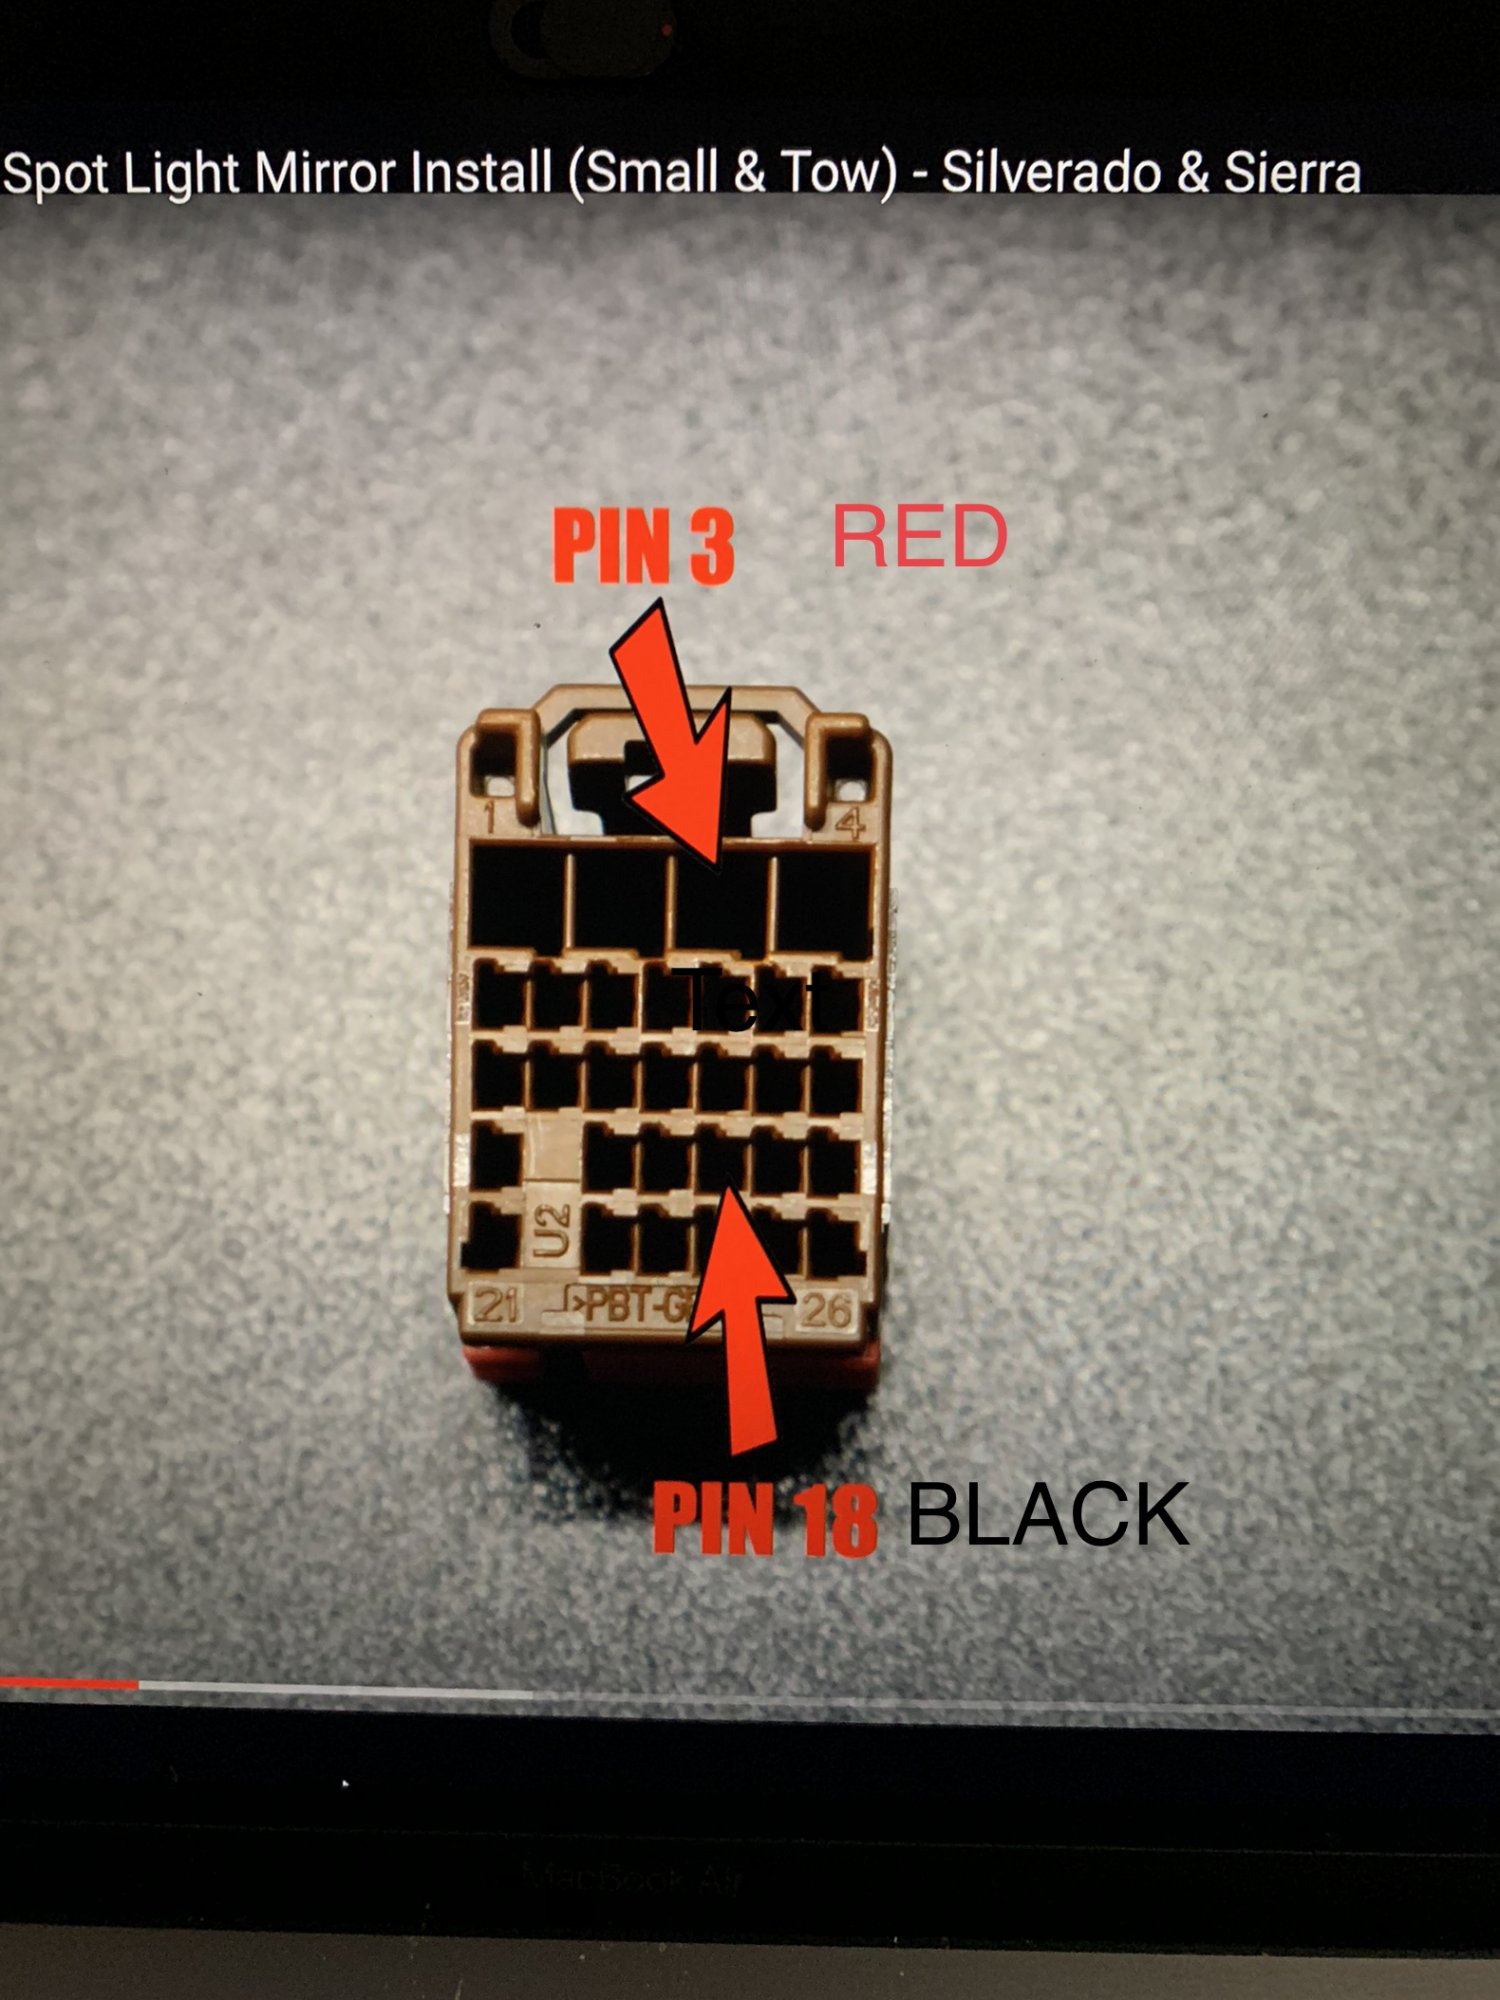
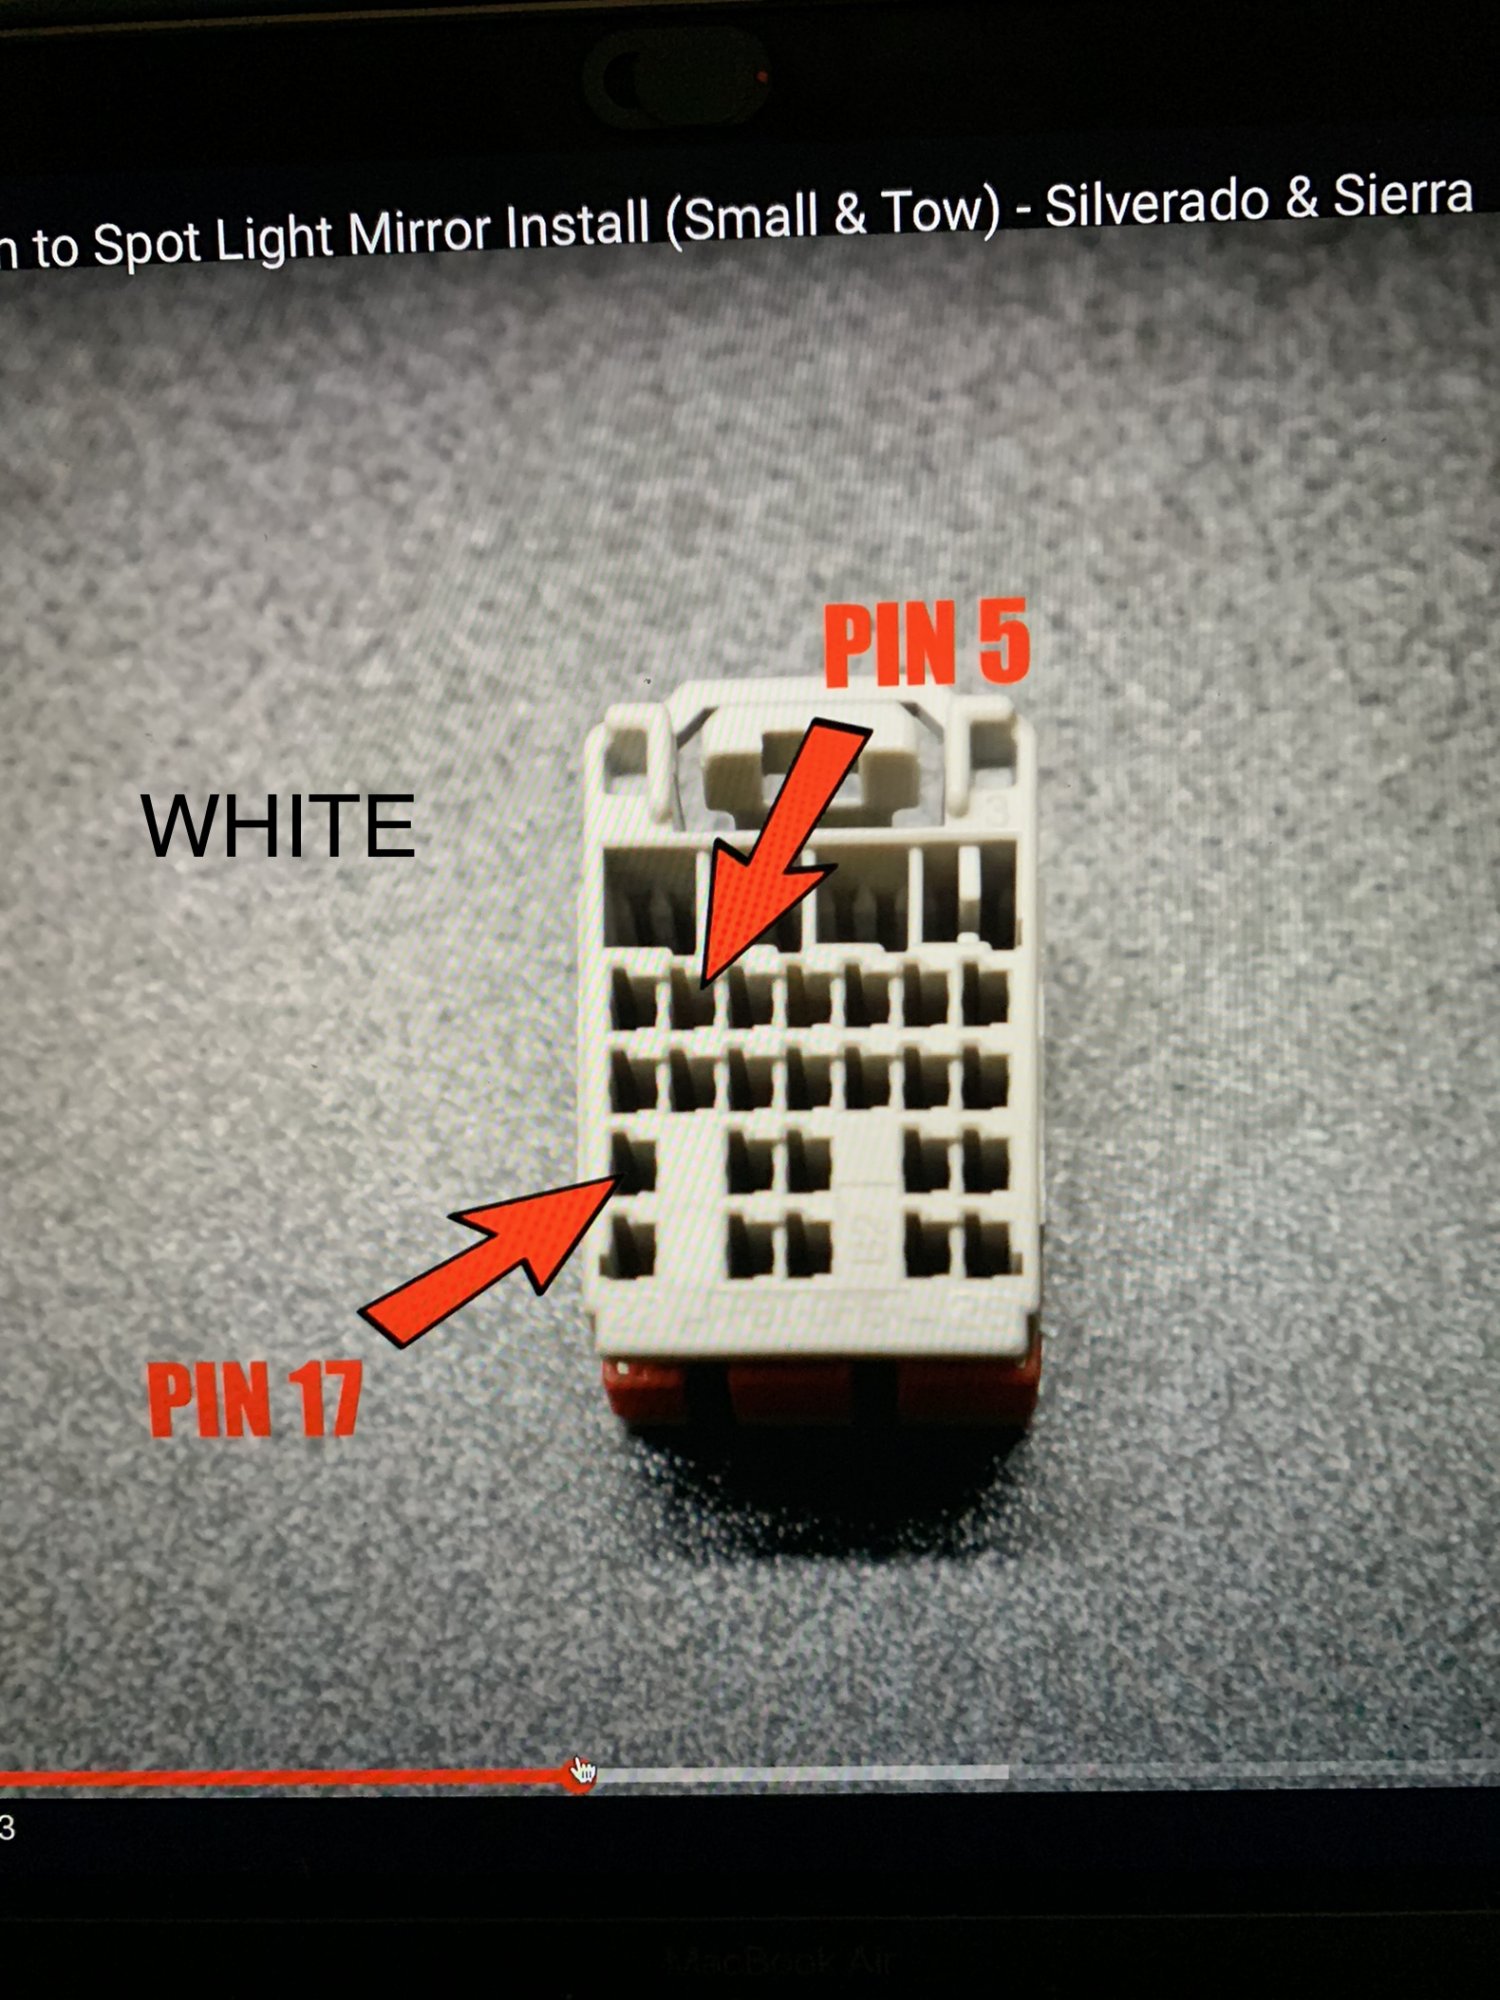
 I am currently sitting in front of boost autos High beam to spot mirror mod for the 2019+ HD trucks. This kit taps into the BCM using a relay and a diode to achieve the spot lights on while in drive. I'll attach a install link that shows the wire taps in the BCM. Although this kit sounds nice, I don't want my Task lights (spot lights) on whenever my high beams are on, but rather have the option to use the stock dash button to achieve my desired lighting while in drive. From what I've broke down I believe this to be a ground activated relay and could be done differently then tapping into the high beams. The kits relay is wired as follows: 30- red to fuse with a jumper to 30, 86-black, 85- red jumper from 30, 87- dual outputs with diode. Could anyone simplify this for me to where I can either just always have use of my mirror lights in drive or park, or what I need to wire/jump etc to achieve this? I feel like I'm over thinking this and there should be a simple answer that tricks the truck's mirror lights to believe they are still in park. Maybe a ground wire just tapped in or something???
-
Does anyone know of a company that makes brackets to fit a 2014-2018 Silverado 1500 to convert tow hooks to shackles (D rings). I see multiple sites that make them for 07-13 and 2019+ but can’t seem to find any for a 14-18. I don’t know why no site is listing them for these trucks and wonder if the brackets from the 2019+ or 07-13 would work on a 2017? Does anyone have any Insight or know of a company that does make them? Thanks
-
I am trying to find a 2 piece drive shaft for my ‘15 Sierra Double Cab. Where can I find one?


.jpg.01a206de0642930ffff48c312b49a96d.jpg)