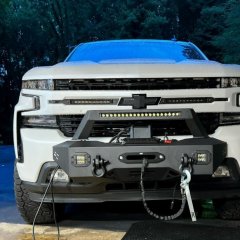
2021 1500 Silverado with 35x12.50R20 3.5 RC lift BUILD
-
Recently Browsing 0 members
- No registered users viewing this page.
-
Forum Statistics
250.4k
Total Topics2.7m
Total Posts -
Member Statistics
342,782
Total Members8,960
Most Online
-
Who's Online 8 Members, 0 Anonymous, 406 Guests (See full list)
-
Latest Articles
-
Posts
-
 I agree with Tim. As tech heavy as engines are these days, no way I’d be an early buyer of the new 6.6. Of course, I bought my ‘26 Denali w/the 6.2 after dumping my Tundra with it’s defective 3.5 liter imploding engine disaster, so I’m a little gun-shy. That said, my 6.2 has been rock solid. I don’t drive it like I do my BMW Z4 M40i, but I don’t baby it either. I got a V8 for a reason. But I’m averaging 18 around town and 22 highway. I have seen 24 highway as well when I wasn’t loaded up heavy. Considering my Tundra with the twin turbo V6 only got 14.5 in town and 17 on the road, I’ll take the 6.2 all day, every day. If I were you, I’d grab a ‘26 while you can. Inventories are probably gonna start dropping and I’ll bet the deals will start looking sweeter as well.
 -
By ShowMeShooter1332 · Posted
I am curious if anyone has figured out a way to add an hard button AUX or 360 Camera switch to the center row of switches. I have a 2021 AT4, and want to split the hill decent button and add a 360 camera button so that you don't have to go into the center display and locate the camera functionality, etc... My father's 2024 Yukon XL AT4 and it has a hard button, see below. I found this thread on the Yukons, but it seems like there may not be a part number for the 2021 sierras. https://www.gm-trucks.com/forums/topic/255339-adding-hard-button-for-camera-on-2021/ Anyone else figured this out. Seems like it would need to be a custom switch! I am getting ready to install the auto stop/start eliminator, so would be nice to knock them out at once. Upvote1Downvote0Go to comments -
.thumb.JPG.2c573de60d3a3a4407c7d92298db46dd.JPG)
-
 Through the years it hasn't been my typical method as I tried to drop oil on an engine that was hot from having been worked, however that was not always practical and had to fire up a unit and let it warm up reasonably well and drop the oil when I had the time to do it but am referring to not only vehicles but a variety of farm equipment and highway tractors etc. However on a vehicle where one is crawling under it and the exhaust is nearby to ones body and if wanting to pull the plug without danger of being hit with boiling hot oil or attempting to remove a HOT oil filter, its sure safer and easier to not have everything smoking hot and can remove the filter right away when under the vehicle and let it all drain. Of course its not the end of the world if a bit of oil stays in the engine that might have eventually found its way out, I like to get out as much as possible but any oil changes that take place in shops would rarely be sitting around for very long at all before the plug is thrown back in and filter slapped on and oil poured in and sent out the door quick like. There would be very little time spent ( assuming they even did it ) in starting the engine with oil to fill the filter, then waiting to verify the level on the stick. A good reason to check ones oil level shortly after a shop changed the oil on a vehicle just to make sure its correct and to look under for any oil around the drain plug or filter.
 -

-
-
GM-Trucks.com Clubs
-

Black Truck Club
Open Club · 612 members
-

White Truck Club
Open Club · 380 members
-

Canadian Owners Club
Open Club · 282 members
-

Red Truck Club
Open Club · 156 members
-

diesel 3.0
Open Club · 279 members
-

Texas Owner's Group
Open Club · 371 members
-

NorthSky Blue Club
Open Club · 118 members
-

Midwest Owner's Group
Open Club · 212 members
-

2015 Custom Sport Club
Open Club · 5 members
-

GM Snow Plowing Club HD
Closed Club · 14 members
-
-
Popular Contributors
-
1

-
2

-
3
-
4

-
5
-
-

Recommended Posts
Create an account or sign in to comment
You need to be a member in order to leave a comment
Create an account
Sign up for a new account in our community. It's easy!
Register a new accountSign in
Already have an account? Sign in here.
Sign In Now