

-
Recently Browsing 0 members
- No registered users viewing this page.
-
Forum Statistics
250.4k
Total Topics2.7m
Total Posts -
Member Statistics
342,804
Total Members8,960
Most Online
-
Who's Online 5 Members, 0 Anonymous, 957 Guests (See full list)
-
Latest Articles
-
Posts
-
Looking for help! 2019 GMC Sierra 1500 - 5.3l 4x4 8l90 61k miles - truck is in Arizona, was over 110 outside on Monday when this whole situation transpired. Never had any major issues with transmission until this point: Truck sat outside my construction office for approx 1 hour idling before I realized, ran around the job site wrapping some things up for the day and then left. Went to get food and sat in the drive through for approx 30 minutes idling. As soon as I pull out of the drive through and onto the main road, rear tires lock up and feels like transmission fell out of the truck. Shifted to park, shut the truck off and tried again, same thing happened. Was able to reverse into parking lot (truck slammed into reverse). Let the truck sit turned off for 10 minutes before trying again, but it continued to happen. Towed truck back to my house. Highest the trans temps reached was 198. Friday, after work I start looking into the situation. Truck sat in my driveway untouched all week. Truck is now driving like normal, transmission doesn’t get over 185 degrees when trying to heat it up. Got up to 60 multiples times with no issues, no issues accelerating, only down shifted hard into first one time at 185 degrees. Does anyone have any insight? Never through a code or a check engine light. Truck has never been used to tow either. No transmission services at this point.
-
 Atlas won. I know better, but I did it anyway. I took a compressed air line with a chuck and rubber tip and jammed it in the open EGR port. The port was clear as far as I could see, and as far as I could poke with a flexible wire, but that doesn't mean it's not clogged. Compressed air blew back at me along with a cloud of black. Oops. I didn't have the rubber tip seated in there all the way. Jammed it up in there some more and squeezed the chuck. PSI was set to 120. Poof! It blew back at me again. Third time...pfffffttssssssspffffffsssfffffff, face full of carbon, and then, kind of a thud..and the air stopped spraying back at me. It was now exiting the exhaust with a low shhhhhh sound as it flowed through the pipe. Something broke free. I pressurized the port again, and air flowed. Made my day. Long story short on this problem, it's fixed. Something was really blocking the EGR passages down low, and compressed air blew it apart. I don't recommend this as who knows what debris was sent where. But it's allowed me to move forward, mentally, and onto the next problems I need to get this little S-Blazer going down the road properly again.
 -

-
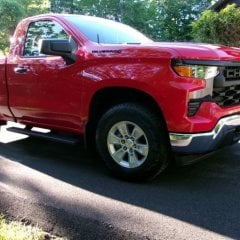 Your truck lowered, looks good. I'm happy with the stance on this. I may need the extra ground clearance given my location/situation.
 -
 With this new pan, do you still use the same procedure to check the level? Its a deeper pan and our trucks do not have a fill tube/dipstick. So fill till fluid runs out the check plug?
-
-
GM-Trucks.com Clubs
-

Black Truck Club
Open Club · 612 members
-

White Truck Club
Open Club · 380 members
-

Canadian Owners Club
Open Club · 282 members
-

Red Truck Club
Open Club · 157 members
-

diesel 3.0
Open Club · 279 members
-

Texas Owner's Group
Open Club · 371 members
-

NorthSky Blue Club
Open Club · 118 members
-

Midwest Owner's Group
Open Club · 212 members
-

2015 Custom Sport Club
Open Club · 5 members
-

GM Snow Plowing Club HD
Closed Club · 14 members
-
-
Popular Contributors
-
.thumb.JPG.2c573de60d3a3a4407c7d92298db46dd.JPG)


Recommended Posts
Create an account or sign in to comment
You need to be a member in order to leave a comment
Create an account
Sign up for a new account in our community. It's easy!
Register a new accountSign in
Already have an account? Sign in here.
Sign In Now