Jump to content

Search the Community

Showing results for tags 'diy'.

  • Search By Tags

    Type tags separated by commas.
  • Search By Author

Content Type


Forums

  • GM-Trucks.com Original News & Product Reviews
    • General Motors Product and Industry News
    • The GM-Trucks.com Garage - Vehicle Testing & Product Reviews
    • The Newsroom Archive
    • The Garage Archive
  • Battery Electric Vehicles - 2022-2026 Ultium Platform
    • 2022-2024 GMC HUMMER EV Pickup & SUV
    • 2024 Silverado EV & Sierra EV
  • Fullsize Truck & SUV - 2019-2023 T1XX Platform
    • 2019-2023 Silverado & Sierra
    • 2020-2024 Silverado HD & Sierra HD
    • 2021-2023 Tahoe, Suburban, Yukon, Yukon XL & Escalade
  • Fullsize Truck & SUV - 2014-2019 K2XX Platform
    • 2014 - 2019 Silverado & Sierra
    • 2015-2020 Suburban/Tahoe & Yukon/Yukon Denali
    • 2015-2019 Silverado HD & Sierra HD
  • Fullsize Truck & SUV - 1999-2006 GMT800 & 2007-2013 GMT900 Platforms
    • 1999-2013 Silverado & Sierra 1500
    • 2000-2014 Silverado & Sierra HD
  • Chevy Colorado & GMC Canyon
    • NEW 2023 Colorado & Canyon
    • 2015-2022 Colorado & Canyon
    • 2005-2012 Chevy Colorado & GMC Canyon
  • Classic Chevrolet / GMC Pickup Trucks
    • 1988-1999 Chevrolet & GMC C/K GMT400 Platform
    • 1973-1987 Chevrolet & GMC Square Body / Rounded Line Pickups
    • 1967-1972 Chevrolet & GMC Glamour / Action Line Pickups
    • 1960-1966 Chevrolet C/K/Apache & GMC 1000-3000 Pickups
    • 1982-2005 Chevrolet S-10/Blazer & GMC S15/Sonoma/Jimmy
    • 1969-1994 Chevrolet K5 Blazer & GMC Fullsize Jimmy
  • Marketplace
    • For Sale/Wanted
    • Member & Vendor Rating Forum
    • Member Product Reviews
  • The Lounge
    • Off-Topic
    • Future Vehicle Speculation & Spy Shots
    • Automotive Industry & Market Discussion
    • New Member Introductions
    • Meetups, Events, & Gatherings
    • GM-Trucks.com Comment Box
  • Hobbies & Lifestyle
    • Photography
    • Major League Sports, Outdoor Recreation, Firearms, Hunting, OHRV
    • Racing, Strip, & Track
    • Trailers, Hitches, & Towing
    • Garage & Home, Snow Plowing, Landscaping, & Lawn Care
    • Technology, Devices, & Gaming
    • Vehicle Buying, Financing, Incentives, & GM Card
    • Vehicle Builds
  • Technical & Advanced
    • Vehicle Appearance, Care, & Maintenance
    • Ask the GM Technician
    • Performance Engine Tuning
    • Transmission, Suspension, Transfer Case, & Axles
    • Wheels, Tires, & TPMS
    • Audio, Electronics, OnStar, MyLink, Intellilink & SiriusXM
    • How-To
  • Commercial Vehicles
    • 1980-2009 Chevrolet Kodiak and GMC Topkick
    • 1996-2018 Chevrolet Express & GMC Savana
    • 2019-2021 Chevrolet Silverado 4500HD/5500HD/6500HD
  • Black Truck Club's Topics
  • Texas Owner's Group's Topics
  • California Owner's Group's Topics
  • New England Owner's Group's Topics
  • Midwest Owner's Group's Topics
  • South Carolina Silverado Owners's Topics
  • Canadian Owners Club's Topics
  • SCUBA divers of GM-Trucks's Scuba Talk
  • Red Truck Club's Topics
  • Idaho Sierra & Silverado Owners Club's Idaho
  • Colorado Trucks's Exhaust Setups
  • Colorado Trucks's Pics of trucks
  • SEO Paint's seo color ordered
  • NorthSky Blue Club's NorthSky Blue Metallic
  • NorthSky Blue Club's Pics
  • diesel 3.0's Topics
  • MIAMI TRUCK LOVERS's YOUR FAVORITE CHERVROLET MOD?

Calendars

  • Events
  • Birthdays
  • Texas Owner's Group's Events
  • California Owner's Group's Events
  • Midwest Owner's Group's Events
  • Red Truck Club's Events

Categories

  • Articles
  • News
  • Reviews
    • Project Sierra
  • Resources

Blogs

There are no results to display.

There are no results to display.


Find results in...

Find results that contain...


Date Created

  • Start

    End


Last Updated

  • Start

    End


Filter by number of...

Joined

  • Start

    End


Group


MSN


Website URL


Yahoo


Skype


Facebook


Twitter


Name


Location


Interests


Drives

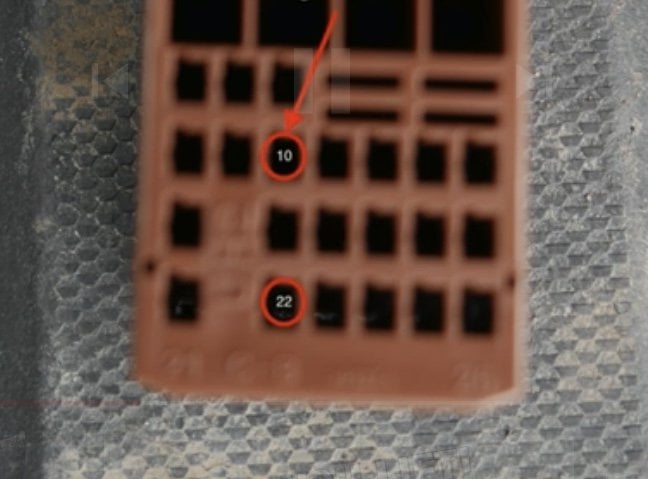
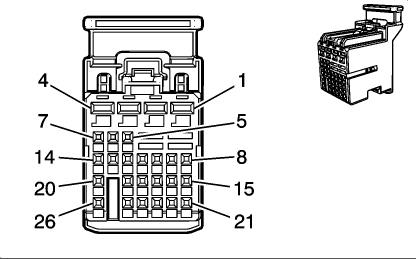
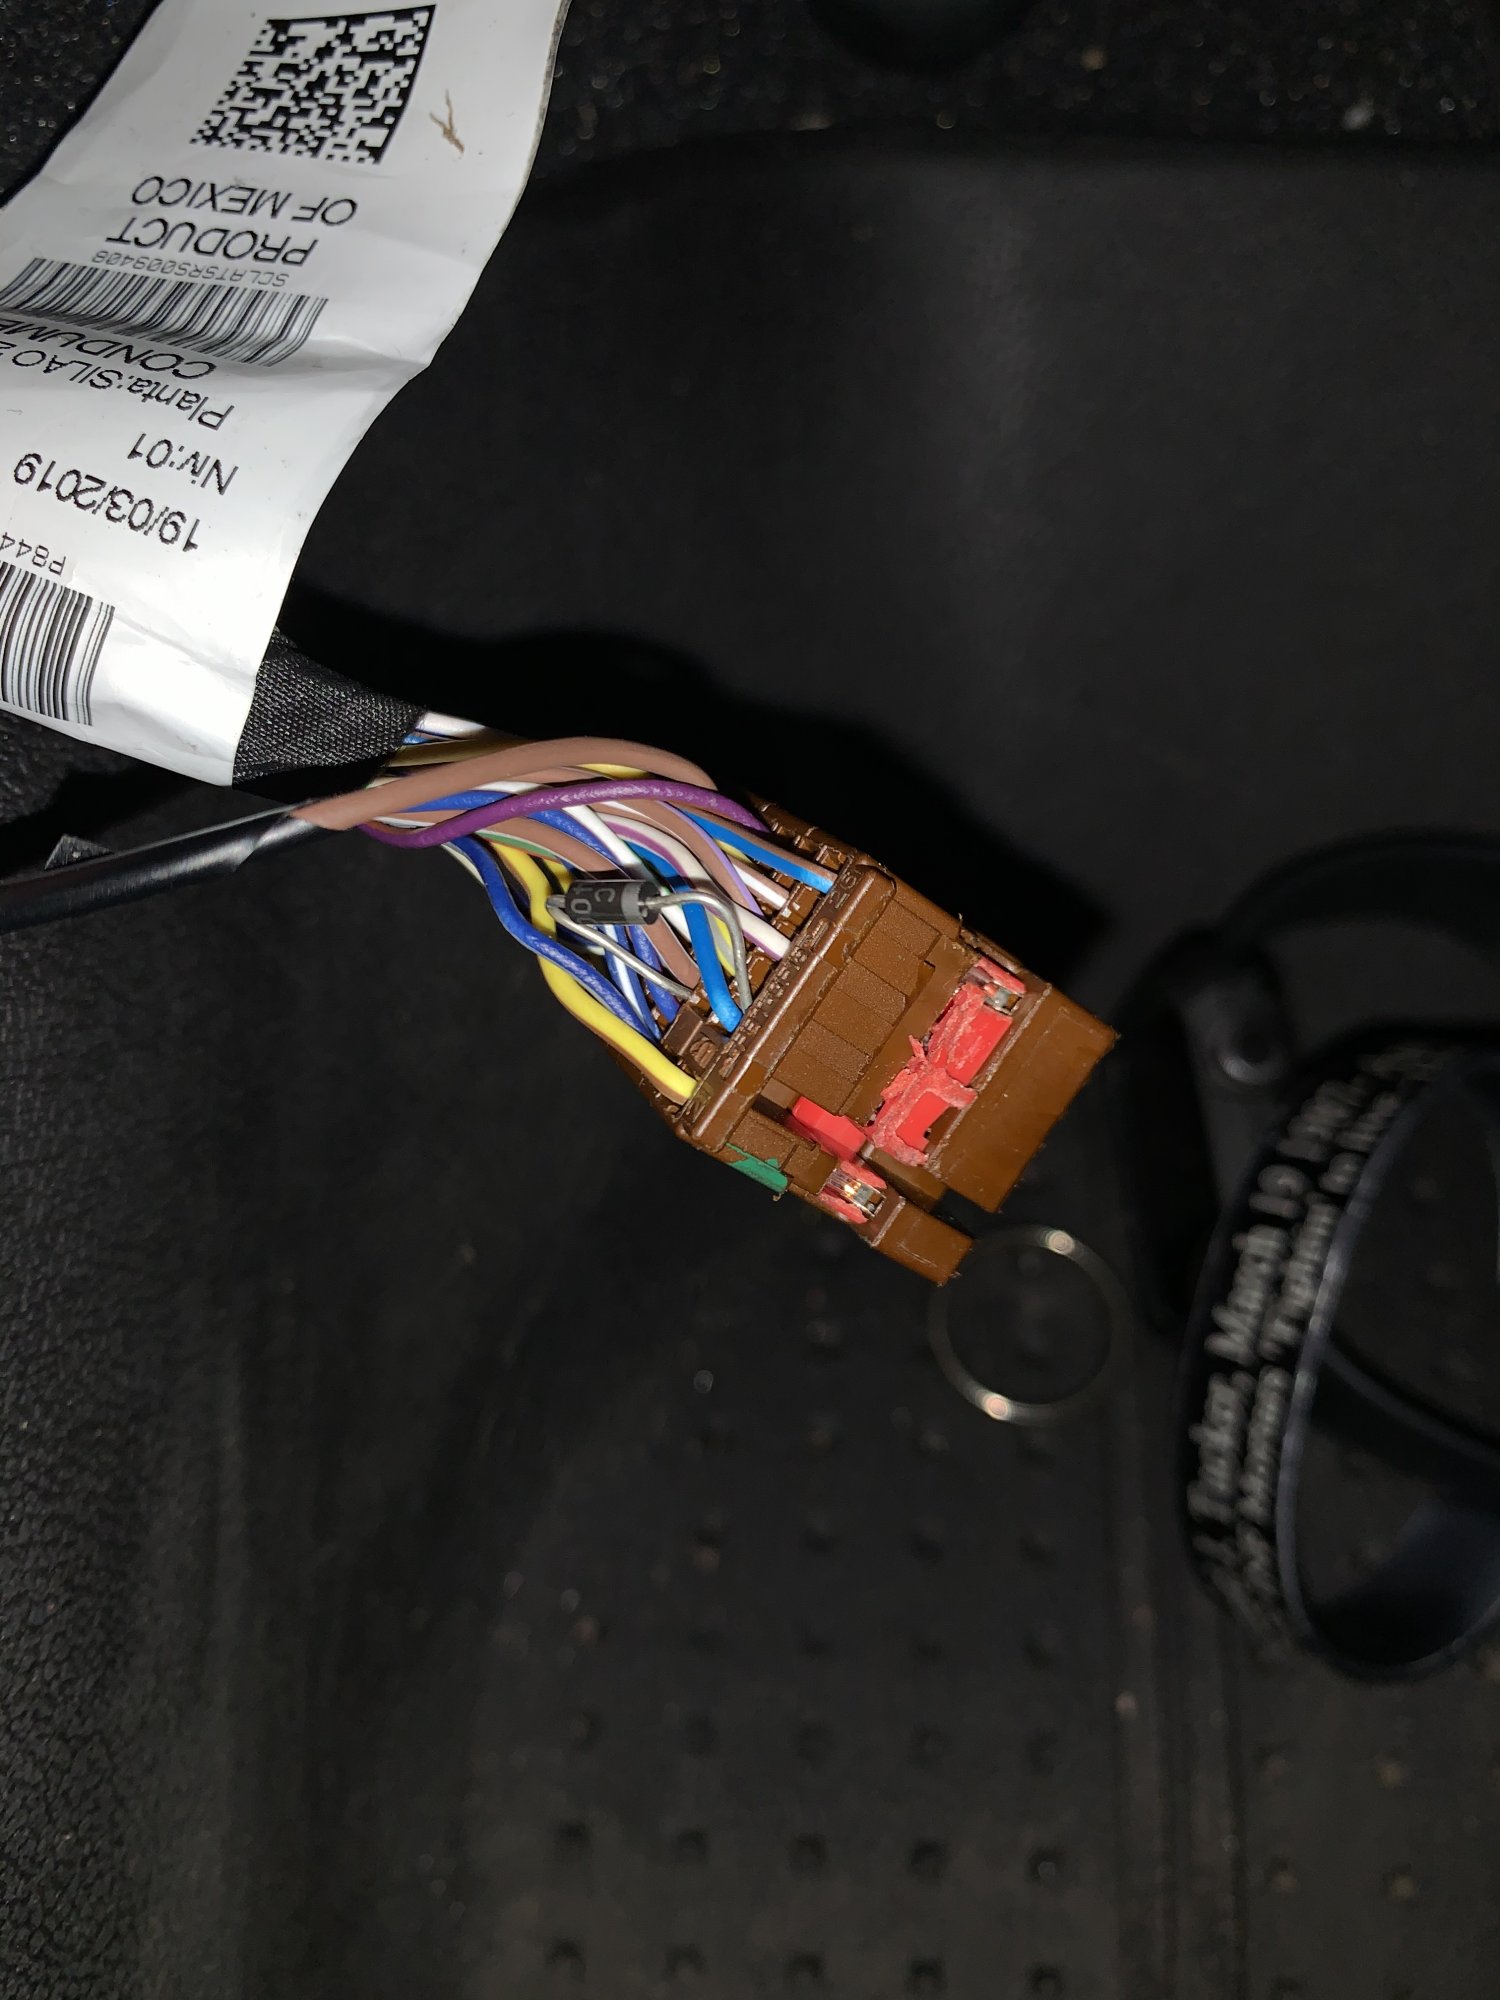
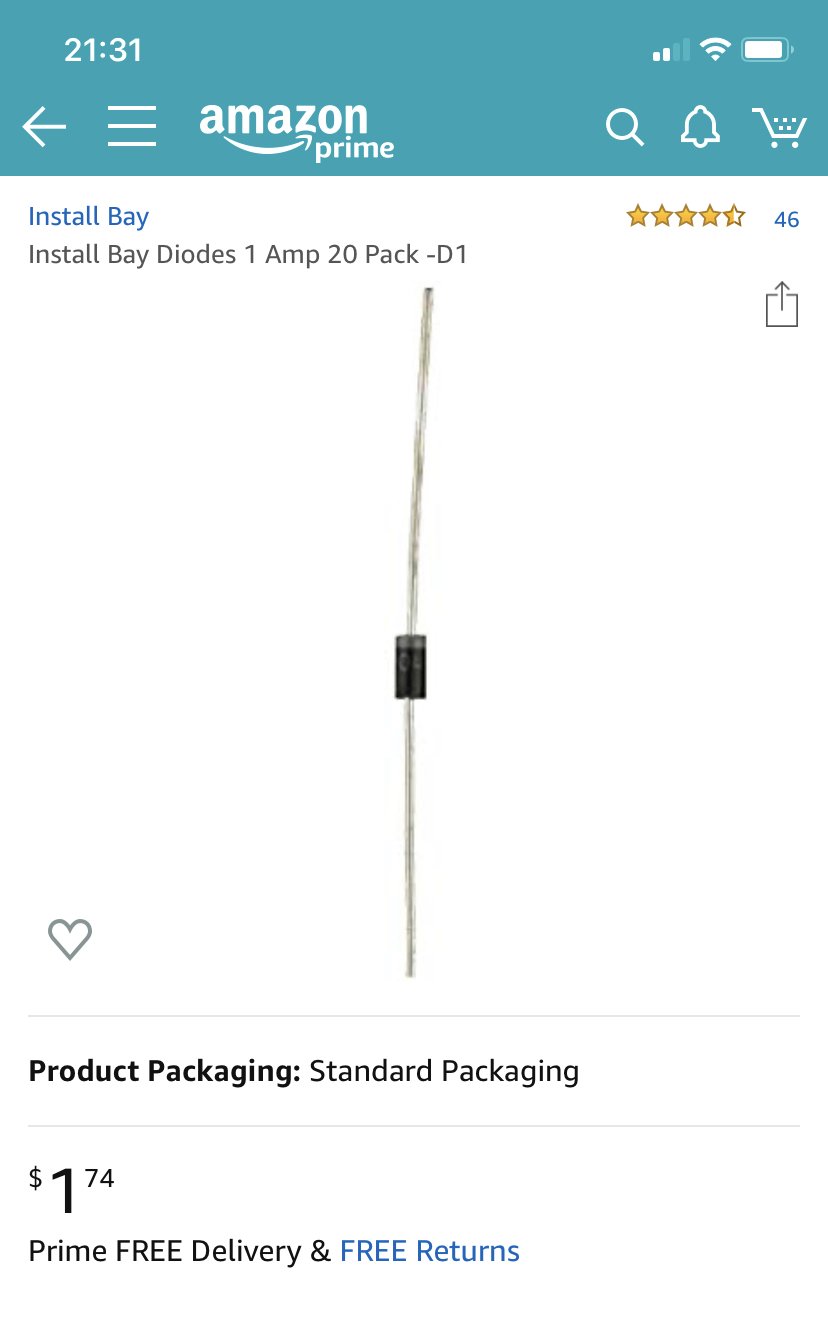
  1. This diode installation allows all of the lights to remain on simultaneously when the high beams are activated on GM vehicles. The diode is super easy to install, you need $2 and 10 minutes. 9 of those minutes will be spent congratulating yourself.After diode placement your lights will function as follows: In auto mode- whenever your lights come on automatically the fogs will be on also. Low Beams & Fogs- Only Low Beams & Fogs will be on High Beams- Low Beams, Fog Lights, & High Beams will all be on (normally by default) The vehicle turns off the fogs when in high beam mode, but this diode solves that. MAKE SURE THE SIDE OF THE DIODE WITHOUT THE STRIPE IS IN THE 10 PIN. The diode allows electricity to travel in only one direction.
  2. Morning/ Afternoon, I have a question about over filling your oil with the newer silverado's. I recently just changed my oil since I got my truck about 3 months ago using the 0W-20 mobil 1. I put in 8 quarts exacly (without filling the filter). let it sit for a second then started her up. Truck ran for a couple of minutes then I shut it off, let it sit for about 10 min and checked the oil. I was not able to read the oil level as accurately as Im used to due to how freaking light the color of the oil lol, so light! I drove it for about a 100 miles, let it sit then checked it again. oil level was right above the hatch line if not right on it so I drained out just a tad to make me feel better then checked again. Now its sitting just above the top dimple but still within the hatch line area. So I guess my question is... Do you think over filling that much would be enough to damage any internals or pump? Any insight is very much appreciated, thank you.
  3. So I wanted a power locking tailgate on my 2019 GMC Canyon. In the past I have used Pop n Lock, but that eventually failed after about 2 years. So Instead, I started looking into how I could retrofit a 2020 power locking handle into my 2019. The video below details everything you need to do it yourself. Totally worth the effort. The OEM lock is much nicer, quieter and will "fingers crossed" last longer than two years.
  4. Hey there! I'm going to do a public service to the GM Truck people and make a guide on how to remove your front fenders from your Early 00's Silverado, Sierra, Yukon, Suburban, Yukon XL, and Tahoe. It's pretty straight forward, but this guide should be a help anyway. If you would prefer to watch an in-depth video with the same steps I'm showing here, please click this link --------> Fender Removal Video 1. Here are the tools you will need: 13 MM Socket 10 MM Socket 13 MM Wrench 10 MM Wrench Socket Wrench Socket Extensions Penetrating Oil or WD-40 Bungee Cord(s) Patience Let's first go over why I'm doing this, this truck was donated to me and my father as a project and this fender has a nasty rust hole straight through. So, we're hitting the Pick-N-Pull tomorrow to get a new fender. (Remove your wheel(s) before this guide) 2. Remove the hood hinge (13MM Bolt), or the hood itself. We had a way to support the side of the hood we were removing so we did not need to entirely remove the hood. If you do not have a way to support the hood, you will need to remove the whole thing. 3. Remove all the 13mm's along the fender you are wanting to remove 4. Remove wheel well splash cover by pulling the head of the little clips to free the liner, here is what the clips look like: 5. Soak 13 MM bolt where the fender and rocker panel meet with lube then try and break it loose. (These are exposed so it'll be rusty.) 6. Remove the 2 hidden 13 MM bolts in the door jam, use a long extension. 7. Unscrew Airbox and remove the hose, next remove your air filter and the top of the airbox. 8. Release bottom part of the airbox by using a screwdriver to push the little pins down which will pop the box out. 9. Remove the 3 10MM bolts holding the airbox support down. Remove any remaining clips. 10. Loosen coolant reservoir and secure to the side https://imgur.com/gallery/jO3RCUZ 11. Remove all remaining 13 mm and 10 mm bolts holding fender to chassis. 12. Remove headlight by pulling up on the metal bars, removing them. Next, pull the light and disconnect the connectors. 13. Remove grill clip from fender 14. Remove the last bolt holding the hood hinge to the fender with a wrench 15. Remove 13 MM bolt holding fender in the wheel well (inner bumper) 17. Wiggle fender upward and pull, it should easily come off of the truck. Ta-Da! Now you have tons of access to work or you're halfway done replacing your fender. I hope this helps! If you have trouble, please comment or refer to this video: Thanks!
  5. By: Zane Merva & Matt Blouin GM-Trucks.com Staff Copyright 2015 Parts & Tools Needed One (1) 11mm fine thread bolt with nut One foot of 12-gauge wire Two (2) crimpable eye fittings Shrink wrap Zip ties Socket Set Pliers Wire stripper/Cutters Estimated price: $12.00 Time to complete: 30 minutes What is It? The relocation of the antenna from stock placement to under the hood for a cleaner look. Skill Level Beginner Warnings and Precautions This relocation will reduce your ability to pick up AM/FM signals. We performed this modification for aesthetic purposes only. OnStar and SirusXM reception will not be affected. Performed On 2011 GMC Sierra 1500 Extended Cab SLT Step One The first step in any project is to prepare your work space. Gather the required tools and safety equipment. Park your vehicle in a place where you have adequate light and you won't have to move it for the duration of the project. Step Two Unscrew and remove the antenna with a small wrench or pliers. Use a rag or paper towel to protect the antenna and prevent scratching the paint in case you want to return it to stock in the future. Step Three Carefully remove plastic trim panel that covers antenna stud. You can pull this piece off with your hands but don’t use too much force or you risk breaking it. Step Four Cut a section of 12-gauge wire approximately one foot in length. Strip about a quarter of an inch off each end. Place two sections of shrink wrap on the wire then crimp the eye-terminal onto the ends of the wire. Heat the shrink wrap to ensure proper seal. Step Five Place the eye-terminal on the 11mm bolt and thread it into the open end of the antenna and tighten down with socket wrench and hold antenna in position with pliers, again being careful not to scratch paint off. Step Six Place antenna under hood in desired location. We chose to relocate under the fender pinch rail next to the battery and intake. Step Seven Route wire up to antenna post being careful to avoid areas where it may pinch. Place the eye-terminal over the post and tighten down with the 11mm bolt. Step Eight Secure antenna with zip ties making sure it is tight to mounting point so it will not move around under rough conditions. Step Nine Place plastic trim panel back over antenna area. Optionally, cover hole with rubber plug, cap, or tape. We've got various sized plugs on order and will update this article if we can find a good fit to cover the left over hole. Conclusion This is an easy and cheap modification to clean up the exterior look of your pickup. Our 2011 Sierra looks way more modern without the ugly mast poking out of the hood. The downside to relocating our antenna is greatly reduced reception. That said, we live in a rural area where reception wasn't great to begin with. Stronger signals in urban areas still work but range you can travel from the station will be limited. Since we rarely use the radio and almost always stream music, this isn't an issue for us.
  6. Installed a set of iBoardAuto running boards on my 2017 Coly. Check out the install and review videos below: INSTALL REVIEW
  7. I am looking to see if anyone has been able to program their own key fobs with any cheaper machines. I have seen the Dorman programmers on eBay and Amazon which can program a 2016 Sierra Key fob. I would like to purchase a programmer or something similar like a diagnostic tool that could also program my wife’s 2012 Malibu or at least the newer GM trucks. Has anyone had luck or know of anyone able to program keys and key fobs with any cheaper tools? Any info is appreciated. Thanks in advance.
  8. Hey all! So, as y’all know I have a 2014 Silverado. I installed LED reverse and cargo bulbs a couple months ago but I noticed there’s interference, and I don’t know what to do to fix it. Calling all electricians out there that know what I could do to fix this. Open for any responses, suggestions, and solutions. Thanks, y’all!
  9. Hi All, About 6 months ago we created a youtube video showing how to remove your front seats and center. That video has received over 7K views and we received many requests for a detailed video guide of how to swap to the center console found in the LTZ models into the trucks with the 40-20-40 bench seats. The parts cost between $600-$750 depending on the source. This is not an upgrade I particularly want in my truck but I have setup a go-fund-me me page (click here). If we can raise enough money, Pete and I will shoot a detailed guide for everyone's benefit. I hope we can get this video created for you!
  10. Here is a video showing how to install a Pop N Lock on a 2015-2017 Colorado or Canyon.
  11. What's up ya'll. I've had my front and rear Rough Country floor mats in my 2014 Silverado Double Cab for a bit over a year. I shot a quick update video to show you guys how they are holding up and protecting my floors
  12. The Sundae Drive does an in-depth video showing how to install an oil catch can for a 2014 Silverado 5.3L. What are the benefits of an oil catch can? Well if you visit the follwing sites you can read all about the benefits and importance of running an oil catch can. Catch cans are NOT ONLY for turbo/supercharger applications. They can be very beneficial for people with naturally aspirated setups. https://www.redline-motorworks.com/bl... http://oilcatchcan.com/oil-catch-can-... Purpose of your Stock PCV System: The PCV (Positive Crankcase Ventilation) system is designed to regulate and remove fumes from the engine crankcase and to alleviate crankcase pressure which could cause oil leaks or seal damage. The PCV system routes crankcase fumes into the intake manifold where they can be burned to eliminate harmful emissions into the atmosphere. The PCV valve controls the amount of crankcase flow volume depending on the engine's load. With large throttle openings (high engine loads), the more blow-by gases are produced, and the more the PCV system flows oil vapor into the intake manifold. A small amount of that ignited mixture leaks past the piston rings and ends up in the crankcase. This leakage is often referred to a "blow-by" or leakage past the pistons. Some of the oil mist and other products settle along the engine intake and over time form a "gunk". Our oil catch can collect the oil mist and condensed the fuel vapors while allowing "cleaner" gasses to pass back into the intake manifold. To pick up a Catch Can of your own go check out: http://www.eliteengineeringusa.com/ Here is the link for the E2 Catch itself and a diagram showing how it works! http://www.eliteengineeringusa.com/e2...
  13. Hi all! I installed some seat covers on my '14 Silverado. Check out the guide and review - I'll be posting long term updates regarding how well these covers hold up.
  14. Hey Guys, After lurking on the forums and finding nothing on how to install a roof tent onto our trucks; I decided to take the plunge and see what it would take to get this done. As these style of tents are up there in pricing, (even more so for those of us in Canada), I didn't want to deal spending money excessively on rack systems that wouldn't be compatible with the tent, so I spoke directly with Smittybilt to see what they would recommend for mounting the tent on our trucks. At first I was considering using one of their contractor ladder racks as they were rated for 1000lbs and offered the ability to mount additional accessories such as light bars, tools and etc. however, their tech-line representative stated that the contractor racks would not only be too wide to properly secure tent but would be limited to having only one position of how the tent opens provided I found or made the appropriate brackets to make it work. Since I was already going into reasonably uncharted territory, I wanted to take the simpler route that even the entry level novice would be comfortable installing using regular household tools with a buddy or two. This led me to the TracRac ladder rack system - as every tent and roof related accessory supplier has led me to believe our roofs aren't rated for carrying weight in general - since it installs in the bed and has cross rails to mount additional items on the sides. In the interest of not making this post redundant, as both kits have fairly reasonable supplied instructions, I will note the key aspects and tips for installation. Installation was performed on: 2015 Sierra 1500 crew with 5’8” box Part numbers used: 1x TracRac 37002 1x Smittybilt 2783 4x 773680 -5” zinc bracket Home Depot Additional tools: 7/32 Allen key and/or Socket 3/16 Allen key and/or Socket Tape measure - preferably one that reads in inches Drill and drill kit Dust pan and brush or vaccum 1-2 additional sets of hands Assemble TracRac: https://c2.rt-static.com/shared/pdf/manufacturers/297/tracrac-pro2.pdf I found it easier to mount the posts first then worry about attaching the crossbars afterwards. The clamps supplied from TracRac are drilled on both sides and the instructions will not make it clear which side is the top or bottom. They are also lined with paint on the inside so before installing the clamps it is a good idea feed the recommended screws into the clamp a few times beforehand just to make it easier to install. The side that forms an inner ridge is the side that goes on top. This will go into the groove found on the posts. The Smittybilt tent has a 47" x57" spread, so be sure to make sure the distance between the front and rear bars posts is around 3.5FT to 3.75FT, this will allow you ample space to properly position the tent onto the bars. The supplied instructions state that for the front the required spacing between clamps must be at least 3” apart, and for the rear 7” apart. I chose to have both the front and rear to have the same spacing since I do not plan on mounting a tool box in the bed of the truck. Once the posts have installed measure lengths of the cross bars to be equally spaced out from the posts as best you can. So that they are evenly placed. I did not install the supplied tie downs on the crossbars yet as I wanted to make sure the roof tent will fit correctly before installing them.
  15. Wanted to share a video of how to install LED Switchbacks on a 2015-2017 Colorado. Enjoy
  16. First off, I'd like to say I am in no way sponsored by any companies or brands represented in this write up. It is simply a 3rd party review and how to. Below are a couple of videos I wanted to share in here on how to install an HID kit for a 2014/2015 Sierra (1500's, it may work on some 2015 2500HD's, but YMMV). I am using a kit made by The Retrofit Source. They specially made this kit with K2 1500 Sierra's in mind. It comes complete with: -Choice of 35watt or 55watt ballasts, high quality Morimoto pieces. I am using 35watt units. -Choice of 3000k, 4500k, 5000k, 6000k HID bulbs (also include alcohol wipes to clean bulbs before installation, nice touch) --- I used a 4500K bulb, which is classified as "warm white" (slightly white-blue at startup, but after about 15-20 seconds becomes the "warm white" color) -Relay Harness w/ built in fuse. This harness has nice ring connectors to connect to battery + and - -Canbus harness (error code eliminator) -Igniter harness x2 -ballasts to bulb harness w/ rubber grommet to seal headlight dust covers. x2 Overall, i thought the kit was very well constructed. High quality braided wiring, all shrink wrapped, potted electronics, waterproof connectors. All A+ quality. I got this kit for $170 off their website, but if you make an account, and load the kit into your cart, then leave it a few days, they will send you a coupon code for 10% off. Not a bad deal IMHO. Link to the Sellers website https://www.theretrofitsource.com/ Link to the specific kit https://www.theretrofitsource.com/hid-systems/morimoto-elite-hid-system-sierra-low-beam.html?carDisplay=2014+GMC+Sierra++%28Projectors%29&preselect=4.1.3-HARN-RELAY-9012%2CXB-BALLAST-35%2C5.3.3-XB3-9012-45 It does require you drill a hole in the dust covers to get the wires to pass through, but it is not hard and can be done with a cordless drill and a 7/8" hole bit. First video is a review of the kit by itself: This next video is the actual installation of the kit And this final video is how to properly aim your headlights (made a few months ago before I had HID's but the concept is the same) Enjoy. Hopefully these videos help some folks out! FINAL VERDICT -Good upgrade in light output using stock projectors. Not very hard to install, but I will still rate it 3.5/5 on a scale of difficulty. 5 being hardest. Just because it requires some work with electronics, which not everyone is comfortable doing. I am very happy with the end result. There is a lot more clean white light out on the road and I can see a lot better on dark roads. Properly aimed, I should not be blinding any other drivers. Post below with questions.
  17. So I've put a scrap piece of carpet in the bed and I'm starting to kind of enjoy it. Along with the kids, who think it's a great place to lay down and play. lol Has anyone attempted any sort of DIY bedrug? $400 is a little more than i would be interested in spending. I have a retractable cover already, so I was thinking maybe some marine carpet over top of some type of foam maybe?
  18. I wanted something to hold smaller items in the bed so I made these dividers and used a branding iron for the chevy logo. The divider closer to the cab is darker as I just finished the poly on it. The other one I made last winter has been used and only had 1 coat of poly as it was too cold at the time. I'll have to redo it at some point. I'm going to add some quickfists to the one near the cab to hold some camping gear (hatchet, shovel, etc...).
  19. Hi All! We excited to share our installation guide of the Magnum Headache rack on my 2014 Silverado 1500. This installation procedure is going to be very similar for most trucks. Enjoy! for the video.
  20. So the weathertech mudflaps have been on my truck for 4 months and while they have held up well, we have found a fitment problem common to all Silverados. Check out the quick video below for details.
  21. Hi all - you can find an installation guide and review of the WeatherTech No Drill Mudflaps for a Silverado 1500 - check it out! Feel free to ask any questions.
×
×
  • Create New...

Important Information

By using this site, you agree to our Terms of Use.