
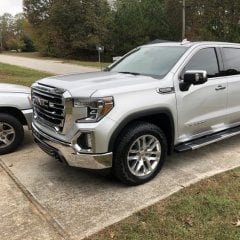
Anyone have a pic of the spoiler (3rd brakelight) removed off the cab?
-
Recently Browsing 0 members
- No registered users viewing this page.
-
Forum Statistics
250.4k
Total Topics2.7m
Total Posts -
Member Statistics
342,799
Total Members8,960
Most Online
-
Who's Online 14 Members, 1 Anonymous, 420 Guests (See full list)
-
Latest Articles
-
Posts
-

By asilverblazer · Posted
Maybe, finding a wiring problem will either be real easy or real hard. -
By asilverblazer · Posted
Focus only on the recurring problem. Don't go looking for more. If the recurring problem is the EGR code; fix that. Ignore data that is irrelevant to diagnosing that ONE issue. It doesn't matter what the O2 sensors are reading or the timing is doing (yet) until the recurring problem is resolved. (If the diagnosis of the EGR requires O2 readings or timing advance readings then obviously use them.) FWIW: I remember watching the timing advance on my 07 Silverado, and those numbers sound similar to what I recall. -

By pimafe6931 · Posted
دليل تجهيز سيارات الرحلات البرية في السعودية 2026 كيف تختار تجهيزات البر المناسبة لسيارتك؟ أصبحت الرحلات البرية والتخييم من أكثر الهوايات انتشاراً في المملكة العربية السعودية، لذلك زاد اهتمام ملاك السيارات بتركيب تجهيزات عملية تساعدهم على السفر والتنقل في الصحراء والطرق الوعرة بأمان وراحة. لكن السؤال الأهم: ما هي تجهيزات البر الأساسية التي تحتاجها سيارتك فعلاً؟ أولاً: صاجات الحماية السفلية تعتبر صاجات الحماية من أهم الإضافات لأي سيارة تستخدم في الرحلات البرية. فهي تحمي الأجزاء الحساسة مثل المحرك والقير والدفرنس من الصدمات والحجارة والعوائق أثناء القيادة خارج الطرق المعبدة. عند اختيار صاجات الحماية يجب الانتباه إلى: - سماكة المعدن. - جودة التصنيع واللحام. - سهولة الفك والتركيب. - وجود ضمان على المنتج. ثانياً: السلة العلوية للسيارة توفر السلة العلوية مساحة إضافية لنقل الأمتعة والخيام وصناديق التخزين والأدوات الكبيرة التي يصعب وضعها داخل السيارة. ومن أهم مزايا السلال العلوية: - زيادة مساحة التخزين. - تنظيم المعدات أثناء الرحلات. - إمكانية إضافة إضاءة أو ملحقات إضافية. ثالثاً: أنظمة الكهرباء والإضاءة يعتمد كثير من أصحاب الرحلات البرية على الإضاءة الإضافية والبطاريات المساعدة لتشغيل الأجهزة المختلفة أثناء التخييم. ومن أشهر التجهيزات: - كشافات LED. - منافذ شحن USB. - بطاريات إضافية. - أنظمة إدارة الطاقة. رابعاً: الأدراج وصناديق التخزين يساعد تنظيم المعدات داخل السيارة على الاستفادة القصوى من المساحات المتاحة وتقليل الفوضى أثناء الرحلات الطويلة. وتشمل حلول التخزين: - الأدراج الخلفية. - الصناديق المعدنية. - حوامل الثلاجات. - أماكن تخزين الأدوات والمعدات. كيف تختار ورشة تجهيز سيارات موثوقة؟ قبل تنفيذ أي تجهيزات لسيارتك تأكد من: 1. الاطلاع على الأعمال السابقة. 2. التأكد من وجود ضمان واضح. 3. استخدام مواد عالية الجودة. 4. توفر خدمة ما بعد البيع. 5. خبرة الورشة في نوع سيارتك. مستقبل تجهيز سيارات الرحلات في السعودية يشهد قطاع تجهيز السيارات نمواً مستمراً مع زيادة الاهتمام بالسياحة الداخلية والرحلات البرية. وأصبح العملاء يبحثون عن حلول تجمع بين المتانة والوزن المناسب والتصميم العملي، مما يدفع الشركات المتخصصة إلى تطوير منتجات أكثر احترافية تناسب مختلف أنواع المركبات. الخلاصة اختيار تجهيزات البر المناسبة لا يعتمد على كثرة الإضافات، بل على احتياجاتك الفعلية وطبيعة استخدامك للسيارة. الاستثمار في تجهيزات عالية الجودة يرفع مستوى الأمان والراحة ويمنحك تجربة أفضل في رحلاتك البرية داخل المملكة العربية السعودية. -
 look for it's replacement procedure on charm.li or alldata.com For my '12, the sensor is pressed into the evaporator directly, and to replace it w/o pulling the whole hvac box, you cut a hole in a specific spot to gain access to it, and then plug the hole afterwards.
 -
 Sounds to me that its on the high speed data line. ECM, TCM, and many other modules talk on it. Wiring issue (corrosion, terminal fretting, pinched or broken wire) or a failed module or failing module (ECM, TCM, aux chassis controller).
-
-
GM-Trucks.com Clubs
-

Black Truck Club
Open Club · 612 members
-

White Truck Club
Open Club · 380 members
-

Canadian Owners Club
Open Club · 282 members
-

Red Truck Club
Open Club · 157 members
-

diesel 3.0
Open Club · 279 members
-

Texas Owner's Group
Open Club · 371 members
-

NorthSky Blue Club
Open Club · 118 members
-

Midwest Owner's Group
Open Club · 212 members
-

2015 Custom Sport Club
Open Club · 5 members
-

GM Snow Plowing Club HD
Closed Club · 14 members
-
-
Popular Contributors
-

.thumb.JPG.2c573de60d3a3a4407c7d92298db46dd.JPG)



Recommended Posts
Create an account or sign in to comment
You need to be a member in order to leave a comment
Create an account
Sign up for a new account in our community. It's easy!
Register a new accountSign in
Already have an account? Sign in here.
Sign In Now